
Managing an Object’s Properties
Now that we’ve read up on the UI classes available to us, let’s start putting more of them to work in our app. Our original app lets us send a tweet, but there’s no way to tell if we were successful. We’ll gradually improve that throughout the next few chapters. For starters, let’s use iOS’s built-in web browser to bring up our Twitter page inside the app.
Adding a UIWebView
Select Main.storyboard to bring up the UI in Interface Builder. We’re going to add a Reload button at the top and a web view (a subview that renders web content) to fill up most of the bottom of our view. While we’re at it, we can get rid of the “I finished the first project” label; having a second button named Show My Tweets, with an active verb, should provide enough context for users to know that these are both buttons.
Reworking GUIs in autolayout can be tricky, so let’s go through the steps carefully. Select the label and press the Backspace key or use the Cut or Delete menu item. Before we add our new button, select the Send Tweet button and look at its constraints. The centering constraint is now orange because the surviving button’s layout is now underconstrained: it depended on the distance to the label above it to know where it should go vertically. We’ll have to fix that.
Using the Object library (⌃⌥⌘3) at the bottom right, drag a new button above the existing one, and give it the title Show My Tweets. Drag it until the center guide appears. Now drag it toward the top of the view until the top margin guide—another dashed blue line—appears. Click the autolayout Align button at the bottom of IB and use its popover to add a Horizontal Center in Container constraint. Then click the Pin button and add a constraint pinning the distance to the Top Layout Guide as 0, which should be the value that pops up automatically because we dragged up to the top margin.
That’s enough to fully specify the new button’s constraints, but we still have our old Send Tweet button. Drag it up or down to position it under the other button, until a horizontal line appears between it and the Show My Tweets button. Use the autolayout Pin button’s popover to pin a distance from this button to Show My Tweets, at either the current distance or Standard. This should turn the bottom button’s constraints blue, indicating it is now adequately constrained.
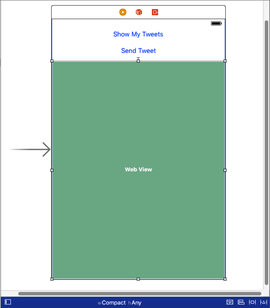
Now we’re ready for the web view that will show our tweets. Drag out a web view—as seen in the figure, its icon in the Object library resembles the Safari app icon—and put it on the bottom portion of the view. Use its handles to drag the bottom and sides of the web view all the way to the bottom and sides of the parent view, and drag the top until a horizontal guide appears between it and the Send Tweet button. It may be easier to set the web view all the way at the bottom first, then fix the sides, and then drag up.
We want this view to always fill the entire width of the screen, always stay at the bottom, and always respect the distance to the Send Tweet button, so we will need four constraints, all from the Pin button.
-
0 distance to the left and right sides of the parent View. Be sure to turn off the Constrain to Margins check box to get all the way to the container’s edges (the distance will initially come up as -20 points otherwise).
-
0 distance to the Bottom Layout Guide
-
Standard (or the current value, 8) distance to Button - Send Tweet
Click Add 4 Constraints and the web view will be properly constrained for autolayout. It should look like the following figure.
For this screenshot, we’ve temporarily set the width to Compact to see it as a portrait iPhone layout. It’s also possible to verify that our layout will work in landscape. From the blue sizing strip, select a rectangle that is one box tall and two boxes wide. The popover window describes this as “any width | compact height,” and says it is for iPhones in landscape orientation. The layout should now look like the following figure. Notice that both buttons maintain their expected spacing from the top, the web view, and each other. We don’t have a lot of vertical space to work with in landscape, but for now, the design is holding up. Just make sure to go back to Any/Any mode, so we don’t inadvertently create any compact-specific constraints, a problem explained back in Autolayout.

Connecting the UIWebView to Code
Now let’s get back to our original goal of showing tweets in the web view. For this to work, we need to write another event-handler method, one that handles a tap on Show My Tweets. That method will need to load the user’s Twitter page in the web view. But wait: even if we connect the button to an action method, how is that method going to be able to call back to the web view and tell it what to display?
At the beginning of the chapter, we talked about outlets, which are used to connect objects in our code to objects in the storyboard. Since our view controller is a Swift class, we can use a property of the class to refer to the web view. The trick here is that preceding a property with the @IBOutlet modifier tells Interface Builder that a property can serve as an outlet, and that will let us connect the code to the UI.
Select Main.storyboard and switch back to Assistant Editor (via the “linked rings” button on the toolbar, ⌥⌘↩, or the View menu). To make room for the split view, we may want to hide the Utility area on the right. This will show the storyboard on the left and ViewController.swift on the right; if this isn’t the case, check the ribbon above the right pane and make sure it’s set to Automatic, which picks the most appropriate counterpart file in the right pane given the selection on the left.
To create an outlet property, we do the same thing we did to create the action method for our button: Control-drag from the storyboard into the code. Start a Control-drag from the web view in the storyboard and drag over to the source code in the right pane, as shown in the following figure.

Drag over different parts of the source file without releasing the button; notice that the tip “Insert Outlet or Outlet Collection” only appears when our drop target is inside the curly brace that defines the class, and not within a method inside the class. Anywhere in here, but ideally in the whitespace just below the class declaration, release to end the drag. Xcode shows a popover to specify the outlet, much like it did when we created the action earlier. Make sure Connection says Outlet and Storage says Weak, and give it the name twitterWebView. When we click Connect, the following declaration is inserted into the source at our drop point:
| | @IBOutlet weak var twitterWebView: UIWebView! |
This one line of code is doing a bunch of things: it declares the attribute IBOutlet (which lets us connect to it with Interface Builder), the weak keyword, it has a var keyword to indicate the property’s value can change, and then finally declares the name twitterWebView and type UIWebView.
Notice the UIWebView type is followed by the exclamation point character (!). We saw that back in Maybe It’s There, Maybe It Isn’t: Optionals as an operator to force-unwrap optionals, while the optional type itself was indicated by a question mark character (?). When used on a type, the ! marks an implicitly unwrapped optional, an optional that does not have to be explicitly unwrapped with an if let in order to use it. That’s super convenient, and there’s only one catch: accessing an implicitly unwrapped optional is exactly like using the ! operator to force-unwrap it, so if it’s nil, we crash instantly. But it won’t be nil, so long as it’s been connected in the storyboard. In fact, that’s the whole point: the twitterWebView property can’t be set before the initializer is done, because loading from the storyboard happens later (but prior to any of our code running). So, technically, it has to be an optional, but it’s never really going to be nil unless we screw up something in the storyboard, so we prefer to act like it’s a regular type.
So now we have a property called twitterWebView. Since twitterWebView is a property of ViewController, within the class we’ll refer to it as self.twitterWebView. For properties that themselves have properties, we just chain dot operators. For example, UIWebView has a canGoBack property, so our view controller class can test this with self.twitterWebView.canGoBack.
Earlier, we mentioned how Automatic Reference Counting (ARC) solves all our memory problems. Well, not quite. There are a few problems it can’t figure out for itself. One is retain cycles, a problem that works like this:
-
Our ViewController knows about the twitterWebView, so ARC can’t free the web view from memory as long as the view controller exists. Otherwise, the view controller might go looking for the web view and it would be gone.
-
But if the twitterWebView also requires the ViewController to hang around in memory, then neither can ever be freed from memory, even if we don’t need them anymore.
The way to break this is to declare one side of the arrangement as weak, meaning that we don’t require an object to hang around in memory if ours is the only one that knows about it.
The reason it works in this case is that the top-level view has strong references to all its children (including the web view), and the view controller has a strong reference to the view, so having an additional strong reference from the view controller to the twitterWebView would be overkill. The rule of thumb is that only “top-level” objects in a storyboard scene (like the view) need strong references, and everything else can be weak. Xcode defaulted to this behavior when we made the connection, and it solves the problem for us.
Calling into the UIWebView Property
Now that we’ve created the twitterWebView property, we’re ready to use it in our code. We’ll write an event handler for Show My Tweets that loads the user’s Twitter page into the web view. How do we do that? Well, if we look up the UIWebView in the documentation viewer, the docs tells us that UIWebView has a loadRequest method that we can use, provided we use a string to create an NSURL (which we assume to be an object that represents a URL), and from that create an NSURLRequest.
But let’s start with getting the button-tap event in the first place. Select Main.storyboard and again switch to the Assistant Editor. Make sure the right pane shows ViewController.swift. Control-drag from the Show My Tweets to anywhere inside the class’s curly braces, as long as it’s not within an existing method’s curly braces. When the drag passes over a viable area of the source file, the drag point will show the pop-up tip “Insert Outlet or Action,” which is what we want to do.
End the drag and fill in the popover, like we did earlier for Send Tweet. Change Connection to Action, enter handleShowMyTweetsTapped for the method name, and change the type from AnyObject to UIButton. Leave the defaults for event (Touch Up Inside) and Arguments (Sender). Click Connect, and Xcode will stub out a method for us:
| | @IBAction func handleShowMyTweetsTapped(sender: UIButton) { |
| | } |
Switch back to Standard Editor mode and select ViewController.swift. The method that Xcode built for us with the drag says @IBAction, which just means that Interface Builder, the storyboard editor, can work with it. It takes one parameter, sender, which is the UIButton that sent the event (that is to say, the button that was tapped). There’s no return type stated, so the method doesn’t return a value.
We sketched out a plan to implement this method earlier: we just have to work up a call to the UIWebView’s loadRequest method. Fill in the method like this:
| 1: | @IBAction func handleShowMyTweetsTapped(sender: UIButton) { |
| 2: | if let url = NSURL (string: "https://twitter.com/pragsiostest") { |
| 3: | let urlRequest = NSURLRequest(URL: url) |
| 4: | twitterWebView.loadRequest(urlRequest) |
| 5: | } |
| 6: | } |
On line 2, we create an NSURL from its initializer that takes an argument called string:. We’ve used http://www.twitter.com/pragsiostest here, but feel free to put in your own Twitter username. Notice this is in an if let, because the NSURL(string:) is a failable initializer: its return type is NSURL?, reserving the right to return nil if our string is garbage.
Next, line 3 takes this NSURL and makes a new NSURLRequest from it. We can then use this urlRequest on line 4 to tell the web view to load up that page, by using its loadRequest method.
Network Security Concerns
We should be ready to go: our button tap will create an NSURLRequest and send that to twitterWebView, which will show it in the user interface. The only problem is that blindly sending requests to the Internet brings up some security concerns we must think about.
Apps built for iOS 9 or later are controlled by App Transport Security (ATS), a feature introduced in iOS 9 to compel developers to adhere to safe, secure, and private networking practices. If you’ve heard the phrase “https everywhere,” you get the gist: use secure connections wherever possible. Under App Transport Security, any attempt to use a plain http-style URL fails immediately. Our app is https, but as of this writing, not all of the twitter.com SSL ciphers are up to Apple’s requirements, so either our NSURLRequest will fail, or some of the images in the page won’t load.
App Transport Security allows us to carve out exceptions to its policies, and since we’re still early in our study, we’ll use the simplest means possible. ATS has a setting that basically means “allow everything,” so that’s what we’ll use.
ATS exceptions are implemented on an app-wide basis, so they go in our apps’ settings. We can see the custom properties for our app by clicking the Pragmatic Tweets project icon at the top of the File Navigator, choosing the PragmaticTweets target, and selecting the Info tab. This view has settings for things like our app version and other metadata:

This is where the App Transport Security settings go, but this UI is hard to edit visually, and even harder to explain. (Trust us on this!) So instead, we’ll go to the file where all these settings actually live. Under the Pragmatic Tweets folder icon, select the Info.plist file. That shows the same metadata in the same hard-to-use interface. Right-click or Control-click Info.plist to expose a pop-up menu, and choose Open As Source Code. This lets us edit the raw XML.
Now, we can carve out our App Transport Security exception. Right before the </dict> at the bottom of the file, add the following:
| | <key>NSAppTransportSecurity</key> |
| | <dict> |
| | <key>NSAllowsArbitraryLoads</key> |
| | <true/> |
| | </dict> |
What this does is basically turn off App Transport Security for the whole app. We really shouldn’t ship an app with security turned off, and we won’t; we’ll be able to replace this raw NSURLRequest later on. For now, this workaround gets us out of security jail.

Now that we’ve turned off ATS, click the Run button to launch the updated app in the Simulator, and then click the Show My Tweets button. The event sent by the new button goes to the handleShowMyTweetsTapped method, it creates a NSURLRequest that ATS lets pass, and this request is sent to the self.twitterWebView property to load up the Twitter page in the web view:
Note that since the UIWebView is a real live web client, it acts just like Safari, so the first time we use it, we might get intercepted by an advertising page asking us to download the Twitter app for iOS, or worse yet a redirect; just look for a close button or link to dismiss it, as we would do in any other browser. At any rate, we’ve now got a live web view of our Twitter account, and a native control to post new tweets… not bad!
Apple’s commitment to security and privacy is pretty serious, so just blindly using https everywhere doesn’t actually cut it. In the case of Twitter, ATS flags us for not providing “forward secrecy,” a more future-proof form of cryptography that can remain secure even if some of the keys it uses later become compromised. As of this writing, Twitter’s SSH support isn’t forward-secrecy compliant.
Turning off ATS is a blunt way around this. The nicer way to handle it is to tell ATS to carve out a specific exception, just for the twitter.com and twimg.com domains, and just for the forward-secrecy requirement. Here’s how we would declare that in Info.plist:
| | <key>NSAppTransportSecurity</key> |
| | <dict> |
| | <key>NSExceptionDomains</key> |
| | <dict> |
| | <key>twitter.com</key> |
| | <dict> |
| | <key>NSExceptionRequiresForwardSecrecy</key> |
| | <false/> |
| | <key>NSIncludesSubdomains</key> |
| | <true/> |
| | </dict> |
| | <key>twimg.com</key> |
| | <dict> |
| | <key>NSExceptionRequiresForwardSecrecy</key> |
| | <false/> |
| | <key>NSIncludesSubdomains</key> |
| | <true/> |
| | </dict> |
| | </dict> |
| | </dict> |
What this says to do is to turn off the forward-secrecy requirement for twitter.com and all its subdomains. Beyond this exception, the rest of ATS remains in effect. Clearly, if we were shipping this app, carving out a narrowly targeted exception like this would be preferable to turning off ATS altogether. To learn more, visit http://developer.apple.com and search for the “App Transport Security Technote.”