
Gesture Recognizers
The first versions of the iPhone SDK gave us only low-level raw touch data via the UIView methods touchesBegan, touchesMoved, touchesEnded, and touchesCancelled. These delivered sets of UITouch events, and from the raw geometry and timing of these events, we could track events like swipes, using logic like “if the touch moved at least 50 points up, and not more than 20 points to either side, in less than 0.5 seconds, then treat it as an upward swipe.”
As one might expect, this was a huge pain in the butt to implement and led to variations in user experience as different developers interpreted the touch data differently, based on what “felt right” to them.
Fortunately, the situation was cleaned up in later versions of iOS thanks to gesture recognizers. With these classes, iOS determines for us what counts as a swipe or a double-tap, and calls into our code only when it detects that a matching gesture has occurred.
The top-level UIGestureRecognizer class represents things like a gesture’s location in a view, its current state (began, changed, ended, and so on), and a list of target objects to be notified as the recognizer’s state changes. Subclasses provide the tracking of distinct gestures like taps, pinches, rotations, and swipes, and these subclasses also contain properties representing traits specific to the gesture: how many taps, how much pinching, and so on.
Segue Gestures
One handy trick for our Twitter app would be to give the user a better view of a given tweeter’s avatar. From the user detail screen we built in the last chapter, we could go to a new screen that shows the image in a larger view, and allow our user to pinch-zoom and move around the avatar in detail.
To do this, we’ll need a new “user image detail” scene in the storyboard. Find the View Controller icon in the Object library, and drag it into the storyboard, to the right of the User Detail View Controller scene that is currently the end of our storyboard. To this new scene, add the following:
-
An image view, with width and height pinned to 280 points, vertically and horizontally aligned in its container
-
A button, with the title Done, pinned 20 points up from the bottom of the container, horizontally aligned in the container
We’ll put some logic into that scene later, but for now, we just need to create a way to get to it from the user detail scene. We could do that by replacing the detail scene’s image view with a button and then adding a segue on the button tap. But to show how flexible gesture recognizers are, we’ll do functionally the same thing by giving the existing image view the ability to handle taps, thereby turning it into a de facto image button.
Scroll through the Object library and find the gesture recognizer icons. They’re displayed as blue circles against dark gray backgrounds, some with swooshes that represent movement. Find the tap gesture recognizer, which is represented as a single static circle, shown in the figure.
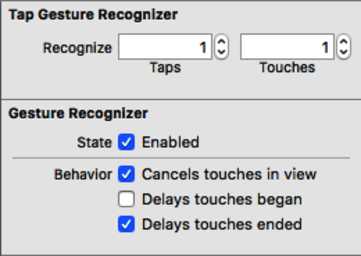
Drag this icon onto the UIImageView that’s above the User Name label in the User Detail View Controller scene. This won’t cause an immediate change to the image view, but the gesture recognizer will become a top-level member of the scene, a sibling to the view controller and the various segues, in the list on the left. Select it from this list and view it with the Attributes Inspector (⌥⌘4). As shown in the figure, the gesture recognizer allows you to configure the number of sequential taps (single-, double-, triple-, and so on) and the number of touches (how many fingers touching the screen) required to trigger the recognizer.
Connecting Gesture Recognizers
One thing we don’t see here is how the gesture recognizer is related to the image view. For that, go to the Connections Inspector (⌥⌘6). There we see that the Referencing Outlet Collections have a property called gestureRecognizers that is connected to the Image View (if it just says View, you probably dropped it on the full view and not the image view; delete the recognizer from the scene and try again).
So it’s not that the recognizer refers to the view; instead, the view knows that the recognizer is one of its potentially many gestureRecognizers. Now let’s address the question of the what the recognizer does when it’s tapped. In the Connections Inspector, we see a few interesting properties: a triggered segue action, a delegate outlet, and a sent action selector. The delegate doesn’t help us here: the UIGestureRecognizerDelegate is meant to let our code adjudicate when two gesture recognizers want to handle the same gesture. What’s useful for us are the selector, which calls a method when the gesture begins, ends, or updates, and the segue action, which takes us to a new scene.
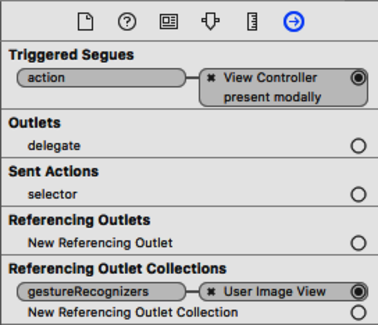
What we want is the segue, so draw a connection line by dragging from the circle next to action in the Connections Inspector to anywhere in the new image detail scene. It would also work to do a Control-drag from the gesture recognizer in the user detail scene over to the image detail scene; Xcode will figure out that a connection between scenes can only be a segue (and not some other kind of connection). At the end of the drag, a pop-up asks what kind of segue we want; coming from a modal scene, the only choice that will work is another Present Modally segue. Our gesture recognizer’s connections should now look like the figure.
We can try running now, choosing a tweet, and drilling down to user details, but clicking the image won’t perform this segue yet. To see why, select the image in the user detail scene, and bring up the Attributes Inspector (⌥⌘4). Notice that User Interaction Enabled is unchecked, since image views by default don’t handle user input. But this means that it won’t process touch events, which in turn means our gesture recognizer will never fire. Simple fix here: just check the User Interaction Enabled box.
Run the app now and we can drill all the way to our new scene, which at this point only shows a Done button, since we haven’t populated the image view yet. Moreover, the Done button doesn’t work, and we’re trapped on this scene. Let’s fix that before we move on. The fix is to use an unwind segue. Back in UserDetailViewController.swift, add an empty implementation for unwindToUserDetailVC:
| | @IBAction func unwindToUserDetailVC (segue : UIStoryboardSegue) { |
| | } |
Now, we can go to the image detail scene in the storyboard, and Control-drag from the Done button to the orange Exit Segue button. At the end of the drag, we have two methods we can unwind to: choose the unwindToUserDetailVC method we just created. Run again, and we can go back from the image detail scene.
So what we’ve accomplished at this point is to bring tap handling to a UIImageView, a class that ordinarily supports no user interaction whatsoever. And we did it without really writing any code—we just created the gesture recognizer in the storyboard, connected it to a new segue, and gave ourselves a no-op method to unwind to.
But we’re just getting started. There’s a lot more we can do to the default image view.
Populating the Image
Before we start gesturing around with the image view, it’ll help to actually have an image we can see. So let’s deal with that now.
In the File Navigator, create a new group called User Image Detail VC, and within that, use New File to create a new class UserImageDetailViewController, a subclass of UIViewController. At the top of this new UserImageDetailViewController.swift file, declare a property for the user image URL:
| | var userImageURL: NSURL? |
We’ll set that property every time we follow the segue to the new scene, so we have some work to do in the storyboard. First, select the image detail scene’s view controller icon (either from the frame below the scene or in the scene’s object list), go to the Identity Inspector (⌥⌘3), and change the class to UserImageDetailViewController. Since we will need to know when we’re taking the segue to this scene, select the segue, bring up the Attributes Inspector (⌘⌥4), and set the identifier to showUserImageDetailSegue.
Now we’re going to be able to set the image URL when we segue to the new scene. We do this back in UserDetailViewController.swift, where we will need to save the URL of the image. Right now, the user detail scene just creates a UIImage to populate this class’s image view, but there’s a good reason it should save off the URL: it will let us get a higher-quality image. Currently, it uses the key profile_image_url_https to get an image URL from the Twitter response. The value is a URL string like https://pbs.twimg.com/profile_images/290486223/pp_for_twitter_normal.png. As it turns out, that _normal is used by Twitter to indicate an icon at a standardized 48×48 size. That’s OK for the user detail view controller, but it will be very blocky in the 280×280 image view in the next scene. Fortunately, if we just strip the _normal, we can get the image in the original size uploaded by the Twitter user, and that will look nicer in the next scene. So start by giving the UserDetailViewController this new property:
| | var userImageURL: NSURL? |
You’re not seeing double; that’s the same property we previously added to UserImageDetailViewController. We want to save the URL in this view controller, and pass it to the next one. To save it here, down in handleTwitterData, inside the closure, change the last few lines (after the userDescriptionLabel.text = (tweetDict["description"] as! String) line) so they save this property and use it to create the userImageView.image, rather than use a local userImageURL variable.
| | if let userImageURL = NSURL (string: |
| | (tweetDict["profile_image_url_https"] as! String)), |
| | userImageData = NSData(contentsOfURL: userImageURL) { |
| | self.userImageURL = userImageURL |
| | userImageView.image = UIImage(data: userImageData) |
| | } |
Now we’re ready to send the good version of the user image URL to the UserImageDetailViewController by writing a prepareForSegue: method:
| 1: | override func prepareForSegue(segue: UIStoryboardSegue, sender: AnyObject?) { |
| - | if let imageDetailVC = segue.destinationViewController |
| - | as? UserImageDetailViewController, |
| - | userImageURL = userImageURL |
| 5: | where segue.identifier == "showUserImageDetailSegue" { |
| - | var urlString = userImageURL.absoluteString |
| - | urlString = urlString.stringByReplacingOccurrencesOfString("_normal", |
| - | withString: "") |
| - | imageDetailVC.userImageURL = NSURL(string: urlString) |
| 10: | } |
| - | } |
We begin with a big if let where that verifies that the destination view controller is of the correct class (lines 2--3), that the userImageURL property is non-nil (line 4), and that the segue has the correct identifier (line 5). If all that is true, we can then get a String version of the URL (line 6), and strip out the _normal substring (lines 7--8). Finally, we make a new NSURL for the full-size image and send it to the user image detail view controller on line 9.
Once the segue is performed, the UserImageDetailViewController will have the URL for the full-size image. Now all we need to do is to populate the image view in that scene. Start by going to the storyboard, going to the last scene (the UserImageDetailViewController), and selecting the 280×280 image view. Bring up the Assistant Editor (the “linked rings” toolbar button, or ⌥⌘↩), with UserImageDetailViewController.swift in the right pane, and Control-drag from the image view in the storyboard to somewhere inside the class (perhaps right after the userImageURL we created), to create an outlet that we’ll name userImageView.
| | @IBOutlet weak var userImageView: UIImageView! |
Now that we can see the image view in code, go back to the standard editor, visit UserImageDetailViewController.swift, and add a viewWillAppear method:
| | override func viewWillAppear(animated: Bool) { |
| | super.viewWillAppear(animated) |
| | if let userImageURL = userImageURL, |
| | imageData = NSData (contentsOfURL: userImageURL) { |
| | userImageView.image = UIImage(data: imageData) |
| | } |
| | } |
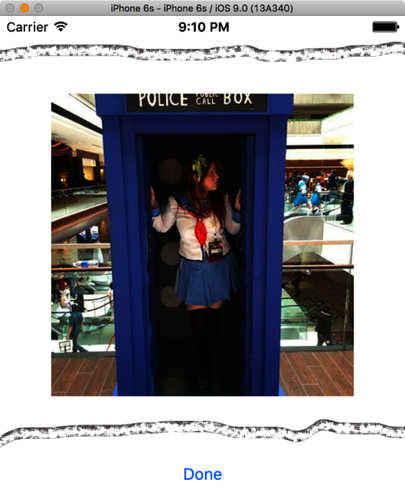
Run the app now, and we can navigate all the way to the image detail scene, which will show the higher-quality user image and not the 48×48 icon. As seen in the figure, we’ve drilled down for a look at Janie’s Twitter avatar.
That’s a nice, normal-looking image for now. But we’re about to start letting our fingers have some fun with it.