
Opening via URLs
The application and its delegate also have methods that relate to how our app interacts with the rest of the system. For example, if we receive a push notification from Apple’s push notification service—something we’d have to set up on a server, and which is beyond the scope of this book—we would get it in the app delegate callback application(didReceiveRemoteNotification:fetchCompletionHandler:).
One way we can work directly with other applications on the device is found in a rather unusual place: URLs. UIApplication offers the method openURL:, which will launch other applications and have them deal with the NSURL. Most web page URLs, with schemes http or https, will open Safari. For example, we can background ourselves and send Safari to this book’s home page with a one-line call:
| | UIApplication.sharedApplication().openURL( |
| | NSURL(string: "https://pragprog.com/book/adios3/ios-9-sdk-development")) |
Not all URLs go to Safari. If the host is www.youtube.com, the YouTube app will open instead, if present. phobos.apple.com iTunes Store URLs will open the iTunes app. And other URL schemes can be used to launch default system apps—for example, mailto:, facetime:, and tel: open the Mail, FaceTime, and Phone apps, respectively. Check out the Apple URL Scheme Reference in the Xcode documentation for the exact syntax and more information.
What’s really cool is that third-party applications can also participate in this system. Any app can create a new URL scheme that it handles, and then other apps that open this URL will launch that app. Since our app does so much with Twitter, let’s offer up our services to other apps.
Declaring a URL Scheme
We start our URL support by just picking a name. It needs to be plausibly unique, since Apple does nothing to police URL schemes. If every Twitter app declares that it will open URLs with the scheme twitter:, who knows which one will launch? Instead, let’s go with pragtweets:.
Let’s think about what service makes sense to offer other applications. We will receive a full URL from the caller, so we could design an API kind of like REST endpoints, with different URL paths leading to different features within our app. We’ll only implement one for now, but we could keep adding to it later by just looking for different strings in the URL.
The user may already have an app to show recent tweets (or see them in Notification Center), so let’s choose something unique that we offer. For this example, we’ll let a URL take us straight to the user detail screen. If we get a URL of the form pragtweets://host/user?screenname=name, we’ll go right to the UserDetailViewController, as if we had drilled down on one of name’s tweets.
At the very top of the File Navigator, click on the top-level PragmaticTweets project icon, and when the project settings come up in the Content View, make sure the selected target is the PragmaticTweets app (as opposed to the PragmaticTweetsTests target). This editor lets us configure how the build process and the resulting app work: what versions of iOS we deploy to, whether we have capabilities like iCloud or in-app purchase, which source files get built and how, and so on.
The Info tab has metadata for our app such as its display name, what features must be present on a device for it to work, and what kinds of documents it accepts or produces. At the bottom of this view, there’s a URL Types section. Expand the disclosure triangle, and then press the plus (+) button to show the settings for a new URL type, seen in the following figure.
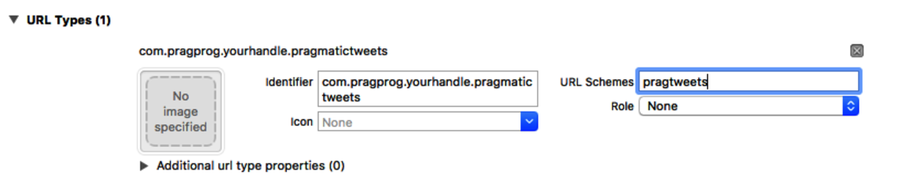
The important entry here is the URL Schemes text field, which takes a comma-separated list of schemes we accept. Enter pragtweets here, without the trailing colon character (:). The identifier should be a reverse-DNS style unique identifier, like com.pragprog.yourhandle.pragmatictweets, and the Role should be None, so that we aren’t making any promises about what we do with the URL (the Viewer and Editor values are more appropriate for dealing with documents passed between apps).
After we run this app once, the system will know to send any URL with the scheme pragtweets: to our app. Now we need to actually do something with this URL when it arrives.
Creating a New Scene
When our app gets opened via a properly formatted URL, we want to go directly to the UserDetailViewController scene, bypassing the two scenes before it (the list of tweets and the tweet detail). This is possible because all we have to give the user detail scene is the screenName we want to view; it will get everything else it needs via its own TwitterAPIRequest.
We could create a new segue from the split view directly to the user detail scene. This would be totally legal. But there’s a problem: the Done button is set to unwind to the tweet detail scene, but in the case where we come straight from the split view scene, there won’t be a previous tweet detail scene, and that will produce an error.
We have a couple of options. We could nuke the exit segue and instead set up a button handler that calls UIViewController’s dismissModalViewController method. This would work for both cases, but it assumes we always come in via a modal segue.
The option we’ll use is to just create another user detail scene, reachable only from the first scene and used only for this URL handler. It makes our storyboard a little bigger, but it lets us customize too—an acceptable trade-off.
In Main.storyboard, select the yellow ball icon for the User scene and do a copy-and-paste (⌘C, then ⌘V). The newly pasted instance will be placed exactly atop the old one. In the layout area, drag this scene by its title bar and notice that it doesn’t have any segues associated with it. Move it closer to the beginning of the storyboard (perhaps under the initial view controller), and then use the name field next to its view controller icon in the scene list to give it a unique name to keep things straight (like User Detail from URL Scene).
Control-click on the Size Class Override View Controller at the beginning of the storyboard to see its connections. Under Triggered Segues, drag from the Manual connection ball down to the new user detail scene. Upon dropping, choose the Present Modally segue type.
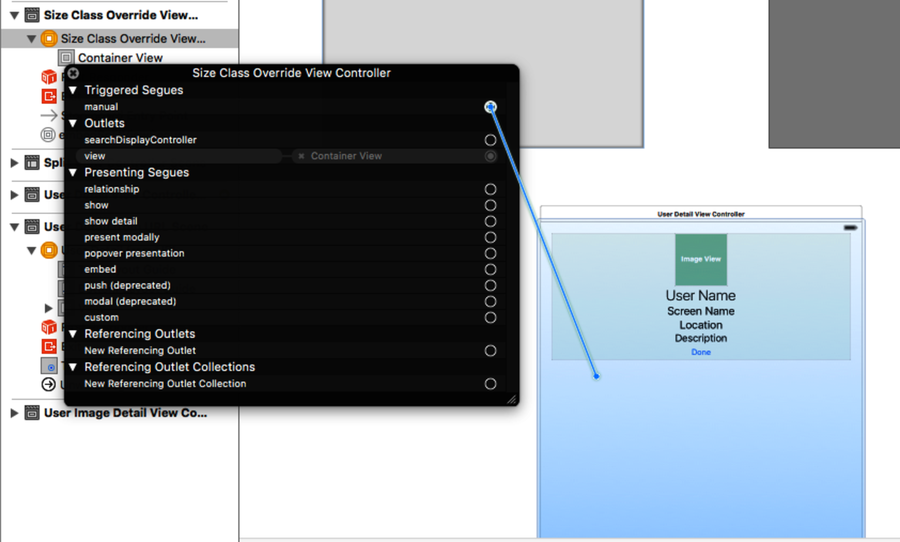
We’re going to need to run this segue manually when the URL comes in, which means we’ll need an identifier string. Select the segue, bring up the Attributes Inspector, and set the identifier to ShowUserFromURLSegue.
Handling the Open URL Callback
Now we’re ready to call this segue when our app is launched from a URL. When that happens, our AppDelegate will receive a callback to the method application(openURL:options:). This method returns a Bool indicating whether it handled the URL successfully, so we should only return true if we can successfully pick out a screenname.
To do that, we’re going to rely on the NSURL class. It has several methods that break down a URL into its various parts: scheme, path, query, and so on. We’ll take the segue if the path is /user and the query is of the form screenname=foo.
| 1: | func application(application : UIApplication, openURL url: NSURL, |
| - | options: [String : AnyObject]) -> Bool { |
| - | var showedUserDetail = false |
| - | guard let query = url.query where url.path == "/user" else { |
| 5: | return false |
| - | } |
| - | let components = query.componentsSeparatedByString("=") |
| - | if components.count > 1 && |
| - | components[0] == "screenname" { |
| 10: | if let sizeClassVC = self.window?.rootViewController |
| - | as? SizeClassOverrideViewController { |
| - | sizeClassVC.performSegueWithIdentifier("ShowUserFromURLSegue", |
| - | sender: self) |
| - | showedUserDetail = true |
| 15: | } |
| - | } |
| - | return showedUserDetail |
| - | } |
We start on line 3 with a showedUserDetail Boolean that will become true only if we kick off the segue (way inside the ifs, on line 14). Then on line 4, we use a guard let where to make sure url.query is non-nil and that the URL’s path is user.
Once we have the query part of the URL, we can split apart the name and value on line 7 with componentsSeparatedByString. That lets lines 8--9 verify that there are two components, and the first is screenname. Note that we’re kind of cheating because there is only one key-value pair; the more general case of ?key1=value1&key2=value2&… would take a lot more work to pick apart.
If we made it this far, then our URL is good. Lines 10--11 ask for our window’s rootViewController as our SizeClassOverrideViewController class, the first scene in the storyboard. If that cast works, then we can tell the view controller to manually perform the ShowUserFromURLSegue segue, on lines 12--13.
At the very end, on line 17 we return a Bool to indicate whether we set showedUserDetail to true. This is to uphold the contract established in the docs for the application(openURL:options:), which expects us to return true or false to indicate whether we handled the URL. For us, that’s determined by whether we made it all the way to performing the segue.

We now have enough done to try it out. Run the app, and then in the Simulator, use Hardware > Home (⇧⌘H) to background our app. Open up Safari and enter a URL like pragtweets://localhost/user?screenname=pragprog (the hostname is ignored, so anything will work there). Press Return or click Go and it should show an alert as shown in the figure, asking if you want to open the page in PragmaticTweets. Click Open.
This opens our app and goes immediately to the user detail scene. None of the fields are filled in yet because we haven’t sent the values to that view controller. Let’s take care of that.
Our AppDelegate can’t see the UserDetailViewController when it kicks off the segue. But the first scene will get a look at it, in prepareForSegue. That scene will need to know about the screen name to show, so switch to SizeClassOverrideViewController.swift and add a screenNameForOpenURL property:
| | var screenNameForOpenURL: String? |
This class already has a prepareForSegue method, to deal with the embedSplitViewSegue at startup, so just add an else if to handle the ShowUserFromURLSegue:
| | override func prepareForSegue(segue: UIStoryboardSegue, sender: AnyObject?) { |
| | if segue.identifier == "embedSplitViewSegue" { |
| | embeddedSplitVC = segue.destinationViewController |
| | as! UISplitViewController |
| | } else if segue.identifier == "ShowUserFromURLSegue" { |
| | if let userDetailVC = segue.destinationViewController |
| | as? UserDetailViewController { |
| | userDetailVC.screenName = screenNameForOpenURL |
| | } |
| | } |
| | } |
Now that this view controller is ready for the segue, go back to AppDelegate.swift and, on a new line right before we performSegueWithIdentifier, send the screen name to the view controller that needs it.
| | sizeClassVC.screenNameForOpenURL = components[1] |
Run again, switch to Safari, open the pragtweets: URL, and this will show the user detail scene with the real name, description, and avatar image.
The last thing we have to do is to fix the Done button, which still thinks it can unwind to the tweet detail scene (since that’s what was in the scene we copied over). First, in SizeClassOverrideViewController.swift, create an unwind method that we can go back to:
| | @IBAction func unwindToSizeClassOverrideVC (segue: UIStoryboardSegue) { |
| | } |
Then, back in the storyboard, go to the new User Detail From URL scene and Control-click or right-click the Done button to show its connections (or bring up the Connections Inspector, ⌥⌘6). Use the x-button to delete any existing unwind segue, close the connections pop-up, and then Control-drag from the button to the orange Exit icon in the title bar atop the scene; when the list of unwind methods appears, choose unwindToSizeClassOverridingVC.
Run again, and open the user detail URL from Safari. Now, not only can we view the user details, but we can also use the Done button to return to the first scene of the app. Now not only is our app useful to our users, but it also offers other apps (or web pages in Safari) the ability to send users over to us with just a simple URL.