
Our First Project
Our project for the rest of the book is a simple Twitter client, which will allow the user to post messages to Twitter, view his or her timeline, and drill down for more details on a tweet or the person who posted it. This lets us develop features that are genuinely valuable to real users, and exposes us to practical concerns about getting data from the Internet and presenting it in the iOS user interface. Not to mention, Twitter clients are among the most-used and most-loved iOS apps, and have been a hotbed of UI innovation: the familiar “pull to refresh” gesture first appeared in “Tweetie,” which later became the official Twitter app for iOS.
As we develop the app, you can use your existing Twitter account or, if you don’t have one or would prefer to use a separate account for development work, create a new Twitter account at http://twitter.com. While working on the book, we’ve used a test account, @pragsiostest, which we’ll use for screenshots.
To begin work on a new app, we need to create a project using the menu sequence File > New > Project (⇧⌘N). There’s also a button on the Xcode greeting window for starting a project, so that’s another way to do it.
When we create a new project, a window opens, and out slides a sheet that asks us what kind of project we want to create. This project template sheet, shown here, has a list on the left side of project categories divided into iOS and Mac OS X, watchOS, and “Other” sections. Since we’re building an iOS application, we’ll select Application from the iOS section and then look at the choices in the main part of the frame. We can click each to see a general description of what kind of app to start on. For our first example, we’ll select Single View Application.

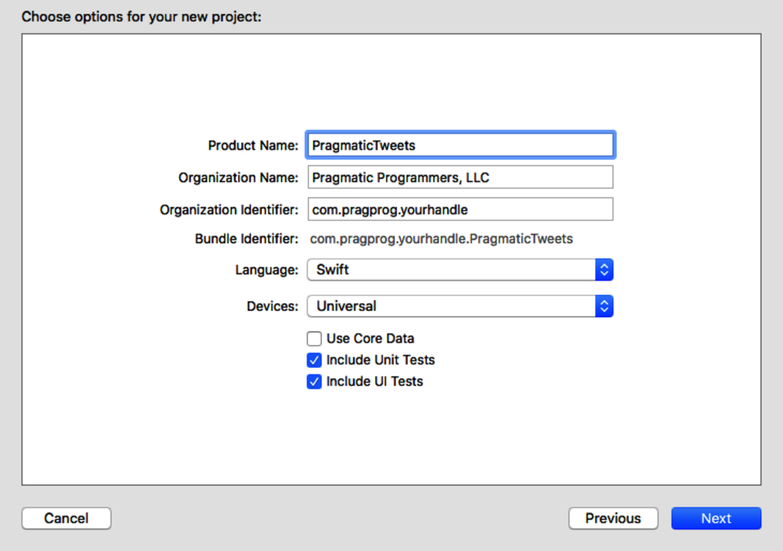
After we click Next, the sheet then asks us for details specific to the project, as shown in the following figure. Some of these change based on the project type; in general, this is where we need to provide names and other identifiers to the app, indicate which device formats (iPhone and/or iPad) it’s for, and so on. For our first app, here’s how we should fill out the form:
-
Product Name—A name for the product with no spaces or other punctuation. Our product will be called PragmaticTweets here.
-
Organization Name—This can be a company, organization, or personal name, which will be used for the copyright statement automatically put at the top of every source file.
-
Organization Identifier—This is a reverse-DNS style stub that will uniquely identify our app in the App Store, so if someone else submits a PragmaticTweets, the two apps won’t be mistaken for each other because they’ll each have a unique Bundle Identifier, which is the auto-generated fourth line of the form. If you have your own domain, you can use it for the company identifier; otherwise, just invert your email address, such as in com.company.yourhandle.
-
Language—There are two choices for this pop-up menu: Swift and Objective-C. We’ve covered Swift for the last three chapters, so let’s choose that here.
-
Devices—This determines whether the template should set us up with an app that’s meant to run on an iPhone (and iPod touch) or iPad or be a “universal” app with a different layout for each. Not all templates offer all three options. With the variety of iOS devices currently available, Apple is pushing hard for developers to build universal apps that run and look good on a variety of screen sizes, all four sizes of iPhone and two of iPad, so select Universal here.
-
Check boxes—Do not select Use Core Data, which is a data persistence framework that is beyond the scope of this book. When we’re done, feel free to move on to Marcus Zarra’s excellent book Core Data (2nd edition): Data Storage and Management for iOS, OS X, and iCloud.[1] Go ahead and check both Include Unit Tests and Include UI Tests. These will make it easier to expose our app to automated testing, which we’ll do in Chapter 6, Testing the App.
After clicking Next, we choose a location on the filesystem for our project. There’s also an option for creating a local Git source code repository for our files. Source control is beyond the scope of this book, but in short: if you want a local history of all your changes, select it. If you don’t need it, or (better yet!) if you plan to check your code into an external source control system like GitHub later on, leave it unselected. Once we specify where the project will be saved, Xcode copies over some starter files for our project and reveals them in its main window.