
Chapter 5
Working with Access Tables
IN THIS CHAPTER
- Understanding datasheets
- Looking at the Datasheet window
- Opening a datasheet
- Entering new data
- Navigating records
- Changing values in a datasheet
- Using the Undo feature
- Copying and pasting values in a datasheet
- Replacing values in a datasheet
- Adding records to a datasheet
- Deleting records from a datasheet
- Displaying records in a datasheet
- Sorting and filtering records
- Aggregating data
- Printing records
In this chapter, you'll use a datasheet to enter data into an Access table and display the data many different ways. Using Datasheet view allows you to see many records at once, in the familiar spreadsheet-style format. In this chapter, you'll work with tblContacts and tblProducts to add, change, and delete data, as well as learn about different features available in Datasheet view.
Understanding Datasheets
Using a datasheet is just one of the ways to view data in Access. A datasheet is visually similar to a spreadsheet in that it displays data as a series of rows and columns. Figure 5.1 shows a typical Datasheet view of a table. Each row represents a single record, and each column represents a single field in the table. Scroll up or down in the datasheet to see the rows (records) that don't fit on the screen; scroll left or right to see the columns (fields) that don't fit.

Figure 5.1 A typical Datasheet view. Each row represents a single record in the table; each column represents a single field (like Description or ModelYear) in the table.
Datasheets are completely customizable, which allows you to view data in many ways. Changing the font size, column widths, and row heights makes more or less of the data fit on the screen. Rearranging the order of the rows and/or columns lets you organize the records and fields logically. Locking columns makes them stay in position as you scroll to other parts of the datasheet, and hiding columns makes them disappear. Filtering the data hides records that don't match specific criteria.
Looking at the Datasheet Window
The datasheet arranges the records initially by primary key and arranges the fields by the order in the table design. At the top of the Access window, you see the title bar (displaying the database filename), the Quick Access toolbar, and the Ribbon. At the bottom of the Access window, you see the status bar, which displays information about the datasheet. For example, it might contain field description information, error messages, warnings, or a progress bar.
Generally, error messages and warnings appear in dialog boxes in the center of the screen rather than in the status bar. If you need help understanding the meaning of a button in the toolbar, move the mouse so that it's hovering over the button, and a tooltip appears with a one- or two-word explanation.
The right side of the Datasheet window contains a scroll bar for moving vertically between records. As you scroll between records, a scroll tip (shown in Figure 5.1) tells you precisely where the scroll bar takes you. The size of the scroll bar “thumb” (the small rectangle on the scroll bar) gives you a proportional look at how many of the total number of records are being displayed. The bottom of the Datasheet window also contains a scroll bar for moving among fields (left to right). The Navigation buttons for moving between records also appear in the bottom-left corner of the Datasheet window.
Moving within a datasheet
You easily move within the Datasheet window using the mouse to indicate where you want to change or add to your data—just click a field within a record. In addition, the ribbons, scroll bars, and Navigation buttons make it easy to move among fields and records. Think of a datasheet as a spreadsheet without the row numbers and column letters. Instead, columns have field names, and rows are unique records that have identifiable values in each cell.
Table 5.1 lists the navigational keys you use for moving within a datasheet.
Table 5.1 Navigating in a Datasheet
| Navigational Direction | Keystrokes |
| Next field | Tab |
| Previous field | Shift+Tab |
| First field of current record | Home |
| Last field of current record | End |
| Next record | Down arrow (↓) |
| Previous record | Up arrow (↑) |
| First field of first record | Ctrl+Home |
| Last field of last record | Ctrl+End |
| Scroll up one page | PgUp |
| Scroll down one page | PgDn |
Using the Navigation buttons
The Navigation buttons (shown in Figure 5.2) are the six controls located at the bottom of the Datasheet window, which you click to move between records. The two leftmost controls move you to the first record or the previous record in the datasheet, respectively. The three rightmost controls position you on the next record, last record, or new record in the datasheet, respectively. If you know the record number (the row number of a specific record), you can click the record-number box, enter a record number, and press Enter.
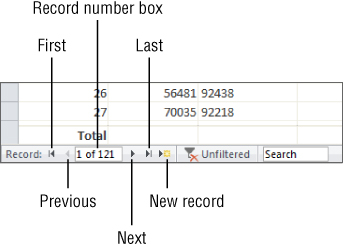
Figure 5.2 The Navigation buttons of a datasheet.
Examining the Datasheet Ribbon
The Datasheet Ribbon (shown in Figure 5.3) provides a way to work with the datasheet. The Home Ribbon has some familiar objects on it, as well as some new ones. This section provides an overview of the groups on the Ribbon; the individual commands are described in more detail later in this chapter.
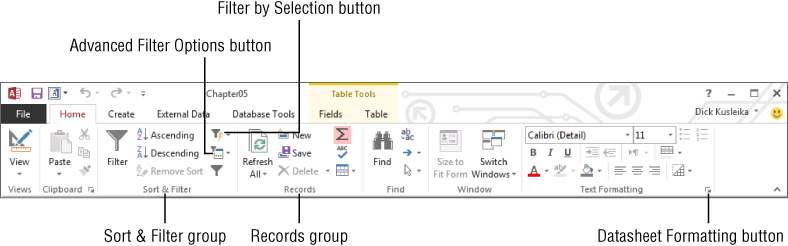
Figure 5.3 The Datasheet Ribbon's Home tab.
Views
The Views group allows you to switch between Datasheet view and Design view. You can see both choices by clicking the View command's downward-pointing arrow. Clicking Design View permits you to make changes to the object's design (table, query, and so on). Clicking Datasheet View returns you to the datasheet.
Clipboard
The Clipboard group contains the Cut, Copy, and Paste commands. These commands work like the commands in other applications (such as Word and Excel). The Paste command's down arrow gives you three choices: Paste, Paste Special, and Paste Append. Paste Special gives you the option of pasting the contents of the Clipboard in different formats (text, CSV, records, and so on). Paste Append pastes the contents of the Clipboard as a new record—as long as a row with a similar structure was copied to the Clipboard.
Sort & Filter
The Sort & Filter group lets you change the order of the rows, as well as limit the rows being displayed, based on the criteria you want.
Records
The Records group lets you save, delete, or add a new record to the datasheet. It also contains commands to show totals, check spelling, freeze and hide columns, and change the row height and cell width.
Find
The Find group lets you find and replace data and go to specific records in the datasheet. Use the Select command to select a record or all records.
Window
The Window group includes two buttons that help you control the items (forms, reports, tables, and so on) that are open in the main Access window:
- Size to Fit Form: The Size to Fit Form button resizes the form in the window to fit the size set when the form was created. By default, Access forms have a sizeable border, which means the user might drag the form to a new size. The Size to Fit Form button restores a form to the size specified at design time.
- Switch Windows: The Switch Windows button lets you choose a different open window to work with. A form or report needed by the user might be under another form or report, and the Switch Windows button provides a quick way to select which object is on top of the other objects in the Access main window.
Text Formatting
The Text Formatting group lets you change the look of text fields in the datasheet. Use these commands to change the font, size, bold, italic, color, and so on. Selecting a font attribute (such as bold) applies the attribute to all fields in the datasheet. (See the Note just below this paragraph for the only exception to this rule.) Use the Align Left, Align Right, and Align Center commands to justify the data in the selected column. Click the Gridlines command to toggle gridlines on and off. Use the Alternate Fill/Back Color command to change the colors of alternating rows or to make them all the same.
Opening a Datasheet
Follow these steps to open a datasheet from the Database window:
- Using the
Chapter05.accdbdatabase from this book's website, click Tables in the Navigation pane. - Double-click the table name you want to open (in this example, tblProducts).
An alternative method for opening the datasheet is to right-click tblProducts and select Open from the pop-up menu.
Entering New Data
All the records in your table are visible when you first open it in Datasheet view. If you just created your table, the new datasheet doesn't contain any data. Figure 5.4 shows an empty datasheet and a portion of the Fields tab of the Ribbon. When the datasheet is empty, the first row contains an asterisk (*) in the record selector, indicating it's a new record.

Figure 5.4 An empty datasheet. Notice that the first record is blank and has an asterisk in the record selector.
The Table Tools tab group of the Ribbon includes virtually all the tools needed to build a complete table. You can specify the data type, default formatting, indexing, field and table validation, and other table construction tasks from the controls in the Table Tools tab group.
The New row appears at the bottom of the datasheet when the datasheet already contains records. Click the New Record command in the Record group of the Ribbon, or click the New Record button in the group of navigation buttons at the bottom of the datasheet to move the cursor to the New row—or simply click on the last row, which contains the asterisk. The asterisk turns into a pencil when you begin entering data, indicating that the record is being edited. A new row—containing an asterisk—appears below the one you're entering data into. The new record pointer always appears in the last row of the datasheet. Figure 5.5 shows adding a new record to tblProducts.

Figure 5.5 Entering a new record into the Datasheet view of tblProducts.
To add a new record to the open Datasheet view of tblProducts, follow these steps:
- Click the New button in the Records group of the Home tab of the Ribbon.
- Type in values for all fields of the table, moving between fields by pressing the Enter key or the Tab key.
When adding or editing records, you might see three different record pointers:
- Record being edited: A pencil icon
- Record is locked (multiuser systems): A padlock icon
- New record: An asterisk icon
Saving the record
Moving to a different record saves the record you're editing. Tabbing through all the fields, clicking on the Navigation buttons, clicking Save in the Record group of the Ribbon, and closing the table all write the edited record to the database. You'll know the record is saved when the pencil disappears from the record selector.
To save a record, you must enter valid values into each field. The fields are validated for data type, uniqueness (if indexed for unique values), and any validation rules that you've entered into the Validation Rule property. If your table has a primary key that's not an AutoNumber field, you'll have to make sure you enter a unique value in the primary key field to avoid the error message shown in Figure 5.6. One way to avoid this error message while entering data is to use an AutoNumber field as the table's primary key.

Figure 5.6 The error message Access displays when attempting to save a record with a duplicate primary key value entered into the new record. Use an AutoNumber field as your primary key to avoid this error.
Now you know how to enter, edit, and save data in a new or existing record. In the next section, you learn how Access validates your data as you make entries into the fields.
Understanding automatic data-type validation
Access validates certain types of data automatically. Therefore, you don't have to enter any data validation rules for these data types when you specify table properties. The data types that Access automatically validates include:
- Number/Currency
- Date/Time
- Yes/No
Access validates the data type when you move off the field. When you enter a letter into a Number or Currency field, you don't initially see a warning not to enter these characters. However, when you tab out of or click on a different field, you get a warning like the one shown in Figure 5.7. This particular warning lets you choose to enter a new value or change the column's data type to Text. You'll see this message if you enter other inappropriate characters (symbols, letters, and so on), enter more than one decimal point, or enter a number too large for the specified numeric data type.

Figure 5.7 The warning Access displays when entering data that doesn't match the field's data type. Access gives you a few choices to correct the problem.
Access validates Date/Time fields for valid date or time values. You'll see a warning similar to the one shown in Figure 5.7 if you try to enter a date such as 14/45/05, a time such as 37:39:12, or an invalid character in a Date/Time field.
Yes/No fields require that you enter one of these defined values:
- Yes: Yes, True, On, –1, or a number other than 0 (which displays as –1)
- No: No, False, Off, or 0
Of course, you can define your own acceptable values in the Format property for the field, but generally these values are the only acceptable ones. If you enter an invalid value, the warning appears with the message to indicate an inappropriate value.
Knowing how properties affect data entry
Because field types vary, you use different data-entry techniques for each type. In the “Saving the record” section earlier in this chapter, you learned that some data-type validation is automatic. Designing tblContacts, however, means entering certain user-defined format and data validation rules. The following sections examine the types of data entry.
Standard text data entry
The first field—ContactID—in tblContacts is an AutoNumber field, while other fields in the table are Short Text fields. After skipping ContactID, you simply enter a value in each field and move on. The ZipCode field uses an input mask (00000-9999;0;) for data entry. The Phone and Fax fields also use an input mask (!(999”) “000-0000;0;_). A 0 in an input mask represents a required numeric entry. A 9 in an input mask represents an optional numeric entry. The ZipCode input mask requires the first five digits, but the plus 4 portion is optional. Short Text fields accept any characters, unless you restrict them with an input mask.
Date/Time data entry
The OrigCustDate and LastSalesDate fields in tblContacts are Date/Time data types, which both use a Short Date format (3/16/2015). However, you could have defined the format as Medium Date (16-Mar-15) or Long Date (Monday, March 16, 2015). Using either of these formats simply means that no matter how you type in the date—using month and year; day, month, and year; or month, day, and year—the date always displays in the specified format (short date [3/16/2015], medium date [16-Mar-15], or long date [Monday, March 16, 2015]). Therefore, if you type 3/16/15 or 16 Mar 15, Access displays the value in the specified format as you leave the field. Dates are actually stored in the database without any formatting, so the format you select for a field doesn't affect how the data is stored.
Number/Currency data entry with data validation
The CreditLimit field in tblContacts has a validation rule assigned to it. It has a Validation Rule property to limit the amount of credit to $250,000. If the rule is violated, a dialog box appears with the validation text entered for the field. If you want to allow a contact to have more than $250,000 of credit, change the validation rule in the table design.
The exact currency character used by Access (in this case, the dollar sign) is determined by the regional options set in the Region and Language Settings of the Control Panel.
OLE object data entry
You can enter Object Linking and Embedding (OLE) object data into a datasheet, even though you don't see the object. An OLE Object field holds many different item types, including:
- Bitmap pictures
- Sound files
- Business graphs
- Word or Excel files
Any object that an OLE server supports can be stored in an Access OLE Object field. OLE objects are generally entered into a form so you can see, hear, or use the value. When OLE objects appear in datasheets, you see text that tells what the object is (for example, you may see Bitmap Image in the OLE Object field). You can enter OLE objects into a field in two ways:
- By pasting from the Clipboard
- By right-clicking on the OLE Object field and selecting Insert Object from the pop-up menu
Long Text field data entry
The Features field in tblProducts is a Long Text data type. This type of field allows up to 1GB of text for each field. As you enter text into a Long Text field, you see only a few characters at a time—the rest of the string scrolls out of sight. Pressing Shift+F2 displays a Zoom window with a scroll bar (see Figure 5.8) that lets you see more characters at a time. Click the Font button at the bottom of the window to view all the text in a different font or size. (The font in Figure 5.8 has been enlarged considerably over the 8-point default font size for the Zoom window.)

Figure 5.8 The Zoom window. Notice that you can see all of the field's data event at a larger font size.
When you first display text in the Zoom window, all the text is selected. You can deselect the text by clicking anywhere in the window. If you accidentally delete all the text or change something you didn't want to, click Cancel to exit back to the datasheet with the field's original data.
Navigating Records in a Datasheet
Wanting to make changes to records after you've entered them is not unusual. You might need to change records because you receive new information that changes existing values or because you discover errors in existing values.
When you decide to edit data in a table, the first step is to open the table, if it isn't already open. From the list of tables in the Navigation pane, double-click tblProducts to open it in Datasheet view. If you're already in Design view for this table, click the Datasheet View button to switch views.
When you open a datasheet in Access that has related tables, a column with a plus sign (+) is added to indicate the related records, or subdatasheets. Click a row's plus sign to open the subdatasheet for the row.
Moving between records
You can move to any record by scrolling through the records and positioning your cursor on the desired record. With a large table, scrolling through all the records might take a while, so you'll want to use other methods to get to specific records quickly.
Use the vertical scroll bar to move between records. The scroll bar arrows move one record at a time. To move through many records at a time, drag the scroll box or click the areas between the scroll thumb and the scroll bar arrows.
Use the five Navigation buttons (refer to Figure 5.2) to move between records. You simply click these buttons to move to the desired record. If you know the record number (the row number of a specific record), click the record number box, enter a record number, and press Enter.
Also, use the Go To command in the Find group of the Ribbon to navigate to the First, Previous, Next, Last, and New records.
Finding a specific value
Although you can move to a specific record (if you know the record number) or to a specific field in the current record, usually you'll want to find a certain value in a record. You can use one of these methods for locating a value in a field:
- Select the Find command (a pair of binoculars) from the Find group of the Ribbon.
- Press Ctrl+F.
- Use the Search box at the bottom of the Datasheet window.
The first two methods display the Find and Replace dialog box (shown in Figure 5.9). To limit the search to a specific field, place your cursor in the field you want to search before you open the dialog box. Change the Look In combo box to Current Document to search the entire table for the value.

Figure 5.9 The Find and Replace dialog box. The fastest way to activate it is to simply press Ctrl+F.
The Find and Replace dialog box lets you control many aspects of the search. Enter the value you want to search for in the Find What combo box, which contains a list of recently used searches. You can enter a specific value or choose to use wildcard characters. Table 5.2 lists the wildcard characters available in the Find dialog box.
Table 5.2 Wildcard Characters
| Character | Description | Example |
| * (asterisk) | Matches any number of characters | Ford* finds Ford Mustang |
| ? (question mark) | Matches any single character | F?rd finds Ford |
| [ ] (brackets) | Matches one of a list of characters | 19[67]1 finds 1961 and 1971 |
| ! (exclamation point) | With brackets, excludes a list of characters | 19[!67]1 finds 1951 but not 1961 |
| - (hyphen) | With brackets, matches a range of characters | 196[2–8] finds 1962 to 1968 |
| # (hash) | Matches one number | 1:## finds 1:18 but not 1:9 |
You can combine wildcard characters for more robust searches. For example, 196[!2–8] will find 1961 and 1969, but nothing in between.
The Match drop-down list contains three choices:
- Any Part of Field: If you select Any Part of Field, Access searches to see whether the value is contained anywhere in the field. This search finds Ford anywhere in the field, including values like Ford Mustang, 2008 Ford F-150, and Ford Galaxy 500.
- Whole Field: The default is Whole Field, which finds fields containing exactly what you've entered. For example, the Whole Field option finds Ford only if the value in the field being searched is exactly Ford, and nothing else.
- Start of Field: A search for Ford using the Start of Field option searches from the beginning of the field and returns all the rows containing Ford as the first four characters of the description.
In addition to these combo boxes, you can use two check boxes at the bottom of the Find and Replace dialog box:
-
Match Case: Match Case determines whether the search is case sensitive. The default is not case sensitive (not checked). A search for SMITH finds smith, SMITH, or Smith. If you check the Match Case check box, you must then enter the search string in the exact case of the field value. (The data types Number, Currency, and Date/Time don't have any case attributes.)
If you've checked Match Case, Access doesn't use the value Search Fields As Formatted (the second check box), which limits the search to the actual values displayed in the table. (If you format a field for display in the datasheet, you should check the box.)
- Search Fields As Formatted: The Search Fields As Formatted check box, the selected default, finds only text that has the same pattern of characters as the text specified in the Find What box. Clear this box to find text regardless of the formatting. For example, if you're searching the Cost field for a value of $16,500, you must enter the comma if Search Fields as Formatted is checked. Uncheck this box to search for an unformatted value (16500).
The search begins when you click the Find Next button. If Access finds the value, the cursor highlights it in the datasheet. To find the next occurrence of the value, click the Find Next button again. The dialog box remains open so that you can find multiple occurrences. Choose one of three search direction choices (Up, Down, or All) in the Search drop-down list to change the search direction. When you find the value that you want, click Close to close the dialog box.
Use the search box at the bottom of the Datasheet window (refer to Figure 5.1) to quickly search for the first instance of a value. When using the search box, Access searches the entire datasheet for the value in any part of the field. If you enter FORD in the search box, the datasheet moves to the closest match as you type each letter. First, it finds a field with F as the first character, then it finds FO, and so on. Once it finds the complete value, it stops searching. To find the next instance, press the Enter key.
Changing Values in a Datasheet
If the field that you're in has no value, you can type a new value into the field. When you enter new values into a field, follow the same rules as for a new record entry.
Manually replacing an existing value
Generally, you enter a field with either no characters selected or the entire value selected. If you use the keyboard (Tab or Arrow keys) to enter a field, you select the entire value. (You know that the entire value is selected when it's displayed in reverse video.) When you begin to type, the new content replaces the selected value automatically.
When you click in a field, the value is not selected. To select the entire value with the mouse, use any of these methods:
- Click just to the left of the value when the cursor is shown as a large plus sign.
- Click to the left of the value, hold down the left mouse button, and drag the mouse to select the whole value.
- Click in the field and press F2.
Changing an existing value
If you want to change an existing value instead of replacing the entire value, use the mouse and click in front of any character in the field to activate Insert mode; the existing value moves to the right as you type the new value. If you press the Insert key, your entry changes to Overstrike mode; you replace one character at a time as you type. Use the arrow keys to move between characters without disturbing them. Erase characters to the left by pressing Backspace, or to the right of the cursor by pressing Delete.
Table 5.3 lists editing techniques.
Table 5.3 Editing Techniques
| Editing Operation | Keystrokes |
| Move the insertion point within a field. | Press the right-arrow (→) and left-arrow (←) keys. |
| Insert a value within a field. | Select the insertion point and type new data. |
| Toggle entire field and insertion point. | Press F2. |
| Move insertion point to the beginning of the field. | Press Ctrl+left-arrow (←) key or press the Home key. |
| Move insertion point to the end of the field. | Press Ctrl+right-arrow (→) key or press the End key. |
| Select the previous character. | Press Shift+left-arrow (←) key. |
| Select the next character. | Press Shift+right-arrow (→) key. |
| Select from the insertion point to the beginning. | Press Ctrl+Shift+left-arrow (←) key. |
| Select from the insertion point to the end. | Press Ctrl+Shift+right-arrow (→) key. |
| Replace an existing value with a new value. | Select the entire field and type a new value. |
| Replace a value with the value of the previous field. | Press Ctrl+' (apostrophe). |
| Replace the current value with the default value. | Press Ctrl+Alt+Spacebar. |
| Insert a line break in a Short Text or Long Text field. | Press Ctrl+Enter. |
| Save the current record. | Press Shift+Enter or move to another record. |
| Insert the current date. | Press Ctrl+; (semicolon). |
| Insert the current time. | Press Ctrl+: (colon). |
| Add a new record. | Press Ctrl++ (plus sign). |
| Delete the current record. | Press Ctrl+– (minus sign). |
| Toggle values in a check box or option button. | Press Spacebar. |
| Undo a change to the current field. | Press Esc or click the Undo button. |
| Undo a change to the current record. | Press Esc or click the Undo button a second time after you undo the current field. |
Using the Undo Feature
The Undo button on the Quick Access toolbar is often dimmed because there's nothing to undo. As soon as you begin editing a record, however, you can use this button to undo the typing in the current field. You can also undo a change with the Esc key; pressing Esc cancels any changes to a field that you're actively editing or cancels the changes to the last field you edited if you're not currently editing a field. Pressing Esc twice undoes changes to the entire current record.
After you type a value into a field, click the Undo button to undo changes to that value. After you move to another field, you can undo the change to the preceding field's value by clicking the Undo button. You can also undo all the changes to an unsaved current record by clicking the Undo button after you undo a field. After you save a record, you can still undo the changes by clicking the Undo button. However, after the next record is edited, changes to the previous record are permanent.
Copying and Pasting Values
Copying or cutting data to the Clipboard is performed by Microsoft Office or Microsoft Windows, depending on the type of data; it isn't a specific function of Access. After you cut or copy a value, you can paste into another field or record by using the Paste command in the Clipboard group of the Ribbon. You can cut, copy, or paste data from any Windows application or from one task to another in Access. Using this technique, you can copy entire records between tables or databases, and you can copy datasheet values to and from Word and Excel.
The Paste command's down arrow gives you three choices:
- Paste: Inserts the contents of the Clipboard into one field
- Paste Special: Gives you the option of pasting the contents of the Clipboard in different formats (text, CSV, records, and so on)
- Paste Append: Pastes the contents of the Clipboard as a new record—provided a row with a similar structure was copied
Replacing Values
To replace an existing value in a field, you can manually find the record to update or you can use the Find and Replace dialog box. Display the Find and Replace dialog box using these methods:
- Select the Replace command from the Find group of the Ribbon.
- Press Ctrl+H.
The Find and Replace dialog box allows you to replace a value in the current field or in the entire table. Use it to find a certain value and replace it with a new value everywhere it appears in the field or table.
After the Find and Replace dialog box is active, select the Replace tab and type in the value that you want to find in the Find What box. After you've selected all the remaining search options (turn off Search Fields As Formatted, for example), click the Find Next button to find the first occurrence of the value. To change the value of the current found item (under the cursor), enter a value in the Replace With box and click the Replace button. For example, Figure 5.10 shows that you want to find the value Mini Vans in the current field and change it to Minivans.

Figure 5.10 The Find and Replace dialog box with the Replace tab showing. In this case, you want to replace Mini Vans with Minivans.
You can select your search options on the Find tab and then select the Replace tab to continue the process. However, it's far easier to simply do the entire process using the Replace tab. Enter the value you want to find and the value that you want to replace it with. After you've completed the dialog box with all the correct information, select one of the command buttons on the side:
- Find Next: Finds the next field that has the value in the Find What field.
- Cancel: Closes the form and performs no find and replace.
- Replace: Replaces the value in the current field only. (Note: You must click the Find Next button first.)
- Replace All: Finds all the fields with the Find What value and replaces them with the Replace With value. Use this if you're sure that you want to replace all the values; double-check the Look In box to make sure you don't replace the values in the entire datasheet if you don't want to.
Adding New Records
There are a number of ways to add a record to a datasheet:
- Click the datasheet's last line, where the record pointer is an asterisk.
- Click the new record Navigation button (the furthest button on the right).
- Click the New command from the Records group of the Ribbon.
- Choose Go To
 New from the Find group of the Ribbon.
 - Move to the last record and press the down-arrow (↓) key.
- Press Ctrl++ (plus sign).
- Right-click any record selector and choose New Record from the context menu. The new record is still appended to the bottom regardless of which record's selector you click.
Once you move to a new record, enter data into the desired fields and save the record.
Deleting Records
To delete records, select one or more records using the record selectors, and then press the Delete key, click the Delete command in the Records group of the Ribbon, or right-click a record's selector. The Delete command's drop-down list contains the Delete Record command, which deletes the current record, even if it isn't selected. When you delete a record, a dialog box asks you to confirm the deletion (see Figure 5.11). If you select Yes, the records are deleted; if you select No or press the Escape key, no changes are made.
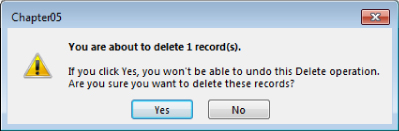
Figure 5.11 The Delete Record dialog box warns you that you're about to delete a specific number of records. The default response is Yes (okay to delete), so be careful when deleting records.
To select multiple contiguous records, click the record selector of the first record that you want to select and drag the mouse to the last record that you want to select. Or click to select the first record, and then hold the Shift key and click on the last record that you want in the selection.
Displaying Records
A number of techniques can increase your productivity when you add or change records. Change the field order, hide and freeze columns, change row height or column width, change display fonts, and change the display or remove gridlines to make data entry easier.
Changing the field order
By default, Access displays the fields in a datasheet in the same order in which they appear in the table design. Sometimes, you want to see certain fields next to each other in order to better analyze your data. To rearrange your fields, select a column by clicking the column heading, and then drag the column to its new location (as shown in Figure 5.12).
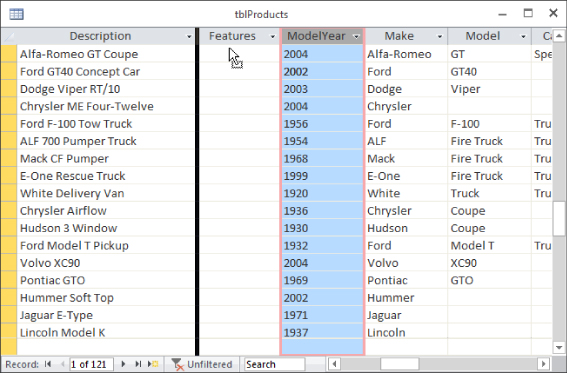
Figure 5.12 Select and drag a column to change the field order.
You can select and drag columns one at a time, or select multiple columns to move at the same time. Suppose you want ModelYear to appear before Features in the tblProducts datasheet. Follow these steps to make this change:
- Position the mouse pointer over the ModelYear column heading. The cursor changes to a down arrow.
- Click to select the column. The entire ModelYear column is now highlighted.
- Release the mouse button.
- Click the mouse button on the column heading again. The pointer changes to an arrow with a box under it.
- Drag the column to the left edge of the datasheet between the Description and Features fields. A thin black column appears between them (refer to Figure 5.12).
- Release the mouse button. The column moves in front of the Features field of the datasheet.
With this method, you can move any individual field or contiguous field selection. To select multiple fields, click and drag the mouse across multiple column headings. Then you can move the fields left or right or past the right or left boundary of the window.
Changing the field display width
You can change the field display width (column width) either by specifying the width in a dialog box (in number of characters) or by dragging the column border. When you hover the mouse over a column border, the cursor changes to the double-arrow symbol.
To widen a column or to make it narrower, follow these steps:
- Place the mouse pointer between two column names on the field separator line. The mouse pointer turns into a small line with arrows pointing to the left and right—if you have it in the correct location.
- Drag the column border to the left to make the column smaller or to the right to make it larger.
Alternatively, you can resize a column by right-clicking the column header and selecting Field Width from the pop-up menu to display the Column Width dialog box, as shown in Figure 5.13. Set the Column Width box to the number of characters you want to fit in the column or click the Standard Width check box to set the column to its default size. Click Best Fit to size the column to the widest visible value.
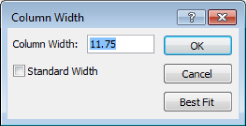
Figure 5.13 The Column Width dialog box.
Changing the record display height
You might need to increase the row height to accommodate larger fonts or text that uses multiple lines. Change the record (row) height of all rows by dragging a row's border to make the row height larger or smaller.
When you drag a record's border, the cursor changes to the vertical two-headed arrow you see at the left edge of Figure 5.14.

Figure 5.14 Changing a row's height. Position the mouse as shown and drag to the desired height.
To increase or decrease a row's height, follow these steps:
- Place the mouse pointer between record selectors of two rows. The cursor changes to the double-pointing arrow (up and down).
- Drag the row border up to shrink all row heights or down to increase all row heights.
You can also resize rows by choosing More ![]() Row Height in the Records group of the Ribbon. The Row Height dialog box appears; there you enter the row height in point size. Check the Standard Height check box to return the rows to their default size.
Row Height in the Records group of the Ribbon. The Row Height dialog box appears; there you enter the row height in point size. Check the Standard Height check box to return the rows to their default size.
Changing display fonts
By default, Access displays all data in the datasheet in the Calibri 11-point Regular font. Use the commands and drop-down lists in the Text Formatting group of the Ribbon (shown in Figure 5.15) to change the datasheet's text appearance.

Figure 5.15 Changing the datasheet's font directly from the Ribbon. Choose font type style, size, and other font attributes for the entire datasheet.
Setting the font display affects the entire datasheet. If you want to see more data on the screen, you can use a very small font. You can also switch to a higher-resolution display size if you have the necessary hardware. If you want to see larger characters, you can increase the font size or click the Bold button.
Displaying cell gridlines and alternate row colors
Normally gridlines appear between fields (columns) and between records (rows). You can set how you want the gridlines to appear using the Gridlines command in the Text Formatting group of the Ribbon (shown in Figure 5.15). Choose from the following options in the Gridlines drop-down list:
- Gridlines: Both
- Gridlines: Horizontal
- Gridlines: Vertical
- Gridlines: None
Use the Background Color and Alternate Row Color drop-down lists, also in the Text Formatting group, to change the background colors of the datasheet. The Background Color palette changes the color of all the rows in the datasheet. The Alternate Row Color palette changes the color of the even-numbered rows. When Alternate Row Color is set, the Background Color palette only affects the odd-numbered rows. To remove coloring from alternate rows, set Alternate Row Color to No Color.
After changing the gridline settings or alternate row colors, Access will ask whether to save the changes to the datasheet's layout. Be sure to click Yes if you want to make the changes permanent.
The Datasheet Formatting dialog box (shown in Figure 5.16) gives you complete control over the datasheet's look. Open this dialog box using the Datasheet Formatting command in the bottom-right corner of the Text Formatting group of the Ribbon. Use the Flat, Sunken, and Raised radio buttons under Cell Effect to change the grid to a 3-D look. Click the Horizontal and Vertical check boxes under Gridlines Shown to toggle which gridlines you want to see. Change the Background Color, Alternate Background Color, and Gridline Color using the available color palettes. The sample in the middle of the dialog box shows you a preview of changes.

Figure 5.16 Use the Datasheet Formatting dialog box to customize the look of the datasheet.
Use the Border and Line Styles drop-down lists to change the look of the gridlines. You can change the styles for the Datasheet Border and the Column Header Underline. Choose a different line style for each of the selections in the first drop-down list. The different line styles you can select from include:
- Transparent Border
- Solid
- Dashes
- Short Dashes
- Dots
- Sparse Dots
- Dash-Dot
- Dash-Dot-Dot
- Double Solid
Figure 5.17 shows a datasheet with dashes instead of solid lines and a higher contrast between alternating rows. You can use the various colors and styles to customize the datasheet's look to your liking.

Figure 5.17 Different line styles and row colors for the datasheet.
Aligning data in columns
Align the data to the left or right, or center it within a column using the alignment buttons. Choose alignments different from the default alignments Access chooses based on a field's data type (text aligns left, numbers/dates align right). Follow these steps to change the alignment of the data in a column:
- Position the cursor anywhere within the column that you want to change the alignment.
- Click the Align Left, Align Center, or Align Right commands in the Text Formatting group of the Ribbon (refer to Figure 5.15) to change the alignment of the column's data.
Hiding and unhiding columns
Hide columns by dragging the column gridline to the preceding field or by setting the column width to 0:
- Position the cursor anywhere within the column that you want to hide.
- Choose More Hide Fields in the Records group of the Ribbon. The column disappears because the column width is simply set to 0. You can hide multiple columns by first selecting them and then choosing More Hide Fields.
After you've hidden a column, you can redisplay it by choosing More ![]() Unhide Fields in the Records group of the Ribbon. A dialog box appears, letting you selectively unhide columns by checking next to each field (see Figure 5.18). Click Close to return to the datasheet showing the desired columns. You can also use this dialog box to hide one or more columns by unchecking the check box next to each field you want to hide.
Unhide Fields in the Records group of the Ribbon. A dialog box appears, letting you selectively unhide columns by checking next to each field (see Figure 5.18). Click Close to return to the datasheet showing the desired columns. You can also use this dialog box to hide one or more columns by unchecking the check box next to each field you want to hide.

Figure 5.18 Hide and unhide columns using the Unhide Columns dialog box.
Freezing columns
When you want to scroll left and right among many columns but want to keep certain columns from scrolling out of view, choose More ![]() Freeze Fields in the Records group of the Ribbon. With this command, for example, you can keep the ProductID and Description fields visible while you scroll through the datasheet to find the product's features. The frozen columns are visible on the far-left side of the datasheet while other fields scroll horizontally out of sight. The fields must be contiguous if you want to freeze more than one at a time. (Of course, you can first move your fields to place them next to each other.) When you're ready to unfreeze the datasheet columns, simply choose More
Freeze Fields in the Records group of the Ribbon. With this command, for example, you can keep the ProductID and Description fields visible while you scroll through the datasheet to find the product's features. The frozen columns are visible on the far-left side of the datasheet while other fields scroll horizontally out of sight. The fields must be contiguous if you want to freeze more than one at a time. (Of course, you can first move your fields to place them next to each other.) When you're ready to unfreeze the datasheet columns, simply choose More ![]() Unfreeze All Fields.
Unfreeze All Fields.
Saving the changed layout
When you close the datasheet, you save all your data changes but you might lose all your layout changes. As you make all these display changes to your datasheet, you probably won't want to make them again the next time you open the same datasheet. If you make any layout changes, Access prompts you to save the changes to the layout when you close the datasheet. Choose Yes to save the changes. You can also save the layout changes manually by clicking Save on the Quick Access toolbar.
Saving a record
Access saves each record when you move off it. Pressing Shift+Enter or selecting Save from the Records group of the Ribbon saves a record without moving off it. Closing the datasheet also saves a record.
Sorting and Filtering Records in a Datasheet
The Sort & Filter group of the Ribbon (shown in Figure 5.19) lets you rearrange the order of the rows and reduce the number of rows. Using the commands in this group, you'll display the records you want in the order you want to see them. The following sections demonstrate how to use these commands.

Figure 5.19 The Sort & Filter group lets you change the record order and reduce the number of visible rows.
Sorting your records with QuickSort
Sometimes you might simply want to sort your records in a desired order. The QuickSort Ribbon commands let you sort selected columns into either ascending or descending order. To use these commands, click in a field you want to sort by, and then click Ascending or Descending. The data redisplays instantly in the sorted order. Right-clicking on a column and selecting either of the Sort buttons also sorts the data. The captions on the right-click menu change depending on the data type of the field. Short Text fields display Sort A to Z and Sort Z to A, while numeric fields display Sort Smallest to Largest and Sort Largest to Smallest. Some fields, such as OLE and Long Text fields, can't be sorted.
To sort your data on the basis of values in multiple fields, highlight more than one column: Highlight a column (see the “Changing the field order” section earlier in this chapter) and before you release the mouse button, drag the cursor to the right or left. When you select one of the QuickSort commands, Access sorts the records into major order (by the first highlighted field) and then into orders within orders (based on subsequent fields). If you need to select multiple columns that aren't contiguous (next to each other), you can move them next to each other (see the “Changing the field order” section earlier in this chapter).
Filtering a selection
Filter by Selection lets you select records on the basis of the current field value. For example, using tblProducts, place your cursor in a row containing Trucks in the Category column, press the Selection command in the Sort & Filter group of the Ribbon, and choose Equals “Trucks.” Access filters the datasheet to show only those records where the Category is trucks.
Access gives you four choices when you click the Selection command:
- Equals “Trucks”
- Does Not Equal “Trucks”
- Contains “Trucks”
- Does Not Contain “Trucks”
The area to the right of the Navigation buttons—at the bottom of the Datasheet window—tells you whether the datasheet is currently filtered; in addition, the Toggle Filter command on the Ribbon is highlighted, indicating that a filter is in use. When you click this command, it removes the filter. The filter specification doesn't go away; it's simply turned off. Click the Toggle Filter command again to apply the same filter.
Filtering by selection is additive. You can continue to select values, each time pressing the Selection command.
If you want to further specify a selection and then see everything that doesn't match that selection (for example, where the Make field isn't Chevrolet), move the cursor to the field (the Make field where the value is Chevrolet), right-click the datasheet, and then select Does Not Equal “Chevrolet” from the filter options that appear in the right-click shortcut menu.
When using the Selection command on numeric or date fields, select Between from the available command to enter a range of values. Enter the smallest and largest numbers or oldest and newest dates to limit the records to values that fall in the desired range.
Imagine using this technique to review sales by salespeople for specific time periods or products. Filtering by selection provides incredible opportunities to drill down into successive layers of data. Even when you click the Toggle Filter command to redisplay all the records, Access still stores the query specification in memory. Figure 5.20 shows the filtered datasheet, with the Filter by Select list still open on the Category field.

Figure 5.20 Using Filter by Selection. In this case, you see all trucks that are not Mack models.
When a datasheet is filtered, each column has an indicator in the column heading letting you know if a filter is applied to that column. Hover the mouse over the indicator to see a tooltip displaying the filter. Click the indicator to specify additional criteria for the column using the pop-up menu shown in Figure 5.21. Click the column heading's down-arrow for an unfiltered column to display a similar menu.

Figure 5.21 Filtering the Make field. Use the column filter menu to select criteria for a field.
The menu contains commands to sort the column ascending or descending, clear the filter from the field, select a specific filter, and check values you want to see in the datasheet. The available commands change based on the data type of the column. In this case, Text Filter lets you enter a criterion that filters the data based on data you type in.
The check boxes in this menu contain data that appear in the column. In this case, the choices are: (Select All), (Blanks), and one entry for each Make in the table. The Mack entry is unchecked in this example. Click (Select All) to see all the records regardless of this field's value. Click (Blanks) to see the records that don't contain data. Select any of the data values to limit the records where the field contains the selected values. Place a check next to each Make you'd like to see and remove the check for each Make you want to exclude.
If you want to filter data but you can't find the value that you want to use and you know the value, click the Text Filters (or Number Filters, Date Filters, and so on) command and choose one of the available commands (Equals, Does Not Equal, Begins With, and so on) to display a dialog box where you type in the desired value.
Filtering by form
Filter by Form lets you enter criteria into a single row on the datasheet. Clicking the Filter by Form button transforms the datasheet into a single row containing a drop-down list in every column. The drop-down list contains all the unique values for the column. An Or tab at the bottom of the window lets you specify OR conditions for each group. Choose Advanced ![]() Filter by Form in the Sort & Filter group of the Ribbon to enter Filter by Form mode, shown in Figure 5.22.
Filter by Form in the Sort & Filter group of the Ribbon to enter Filter by Form mode, shown in Figure 5.22.
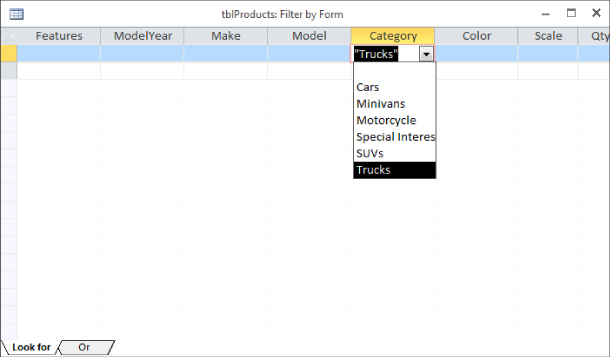
Figure 5.22 Using Filter by Form lets you set multiple conditions for filtering at one time. Notice the Or tab at the bottom of the window.
Select values from the combo boxes or type values you want to search for in the field. If you want to see records where the Category is Trucks or SUVs, select Trucks from the Category drop-down list, select the Or tab at the bottom of the window, and then select SUVs from the Category drop-down list. To see records where Category is SUV and QtyInStock is 1, select SUV from the Category drop-down and type 1 in QtyInStock. Once you enter the desired criteria, click the Toggle Filter command to apply the filter. (The Toggle Filter button is shown in Figure 5.19.)
Enter as many conditions as you need using the Or tab. If you need even more advanced manipulation of your selections, you can choose Advanced ![]() Advanced Filter/Sort from the Sort & Filter group of the Ribbon to get an actual Query by Example (QBE) screen that you can use to enter more-complex criteria.
Advanced Filter/Sort from the Sort & Filter group of the Ribbon to get an actual Query by Example (QBE) screen that you can use to enter more-complex criteria.
Aggregating Data
Historically, Access datasheets have always borne a close resemblance to Excel worksheets. Not only do worksheets and datasheets look alike, but in many ways they work alike as well. As you've seen in this chapter, Access datasheets support sorting, searching, freezing columns, and other features mirrored in Excel worksheets. But, until recently, Access datasheets and Excel worksheets had little else in common.
Unlike Excel worksheets, Access datasheets haven't supported row and column summation and other types of data aggregation. Beginning with Access 2007, Access datasheets support a Totals row at the bottom of datasheets. The Totals row is opened by clicking the Totals button in the Records group on the Home tab of the Ribbon (the Totals button is marked with a Greek sigma character, much like the AutoSum button in Excel). Each column in the totals row can be set to a different aggregate calculation (Sum, Average, Minimum, Maximum, Count, Standard Deviation, or Variance).
To use the Totals row, open a table or form in Datasheet view and click the Totals button in the Records group (see Figure 5.23) on the Home tab of the Ribbon. Access adds a Totals row at the bottom of the datasheet, just below the New row.

Figure 5.23 The datasheet Totals row.
Clicking a column in the Totals row transforms the datasheet cell to a drop-down list. The items in the drop-down list are specific to the column's data type. For example, in text columns, the drop-down list shows only None and Count, while a numeric column contains a full complement of totals calculations (Sum, Average, Count, and so on). DateTime columns include None, Average, Count, Minimum, and Maximum.
The Totals calculation you choose is dynamic. As you change data in the datasheet or underlying table, the calculation results displayed in the Totals row are automatically updated after a very short delay. Recalculating a lot of totals extracts a small performance penalty, so you might want to hide the Totals row when its special features aren't needed.
The Totals options you choose for the columns in a datasheet persist. If you close the datasheet and re-open it, the Totals row is still there.
To remove the Totals row, open the datasheet and click the Totals button in the Records group on the Ribbon. Here's one interesting behavior of the Totals row: If you choose to remove it, you can restore it later (by clicking the Totals button again). The row is restored to its original setting.
Printing Records
You can print all the records in your datasheet in a simple row-and-column layout. In Chapter 20, you learn to produce formatted reports. For now, the simplest way to print is to click File ![]() Print, and choose one of the Print options as shown in Figure 5.24.
Print, and choose one of the Print options as shown in Figure 5.24.
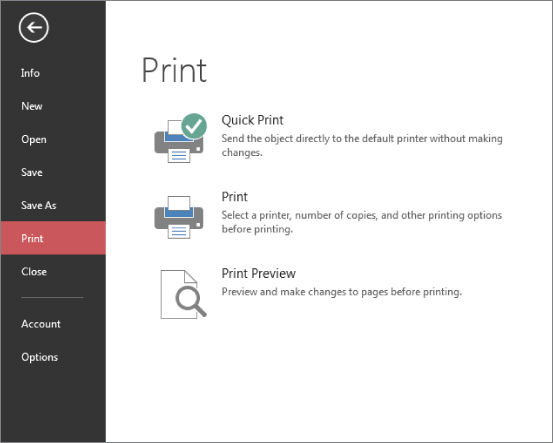
Figure 5.24 The Microsoft Office Print menu.
If you choose Print, and not Quick Print or Print Preview, Access shows the Print dialog box. From the Print dialog box, customize your printout by selecting from several options:
- Print Range: Prints the entire datasheet or only selected pages or records
- Copies: Determines the number of copies to be printed
- Collate: Determines whether multiple copies are collated
You can also change the printer, click the Properties button, and set options for the selected printer. The Setup button allows you to set margins and print headings.
The printout reflects all layout options that are in effect when the datasheet is printed. Hidden columns don't print. Gridlines print only if the cell gridline properties are on. The printout also reflects the specified row height and column width.
Only so many columns and rows can fit on a page; the printout takes up as many pages as required to print all the data. Access breaks up the printout as necessary to fit on each page. For example, the tblProducts printout might be nine pages—three pages across are needed to print all the fields in tblProducts, and all the records require three pages in length. The records of tblContacts might need four pages in length. The number of pages depends on your layout and your printer.
Previewing Records
Although you may have all the information in the datasheet ready to print, you may be unsure of whether to change the width or height of the columns or rows, or whether to adjust the fonts to improve your printed output. To preview your print job, click the Print Preview command under the Print menu to display the Print Preview window. The default view is the first page in single-page preview. Use the Ribbon commands to select different views and zoom in and out. Click Print to print the datasheet to the printer. Click the Close Print Preview command on the right side of the Ribbon to return to Datasheet view.