
Chapter 17
Creating Basic Access Forms
IN THIS CHAPTER
- Creating different types of forms
- Adding controls to a form
- Working with the Property Sheet
Forms provide the most flexible way for viewing, adding, editing, and deleting your data. They're also used for switchboards (forms with buttons that provide navigation), for dialog boxes that control the flow of the system, and for messages. Controls are the objects on forms, such as labels, text boxes, buttons, and many others. In this chapter, you learn how to create different types of forms. We also fill you in on the types of controls that are used on a form. This chapter also discusses form and control properties and how you determine the appearance and behavior of an Access interface through setting or changing property values.
The forms you add to an Access database are a critical aspect of the application you create. In most situations, users should not be permitted direct access to tables or query datasheets. It's far too easy for a user to delete valuable information or incorrectly input data into the table. Forms provide a useful tool for managing the integrity of a database's data. Because forms can contain VBA code or macros, a form can verify data entry or confirm deletions before they occur. Also, a properly designed form can reduce training requirements by helping the user understand what kind of data is required by displaying a message as the user tabs into a control. A form can provide default values or perform calculations based on data input by the user or retrieved from a database table.
Formulating Forms
Use the Forms group on the Create tab of the Ribbon to add forms to your database. The commands in the Forms group, shown in Figure 17.1, let you create the following different types of forms and ways to work with Access forms:
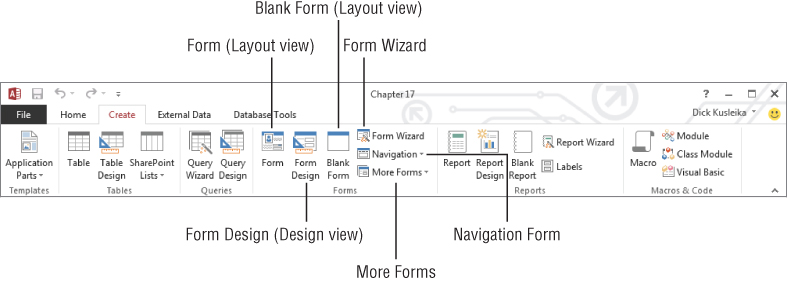
Figure 17.1 Use the Forms group on the Create tab of the Ribbon to add new forms to your database.
- Form: Creates a new form that lets you enter information for one record at a time. You must have a table, query, form, or report open or selected to use this command. When you click the Form button with a table or query highlighted in the Navigation pane, Access binds the new form to the data source and opens the form in Layout view.
- Form Design: Creates a new blank form and displays it in Design view. The form isn't bound to any data source. You must specify a data source (table or query) and build the form by adding controls from the data source's field list.
- Blank Form: Instantly creates a blank form with no controls. Like Form Design, the new form is not bound to a data source, but it opens in Layout view.
- Form Wizard: Access features a simple wizard to help you get started building forms. The wizard asks for the data source, provides a screen for selecting fields to include on the form, and lets you choose from a number of very basic layouts for the new form.
- Navigation Form: The Access navigation form is a specialized form intended to provide user navigation through an application. Navigation forms are discussed in detail later in this chapter.
- More Forms: The More Forms button in the Forms group drops down a gallery containing a number of other form types.
- Multiple Items: This is a simple tabular form that shows multiple records bound to the selected data source.
- Datasheet: Creates a form that is displayed as a datasheet.
- Split Form: Creates a split form, which shows a datasheet in the upper, lower, left, or right area of the form, and a traditional form in the opposite section for entering information on the record selected in the datasheet.
- Modal Dialog: Provides a template for a modal dialog form. A modal dialog form (often called a dialog box) stays on the screen until the user provides information requested by the dialog or is dismissed by the user.
If any of the terminology in the preceding bullets is new to you, don't worry—each of these terms is discussed in detail in this chapter. Keep in mind that the Access Ribbon and its contents are very context dependent, so every item may not be available when you select the Create tab.
Creating a new form
Like many other aspects of Access development, Access provides multiple ways of adding new forms to your application. The easiest is to select a data source, such as a table, and click the Form command on the Create tab of the Ribbon. Another is to use the Form Wizard and allow the wizard to guide you through the process of specifying a data source and other details of the new form.
Using the Form command
Use the Form command in the Forms group of the Ribbon to automatically create a new form based on a table or query selected in the Navigation pane.
To create a form based on tblProducts, follow these steps:
- Select tblProducts in the Navigation pane.
- Select the Create tab of the Ribbon.
- Click the Form command in the Forms group. Access creates a new form containing all the fields from tblProducts displayed in Layout view, shown in Figure 17.2. Layout view lets you see the form's data while changing the layout of controls on the form. (The form shown in Figure 17.2 is included in the
Chapter17.accdbexample database as frmProducts_AutoForm.)
Figure 17.2 Use the Form command to quickly create a new form with all the fields from a table or query.
The new form is opened in Layout view, which is populated with controls, each of which is bound to a field in the underlying data source. Layout view gives you a good idea how the controls appear relative to one another, but it provides only limited ability to resize controls or move controls on the form. Right-click the form's title bar and select Design View to rearrange controls on the form.
The Form Design button in the Forms group also creates a new form, except that the form is not automatically bound to a table or query, no controls are added to the form's design surface, and the form is opened in Design view. Form Design is most useful when you're creating a new form that might not use all the fields in the underlying data source, and you want more control over control placement from the start.
Similarly, the Blank Form option opens a new empty form, but this time in Layout view. You add controls to the form's surface from the field list, but you have little control over control placement. The Blank Form option is most useful for quickly building a form with bound controls with little need for precise placement. A new blank form can be produced in less than a minute.
Using the Form Wizard
Use the Form Wizard command in the Forms group to create a form using a wizard. The Form Wizard visually walks you through a series of questions about the form that you want to create and then creates it for you automatically. The Form Wizard lets you select which fields you want on the form, the form layout (Columnar, Tabular, Datasheet, Justified), and the form title.
To start the Form Wizard based on tblCustomers, follow these steps:
- Select tblCustomers in the Navigation pane.
- Select the Create tab of the Ribbon.
- Click the Form Wizard button in the Forms group. Access starts the Form Wizard, shown in Figure 17.3.

Figure 17.3 Use the Form Wizard to create a form with the fields you choose.
The wizard is initially populated with fields from tblCustomers, but you can choose another table or query with the Tables/Queries drop-down list above the field selection area. Use the buttons in the middle of the form to add and remove fields to the Available Fields and Selected Fields list boxes.
The series of buttons at the bottom of the form let you navigate through the other steps of the wizard. The types of buttons available here are common to most wizard dialog boxes:
- Cancel: Cancel the wizard without creating a form.
- Back: Return to the preceding step of the wizard.
- Next: Go to the next step of the wizard.
- Finish: End the wizard using the current selections and the default selections for any steps you don't complete.
Clicking Next opens the second wizard dialog box (shown in Figure 17.4) where you specify the overall layout and appearance of the new form.
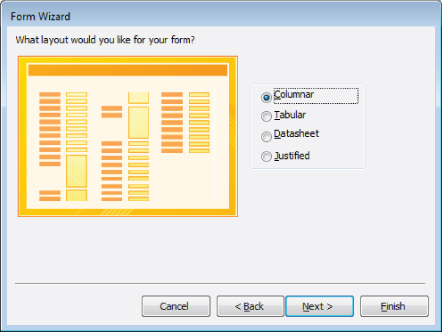
Figure 17.4 Select the overall layout for the new form.
The Columnar layout is the default layout, but you can also choose the Tabular, Datasheet, or Justified options. Clicking Next takes you to the last wizard dialog box (shown in Figure 17.5), where you provide a name for the new form.

Figure 17.5 Saving the new form.
Looking at special types of forms
When working with Access, the word form can mean any of several different things, depending on context. This section discusses several different ways that “forms” are used in Access and presents an example of each usage.
Navigation forms
Navigation forms include a number of tabs that provide instant access to other forms in a form/subform arrangement. Subforms are forms that are displayed inside another form and are discussed later in this chapter. The Navigation button on the Ribbon offers a number of button placement options (shown in Figure 17.6). Horizontal Tabs is the default.
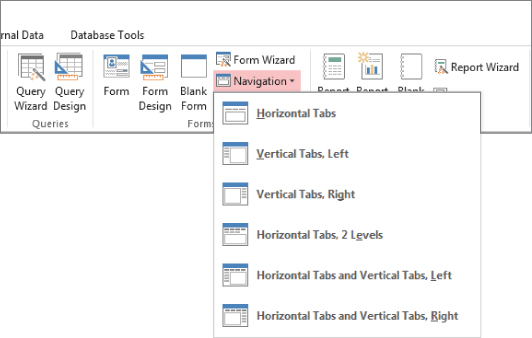
Figure 17.6 The Navigation button provides a number of tab placement options.
Selecting the Horizontal Tabs placement in the Navigation drop-down list opens the new navigation form in Design view (see Figure 17.7). The new form includes a row of tabs along the top and a large area under the tabs for embedding subforms. You type the tab's label (like Products) directly into the tab, or add it through the tab's Caption property. As you complete the tab's label, Access adds a new, blank tab to the right of the current tab.

Figure 17.7 The navigation form features a large area for embedding subforms.
In Figure 17.7, the Horizontal Tabs option was selected when choosing a navigation form template and a tab was named Products, which generates a new Add New tab. The alternatives to Horizontal Tabs (Vertical Tabs, Left, Vertical Tabs, Right, and so on) are shown in Figure 17.6.
The Product tab's Property Sheet (shown in Figure 17.8) includes the Navigation Target Name property for specifying the Access form to use as the tab's subform. Select a form from the drop-down list in the Navigation Target Name property, and Access creates the association to the subform for you.
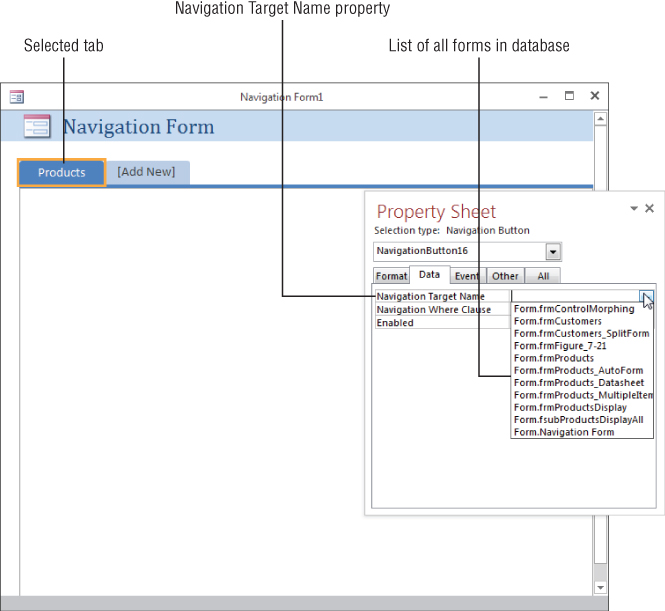
Figure 17.8 Use the Navigation Target Name property to specify the tab's subform.
The completed navigation form is shown in Figure 17.9. The auto-generated navigation form makes extravagant use of screen space. There are a number of things that could be done to enhance this form, such as removing the navigation form's header section and reducing the empty space surrounding the subform. frmProducts, shown in Figure 17.9, is included in the Chapter17.accdb example database.
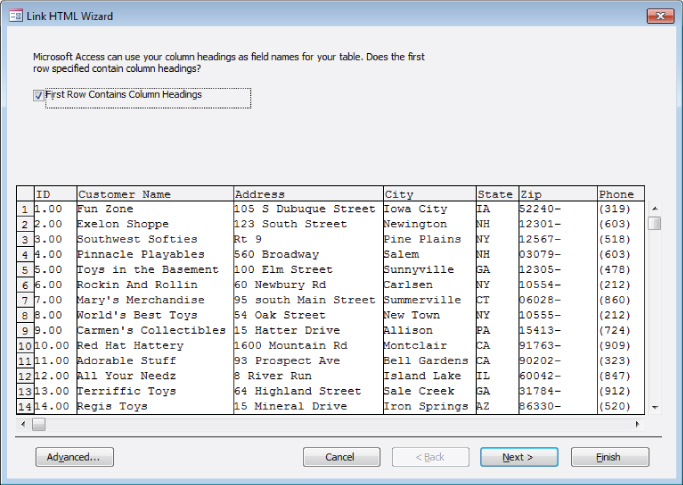
Figure 17.9 A navigation form is a quick and easy way to provide basic navigation features.
Multiple-items forms
Click the More Forms button in the Forms group of the Ribbon and then click the Multiple Items button to create a tabular form based on a table or query selected in the Navigation pane. A tabular form is much like a datasheet, but it's much more attractive than a plain datasheet.
Because the tabular form is an Access form, you can convert the default text box controls on the form to combo boxes, list boxes, and other advanced controls. Tabular forms display multiple records at one time, which makes them very useful when you're reviewing or updating multiple records. To create a multiple-items form based on tblProducts, follow these steps:
- Select tblProducts in the Navigation pane.
- Select the Create tab on the Ribbon.
- Click the More Forms button and click Multiple Items. Access creates a new multiple-items form based on tblProducts displayed in Layout view (as shown in Figure 17.10).

Figure 17.10 Create a multiple-items form when you want to see more than one record at a time.
Split forms
Click the More Forms button in the Form group of the Ribbon and then click the Split Form button to create a split form based on a table or query selected in the Navigation pane. The split-form feature gives you two views of the data at the same time, letting you select a record from a datasheet in the lower section and edit the information in a form in the upper section.
To create a split form based on tblCustomers, follow these steps:
- Select tblCustomers in the Navigation pane.
- Select the Create tab of the Ribbon.
- Click the More Forms button and click Split Form. Access creates a new split form based on tblCustomers displayed in Layout view (shown in Figure 17.11). Resize the form and use the splitter bar in the middle to make the lower section completely visible.
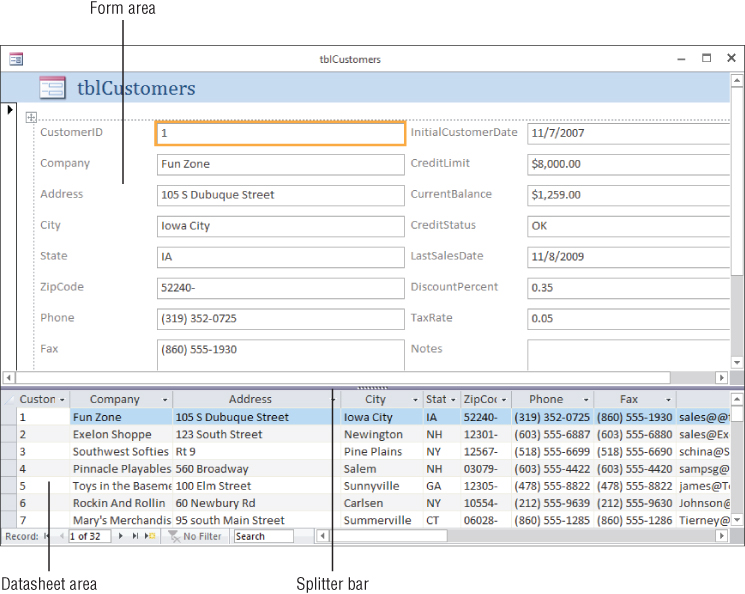
Figure 17.11 Create a split form when you want to select records from a list and edit them in a form. Use the splitter bar to resize the upper and lower sections of the form.
The Split Form Orientation property (on the Format tab of the form's Property Sheet) determines whether the datasheet is on the top, bottom, left, or right of the form area. The default is as shown in Figure 17.11, with the datasheet area on the bottom. frmCustomers_SplitForm (shown in Figure 17.11) is included in the Chapter17.accdb example database.
Datasheet forms
Click the More Forms button in the Forms group of the Ribbon and then click the Datasheet button to create a form that looks like a table or query's datasheet. A datasheet form is useful when you want to see the data in a row and column format, but you want to limit which fields are displayed and editable.
To create a datasheet form based on tblProducts, follow these steps:
- Select tblProducts in the Navigation pane.
- Select the Create tab of the Ribbon.
- Click the More Forms button in the Forms group and then click Datasheet. You can view any form you create as a datasheet by selecting Datasheet View from the View drop-down menu on the Ribbon. A datasheet form appears in Datasheet View by default when you open it.
Resizing the form area
In Design view, the area with gridlines is where you add controls to your form. This is the size of the form when it's displayed. Resize the grid area of the form by placing the cursor on any of the area borders and dragging the border of the area to make it larger or smaller. Figure 17.12 shows a blank form in Design view being resized.

Figure 17.12 Design view of a blank form. Resize the form area by dragging the bottom-right corner.
Saving your form
You can save the form at any time by clicking the Save button in the Quick Access toolbar. When you're asked for a name for the form, give it a meaningful name (for example, frmProducts, frmCustomers, or frmProductList.) Once you've given the form a name, you won't be prompted the next time you click Save.
When you close a form after making changes, Access asks you to save it. If you don't save a form, all changes since you opened the form (or since you last clicked Save) are lost. You should frequently save the form while you work if you're satisfied with the results.
Working with Controls
Controls and properties form the basis of forms and reports. It's critical to understand the fundamental concepts of controls and properties before you begin to apply them to custom forms and reports.
The term control has many definitions in Access. Generally, a control is any object on a form or report, such as a label or text box. These are the same sort of controls used in any Windows application, such as Access, Excel, web-based HTML forms, or those that are used in any language, such as .NET, Visual Basic, C++, or C#. Although each language or product has different file formats and different properties, a text box in Access is similar to a text box in any other Windows product.
You enter data into controls and display data using controls. A control can be bound to a field in a table (when the value is entered in the control, it's also saved in some underlying table field), or data can be unbound and displayed in the form but not saved when the form is closed. A control can also be an object that doesn't hold data, such as a line or rectangle.
Some controls that aren't built into Access are developed separately—these are ActiveX controls. ActiveX controls extend the basic feature set of Access and are available from a variety of vendors.
Whether you're working with forms or reports, essentially the same process is followed to create and use controls. In this chapter, I explain controls from the perspective of a form.
Categorizing controls
Forms and reports contain many different types of controls. You can add these controls to forms using the Controls group on the Design tab, shown in Figure 17.13. Hovering the mouse over the control displays a tooltip telling you what the control is.

Figure 17.13 The Design tab lets you add and customize controls in a form's Design view.
Table 17.1 briefly describes the basic Access controls.
Table 17.1 Controls in Access Forms
| Control | What It Does |
| Text box | Displays and allows users to edit data. |
| Label | Displays static text that typically doesn't change. |
| Button | Also called a command button. Runs macros or VBA code when clicked. |
| Tab control | Displays multiple pages in a file folder type of interface. |
| Hyperlink | Creates a link to a web page, a picture, an e-mail address, or a program. |
| Option group | Holds multiple option buttons, check boxes, or toggle buttons. |
| Page break | Usually used for reports and indicates a physical page break. |
| Combo box | A drop-down list of values. Combo boxes include a text box at the top for inputting values that are not included in the drop-down list. |
| Chart | Displays data in a graphical format. |
| Line | A graphical line of variable thickness and color, which is used for separation. |
| Toggle button | This is a two-state button—up or down—which usually uses pictures or icons instead of text to display different states. |
| Rectangle | A rectangle can be any color or size or can be filled in or blank; the rectangle is used to group related controls visually. |
| List box | A list of values that is always displayed on the form or report. |
| Check box | A two-state control, shown as a square that contains a check mark if it's on and an empty square if it's off. Before a check box's value is set, it appears as a grayed-out square. |
| Unbound object frame | Holds an OLE object or embedded picture that isn't tied to a table field and can include graphs, pictures, sound files, and video. |
| Attachment | Manages attachments for the Attachment data type. Attachment fields (see Chapter 3) provide a way to attach external files (such as music or video clips or Word documents) to Access tables. |
| Option button | Also called a radio button, this button is displayed as a circle with a dot when the option is on. |
| Subform/subreport | Displays another form or report within the main form or report. |
| Bound object frame | Holds an OLE object or embedded picture that is tied to a table field. |
| Image | Displays a bitmap picture with very little overhead. |
The Use Control Wizards button, revealed by expanding the Controls group by clicking on the More button in the lower-right corner of the group, doesn't add a control to a form. Instead, the Use Control Wizards button determines whether a wizard is automatically activated when you add certain controls. The option group, combo box, list box, subform/subreport, bound and unbound object frame, and command button controls all have wizards to help you when you add a new control. You can also use the ActiveX Controls button (also found at the bottom of the expanded Controls group) to display a list of ActiveX controls, which you can add to Access.
There are three basic categories of controls:
- Bound controls: These are controls that are bound to a field in the data source underlying the form. When you enter a value in a bound control, Access automatically updates the field in the current record. Most of the controls used for data entry can be bound. Controls can be bound to most data types, including Text, Date/Time, Number, Yes/No, OLE Object, and Long Text fields.
- Unbound controls: Unbound controls retain the entered value, but they don't update any table fields. You can use these controls for text label display, for controls such as lines and rectangles, or for holding unbound OLE objects (such as bitmap pictures or your logo) that are stored not in a table but on the form itself. Very often, VBA code is used to work with data in unbound controls and directly update Access data sources.
- Calculated controls: Calculated controls are based on expressions, such as functions or calculations. Calculated controls are unbound because they don't directly update table fields. An example of a calculated control is
=[SalePrice] - [Cost]. This control calculates the total of two table fields for display on a form but is not bound to any table field. The value of an unbound calculated control may be referenced by other controls on the form, or used in an expression in another control on the form or in VBA in the form's module.
Adding a control
You add a control to a form in a number ways:
- By clicking a button in the Controls group on the Design tab of the Ribbon and drawing a new unbound control on the form: Use the control's ControlSource property to bind the new control to a field in the form's data source.
- By dragging a field from the field list to add a bound control to the form: Access automatically chooses a control appropriate for the field's data type and binds the control to the selected field.
- By double-clicking a field in the field list to add a bound control to the form: Double-clicking works just like dragging a field from the field list to the form. The only difference is that, when you add a control by double-clicking a field, Access decides where to add the new control to the form. Usually the new control is added to the right of the most recently added control, and sometimes below it.
- By right-clicking a field in the field list and choosing Add Field to View: Right-clicking places a bound control in the same location as if it were double-clicked.
- By copying an existing control and pasting it to another location on the form: Copying a control can be done in all the familiar ways: Click Copy on the Home tab of the Ribbon, right-click the control and choose Copy, or press Ctrl+C. Pasted controls are bound to the same field as the control that was copied.
Using the Controls group
When you use the buttons in the Controls group to add a control, you decide which type of control to use for each field. The control you add is unbound (not attached to the data in a table field) and has a default name such as Text21 or Combo11. After you create the control, you decide what table field to bind the control to, enter text for the label, and set any properties. You'll learn more about setting properties later in this chapter.
You can add one control at a time using the Controls group. To create three different unbound controls, perform these steps:
- With the form created earlier open in Design view, click the Text Box button in the Controls group.
- Move the mouse pointer to the Form Design window, and click and drag the new control onto the form's surface in its initial size and position. Notice that a label control is added when you add a text box.
- Click the Option button in the Controls group, and click and drag the new Option button onto the form's surface in its initial size and position.
- Click the Check Box button in the Controls group and add it to the form, as you added the other controls. When you're done, your screen should resemble Figure 17.14.

Figure 17.14 Unbound controls added from the Controls group.
Using the field list
The field list displays a list of fields from the table or query the form is based on. Open the field list by clicking the Add Existing Fields button in the Tools group on the Design tab of the Ribbon (refer to Figure 17.13).
If you created a form using a method that automatically binds the form to a table or query, the field list for that table or query will be displayed. For this example, we created a form using the Blank Form button, which does not automatically bind the form to a datasource. In this case, the field list only shows a Show All Tables link. Click the Show All Tables link to get a list of tables. Then click the plus sign next to tblProducts to show the fields in that table.
Drag Model from the field list and drop it onto the form to create a control bound to the Model field in tblProducts . You can select and drag fields one at a time or select multiple fields by using the Ctrl key or Shift key:
- To select multiple contiguous fields, hold down the Shift key and click the first and last fields that you want.
- To select multiple noncontiguous fields, hold down the Ctrl key and click each field that you want.
By default, the Field List appears docked on the right of the Access window. The Field List window is movable and resizable and displays a vertical scroll bar if it contains more fields than can fit in the window. Figure 17.15 shows the Field List undocked and moved on top of the form.
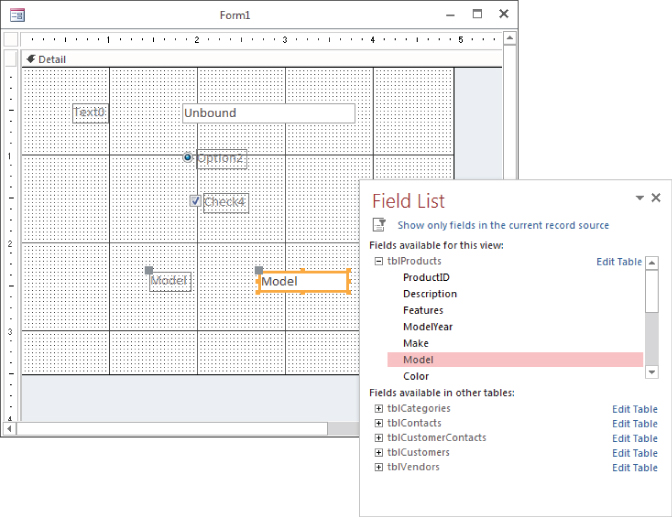
Figure 17.15 Click Add Existing Fields in the Tools group to show the Field List.
Most often, dragging a field from the Field List adds a bound text box to the Design window. If you drag a Yes/No field from the Field List window, Access adds a check box. Optionally, you can select the type of control by selecting a control from the Controls group and dragging the field to the Design window.
You gain several distinct advantages by dragging a field from the Field List window:
- The control is automatically bound to the field.
- Field properties inherit table-level formats, status bar text, and data validation rules and messages.
- The label control and label text are created with the field name as the caption.
- The label control is attached to the field control, so they move together.
Select and drag the Description, Category, RetailPrice, and Cost fields from the Field List window to the form, as shown in Figure 17.16. Double-clicking a field also adds it to the form.

Figure 17.16 Drag fields from the Field List to add bound controls to the form.
You can see four new pairs of controls in the form's Design view—each pair consists of a label control and a text box control (Access attaches the label control to the text box automatically). You can work with these controls as a group or independently, and you can select, move, resize, or delete them. Notice that each control has a label with a caption matching the field name, and the text box control displays the bound field name used in the text box. If you want to resize just the control and not the label, you must work with the two controls (label and associated text box) separately. You'll learn about working with labels attached to controls later in this chapter.
Close the Field List by clicking the Add Existing Fields command in the Tools group of the Ribbon or by clicking the Close button on the Field List.
In the “Introducing Properties” section, later in this chapter, you learn how to change the control names, captions, and other properties. Using properties speeds the process of naming controls and binding them to specific fields. If you want to see the differences between bound and unbound controls, switch to Form view using the View command in the View group of the Ribbon. The Description, Category, RetailPrice, and Cost controls display data because they're bound to tblProducts. The other three controls don't display data because they aren't bound to any data source.
Selecting and deselecting controls
After you add a control to a form, you can resize it, move it, or copy it. The first step is to select one or more controls. Depending on its size, a selected control might show from four to eight handles (small squares called moving and sizing handles) around the control—at the corners and midway along the sides. The move handle in the upper-left corner is larger than the other handles and you use it to move the control. You use the other handles to size the control. Figure 17.17 displays some selected controls and their moving and sizing handles.

Figure 17.17 Selected controls and their moving and sizing handles.
The Select command (which looks like an arrow) in the Controls group must be chosen in order for you to select a control. If you use the Controls group to create a single control, Access automatically reselects the pointer as the default.
Selecting a single control
Select any individual control by clicking anywhere on the control. When you click a control, the sizing handles appear. If the control has an attached label, the move handle for the label also appears in the upper-left corner of the control. If you select a label control that is associated with another control, all the handles for the label control are displayed, and only the move handle appears in the associated control.
Selecting multiple controls
You select multiple controls in these ways:
- By clicking each control while holding down the Shift key
- By dragging the pointer through or around the controls that you want to select
- By clicking and dragging in the ruler to select a range of controls
Figure 17.17 shows the result of selecting the multiple bound controls graphically. When you select multiple controls by dragging the mouse, a rectangle appears as you drag the mouse. Be careful to drag the rectangle only through the controls you want to select. Any control you touch with the rectangle or enclose within it is selected. If you want to select labels only, make sure that the selection rectangle only touches the labels.
Deselecting controls
Deselect a control by clicking an unselected area of the form that doesn't contain a control. When you do so, the handles disappear from any selected control. Selecting another control also deselects a selected control.
Manipulating controls
Creating a form is a multistep process. Once you've added controls to your form, you need to move them to their desired position and properly size them. The Arrange tab of the Ribbon (shown in Figure 17.18) contains commands used to assist you in manipulating controls.

Figure 17.18 The Arrange tab lets you work with moving and sizing controls, as well as manipulate the overall layout of the form.
Resizing a control
You resize controls using any of the smaller handles in the upper, lower, and right edges of the control. The sizing handles in the control corners let you drag the control larger or smaller in both width and height—and at the same time. Use the handles in the middle of the control sides to size the control larger or smaller in one direction only. The top and bottom handles control the height of the control; the left and right handles change the control's width.
When the mouse pointer touches a corner sizing handle of a selected control, the pointer becomes a diagonal double arrow. You can then drag the sizing handle until the control is the desired size. If the mouse pointer touches a side handle in a selected control, the pointer changes to a horizontal or vertical double-headed arrow. Figure 17.19 shows the Description control after being resized. Notice the double-headed arrow in the corner of the Description control.

Figure 17.19 Resizing a control.
When you double-click on any of the sizing handles, Access resizes a control to best fit the text contained in the control. This feature is especially handy if you increase the font size and then notice that the text is cut off either at the bottom or to the right. For label controls, note that this best-fit sizing adjusts the size vertically and horizontally, though text controls are resized only vertically. This is because when Access is in Form Design mode, it can't predict how much of a field to display—the field name and field contents can be radically different. Sometimes, Access doesn't correctly resize the label and you must manually change its size.
Sizing controls automatically
The Size/Space drop-down on the Size and Ordering group of the Arrange tab of the Ribbon has several commands that help the arrangement of controls:
- To Fit: Adjusts control height for the font of the text they contain
- To Tallest: Makes selected controls the height of the tallest selected control
- To Shortest: Makes selected controls the height of the shortest selected control
- To Grid: Moves all sides of selected controls in or out to meet the nearest points on the grid
- To Widest: Makes selected controls the width of the widest selected control
- To Narrowest: Makes selected controls the height of the narrowest selected control
Moving a control
After you select a control, you can easily move it, using any of these methods:
- Click the control and hold down the mouse button; the cursor changes to a four-directional arrow. Drag the mouse to move the control to a new location.
- Click once to select the control and move the mouse over any of the highlighted edges; the cursor changes to a four-directional arrow. Drag the mouse to move the control to a new location.
- Select the control and use the arrow keys on the keyboard to move the control. Using this technique, a control changes by only 1 pixel at a time (or moves to the nearest grid line if Snap to Grid is selected in the Size/Space gallery on the Arrange tab of the Ribbon).
Figure 17.20 shows a label control that has been separately moved to the top of the text box control.

Figure 17.20 Moving a control.
Press Esc before you release the mouse button to cancel a moving or a resizing operation. After a move or resizing operation is complete, click the Undo button on the Quick Access toolbar to undo the changes, if needed.
Aligning controls
You might want to move several controls so that they're all aligned. The Sizing and Ordering group's Align gallery on the Arrange tab of the Ribbon contains the following alignment commands:
- To Grid: Aligns the top-left corners of the selected controls to the nearest grid point
- Left: Aligns the left edge of the selected controls with the leftmost selected control
- Right: Aligns the right edge of the selected controls with the rightmost selected control
- Top: Aligns the top edge of the selected controls with the topmost selected control
- Bottom: Aligns the bottom edge of the selected controls with the bottommost selected control
You can align any number of selected controls by selecting an align command. When you choose one of the align commands, Access uses the control that's the closest to the desired selection as the model for the alignment. For example, suppose that you have three controls and you want to left-align them. They're aligned on the basis of the control farthest to the left in the group of the three controls.
Figure 17.21 shows several sets of controls. The first set of controls is not aligned. The label controls in the middle set of controls have been left-aligned while the text box controls in the right-side set have been right-aligned.

Figure 17.21 An example of unaligned and aligned controls on the grid.
Each type of alignment must be done separately. In this example, you can left-align all the labels or right-align all the text boxes at once.
By default, Access displays a series of small dots across the entire surface of a form while it's in Design view. The grid can assist you in aligning controls. Hide or display the grid by selecting the Grid command from the Size/Space gallery under the Sizing & Ordering group on the Arrange tab of the Ribbon. You can also hide or display the ruler using the Ruler command in the same gallery.
Use the Snap to Grid command in the Size/Space gallery to align controls to the grid as you draw or place them on a form. This also aligns existing controls to the grid when you move or resize them.
As you move or resize existing controls, Access lets you move only from grid point to grid point. When Snap to Grid is off, Access ignores the grid and lets you place a control anywhere on the form or report.
The Sizing & Ordering group on the Arrange tab of the Ribbon contains commands to adjust spacing between controls. The spacing commands adjust the distance between controls on the basis of the space between the first two selected controls. If the controls are across the screen, use horizontal spacing; if they're down the screen, use vertical spacing. The spacing commands are:
- Equal Horizontal: Makes the horizontal space between selected controls equal. You must select three or more controls in order for this command to work.
- Increase Horizontal: Increases the horizontal space between selected controls by one grid unit.
- Decrease Horizontal: Decreases the horizontal space between selected controls by one grid unit.
- Equal Vertical: Makes the vertical space between selected controls equal. You must select three or more controls in order for this command to work properly.
- Increase Vertical: Increases the vertical space between selected controls by one grid unit.
- Decrease Vertical: Decreases the vertical space between selected controls by one grid unit.
Modifying the appearance of a control
To modify the appearance of a control, select the control and click commands that modify that control, such as the options in the Font or Controls group. Follow these steps to change the text color and font of the Description label:
- Click the Description label on the form.
- In the Font group on the Format tab of the Ribbon, change Font Size to 14, click the Bold button, and change Font Color to blue.
- Resize the Description label so the larger text fits. You can double-click any of the sizing handles to autosize the label.
To modify the appearance of multiple controls at once, select the controls and click commands to modify the controls, such as commands in the Font or Controls group. To change the text color and font of the Category, Retail Price, and Cost labels and text boxes, follow these steps:
- Select the three labels and three text boxes by dragging a selection box through them.
- In the Font group on the Format tab of the Ribbon, change the Font Size to 14, click the Bold button, and change Font Color to blue.
- Resize the labels and text boxes so the larger text fits. You can double-click any of the sizing handles to autosize the controls. As you click the commands, the controls' appearances change to reflect the new selections (shown in Figure 17.22). The fonts in each control increase in size, become bold, and turn blue. Any changes you make apply to all selected controls.
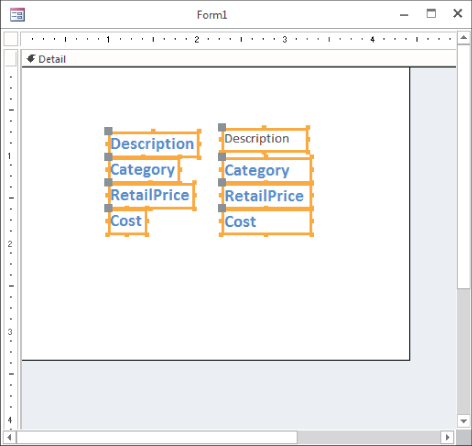
Figure 17.22 Changing the appearance of multiple controls at the same time.
When multiple controls are selected, you can also move the selected controls together. When the cursor changes to the four-directional arrow, click and drag to move the selected controls. You can also change the size of all the controls at once by resizing one of the controls in the selection. All the selected controls increase or decrease by the same number of units.
Grouping controls
If you routinely change properties of multiple controls, you might want to group them together. To group controls together, select the controls by holding down the Shift key and clicking them or dragging the selection box through them. After the desired controls are selected, select the Group command from the Size/Space gallery on the Arrange tab of the Ribbon. When one control in a group is selected, all controls in that group are automatically selected, as shown in Figure 17.23.
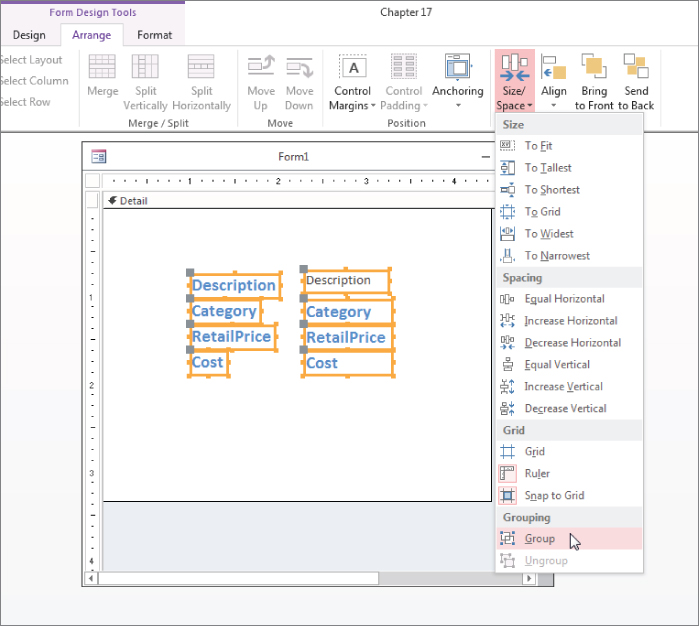
Figure 17.23 Grouping multiple controls together.
Double-click a control to select just one control in a group. After a single control in the group is selected, you can click any other control to select it. To reselect the entire group, click on an empty area of the form, and then click on any control in the group.
To resize the entire group, put your mouse on the side you want to resize. After the double arrow appears, click and drag until you reach the desired size. Every control in the group changes in size. To move the entire group, click and drag the group to its new location. With grouped controls, you don't have to select all the controls every time you change something about them.
To remove a group, select the group by clicking any field inside the group, and then select the Ungroup command from the Size/Space gallery of the Arrange tab of the Ribbon.
Changing a control's type
Although there are times you may want to use a check box to display a Boolean (yes/no) data type, there are other ways to display the value, such as a toggle button, as shown in Figure 17.24. A toggle button is raised if it's true and depressed (or at least very unhappy) if it's false.
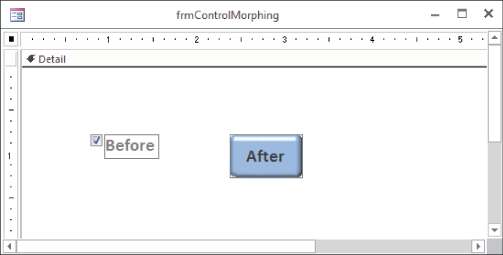
Figure 17.24 Turn a check box into a toggle button.
Use these steps to turn a check box into a toggle button:
- Select the Before label control (just the label control, not the check box).
- Press Delete to delete the label control because it isn't needed.
- Right-click the check box, and choose Change To
 Toggle Button from the pop-up menu.
 - Resize the toggle button and click inside it to get the blinking cursor; then type After on the button as its caption (shown on the right of Figure 17.24).
Copying a control
You can create copies of any control by copying it to the Clipboard and then pasting the copies where you want them. If you have a control for which you've entered many properties or specified a certain format, you can copy it and revise only the properties (such as the control's name and bound field name) to make it a different control. This capability is useful with a multiple-page form when you want to display the same values on different pages and in different locations, or when copying a control from one form to another.
Deleting a control
You can delete a control simply by selecting it in the form's Design view and pressing the Delete key on your keyboard. The control and any attached labels will disappear. You can bring them back by immediately selecting Undo from the Quick Access toolbar (or using the keyboard shortcut for Undo, Ctrl+Z). You can also select Cut from the Clipboard group on the Home tab of the Ribbon, or Delete from the Records group on the Home tab of the Ribbon.
You can delete more than one control at a time by selecting multiple controls and pressing Delete. You can delete an entire group of controls by selecting the group and pressing Delete. If you have a control with an attached label, you can delete only the label by clicking the label itself and then selecting one of the delete methods. If you select the control, both the control and the label are deleted.
To delete only the label of the Description control, follow the next set of steps (this example assumes that you have the Description text box control in your Form Design window):
- Select the Description label control only.
- Press Delete to remove the label from the form.
Reattaching a label to a control
Later in this chapter, in the “Naming control labels and their captions” section, you'll learn about the special relationship between a control and its label. By default, Access controls include a label when the control is added to a form; this label moves around with the control as you reposition the control on the form. The “Naming control labels and their captions” section describes these behaviors and how to work with control labels. If you accidentally delete a label from a control, you can reattach it. To create and then reattach a label to a control, follow these steps:
- Click the Label button on the Controls group.
- Place the mouse pointer in the Form Design window. The mouse pointer becomes a capital A.
- Click and hold down the mouse button where you want the control to begin; drag the mouse to size the control.
- Type Description and click outside the control.
- Select the Description label control.
- Select Cut from the Clipboard group on the Home tab of the Ribbon.
- Select the Description text box control.
- Select Paste from the Clipboard group on the Home tab of the Ribbon to attach the label control to the text-box control.
Another way to attach a label to a control is to click the informational icon next to the label, shown in Figure 17.25. This informational icon lets you know that this label is unassociated with a control. Select the Associate Label with a Control command from the menu, and then select the control you want to associate the label with.

Figure 17.25 Associating a label with a control.
Introducing Properties
Properties are named attributes of controls, fields, or database objects that are used to modify the characteristics of a control, field, or object. Examples of these attributes are the size, color, appearance, or name of an object. A property can also modify the behavior of a control, determining, for example, whether the control is read-only or editable and visible or not visible.
Properties are used extensively in forms and reports to change the characteristics of controls. Each control on the form has properties. The form itself also has properties, as does each of its sections. The same is true for reports; the report itself has properties, as does each report section and individual control. The label control also has its own properties, even if it's attached to another control.
Everything that you do with the Ribbon commands—from moving and resizing controls to changing fonts and colors—can be done by setting properties. In fact, all these commands do is change properties of the selected controls.
Displaying the Property Sheet
Properties are displayed in a Property Sheet (sometimes called a Property window). To display the Property Sheet for the Description text box, follow these steps:
- Drag Description, Category, RetailPrice, and Cost from the Field List to the form's Design view.
- Click the Description text box control to select it.
- Click the Property Sheet command in the Tools group on the Design tab of the Ribbon, or press F4 to display the Property Sheet. The screen should look like the one shown in Figure 17.26. In Figure 17.26, the Description text box control has been selected and the Format tab in the Property Sheet is being scrolled to find the margin properties associated with a text box.

Figure 17.26 Change an object's properties with the Property Sheet.
Because the Property Sheet is a window, it can be undocked, moved, and resized. It does not, however, have Maximize or Minimize buttons.
There are several ways to display a control's Property Sheet if it isn't visible:
- Select a control and click the Property Sheet command in the Tools group on the Design tab of the Ribbon.
- Double-click the edge of any control.
- Right-click any control and select Properties from the pop-up menu.
- Press F4 while any control is selected.
Getting acquainted with the Property Sheet
With the Property Sheet displayed, click any control in Design view to display the properties for that control. Select multiple controls to display similar properties for the selected controls. The vertical scroll bar lets you move among various properties.
The Property Sheet has an All tab that lets you see all the properties for a control. Or you can choose another tab to limit the view to a specific group of properties. The specific tabs and groups of properties are as follows:
- Format: These properties determine how a label or value looks: font, size, color, special effects, borders, and scroll bars.
- Data: These properties affect how a value is displayed and the data source it's bound to: control source, input masks, validation, default value, and other data type properties.
- Event: Event properties are named events, such as clicking a mouse button, adding a record, pressing a key for which you can define a response (in the form of a call to a macro or a VBA procedure), and so on.
- Other: Other properties show additional characteristics of the control, such as the name of the control or the description that displays in the status bar.
Figure 17.26 shows the Property Sheet for the Description text box. The first column lists the property names; the second column is where you enter or select property settings or options. You can use the combo box near the top of the Property Sheet (displaying Description in Figure 17.26) to change which control's properties are shown. The combo box also allows you to select other objects on the form, like the Detail section, Form Header, or the Form itself.
Changing a control's property setting
There are many different methods for changing property settings, including the following:
- Enter or select the desired value in a Property Sheet.
- For some properties, double-clicking the property name in the Property Sheet cycles through all the acceptable values for the property.
- Change a property directly by changing the control itself, such as changing its size.
- Use inherited properties from the bound field or the control's default properties.
- Enter color selections for the control by using the Ribbon commands.
- Change label text style, size, color, and alignment by using the Ribbon commands.
You can change a control's properties by clicking a property and typing the desired value.
In Figure 17.27, you see a down arrow and a button with three dots to the right of the Control Source property entry area. Some properties display a drop-down arrow in the property entry area when you click in the area. The drop-down arrow tells you that Access has a list of values from which you can choose. If you click the down arrow in the Control Source property, you find that the drop-down list displays a list of all fields in the data source—tblProducts. Setting the Control Source property to a field in a table creates a bound control.

Figure 17.27 Setting a control's Control Source property.
Some properties have a list of standard values such as Yes or No; others display varying lists of fields, forms, reports, or macros. The properties of each object are determined by the control itself and what the control is used for.
A nice feature in Access is the ability to cycle through property choices by repeatedly double-clicking the choice. For example, double-clicking the Display When property alternately selects Always, Print Only, and Screen Only.
The Builder button contains an ellipsis (…) and opens one of the many builders in Access, including the Macro Builder, the Expression Builder, and the Code Builder. When you open a builder and make some selections, the property is filled in for you. You'll learn about builders later in this book.
Each type of object has its own Property Sheet and properties. These include the form itself, each of the form sections, and each of the form's controls. Once you've displayed the Property Sheet by clicking Property Sheet on the Form Design Tools Design Ribbon, you can change what the Property Sheet displays in two ways: By selecting the object on the form or by choosing the object from the Property Sheet's combo box. The Property Sheet will instantly change to show the properties for the selected object.
Naming control labels and their captions
You might notice that each of the data fields has a label control and a text box control. Normally, the label's Caption property is the same as the text box's Name property. The text box's Name property is usually the same as the table's field name—shown in the Control Source property. Sometimes, the label's Caption is different because a value was entered into the Caption property for each field in the table.
When creating controls on a form, it's a good idea to use standard naming conventions when setting the control's Name property. Name each control with a prefix followed by a meaningful name that you'll recognize later (for example, txtTotalCost, cboState, lblTitle). Table 17.2 shows the naming conventions for form and report controls. You can find a complete, well-established naming convention online at www.xoc.net/standards.
Table 17.2 Form/Report Control Naming Conventions
| Prefix | Object |
| frb | Bound object frame |
| cht | Chart (graph) |
| chk | Check box |
| cbo | Combo box |
| cmd | Command button |
| ocx | ActiveX custom control |
| det | Detail (section) |
| gft[n] | Footer (group section) |
| fft | Form footer section |
| fhd | Form header section |
| ghd[n] | Header (group section) |
| hlk | Hyperlink |
| img | Image |
| lbl | Label |
| lin | Line |
| lst | List box |
| opt | Option button |
| grp | Option group |
| pge | Page (tab) |
| brk | Page break |
| pft | Page footer (section) |
| phd | Page header (section) |
| shp | Rectangle |
| rft | Report footer (section) |
| rhd | Report header (section) |
| sec | Section |
| sub | Subform/subreport |
| tab | Tab control |
| txt | Text box |
| tgl | Toggle button |
| fru | Unbound object frame |
The properties displayed in Figure 17.27 are the specific properties for the Description text box. The first two properties, Name and Control Source, are set to Description.
The Name is simply the name of the field itself. When a control is bound to a field, Access automatically assigns the Name property to the bound field's name. Unbound controls are given names such as Field11 or Button13. However, you can give the control any name you want.
With bound controls, the Control Source property is the name of the table field to which the control is bound. In this example, Description refers to the field with the same name in tblProducts. An unbound control has no control source, whereas the control source of a calculated control is the actual expression for the calculation, as in the example =[SalePrice] - [Cost].