
Chapter 6
Importing and Exporting Data
IN THIS CHAPTER
- Understanding external data
- Selecting the import and export options that are right for you
- Creating import specifications
- Exporting to external tables and files
- In this chapter, we show you how to bring data into your Access database from an outside source by importing. We also show you how to create external files from the data by exporting. An import process adds data to an Access database from some external source, such as an XML file. An export from Access means you create something outside the Access database, like an XML or Excel file containing data stored in Access.
How Access Works with External Data
Exchanging information between Access and another program is an essential capability in today's database world. Information is usually stored in a wide variety of application programs and data formats. Access, like many other products, has its own native file format, designed to support referential integrity and provide support for rich data types, such as OLE objects. Most of the time, Access alone is sufficient for the job. Occasionally, however, you need to move data from one Access database file to another or use data from another program's format.
Types of external data
Access can use and exchange data among a wide range of applications. For example, you may need to get data from a Microsoft Excel file, a SQL Server, Oracle, or even a text file. Access can move data among several categories of applications, including other Windows applications, Macintosh applications, database management systems, text files, and even mainframe files.
Ways of working with external data
Often, you need to move data from another application or file into your Access database, or vice versa. You might need to get information you already have in an external spreadsheet file. You can reenter all that information by hand or have it automatically imported into your database.
Access has tools that enable you to exchange data with another database or spreadsheet file. In fact, Access can exchange data with many different file types, including the following:
- Access database objects (all types)
- Text files
- Excel files
- ODBC databases (SQL Server, Sybase Server, Oracle Server, and other ODBC-compliant databases)
- HTML tables, lists, and documents
- XML documents
- Outlook tables
- Microsoft Exchange documents
- SharePoint lists
- Word documents
- Rich Text Format (RTF) documents
Access works with these external data sources in several ways:
- Linking: Linking to data creates a connection to a table in another Access database or links to the data from a different format. Linking uses the data in the source file format (such as Excel or XML). The linked data remains in its original file. The file containing the linked data should not be moved, deleted, or renamed; otherwise, Access won't be able to locate the data the next time it's needed. If moving or renaming the linked data source is unavoidable, Access provides tools for relinking to the source.
- Importing: Importing copies data from a data source, another Access database, or another application's database file into an Access table. The imported data is converted to the appropriate Access data type, stored in a table, and managed by Access from that point on.
- Exporting: Exporting copies data from an Access table into a text file, another Access database, or another application's file. Like importing, changing the source data does not affect the exported data.
Each method has clear advantages and disadvantages, as covered in the following sections.
When to link to external data
Linking in Access enables you to work with the data in another application's format—thus, sharing the file with the existing application. If you leave data in another database format, Access can read the data while the original application is still using it. This capability is useful when you want to work with data in Access that other programs also need to work with. However, there are limitations as to what you can do with linked data. For example, you can't update data in a linked Excel spreadsheet or a linked text file. The ability to work with external data is also useful when you use Access as a front end for a SQL Server database—you can link to a SQL Server table and directly update the data, without having to batch-upload it to a SQL Server.
Access databases are often linked to external data so that people can use Access forms to add and update the external data or to use the external data in Access reports.
You can link to the following types of data in Access:
- Other Access tables (ACCDB, ACCDE, ACCDR, MDB, MDA, MDE)
- Excel spreadsheets
- Outlook folders
- Text files
- XML files
- HTML documents
- SharePoint lists
- ODBC databases
A big disadvantage of working with linked tables is that you lose the capability to enforce referential integrity between tables (unless all the linked tables are in the same external Access database or all are in some other database management system that supports referential integrity). Linked tables may exhibit somewhat poorer performance than local tables. Depending on the source, and the location of the source data, users might experience a noticeable delay when they open a form or report that is based on linked data.
Performance issues become more pronounced when joining linked and local data in a query. Because Access is unable to apply optimization techniques to foreign data, many joins are inefficient and require a lot of memory and CPU time to complete. However, Access can work with many different types of external data, which makes it the ideal platform for applications requiring these features.
When to import external data
Importing data enables you to bring an external table or data source into a new or existing Access table. By importing data, Access automatically converts data from the external format and copies it into Access. You can even import data objects into a different Access database or Access project from the one that is currently open. If you know that you'll use your data in Access only, you should import it. Generally, Access works faster with its own local tables.
One of the principal reasons to import data is to customize it to meet your needs. After a table has been imported into an Access database, you can work with the new table as if you'd built it in the current database. With linked tables, on the other hand, you're greatly limited in the changes you can make. For example, you can't specify a primary key or assign a data entry rule, which means that you can't enforce integrity against the linked table. Also, because linked tables point to external files, which Access expects to find in a specific location, it can make distributing your application more difficult.
Data is frequently imported into an Access database from an obsolete system being replaced by a new Access application. When the import process is complete, the obsolete application can be removed from the user's computer.
When to export internal data
Exporting data enables you to pass data to other applications. By exporting data, Access automatically converts data to the external format and copies it to a file that can be read by the external application. As we've already mentioned, sometime you have to import data into Access as opposed to just linking to the external data source if you want to be able to modify the data. If you still need to be able to work with the modified data in the external application, you have little choice but to create a new file by exporting the modified data.
A common reason to export data is because you want to share the data with other users who don't have Access installed.
Options for Importing and Exporting
Before examining the processes of importing and exporting, let's take a brief look at the various options for importing and exporting data with Access.
Access is often described as a “landing pad” for many types of data. This means that Access can use and exchange data among a wide range of applications. For example, you might need to get data from SQL Server or Oracle, a text file, or even an XML document. Access can move data among several categories of applications, database engines, and even platforms (mainframes and Macintosh computers).
Open the Chapter06_1.accdb database in Access, and click the External Data tab of the Ribbon (see Figure 6.1). You'll see the following groups: Import & Link, Export, and Web Linked Lists.

Figure 6.1 The External Data tab of the Ribbon hints at the variety of external data sources available to Access.
The Import & Link group includes the following options:
- Saved Imports
- Linked Table Manager
- Excel
- Access
- ODBC Database
- Text File
- XML File
- More: Click this button to open the More drop-down list, which has the following options:
- SharePoint List
- Data Services
- HTML document
- Outlook folder
The Export group includes the following options:
- Saved Exports
- Excel
- Text File
- XML File
- PDF or XPS
- Access
- Word Merge
- More: Click this button to open the More drop-down list, which has the following options:
- Word
- SharePoint List
- ODBC Database
- HTML Document
Obviously, Microsoft has prepared Access well for its role as a “landing pad” for data.
Importing External Data
An import copies external data into an Access database. The external data remains in its original state, but, after the import, a copy exists within Access. When you import a file (unlike when you link tables), Access converts a copy of the data from an external source into records in an Access table. The external data source is not changed during the import. No connection to the external data source is maintained once the import process is complete.
You can import information to new or existing tables. Every type of data can be imported to a new table. However, some types of imports—such as spreadsheets and text files—don't necessarily have a table structure compatible with Access. In those cases, Access will create a table structure for you. If you want to control the structure of the table, you should create the table before importing.
Importing from another Access database
You can import items from a source database into the current database. The objects you import can be tables, queries, forms, reports, macros, or modules. Import an item into the current Access database by following these steps:
- Open the destination database you want to import into. In this case, open the
Chapter06_1.accdbdatabase. - Select the External Data tab.
- Click the Access option in the Import & Link group, and then click the Browse button to select the filename of the source database (
Chapter06_2.accdb). - Select the Import Tables, Queries, Forms, Reports option button and click OK. The Import Objects dialog box (shown in Figure 6.2) appears. It gives you options for importing a database object.
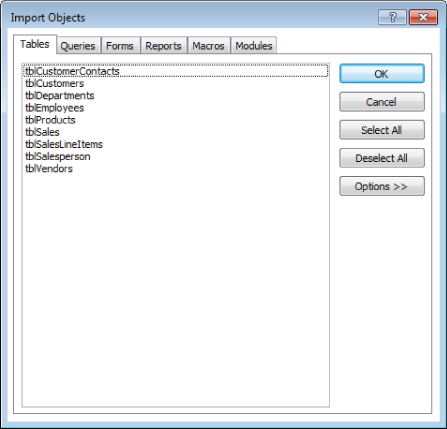
Figure 6.2 Many types of Access database objects can be imported from one Access database into another.
- Select a table and click OK. If an object already exists in the destination database, then a sequential number is added to the name of the imported object, distinguishing it from the original item. For example, if tblDepartments already exists, the new imported table is named tblDepartments1.
The Get External Data – Save Import Steps dialog box appears, with a very useful feature that allows you to store the import process as a saved import, as shown in Figure 6.3.
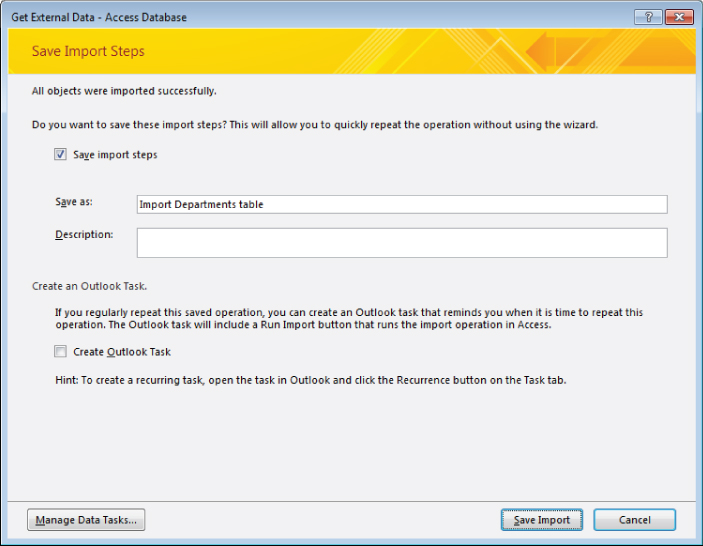
Figure 6.3 The Saved Import Steps feature lets you save frequently executed import processes for future use.
- Provide a name for the import process to make it easy to recall the saved import's purpose. You can execute the saved import again at a later date by clicking the Saved Imports button in the Import & Link group of the External Data tab of the Ribbon. From the Manage Data Tasks dialog box (see Figure 6.4), you can change the name of the saved import, the location of the source file, and the description of the saved import. All other information about the saved import (such as the destination table name) can't be changed. If you need to change other information, create a new saved import with the proper parameters.

Figure 6.4 The Saved Imports feature lets you rerun previous saved import processes.
Importing from an Excel spreadsheet
You can import data from Excel spreadsheets to a new or existing table. The primary rule when importing Excel data is that each cell in a column must contain the same type of data. When you're importing Excel data into a new table, Access guesses at the data type to assign to each field in the new table based on the first few rows of Excel data (other than column headings). An import error may occur if any Excel row past the first row contains incompatible data. In Figure 6.5, the Age column should contain all numeric data, but it contains an age written out as words. This is likely to cause an error during the import process. The data in Row 5 should be changed so that the entire column contains numeric data (as shown in Figure 6.6).

Figure 6.5 Access can import data from an Excel spreadsheet, but there are some restrictions.

Figure 6.6 Excel worksheet columns should contain consistent data.
You can import all the data from an Excel spreadsheet, or just the data from a named range of cells. Naming a range of cells in your spreadsheet can make importing into Access easier. Often a spreadsheet is formatted into groups of cells (or ranges). One range may contain a listing of sales by customer, for example, while another may include total sales for all customers, totals by product type, or totals by month purchased. By providing a range name for each group of cells, you can limit the import to just one section of the spreadsheet data.
To import EMPLIST.xls, follow these steps:
- Click the Excel button in the Import & Link group on the External Data tab.
- Browse to the Excel file.
- Select Import the Source Data into a New Table in the Current Database and click OK. The first Import Spreadsheet Wizard screen (see Figure 6.7) shows lists of worksheets or named ranges, and a preview of the data, in the Excel spreadsheet.

Figure 6.7 The Import Spreadsheet Wizard.
- Select a worksheet or named range and click Next.
- On the next screen (shown in Figure 6.8), select the First Row Contains Column Headings check box and click Next. Normally you don't want the Excel column headings stored as field data. Access uses the column headings as the field names in the new table.

Figure 6.8 Does the first row contain column headings?
- On the next screen (shown in Figure 6.9), you can override the default field name and data type, remove fields from the import, and create an index on a field. When you're done, click Next.

Figure 6.9 You can override any of the default settings Access has chosen.
- On the next screen, set a primary key for the new table (see Figure 6.10) and click Next. A primary key uniquely identifies each row in a table.

Figure 6.10 Specify a primary key for the new table.
- Specify the new table's name and click Finish.
- If you want to, save the import process for later execution. The new table now appears in the Navigation pane.
Importing a SharePoint list
SharePoint lists are candidate data sources for Access databases. Because SharePoint lists reside on web servers, SharePoint data is accessible across a network to qualified users. This gives Access the ability to share data virtually anywhere in the world.
Because SharePoint is deployed on a large number of corporate intranets, Access is likely to continue as a component in enterprise environments.
Importing data from text files
There are many reasons for text file output, such as business-to-business (B2B) data transfers. Also, mainframe data is often output as text files to be consumed in desktop applications. Access can import from two different types of text files: delimited and fixed width. The Access Import Text Wizard assists you in importing or exporting both delimited and fixed-width text files.
Delimited text files
In delimited text files (sometimes known as comma-delimited text files, comma-separated-values text files, or tab-delimited text files), each record is on a separate line in the text file. The fields on the line contain no trailing spaces, normally use commas or tab characters as field separators, and might have certain fields that are enclosed in qualifying characters (such as single or double quotation marks). Here's an example of a comma-delimited text file:
1,Davolio,Nancy,5/1/14 0:00:00,4000
2,Fuller,Andrew,8/14/14 0:00:00,6520
3,Leverling,Janet,4/1/14 0:00:00,1056
4,Peacock,Margaret,5/3/15 0:00:00,4000
5,Buchanan,Steven,10/17/15 0:00:00,5000
6,Suyama,Michael,10/17/15 0:00:00,1000
7,King,Robert,1/2/14 0:00:00,1056
8,Callahan,Laura,3/5/14 0:00:00,1056
9,Dodsworth,Joseph,11/15/14 0:00:00,1056
Notice that the file has nine records (rows of text) and five fields. A comma separates each field. In this example, text fields are not qualified with double quotation marks. Notice also that the rows are different lengths because of the variable data within each row.
To import a delimited text file named ImportDelim.txt, follow these steps:
- Open the
Chapter06_1.accdbdatabase. - Select the External Data tab.
- Click Text File in the Import & Link group.
- Browse to the
ImportDelim.txtfile, select the Import option button, and click OK. The first screen of the Import Text Wizard (shown in Figure 6.11) appears. The Import Text Wizard displays the data in the text file and lets you choose between delimited or fixed width.
Figure 6.11 The first screen of the Import Text Wizard.
- Select Delimited and click Next. The next screen of the Import Text Wizard (shown in Figure 6.12) appears. As you can see in Figure 6.12, this screen enables you to specify the separator used in the delimited file. A separator is the character placed between fields in a delimited text file. The separator is often a comma or semicolon, although it can be another character.
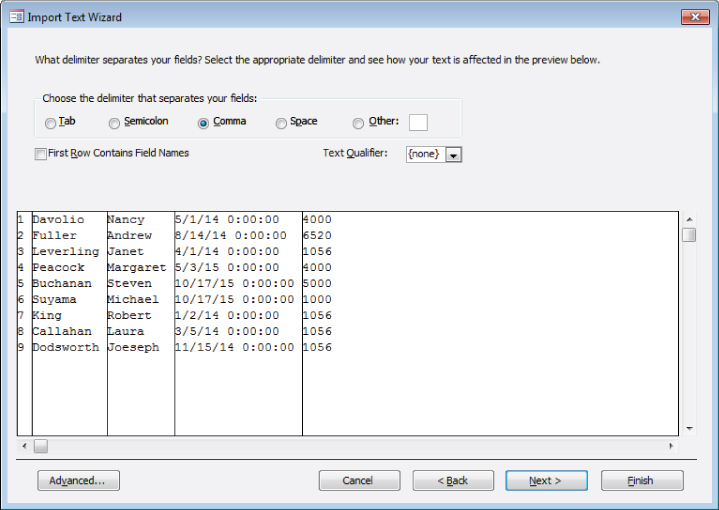
Figure 6.12 The second Import Text Wizard screen.
- Select the delimiter that separates your fields; if an uncommon delimiter is used, select Other and enter the delimiter in the Other box.
- If the first row contains field names for the imported table, select the First Row Contains Field Names check box. When you're done with this screen, click Next. The next few screens are very similar to the steps involved when importing Excel worksheets. You can change field names, specify a primary key, and save the import for future use. Save the imported text file with a descriptive Access table name. Access creates the new table, using the text file's name by default. The new table appears in the Navigation pane.
Fixed-width text files
Fixed-width text files also place each record on a separate line. However, the fields in each record are fixed in length. Fields are padded with trailing spaces to maintain spacing within each line, as shown in Figure 6.13.

Figure 6.13 A typical fixed-width text file.
Notice that the fields in a fixed-width text file are not separated by delimiters. Instead, they start at exactly the same position in each record, and each record has exactly the same length.
Text values, such as first and last names, are not surrounded by quotation marks. There is no need for delimiting text values because each field is a specific width. Anything within a field's position in a row is considered data and does not require delimiters.
To import a fixed-width text file, follow these steps:
- Open the
Chapter06_1.accdbdatabase. - Select the External Data tab.
- Click Text File in the Import & Link group.
- Browse to
ImportFixed.txt, select the Import option button, and click OK. The first screen of the Import Text Wizard (refer to Figure 6.11) appears. The Import Text Wizard displays the data in the text file and lets you choose between delimited or fixed width. - Select Fixed Width and click Next. The next screen of the Import Text Wizard (shown in Figure 6.14) appears.
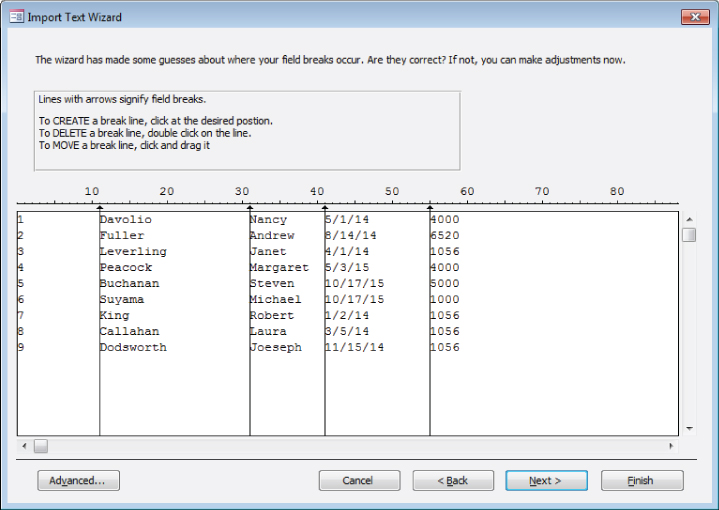
Figure 6.14 The Import Text Wizard screen for fixed-width text files.
- Adjust field widths as needed. Access guesses at the best breaks to use for fields, based on the most consistent spacing across rows. In this case, the field breaks are very consistent. If necessary, however, use the mouse to grab a dividing line and move it left or right to change the width of fields in the file.
- Click the Advanced button at the bottom of the wizard. The Import Specification dialog box (shown in Figure 6.15) appears. The Import Specification dialog box lets you change the default formats for dates, times, field names, indexing, and data types. It also provides an option for skipping fields you don't want to import. (For detailed information on this dialog box, see the following sidebar.)

Figure 6.15 The Import Specification dialog box for importing a fixed-width text file.
- Ensure that the Date Order is set to MDY and the Four Digit Years check box is selected.
- Select the Leading Zeros in Dates check box.
- Click OK to dismiss the Import Specification dialog box.
- Continue through the remaining Import Text Wizard screens.
Importing and exporting XML documents
Importing XML documents is easy with Microsoft Access. XML is often used to transfer information between disparate platforms, databases, operating systems, applications, companies, planets, universes—you name it! XML is used for raw data, metadata (data descriptions), and even processing data. It's safe to say that most Access developers eventually import or export data in XML format.
Presenting XML in Access needs to be done in an odd way. You could easily import a simple XML document in your Access database, but the best way to find out how well Access uses XML is to begin by exporting something into XML.
Follow these steps to export data from Access to an XML file:
- Open the
Chapter06_1.accdbdatabase. - Open tblDepartments in Datasheet view.
- Select the External Data tab, and click XML File in the Export section.
- Name the XML file
tblDepartments.xml, and click OK. The Export XML dialog box (shown in Figure 6.16) appears.
Figure 6.16 The Export XML dialog box.
The Export XML dialog box includes options for specifying advanced options for the XML export process. Clicking the More Options button opens a dialog box (see Figure 6.17) with several important XML settings.
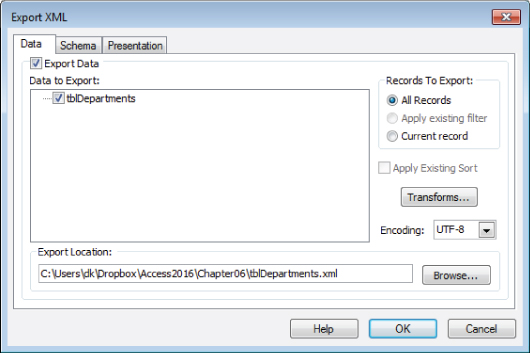
Figure 6.17 Advanced XML export options.
The data contained in an XML file may be relational or hierarchical. For example, a single XML file might contain information on both product categories and the products themselves. A schema file is needed for complex XML to be understood by other applications. Access automatically produces a schema file (XSD extension) for data exported in XML format. Figure 6.18 shows the Schema tab of the Export XML dialog box.

Figure 6.18 Exporting XML schema information.
The XML schema file includes information such as the data type of each field and the source table's primary key and indexes.
A further refinement of the XML export process is to specify how the XML data should be presented in an application using the exported data. (The presentation is specified using HTML conventions.) In most cases, the XML presentation file (XSL extension) is not needed, because the application that is designed to use the XML file displays the data as required by its users. Figure 6.19 shows the Presentation tab of the Export XML dialog box. Notice that none of the options on this tab is selected by default.

Figure 6.19 XML presentation options.
In a text editor, such as Notepad, open tblDepartments.xml. You'll see the contents of the XML file, as shown in Figure 6.20.

Figure 6.20 An exported XML file in plain text.
The first two lines of the text file define the version of XML that was used and the schema. The exported data and structure start on the third line. XML is a hierarchy of tags that define the structure of the data, and each piece of data is within an opening and closing tag. Each record begins with a tag for the name of the table. In this example <tblDepartments> is the tag that defines the table. A few lines down, there is a closing tag, </tblDepartments>, signifying the end of the record.
In between these two tags are the fields and data for that record. The first field of the first record is recorded as <DeptNumber>1000</DeptNumber>. An application that understands XML will interpret that line to mean there is a field named DeptNumber and this record has 1000 in that field. This hierarchy of tags and data continues for each field in the record and for each record in the table.
Just as Access can export to XML, it can also import it. To import the tblDepartments.xml file that you just exported, follow these steps:
- Click on the XML File button on the Import & Link group of the External Data tab.
- Browse to
tblDepartments.xmland click OK. The Import XML dialog, shown in Figure 6.21, displays how Access interprets the XML data.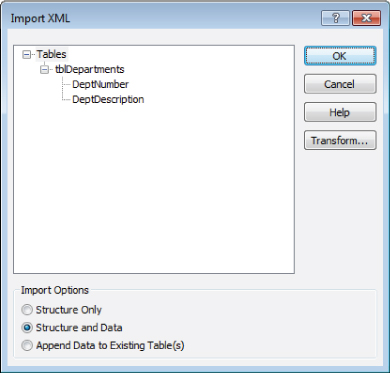
Figure 6.21 Access understands XML data.
- Click OK.
Access converted the well-formed XML into a table. The <tblDepartments> tag determine what the imported table will be named, the tags within the <tblDepartments> tag and its closing tag define the fields, and the data in between the field tags will become data in the new table.
Importing and exporting HTML documents
Access enables you to import HTML tables as easily as any other database, Excel spreadsheet, or text file. You simply select an HTML file to import and use the HTML Import Wizard. The HTML Import Wizard works exactly like the other import wizards described earlier in this chapter.
And just like demonstrating XML in the previous section, we'll do an HTML import in reverse, as well. First, you export a table to generate an HTML file, and then you import the file back into Access to create a new table:
- Open the
Chapter06_1.accdbdatabase and select tblEmployees from the Navigation bar. - Select the External Data tab, click the More drop-down button in the Export group, and select HTML Document.
- Specify an HTML file as the export destination in the Export – HTML Document dialog box (see Figure 6.22).

Figure 6.22 The Export – HTML Document dialog box.
- Select your HTML output options and click OK. The HTML export is completed as soon as you click the OK button. Unless you check Export Data with Formatting and Layout, no options other than what you see in Figure 6.22 are available when exporting HTML data.
Exporting data with formatting and layout, an option in the Export – HTML Document dialog box, presents additional exporting options. The most important option is that it allows you to specify an HTML template for your export. An HTML template is a normal HTML file, except that it includes special tags that Access recognizes. These tags instruct Access where to place certain data when exporting, allowing you to define the other aspects of the HTML document, such as styling and logos.
Importing the HTML is much like importing a text file shown previously in this chapter. In fact, the Import HMTL Wizard has most of the same screens and options as the Import Text Wizard, such as defining data types for fields and identifying the primary key.
Importing Access objects other than tables
You can import other Access database tables or any other object in another database, which means you can import an existing table, query, form, report, macro, or module from another Access database. You can also import custom toolbars and menus.
As a simple demonstration, follow these steps:
- Open the
Chapter06_1.accdbdatabase. - Select the External Data tab, and in the Import & Link group, click the option to import from another Access database. The screen in Figure 6.23 appears. Notice that this dialog box enables you to specify whether to import database objects or link to tables in an external Access database.

Figure 6.23 The same wizard imports objects and links to external Access tables.
- Browse to the
Chapter06_2.accdbdatabase and click OK. Figure 6.24 shows that you can import every type of Access object.
Figure 6.24 Importing Access objects.
When including tables, queries, forms, reports, macros, or modules—all in the same import—you can select objects from each tab and then import all the objects at once.
Figure 6.24 shows the Import Objects dialog box with the Options button clicked. Clicking Options shows the options for importing table relationships, menus, toolbars, and other Access database objects. Importing (and exporting, for that matter) is an excellent way of backing up objects prior to making changes to them.
Importing an Outlook folder
An interesting Access import capability is the option to import data directly from Outlook. Although most people think of Outlook as an e-mail system, it supports a number of important business needs, such as scheduling and contact management.
When working with Outlook data, Access doesn't care whether an imported item is an e-mail or contact. Access handles all types of Outlook objects with equal ease.
Select Outlook Folder from the More drop-down list in the Import & Link group to open the initial Outlook Folder import dialog box (shown in Figure 6.25). Access provides options for importing Outlook data, adding it to an existing Access table, or linking to it from the current Access database.

Figure 6.25 The initial Outlook import options.
Selecting the import option opens the Import Exchange/Outlook Wizard (shown in Figure 6.26). As shown in this dialog box, Access can import Outlook e-mail, contacts, calendars, journals, and other folders.
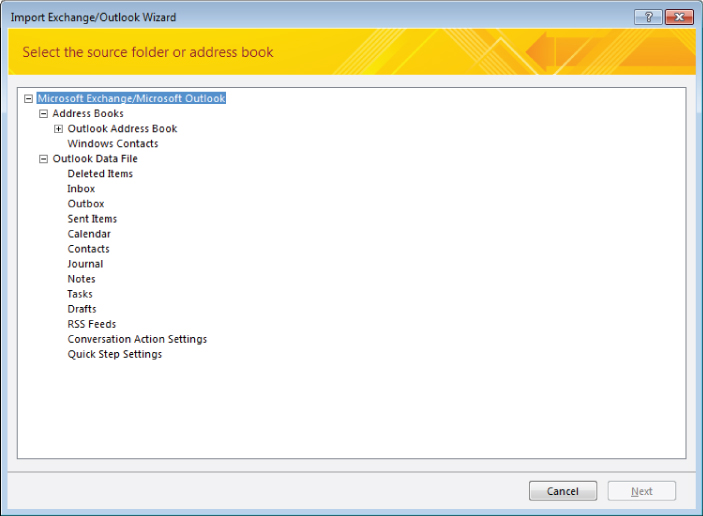
Figure 6.26 Importing Outlook objects into Access.
Depending on which item you select in the Import Exchange/Outlook Wizard, the remaining wizard screens walk you through the process of bringing Outlook data into Access. You can import Outlook data into a new or existing table, add a primary key, specify data types, and save the import process for later execution.
Exporting to External Formats
An export copies data from an Access table to some other application or data source, such as an XML document. The exported result uses the format of the destination data source and not the format of an Access database. You can copy data from an Access table or query into a new external file. You can export tables to several different sources.
Exporting objects to other Access databases
When the destination of an export process is an Access database, you can export every type of Access object (tables, queries, forms, reports, and so on). Unlike importing, which allows you to import many objects at once, exporting only allows you to export one object at a time. To export an object to another Access database, follow these generic steps:
- Open the source database and select an object to export.
- Click the Access button under the Export section of the External Data tab. The Export – Access Database dialog box appears.
- Use the Browse button to locate the destination Access database.
- Click OK. The Export dialog box is shown.
If an object already exists in the target database, you'll be asked whether you want to replace the object in the target database. If you don't, you can create a new object in the target database.
- The last step of the wizard enables you to save the export configuration for future use. This option can be quite handy if you'll be frequently performing the same export process.
Exporting through ODBC drivers
Access can export to any Open Database Connectivity (ODBC) compliant database. ODBC compliant databases come with an ODBC driver that serves as the connection between Access and the database. Many of the most popular databases, including Access, are ODBC compliant.
To export through an ODBC driver, follow these steps:
- Open
Chapter06_1.accdband select an object to export, such as tblEmployees. - Click More
 ODCB Database under the Export group of the External Data tab. The Export dialog box appears as shown in Figure 6.27.

Figure 6.27 Naming the table in an ODBC destination.
- Type a name for the table or simply click OK to use the default name.
- Select the appropriate driver for your database from the Select Data Source dialog box (see Figure 6.28). This example uses SQLite3, a free, open-source, ODBC compliant database. Consult your databases documentation for the name of its driver.
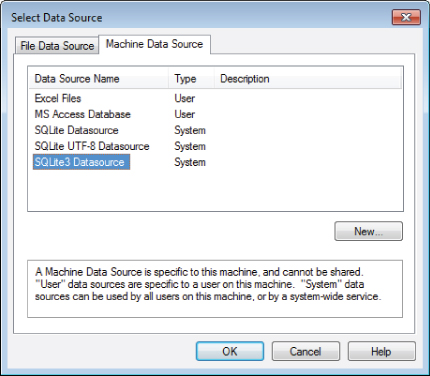
Figure 6.28 Selecting the ODBC driver.
- Provide the remaining information required by the ODBC driver to complete the export. The nature of the information needed is highly dependent on the driver and will be different for different databases. Figure 6.29 shows the SQLite3 ODBC Driver Connect dialog box.
![Screenshot of SQLite3 ODBC Driver Connect dialog box displaying data entry fields for data source name, database name, lock timeout [ms], sync mode, and load extensions.](http://images-20200215.ebookreading.net/22/4/4/9781119086543/9781119086543__access-2016-bible__9781119086543__images__c06f029.jpg)
Figure 6.29 SQLite3 requires additional information, such as the database name, to make the connection.
When the export is complete, you can use the new table in the other database. Figure 6.30 shows that tblEmployees was successfully exported to a SQLite3 database.

Figure 6.30 The Employees table has successfully exported to a SQLite3 database.
Exporting to Word
Access provides two ways to transfer data to Word: Export to Rich Text Format and Word Merge. Rich Text Format (RTF) is a plain text file with special characters that define the formatting. Exporting to RTF creates a document with an RTF extension, not a native Word document (though Word can read RTF, as can WordPad and many other text editors).
Merging data into Word
The real power of exporting to Word is to use the data in Word Merge. With Word Merge, you can control where your data ends up in the Word document. This is useful for such tasks as sending letters, addressing envelopes, producing reports, and creating file folder labels.
To create file folder labels for each department in tblDepartments, follow these steps:
- Open tblDepartments in Datasheet view.
- Click the Word Merge button in the Export group on the External Data tab.
- On the first screen of the Microsoft Word Mail Merge Wizard, shown in Figure 6.31, select Create a New Document and Then Link the Data to It, and click OK. Word opens to a new document and the Mail Merge task pane appears on the right.
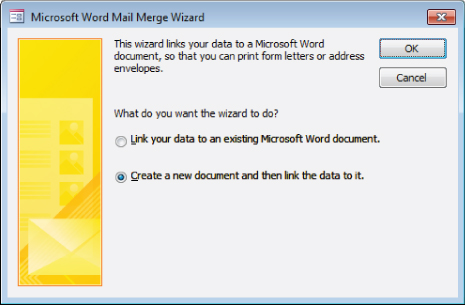
Figure 6.31 The Microsoft Word Mail Merge Wizard allows you to export data to existing or new documents.
- Follow the Mail Merge wizard for the type of labels you have. On step 3 of the wizard, shown in Figure 6.32, Microsoft Word has already selected Use an Existing List and specified tblDepartments as the data source.

Figure 6.32 The Departments table from
Chapter06_1is the specified data source. - Arrange the DeptNumber and DeptDescription on the label and template and complete the merge. Use the Insert Merge Field button on the Mailings Ribbon to place the fields on the label. You can add other text and punctuation, and even put fields on their own lines. Figure 6.33 shows the results of a merge where the department number and description are separated by a hyphen.

Figure 6.33 A completed Word Merge.
Publishing to PDF or XPS
The PDF and XPS file formats were developed to display data as it would appear on a printed page. Data displayed in these formats is generally not editable. Publishing to PDF or XPS outputs a relatively small file and is useful when you want to share data but don't want the other person to be able to change it.
To export tblEmployees to a PDF, follow these steps
- Select tblEmployees in the Navigation pane.
- Select PDF or XPS from the Export group on the External Data tab of the Ribbon. The Publish as PDF or XPS dialog box appears.
- Select PDF from the Save As Type drop-down list (see Figure 6.34).
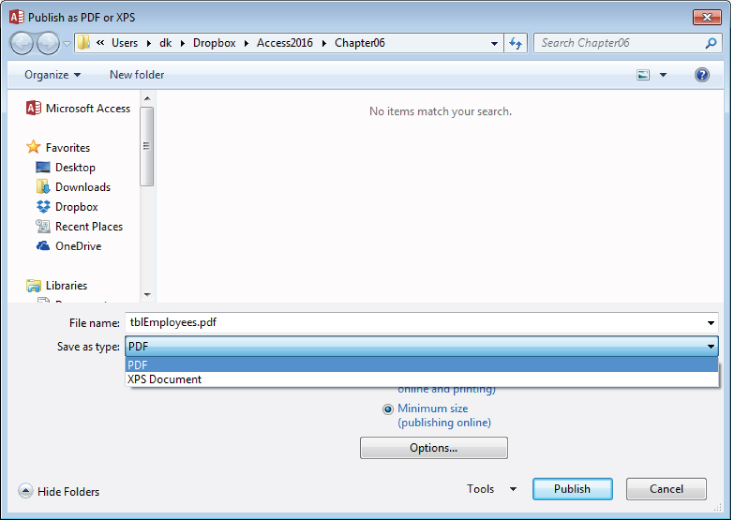
Figure 6.34 Select PDF or XPS as a file format.
- Click the Publish button.
The result, as shown in Figure 6.35, is a PDF file that can be opened by many different PDF reader programs. Most computers have some PDF reader software installed, which makes it a great format for sharing data you don't want changed.

Figure 6.35 A table published in the PDF file format.