
Chapter 33
Deploying Access Applications to SharePoint
IN THIS CHAPTER
- Understanding web publishing with Access
- Examining the limitations of Access web applications
- Building a starting data model
- Initializing a web application
- Editing tables and default views
- Creating validation rules and events
- Creating your own views
- Managing your web applications
Over the last decade, Microsoft has been emphasizing and promoting SharePoint as a platform for collaborative development. Chapter 32 explored some of the capabilities built into Access that enable Access users to seamlessly share data with SharePoint users.
With the release of Access 2010 and SharePoint 2010, Microsoft took the next step with SharePoint and Access Services. Access Services is a SharePoint implementation that allows Access applications to run directly in the browser via SharePoint. The bottom line is that Access developers have the ability to bring their applications to the web.
In this chapter, you get an understanding of Access Services and how it can help you create Access 2016 applications with a credible web presence.
Understanding Web Publishing with Access
IT departments have long criticized Access applications as a development platform that has issues with version control and data security. It was not uncommon to find users with different versions of Access applications running on different computers. It was also difficult to guarantee a high degree of database security.
Although these problems were evident to IT departments, many Access developers and business users were reluctant to move their applications to IT where they would have to depend on IT development teams to manage the time and resources needed to build and support the application. Business users know all too well how IT development teams can quickly become overwhelmed by the need for changes and new features.
Microsoft's solution to the conflicting needs of business users and IT departments is to provide tools in Access that allow developers to publish Access applications on SharePoint sites. When you publish a properly prepared Access application to SharePoint, users instantly gain the ability to view and work with web-based Access forms via a SharePoint site.
Versioning issues go away with the ability to republish your Access application any time changes are needed. Once the application is republished, all users receive the updates the next time they use the web application. Also, the data is secure because users must be granted permission to use SharePoint, but after they provide their username and password, the SharePoint data is accessible through any web browser.
When you publish an Access 2016 web application to SharePoint, new SQL Server 2012 tables are created to store the data. It might be surprising to learn that SQL Server is used instead of SharePoint lists, but there are real advantages associated with the use of SQL Server. SQL Server tables can handle larger, more complex sets of data than SharePoint lists, allowing for greater scalability as the data in your application grows. Also, this architecture allows for IT developers to more easily integrate and work with the data since it is already in a SQL environment.
Understanding Access Services
When an Access application is published to SharePoint, a SharePoint service application called Access Services renders the ASPX pages necessary to display the Access application in a web browser. In other words, Access Services is the driving force behind SharePoint-hosted Access applications.
Access Services compiles and executes the queries in the Access web application and directs the queries against the SharePoint lists containing the data. Access Services also synchronizes updates between versions of the Access application on a developer's desktop and the version stored in SharePoint.
Perhaps the most important role played by Access Services is to translate the relational data model to SQL Server when your application is published to SharePoint. SharePoint itself can't recognize the relational nature of your data. Access Services provides the logic SQL Server requires to create the back-end database for your application.
Access Services in SharePoint also provides data caching. Instead of relying on the native ability of SharePoint to locate and deliver data, Access Services provides a middle-tier caching service that stores data that is likely to be consumed by the application and delivers the data much more quickly than SharePoint alone. The caching is transparent to users and developers, and no configuration options exist for setting up the cache or modifying its parameters.
The Access Services layer filters data in a query before adding it to the cache. This means that queries that include a WHEREWHERE
Why SharePoint?
Many developers question why Microsoft chose to make Access web development reliant on SharePoint Services. If the intent is to make Access a bona-fide web development tool, doesn't it make sense to incorporate true web development capabilities into Access, like Microsoft did with Visual Studio, many years ago?
When Microsoft examined the issues involved, it quickly became clear that adding credible web development capabilities to Access wasn't practical. Many people forget that a website is far more than just HTML pages. Security, performance, and data integrity issues must be considered.
Microsoft chose SharePoint as the platform for Access web publishing because of the significant features built into SharePoint, including the following:
- Security: SharePoint supports users and groups of users. Users and groups may be granted or denied access to various parts of a SharePoint website, and designated users may be granted permission to add, delete, or modify the site.
- Versioning: SharePoint automatically maintains a version history of objects and data. Changes can be rolled back to an earlier state at virtually any time. The ability to roll back changes can be granted to individual users, and DBA support is not required.
- Recycle bin: Deleted data and objects are held in a recycle bin so that they may be recovered. Unlike Access, in which every deletion or change is permanent, SharePoint supports an undo feature for its data.
- Alerts: Users and groups can be e-mailed when specific data in a SharePoint list is added, deleted, or changed. If granted the proper permissions, users can manage their own alerts.
- End-user maintenance: SharePoint sites are meant to be maintained by their users, without the intervention of IT departments. Although SharePoint pages are not as flexible as typical web pages, a SharePoint developer can add or remove features from pages; change fonts, headings, colors, and other attributes of pages; create subsites and lists; and perform many other maintenance and enhancement tasks.
- Other features: Every SharePoint site includes a number of features—such as a calendar, a task list, and announcements—that users can turn off or remove.
The ability of users to maintain a SharePoint site is a major difference between a SharePoint site and a website built with a tool such as ASP.NET. The web pages in a .NET website are tightly bound to the compiled code that manages the site. A user can't change an ASPX page because it's stored on a web server, and (in most cases) the code behind the page must be recompiled when changes are made to the page's interface.
Examining the Limitations of Access Web Applications
Access web applications are not the best solution for public-facing websites; they're better suited for departmental or workgroup environments. Certain limitations mean that the Access/SharePoint web option is targeted for specific situations.
The limitations of Access web applications are determined more by SharePoint than anything in Access itself. For instance, SharePoint doesn't support anonymous access to SharePoint sites. Users are expected to log in to a SharePoint site, using a valid username and password. (SharePoint uses Windows Active Directory services to identify users.)
Although workarounds exist for this limitation, it can be difficult to restrict users to certain portions of a SharePoint application. In general, after users are authenticated by SharePoint's security system, they can access the lists, calendars, and other features supported by the SharePoint site. Restricting users means determining which features should be allowed for which sets of users, and individually setting permissions for those features throughout the SharePoint site. Most web applications, on the other hand, present only the features the developer has specified.
SharePoint was never meant to be a general-purpose web development tool; instead, it was designed and built primarily as a collaborative platform for sharing data and documents. This means that SharePoint pages are built from templates, not from free-form HTML. As a result, all SharePoint pages share certain appearance features.
In most cases, the similarities between pages hosted on different SharePoint sites are an asset, not a hindrance. After users are familiar with SharePoint and SharePoint pages, no further instruction is needed, so users are productive more quickly than with applications where each page is different. Common tasks such as adding a new item to a list or editing an existing item are the same in every SharePoint page.
You can customize the colors, fonts, and some other appearance attributes of a SharePoint page. However, the basic layout—with the Navigation pane at the left, a Ribbon and “breadcrumbs” at the top, and an items list to the right of the Navigation pane—is common to all SharePoint pages.
If absolutely necessary, you can create a custom page template from scratch, or from an existing template, and use it on a SharePoint site. Because most SharePoint sites are used on an intranet for a specialized audience, however, the default page layout usually works quite well.
Limitations of Access Services
As with other Microsoft technologies, Access Services comes with its own set of limitations (see Table 33.1). It's important to be aware of these before deciding whether to publish your Access applications to SharePoint.
Table 33.1 Access Services Limitations
| Type of Query or Field | Comments |
| Maximum records per table | The maximum number of records that a table in an application can contain. Maximum: No limit Default: 500,000 |
| Maximum columns per query | The maximum number of columns that can be referenced in a query. Note that some columns may automatically be referenced by the query engine and will be included in this limit. Maximum: 255 Default: 40 |
| Maximum rows per query | The maximum number of rows that the output of the query can have. Maximum: 200,000 Default: 25,000 |
| Maximum sources per query | The maximum number of lists that may be used as input to one query. Maximum: 20 Default: 12 |
| Maximum calculated columns per query | The maximum number of inline calculated columns that can be included in a query, either in the query itself or in any subquery on which it is based. Maximum: 32 Default: 10 |
| Maximum Order By clauses per query | The maximum number of fields referenced in the Order By clause in a query. Maximum: 8 Default: 4 |
| Maximum request duration (request time-out setting) | The maximum duration (in seconds) allowed for a request from an application. Maximum: No limit Default: 30 |
| Memory utilization | The maximum number of private bytes (in MB) allocated by the Access Database Service process. Maximum: 50% of physical memory on the client computer Default: 50% of physical memory on the client computer |
You'll note a default value for each of these limitations. These default values represent the standard value when Access Services is installed on the SharePoint site. In order to use the maximum values, your SharePoint administrator will have to explicitly configure each attribute to the maximum allowable.
After looking at these limitations, it should be clear that not all Access applications are good candidates for a web application. In the past, Microsoft has been blunt in suggesting that applications with more than 40,000 rows in one table are not good candidates for SharePoint-hosted Access applications. This, however, is a blanket suggestion to help you avoid performance issues after publishing your applications to the web.
The fact is that the performance of your Access web application depends on many factors: the number of records, number of tables, complexity of queries, the number of data calls to the server, and so on. It really depends on your situation.
If your Access application exceeds any of the limits shown in Table 33.1, you'll need to consider a more traditional web development path, using tools such as ASP.NET and SQL Server. These development platforms are geared toward large-scale, high-performance, data-driven websites.
Transactional limitations
A SharePoint-hosted Access web application is not a great platform for environments where hundreds of users are constantly adding to or updating data. Although SharePoint uses SQL Server as its underlying database, database updates are considerably slower than when working directly with SQL Server tables through linked Access tables or stored procedures.
In other words, a SharePoint-hosted Access database should not be used for applications requiring high-volume data entry features. Instead, the SharePoint-hosted Access application would be used ideally for moderate database updates and reporting.
Publishing a Custom Access Application to SharePoint
In the following example, an entire Access 2016 application is published to SharePoint. Specifically, we'll create a sales opportunity web application that allows sales reps to enter new sales opportunities via a SharePoint web page. Managers will also be able to run reports from our new web application.
Because our application will be published to SharePoint, any users (with the proper SharePoint credentials) can access the application through a web browser, without the need for Microsoft Access on their desktop.
Preparing the Access data model
When starting an Access web application, you'll need to begin with a basic Access data model. Because Access Services can't accept complex logic and VBA procedures, your starting data model will have to be fairly simple.
We'll start with a set of base tables (see Figure 33.1). These tables are found in a standard ACCDB database.
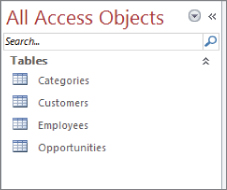
Figure 33.1 Start with a set of base tables.
You'll want to establish defined relationships between each table via the Relationships tool in the Database Tools dialog box. These relationships will ensure that Access Services properly handles the interactivity between each table in your model. Figure 33.2 illustrates the Relationships screen for our starting data model.

Figure 33.2 Be sure to establish Relationships between the tables in your data model.
Notice in Figure 33.2 that each table contains a primary key. It's important to note that Access Services does not effectively handle many-to-many relationships, so you'll need to ensure that each table in your starting data model has a single-field primary key that serves as a unique identifier for the rows within the table. The best way to achieve this is to create an AutoNumber field in each table that serves as the primary key. To do this, simply go into the Design view of each table and add a field called “ID” (see Figure 33.3). Then set the Data Type for the field to AutoNumber. Once that's done, set it as the primary key.
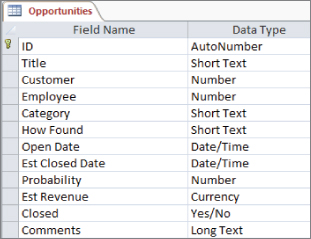
Figure 33.3 Create an AutoNumber field for each table, and then set the AutoNumber field as the primary key.
Another step you can take to prepare your data model is to add any lookup fields that will assist your users during data entry. Figure 33.4 illustrates a lookup field in the Opportunities table that allows a user to select from a list of Companies when entering a new record. This prevents the user from having to remember company names, saving time and avoiding data entry errors.

Figure 33.4 Add lookup fields wherever possible, allowing for more effective data entry.
Chapter 3 covers lookup fields in detail, but as a refresher, look at Figure 33.5. A lookup field is set in the Design view of the table. In this example, the Company field has a lookup that returns the ID, Company, and ContactName from the Customers table. Again, this gives your users an interactive drop-down list, allowing them to easily select and tag correct company data.

Figure 33.5 You can set lookup fields in the Design view of your tables.
Once you've taken these preparatory steps, you're ready to create your custom web application. Notice that we haven't created any queries or forms in this starting data model. The data model truly consists of base tables with some rudimentary logic. Access 2016 web applications simply will not accept any more than that initially. However, as you'll see in the next section, you can add queries, nuanced logic, and other configurations once the web application has been created.
Initializing and configuring the custom web application
Now that you have a starting data model, it's time to create the custom web application:
- Open Access 2016 via the Windows Start button (Start
 Programs Access 2016). You'll see the default welcome screen shown in Figure 33.6.

Figure 33.6 Start Access 2016 via the Windows Start button, and press the Custom Web App button.
- Click the Custom Web App button. The Custom Web App dialog box appears.
- Enter a name for your application and the URL for the target SharePoint site (see Figure 33.7), and click Create.
- When prompted, enter your username and password. Access caches this information for future use and doesn't ask for them again unless they change.

Figure 33.7 Specify the name and SharePoint site for your application.
After a bit of gyrating, SharePoint creates an empty web application on the SharePoint site. In Access, you see a new web database similar to the one shown in Figure 33.8.
- Here, you need to tell Access which tables you want to use for your web application. Take a moment to look at the bottom of Figure 33.8. Notice that you have the option of pulling tables in from all kinds of sources: Access, Excel, SQL Server, Other ODBC connections, text files, and even SharePoint lists. This gives you the flexibility to utilize virtually any data source for your web application.

Figure 33.8 Click the Access icon to pull data from the data model in the SalesApplication.accdb file.
This example uses the basic data model found in
SalesApplication.accdb - Click the Access icon shown at the bottom of Figure 33.8.

Figure 33.9 Select all the tables you want included in your web application.
- Select the database you want to use as the source for your data. The Import Objects dialog box (shown in Figure 33.9) appears.
- Select the tables you want included in your web application (in this case, choose Select All), and click OK.
Reviewing and editing table views
After you select your source tables, Access imports them into the web application. At this point, your screen looks similar to Figure 33.10. Each table name appears on the left of the screen with a set of views in the middle of the screen. Clicking the Navigation Pane button on the Ribbon will activate the familiar-looking Navigation pane you're used to seeing in a standard Access database.

Figure 33.10 Access imports all the selected tables and creates two default views for each table.
Each table will have two default views associated with it: a List view and a Datasheet view. Clicking the List view for a table allows you to view and edit each field in the table in a form (see Figure 33.11). That's right—Access automatically created a form for each table. In fact, you'll find the design and layout of the automatically created forms to be surprisingly good. Nevertheless, you can edit the form if you want.

Figure 33.11 Access automatically creates a form for each table in a List view.
Clicking the Datasheet view for a table allows you to view and edit each field in a datasheet format. Again, you can edit the view to add or remove fields as needed.
Some of the tables in your data model are there simply as reference tables, not to be shown to the public. In Figure 33.12, the Categories table is not something we want the users of our application to see. In this case, we can hide that table by selecting the table and selecting the gear icon to reveal the Hide command. This ensures that our users are not able to view or edit this table.
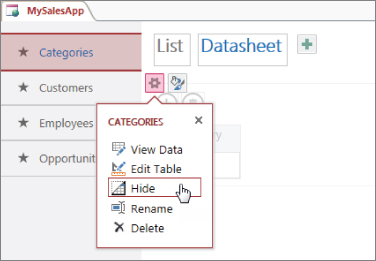
Figure 33.12 You can hide tables you don't want to be viewed or edited by your users.
After a table is set to be hidden, it will have a perforated border around it and it will be given a lighter, subdued color. This way, you can tell it's hidden from the public.
Adding a validation rule to a table
At this point, you'll want to add any rules or logic to make your application more than just a few simple tables. To do so, you'll need to edit each table individually. Select the target table and click the gear icon to reveal the Edit Table option (see Figure 33.13).
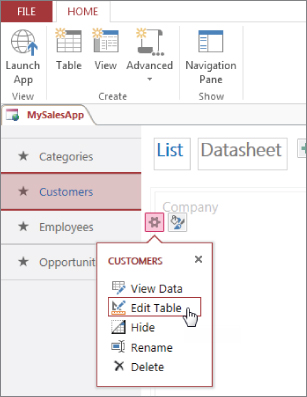
Figure 33.13 Choose to edit the Customers table.
In Figure 33.14, you'll see the Customers table in Design View. When users enter a new customer into the Customers form, we want to ensure that they can't save the record without entering values in the Company field and the ContactName field.
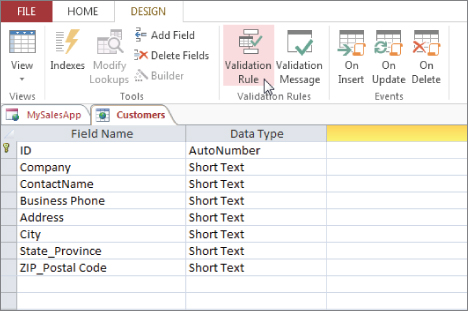
Figure 33.14 Add a new validation rule to the Customers table.
Access allows you to add validation rules to your tables by clicking the Validation Rule command on the Ribbon.
The Expression Builder dialog box (shown in Figure 33.15) appears. Here, you can enter any expression you want. In this case, we want to ensure that the Company and ContactName fields are not null, so enter the following expression:
Coalesce([Company], [ContactName]) Is Not Null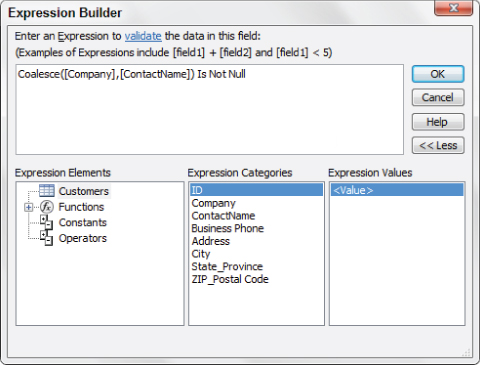
Figure 33.15 Enter the desired validation rule in the form of an expression. This expression ensures that the Company and ContactName fields are not left blank.
Once we confirm the expression, we can click the Validation Message command (shown in Figure 33.16) to enter a message to our users.

Figure 33.16 Click the Validation Message command.
In the Enter Validation Message dialog box (shown in Figure 33.17), we want to enter the message that the users will see when they violate our newly created validation rule.

Figure 33.17 Enter a message that will show when the validation rule is violated.
Adding events to a table
Sometimes, you'll want to trigger an event in your web application when a record is inserted, updated, or deleted. As mentioned earlier, Access Services can't translate VBA into JavaScript, so VBA is out of the question. In order to add events, you'll have to use data macros.
To illustrate how to use events, let's add an event to our Opportunities table.
In our custom web application, we have a table where users can enter new sales opportunities. When entering a new sales opportunity, users will have to provide an estimated revenue value and a probability percent. We'll want to fire an event when either of those fields doesn't conform to what the application needs.
First, select the Opportunities table and click the gear icon to reveal the Edit Table option. After clicking Edit Table, you see the Opportunities table in Design view (see Figure 33.18). Here, click the On Insert command in the Events group.
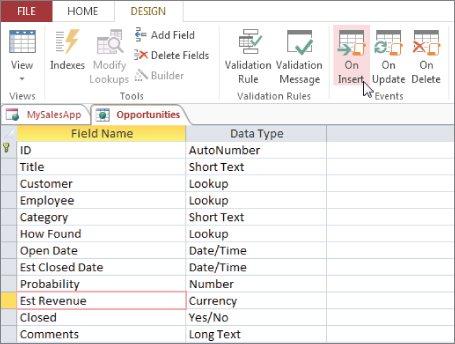
Figure 33.18 The Events group shown in Design view allows you to add data macros that fire On Insert, On Update, and On Delete.
Access activates the Macros window, where you can build the inner workings of your data macro. As you can see in Figure 33.19, we'll trigger an error message if the Est Revenue field is less than 0 or if the Probability field is not between 0 and 1.

Figure 33.19 Use the Macros window to add the logic for your event.
Creating your own queries and views
As mentioned previously, Access starts you off with two default views for each table in your web application: a List view and a Datasheet view. You can extend the functionality of your application by adding your own views based on custom queries.
Start by selecting the Advanced drop-down list and selecting Query (see Figure 33.20).

Figure 33.20 Select the Advanced drop-down list, and then select Query.
When you choose Query from the Advanced drop-down list, Access activates the familiar Query Builder. As you can see in Figure 33.21, building a query in a web application is similar to building one in a standard Access database. In this example, we're summarizing the open opportunity sales for each sales rep.

Figure 33.21 Build your query in the same fashion you would in a standard Access database.
After you save your query with a name (SalesSummary in this case), Access shows you the results (see Figure 33.22).

Figure 33.22 Save your query with a name and view the results.
Now it's time to create a new view from the query. Select any table used in the query, and then click the plus icon. The dialog box shown in Figure 33.23 appears. Here, provide a name for your new view, select a view type (List or Datasheet), and then choose your query as the data source for the view.

Figure 33.23 Start a new view by clicking the plus icon and fill in the required attributes.
After clicking the Add New View button, your view will be available along with the default views (see Figure 33.24).

Figure 33.24 Any new views will show next to the default views.
A final word on configuring your web application
In this section, we quickly looked at the various ways you can configure your web application. Obviously, the basic scenarios shown here are designed to give you a general overview of the tools Access has provided for configuring your application. It goes without saying that these fundamental building blocks can be extended to add as much complexity as you need to your web application.
The key concept you should take away is that configuration of an Access 2016 web application is done after a web application has been created. Many Access developers approach web applications with the notion that they can take their existing database and simply make it web-enabled. Unfortunately, it doesn't work that way in Access 2016.
You start a web application with nothing more than tables that have a basic relationship schema. All the logic, rules, and events are built within the web application environment.
Launching and managing your web application
Once you've completed the configuration of your web application, you can click the Launch App command (see Figure 33.25). Enter your username and password if asked to do so.

Figure 33.25 Launch your web application.
Your web application will show through a SharePoint screen, with easy navigation and filtering options built in (see Figure 33.26).
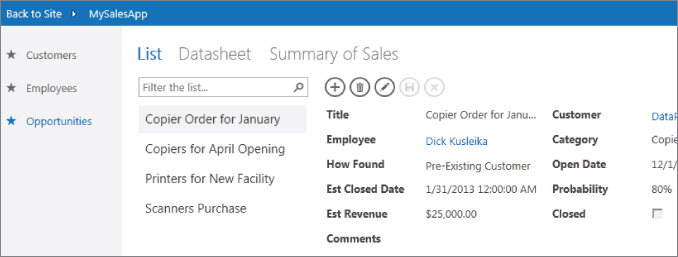
Figure 33.26 Your web application will be displayed via a SharePoint portal.
SharePoint and Access Services do a nice job of making your web application look professional. For example, in Figure 33.27, you can see that any date field comes with a visually appealing calendar selector.

Figure 33.27 SharePoint and Access Services automatically add nice touches to your web application.
Any events you've added are compiled and made part of the application. In our example, we added an event that raises an error if the Est Revenue field has a value less than zero. As you can see in Figure 33.28, the application activates a message box based on our event.
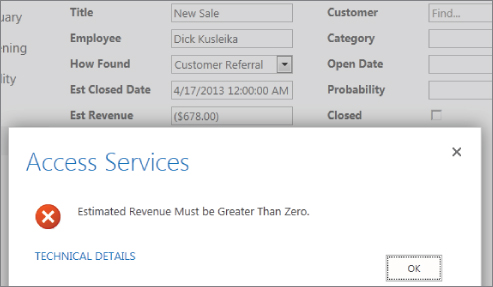
Figure 33.28 Any event built into the web application is triggered as designed.
And because we created our application with properly formed table relationships, Access services is able to automatically add useful hierarchical views for our users. In Figure 33.29, you can see that when DataPig Technologies is selected from the Customers table, a list of existing opportunities from the Opportunities table is also shown.

Figure 33.29 Useful hierarchical views are automatically created based on table relationships.
Our custom-made view is also available, automatically including any new data that has been entered (see Figure 33.30).

Figure 33.30 Custom-made views dynamically keep up with the data in the web application.
Right-clicking any Datasheet view through a SharePoint portal allows the user to export the table to a local Excel spreadsheet (see Figure 33.31).
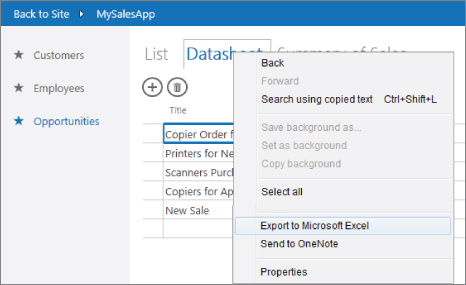
Figure 33.31 Exporting data to Excel is as easy as right-clicking any Datasheet view.
If you need to make changes to your web application, simply click the gear icon at the top right of your application. Then click the Customize in Access option (see Figure 33.32). An ACCDW database file, which can be opened and edited with Access 2016, is downloaded to a location of your choosing. Note that not all users will see the gear icon. You must have publishing permissions (set by the SharePoint Administrator) to choose this action.

Figure 33.32 To make changes to the web application, click the Customize in Access option.
Once you make the necessary changes, simply launch the application again. Users will seamlessly get any changes you make to the ACCDW database.
You can view and manage all your web applications via SharePoint. Clicking the three dots next to each application will activate a dialog box (shown in Figure 33.33) that gives you the ability to view usage logs, manage permissions for your application, and remove the application.

Figure 33.33 SharePoint allows administrators and publishers to view all the applications on the site, view logs, manage permissions, and remove applications.