
Chapter 18
Working with Data on Access Forms
IN THIS CHAPTER
- Viewing and modifying data in Form view
- Editing form data
- Printing Access forms
- Understanding form properties
- Adding form headers and footers
- Adjusting a form's layout
- Adding calculated controls to a form
- Converting a form to a report
In Chapter 17, you learned about the tools necessary to create and display a form—Design view, bound and unbound controls, the Field List, and the Controls group on the Ribbon. In this chapter, you learn how to work with data on the form, view and change the form's properties, and use Layout view.
An Access application's user interface is made up of forms. Forms display and change data, accept new data, and interact with the user. Forms convey a lot of the personality of an application, and a carefully designed user interface dramatically reduces the training required of new users.
Most often, the data displayed on Access forms is bound (either directly or indirectly) to Access tables. Changes made to a form's data affect the data stored in the underlying tables.
Using Form View
Form view is where you actually view and modify data. The data in Form view is the same data shown in a table or query's Datasheet view, just presented a little differently. Form view presents the data in a user-friendly format, which you create and design.
To demonstrate the use of the Form view, follow these steps to create a new form based on tblProducts:
- Select tblProducts in the Navigation pane.
- Select the Create tab on the Ribbon.
- Click the Form command in the Form group.
- Click the Form View button in the Views group of the Home tab to switch from Layout view to Form view.
Figure 18.1 shows the newly created form displayed in Form view. This view shows the form's title bar with its caption and the form header at the top and the navigation controls at the bottom. The main part of the form in the center of the screen displays your data, one record at a time.

Figure 18.1 A form in Form view.
The status bar at the bottom of the window displays the active field's Status Bar Text property that you defined when you created the table (or form). If no Status Bar Text exists for a field, Access displays “Form View” in the status bar. Generally, error messages and warnings appear in dialog boxes in the center of the screen (rather than in the status bar). The navigation controls and search box are found at the bottom of the form's window, and the view shortcuts are found in the status bar. These features let you move from record to record or quickly find data.
Looking at the Home tab of the Ribbon
The Home tab of the Ribbon tab (shown in Figure 18.2) provides a way to work with the data. The Home tab has some familiar objects on it, as well as some new ones. This section provides an overview of the Home tab. The individual commands are described in more detail later in this chapter.

Figure 18.2 The Home tab of the Ribbon.
The Views group
At the far left is the Views group, which allows you to switch among the following views, which you can see by clicking the button's drop-down arrow.
- Form view: Allows you to manipulate data on the form
- Datasheet view: Shows the data in the row-and-column format
- Layout view: Allows you to change the form's design while viewing data
- Design view: Allows you to make changes to the form's design
The Clipboard group
The Clipboard group contains the Cut, Copy, Paste, and Format Painter commands. These commands work like the same commands in other applications (like Word and Excel). The Clipboard is a resource provided by Windows and shared by virtually all Windows applications. Items you copy or cut from Excel, for example, can be pasted into Access if the context is appropriate. For example, you could copy a VBA procedure from an Excel worksheet and paste it into an Access VBA code module because the contexts are the same. But you can't copy an Excel spreadsheet and paste it into an Access form in Form view, because Form view has no way of working with an Excel spreadsheet.
The Paste command's drop-down arrow gives you three choices:
- Paste: Inserts whatever item has been copied to the Windows Clipboard into the current location in Access. Depending on the task you're working on, the pasted item might be plain text, a control, a table or form, or some other object.
- Paste Special: Gives you the option of pasting the contents of the Clipboard in different formats (text, CSV, records, and so on).
- Paste Append: Pastes the contents of the Clipboard as a new record—as long as a record with a similar structure was copied to the Clipboard. Obviously, Paste Append remains disabled for any operation that doesn't involve copying and pasting a database table record.
The other controls in the Clipboard group include:
- Cut: Removes the item from its current place in the application and puts it onto the Windows Clipboard. The item is not destroyed when removed from its current location; however, it must be pasted before a second item is copied to the Clipboard. (A cut or copied item overwrites whatever is on the Clipboard.)
- Copy: Copies the item or object to the Clipboard. Copy can be applied to plain text, but it also applies to controls on a form or report (with the form or report in Design view, of course), database records, entire tables, queries, other database objects, and so on. The Windows Clipboard accepts virtually anything that is copied to it.
- Format Painter: The Format Painter (the icon that looks like a paint brush) is a special tool to use when working with Access forms and reports in Design view. The concept of Format Painter is quite simple: You copy the format of an item (such as its font settings) and paint the formatting onto another item or group of items.
The Sort & Filter group
The Sort & Filter group lets you change the order of the records, and, based on your criteria, limit the records shown on the form.
The Records group
The Records group lets you save, delete, or add a new record to the form. It also contains commands to show totals, check spelling, freeze and hide columns, and change the row height and cell width while the form is displayed in Datasheet view.
The Find group
The Find group lets you find and replace data and go to specific records in the datasheet. Use the Select command to select a record or all records.
The Window group
The Window group contains two controls:
- Size to Fit Form: When you work with a form in Design view, Access “remembers” the size (height and width) of the form at the moment you save it. When working with the overlapping windows interface, a user may resize a form by dragging its borders to a new size and shape. The Size to Fit Form returns the form to the dimension set at design time.
- Switch Windows: Switch Windows provides a handy way to see all the objects (forms, reports, tables, and so on) that are currently open in the main Access windows. You can change to another object by selecting it from the drop-down list that appears when you click Switch Windows.
The Text Formatting group
The Text Formatting group lets you change the look of the datasheet in Datasheet view or Design view. Use these commands to change the font, size, bold, italic, color, and so on. Use the Align Left, Align Right, and Align Center commands to justify the data in the selected column. Click the Gridlines option to toggle gridlines on and off. Use Alternate Row Color to change the colors of alternating rows, or make them all the same. When modifying text in a Long Text field with the Text Format property set to Rich Text, you can use these commands to change the fonts, colors, and so on.
Navigating among fields
Navigating a form is nearly identical to moving around a datasheet. You can easily move around the form by clicking the control that you want and making changes or additions to your data. Because the form window displays only as many fields as can fit onscreen, you need to use various navigational aids to move within your form or between records.
Table 18.1 displays the navigational keys used to move between fields within a form.
Table 18.1 Navigating in a Form
| Navigational Direction | Keystrokes |
| Next field | Tab, right-arrow (→) key, down-arrow (↓) key, or Enter |
| Previous field | Shift+Tab, left-arrow (←) key, or up-arrow (↑) key |
| First field of current record | Home |
| First field of first record | Ctrl+Home |
| Last field of current record | End |
| Last field of last record | Ctrl+End |
| Next page | PgDn or Next Record |
| Previous page | PgUp or Previous Record |
Moving among records in a form
Although you generally use a form to display one record at a time, you still need to move between records. The easiest way to do this is to use the Navigation buttons, shown in Figure 18.3.

Figure 18.3 The Navigation buttons of a form.
The Navigation buttons are the six controls located at the bottom-left corner of the Form window. The two leftmost controls move you to the first record and the previous record in the form. The three rightmost controls position you on the next record, last record, or new record in the form. If you know the record number (the row number of a specific record), you can click the Current Record box, enter a record number, and press Enter to go directly to that record.
The record number displayed in the Navigation controls is just an indicator of the current record's position in the recordset and may change when you filter or sort the records. To the right of the record number is the total number of records in the current view. The record count may not be the same as the number of records in the underlying table or query. The record count changes when you filter the data on the form.
Changing Values in a Form
Earlier in this book, you learned datasheet techniques to add, change, and delete data within a table. These techniques are the same ones you use on an Access form. Table 18.2 summarizes these techniques.
Table 18.2 Editing Techniques
| Editing Technique | Keystrokes |
| Move insertion point within a control | Press the right-arrow (→) and left-arrow (←) keys |
| Insert a value within a control | Select the insertion point and type new data |
| Select the entire contents of a control | Press F2 |
| Replace an existing value with a new value | Select the entire field and enter a new value |
| Replace a value with the value of the preceding field | Press Ctrl+' (single quotation mark) |
| Replace the current value with the default value | Press Ctrl+Alt+Spacebar |
| Insert the current date into a control | Press Ctrl+; (semicolon) |
| Insert the current time into a control | Press Ctrl+: (colon) |
| Insert a line break in a Text control | Press Ctrl+Enter |
| Insert a new record | Press Ctrl++ (plus sign) |
| Delete the current record | Press Ctrl+– (minus sign) |
| Save the current record | Press Shift+Enter or move to another record |
| Toggle values in a check box or option button | Spacebar |
| Undo a change to the current control | Press Esc or click the Undo button |
| Undo a change to the current record | Press Esc or click the Undo button a second time after you Undo the current control |
Knowing which controls you can't edit
Some controls, including the following, can't be edited:
- Controls displaying AutoNumber fields: Access maintains AutoNumber fields automatically, calculating the values as you create each new record.
- Calculated controls: Access may use calculated controls in forms or queries. Calculated values are not actually stored in your table.
- Locked or disabled fields: You can set certain form and control properties to prevent changes to the data.
- Controls in multiuser locked records: If another user locks the record, you can't edit any controls in that record.
Working with pictures and OLE objects
Object Linking and Embedding (OLE) objects are objects not part of an Access database. OLE objects commonly include pictures but may be any number of other data types, such as links to Word documents, Excel spreadsheets, and audio files. You can also include video files such as MPG or AVI files.
In Datasheet view, you can't view a picture or an OLE object without accessing the OLE server (such as Word, Excel, or the Windows Media Player). In Design view, however, you can size the OLE control area to be large enough to display a picture, chart, or other OLE objects in Form view. You can also size Text Box controls on forms so that you can see the data within the field—you don't have to zoom in on the value, as you do with a datasheet field.
The Access OLE control supports many types of objects. As with a datasheet, you have two ways to enter OLE fields into a form:
- Copy the object (such as an MP3 file) to the Clipboard and paste it from the controls in the Clipboard group of the Ribbon.
- Right-click the OLE control and click Insert Object from the shortcut menu to display the Insert Object dialog box, shown in Figure 18.4. Use the Insert Object dialog box to add a new object to the OLE field, or add an object from an existing file. The Create from File option button adds a picture or other OLE object from an existing file.
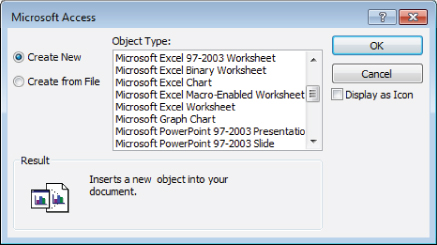
Figure 18.4 The Insert Object dialog box.
When displaying a picture in an OLE control, set the Size Mode property to control how the image representing the OLE object is displayed. The settings for this property are:
- Clip: Keeps the image at its original size and cuts off parts of the picture that don't fit in the control.
- Zoom: Fits the image in the control and keeps it in its original proportion, which may result in extra white space.
- Stretch: Sizes an image to fit exactly between the frame borders. The stretch setting may distort the picture.
Entering data in the Long Text field
The Features field in the frmProducts form is a Long Text data type. This type of field contains up to 1GB of characters. The first three lines of data appear in the text box. When you click in this text box, a vertical scroll bar appears, allowing you to view all the data in the control.
Better yet, you can resize the control in the form's Design view if you want to make it larger to show more data. Another method for viewing more text in a Long Text field's text box, is to press Shift+F2 with the text box selected. A Zoom dialog box is displayed, as shown in Figure 18.5, allowing you to see more data. The text in the Zoom dialog box is fully editable. You can add new text or change text already in the control.

Figure 18.5 The Zoom dialog box.
Entering data in the Date field
The SaleDate field in the frmSales_Layout form is a Date/Time data type. This field is formatted to accept and show date values. When you click in this text box, a Date Picker icon automatically appears next to it, as shown in Figure 18.6. Click the Date Picker to display a calendar from which you can choose a date.

Figure 18.6 Using the Date Picker control.
If the Date Picker doesn't appear, switch to Design view and change the control's Show Date Picker property to For Dates. Set the Show Date Picker property to Never,as shown in Figure 18.7, if you don't want to use the Date Picker.

Figure 18.7 Change the Show Date Picker property to Never to disable it.
Using option groups
Option groups let you choose exactly one value from a number of possibilities. Option groups work best when you have a small number of mutually exclusive choices to select from. Figure 18.8 shows an option group next to the Follow-Up Date text box. Option groups most commonly contain option buttons but also work with toggle buttons and check boxes.

Figure 18.8 Using an option group to select a mutually exclusive value.
The easiest and most efficient way to create option groups is with the Option Group Wizard. You can use it to create option groups with multiple option buttons, toggle buttons, or check boxes. When you're through, all your control's property settings are correctly set. To create an option group, switch to Design view and select the Option Group button from the Design tab's Controls group. Make sure the Use Control Wizards command is selected.
Each element in an option group is assigned a number in its Option Value property. When an option group is bound to a field, the Option Value is stored in that field when the record is saved.
Using combo boxes and list boxes
Access has two types of controls—list boxes and combo boxes—for showing lists of data from which a user can select. The list box always displays as much of the list as possible, whereas the combo box has to be clicked to open the list. Also, the combo box enables you to enter a value that is not on the list and takes up less room on the form.
Because combo boxes are a very efficient use of space on the surface of a form, you may want to use (for example) a combo box containing values from tblCustomers, as shown in Figure 18.9. The easiest way to do this is with the Combo Box Wizard. This wizard walks you through the steps of creating a combo box that looks up values in another table. To create a combo box, switch to Design view and select the Combo Box command from the Design tab's Controls group. Make sure the Use Control Wizards command is selected.

Figure 18.9 Using a combo box to select a value from a list.
After you create the combo box, examine the Row Source Type, Row Source, Column Count, Column Heads, Column Widths, Bound Column, List Rows, and List Width properties. Once you become familiar with setting these properties, you can right-click a text box, choose Change To ![]() Combo Box, and set the combo box's properties manually.
Combo Box, and set the combo box's properties manually.
Switching to Datasheet view
With a form open, switch to Datasheet view by using one of these methods:
- Click the Datasheet View command in the Home tab's Views group.
- Click the Datasheet View button in the View Shortcuts section at the bottom-right of the Access window.
- Right-click the form's title bar—or any blank area of the form—and choose Datasheet View from the pop-up menu.
The datasheet is displayed with the cursor on the same field and record that it occupied while in the form. Moving to another record and field and then redisplaying the form in Form view causes the form to appear with the cursor on the field occupied in Datasheet view.
To return to Form view—or any other view—select the desired view from the Views group, the View Shortcuts, or the pop-up menu.
Saving a record
Access automatically saves each record when you move off it. Pressing Shift+Enter or selecting Save from the Records group on the Ribbon saves a record without moving off it. Closing the form also saves a record.
Printing a Form
You can print one or more records in your form exactly as they appear onscreen. (You learn how to produce formatted reports in Chapter 20.) The simplest way to print is to use the keyboard shortcut Ctrl+P to show the Print dialog box. The Print dialog box has several options to customize your printout.
- Print Range: Prints the entire form or only selected pages or records
- Copies: Determines the number of copies to be printed
- Collate: Determines whether copies are collated
You can also click the Properties button and set options for the selected printer or select a different printer. The Setup button allows you to set margins and print headings.
Printing a form is like printing anything else. Windows is a WYSIWYG (“What You See Is What You Get”) environment, so what you see on the form is what you get in the printed hard copy. If you added page headers or page footers, they would be printed at the top or bottom of the page. The printout contains any formatting that you specified in the form (including lines, boxes, and shading) and converts colors to grayscale if you're using a black-and-white printer.
The printout includes as many pages as necessary to print all the data. If your form is wider than a single printer page, you need multiple pages to print your form. Access breaks up the printout as necessary to fit on each page.
The Print command under the File menu provides additional printing options:
- Quick Print: Prints the active form using the default printer with no opportunity to change any options
- Print: Shows the Print dialog box
- Print Preview: Shows what the printout will look like based on the current settings
Working with Form Properties
You use form properties to change the way the form is displayed and behaves. Property settings include the form's background color or picture, the form's width, and so on. Tables 18.3 through 18.5 cover some of the more important properties. Changing default properties is relatively easy: You select the property in the Property Sheet and type or select a new value.
Table 18.3 Form Format Properties
| Property | Description | Options |
| Caption | Text that is displayed in the form's title bar | Up to 2,048 characters |
| Default View | Determines the initial view when the form is opened | Single Form: One record per page (default) Continuous Forms: As many records per page as will fit Datasheet: Row and column view Split Form: Displays a datasheet in the upper portion and a form in the lower portion |
| Allow Form View | Form view allowed | Yes/No |
| Allow Datasheet View | Datasheet view allowed | Yes/No |
| Allow Layout View | Layout view allowed | Yes/No |
| Scroll Bars | Determines whether any scroll bars are displayed | Neither: No scroll bars are displayed Horizontal Only: Displays only a horizontal scroll bar Vertical Only: Displays only a vertical scroll bar Both: Displays both horizontal and vertical scroll bars |
| Record Selectors | Determines whether the Record Selector is displayed | Yes/No |
| Navigation Buttons | Determines whether navigation buttons are visible | Yes/No |
| Dividing Lines | Determines whether lines between form sections are visible | Yes/No |
| Auto Resize | Automatically resizes form to display a complete record | Yes/No |
| Auto Center | Centers form onscreen when it's opened | Yes/No |
| Border Style | Determines the form's border style | None: No border or border elements (scroll bars, navigation buttons) Thin: Thin border, not resizable Sizable: Normal form settings Dialog: Thick border, title bar only, cannot be sized; use for dialog boxes |
| Control Box | Determines whether control menu (Restore, Move, and Size) is available | Yes/No |
| Min Max Buttons | Specifies whether the Min and Max buttons appear in the form's title bar | None: No buttons displayed in upper-right corner of form Min Enabled: Displays only Minimize button Max Enabled: Displays only Maximize button Both Enabled: Displays Minimize and Maximize buttons |
| Close Button | Determines whether to display Close button in upper-right corner and a close menu item on the control menu | Yes/No |
| Width | Displays the value of the width of the form. Width can be entered or Access sets it as you adjust the width of the form. | A number from 0 to 22 inches (55.87 cm) |
| Picture | Displays the name of the file used as the background of the entire form | Any valid image file name |
| Picture Type | Determines whether the form's picture is embedded or linked | Embedded: Picture is embedded in the form and becomes a part of the form Linked: Picture is linked to the form; Access stores the location of the picture and retrieves it every time the form is opened Shared: Picture is stored by Access and is available to other objects in the database |
| Picture Size Mode | Determines how the form's picture is displayed | Clip: Displays the picture at its actual size Stretch: Fits picture to form size (nonproportional) Zoom: Fits picture to form size (proportional), which may result in the picture not fitting in one dimension (height or width) Stretch Horizontal: Fits picture to width of form, ignoring height dimension Stretch Vertical: Fits picture to height of form, ignoring width dimension |
| Picture Alignment | Determines the form's picture alignment | Top Left: Displays the picture in the top-left corner of the form Top Right: Displays the picture in the top-right corner of the form Center (default): Centers the picture Bottom Left: Displays the picture in the bottom-left corner of the form Bottom Right: Displays the picture in the bottom-right corner of the form Form Center: Centers the picture horizontally and vertically |
| Picture Tiling | Used when you want to overlay multiple copies of a small bitmap (for example, a single brick can become a wall) | Yes/No |
| Grid X | Displays setting for number of points per inch when X grid is displayed | An number from 1 to 64 |
| Grid Y | Displays setting for number of points per inch when Y grid is displayed | A number from 1 to 64 |
| Layout for Print | Determines whether form uses screen fonts or printer fonts | Yes: Printer Fonts No: Screen Fonts |
| Sub-datasheet Height | Determines the height of a sub-datasheet when expanded | A number from 0 to 22 inches (55.87 cm) |
| Sub-datasheet Expanded | Determines the saved state of all sub-datasheets in a table or query | Yes: The saved state of sub-datasheets is expanded. No: The saved state of sub-datasheets is closed. |
| Palette Source | The palette for a form or report | (Default): Indicates the default Access color palette You can also specify other Windows palette files (PAL), ICO, BMP, DB, and WMF files. |
| Orientation | Determines view orientation | Right-to-Left: Appearance and functionality move from right to left. Left-to-Right: Appearance and functionality move from left to right. |
| Moveable | Determines whether the form can be moved | Yes/No |
| Split Form Orientation | Determines the look of a form in Split Form view | Datasheet on Top: Datasheet appears at the top of the form. Datasheet on Bottom: Datasheet appears at the bottom of the form. Datasheet on Left: Datasheet appears to the left of the form. Datasheet on Right: Datasheet appears to the right of the form. |
| Split Form Datasheet | Determines whether data can be edited in the datasheet of a Split Form | Allow Edits: Edits are allowed. Read Only: Data is read-only and cannot be changed. |
| Split Form Splitter Bar | Determines whether there's a splitter bar on a Split Form | Yes/No |
| Save Splitter Bar Position | Determines whether the position of the Splitter Bar should be saved | Yes/No |
| Split Form Size | Size of the form part of the Split Form | Auto to let Access size the form or a number to set the actual size |
| Split Form Printing | Determines which section of a Split Form to print | Form Only: Prints the form portion Datasheet Only: Prints the datasheet section |
| Navigation Caption | Overrides the word Record in the form's navigation buttons | Up to 255 characters |
Table 18.4 Form Data Properties
| Property | Description | Options |
| Record Source | Specifies the source of data displayed on the form | Unbound: Blank Bound: The name of a table, query, or a SQL statement |
| Filter | Used to specify a subset of records to be displayed when a filter is applied to a form; can be set in the form properties, with a macro, or through VBA | Any string that is a valid SQL WHERE clause without the WHERE keyword |
| Filter on Load | Applies filter at form/report startup | Yes/No |
| Order By | Specifies the field(s) used to order the data in the view | Any string that is a valid SQL ORDER BY clause without the ORDER BY keywords |
| Order By on Load | Applies sort at form/report startup | Yes/No |
| Allow Filters | Determines whether a user will be able to display a filtered form | Yes/No |
| Allow Edits | Determines whether a user will be able to edit data, making the form editable or read only | Yes/No |
| Allow Deletions | Determines whether a user will be able to delete records | Yes/No |
| Allow Additions | Determines whether a user will be able to add records | Yes/No |
| Data Entry | Determines whether form opens to a new blank record, not showing any saved records | Yes/No |
| Recordset Type | Used to determine whether multi-table forms can be updated | Dynaset: Only default table field controls can be edited. Dynaset (Inconsistent Updates): All tables and fields are editable. Snapshot: No fields are editable (same as read-only). |
| Record Locks | Used to determine default multiuser record locking on bound forms | No Locks: Locks record only as it's saved All Records: Locks entire form's records while using the form Edited Record: Locks only current record during an edit |
| Fetch Defaults | Determines whether default values should be retrieved. | Yes/No |
Table 18.5 Form “Other” Properties
| Property | Description | Option Definition |
| Pop Up | Form is a pop-up that floats above all other objects. | Yes/No |
| Modal | User must close the form before doing anything else; disables other windows; when Pop Up set to Yes, Modal disables menus and toolbar, creating a dialog box. | Yes/No |
| Cycle | Determines how Tab works in the last field of a record | All Records: Tabbing from the last field of a record moves to the next record. Current Record: Tabbing from the last field of a record moves to the first field of that record. Current Page: Tabbing from the last field of a record moves to the first field of the current page. |
| Ribbon Name | Name of custom Ribbon to apply on open | A valid Ribbon name (See Chapter 30) |
| Shortcut Menu | Determines whether shortcut (right-click) menus are available | Yes/No |
| Shortcut Menu Bar | Specifies the name of an alternate shortcut menu bar | A valid menu bar name |
| Fast Laser Printing | Prints rules instead of lines and rectangles | Yes/No |
| Tag | Allows you to store extra information about your form | A string up to 2048 characters long |
| Has Module | Allows you to show if your form has a class module; setting this property to No removes the VBA code module attached to the form. | Yes/No |
| Use Default Paper Size | Uses the default paper size when printing | Yes/No |

Figure 18.10 Using the form selector to display the form's Property Sheet.
To set a form's properties, you have to show the Property Sheet for the form. Switch to Design or Layout view and display the form's Property Sheet in one of the following ways:
- Click the form selector so a small black square appears, and then click the Property Sheet button in the Design tab's Tools group.
- Click the Property Sheet command in the Design tab's Tools group, and then select Form from the drop-down at the top of the Property Sheet.
- Double-click the form selector.
- Right-click the form selector, either of the rulers, or in an empty area of the form and select Form Properties from the pop-up menu or by pressing F4 while the form is in Design or Layout view.
By default, the form's Property Sheet appears docked to the right side of the Access window. Because the Property Sheet is a window, it can be undocked, moved, and resized. In Figure 18.10, the Property Sheet has been undocked and dragged to a position overlying frmProducts. Notice that the Property Sheet window doesn't have Maximize or Minimize buttons, sorting capabilities, or searching capabilities.
Changing the title bar text with the Caption property
Normally, a form's title bar shows the name of the form after it's saved. The form's Caption property specifies the text displayed in the title bar when the form is in Form view. Follow these steps to change the title bar text:
- Click the form selector to make sure the form itself is selected.
- Click the Property Sheet button in the Design tab's Tools group, or press F4 to open the Property Sheet.
- Click the Caption property in the Property Sheet and enter Products in the property's text box, as shown in Figure 18.11.
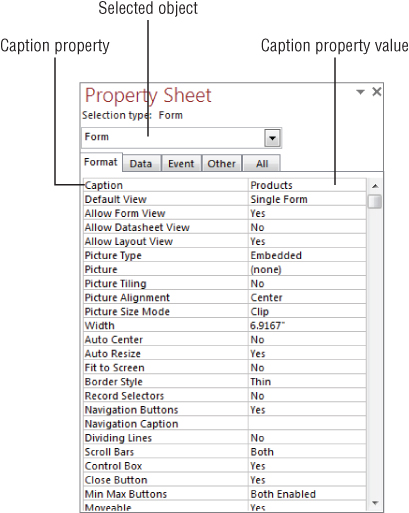
Figure 18.11 Change the Caption property in the form's Property Sheet.
- Click any other property or press Enter to move off of the Caption property.
- Switch to Form view to see the form's new title bar text. The caption you enter in the form's properties overrides the name of the saved form.
Creating a bound form
A bound form is directly connected to a data source, such as a table or query. Bound forms usually automatically update data in the bound data source when the user moves to a new record in the form.
To create a bound form, you must specify a data source in the form's RecordSource property. In Figure 18.11, the Data tab of the Property Sheet contains the properties controlling what and how data is displayed on the form. Although not shown here, the Record Source property is at the very top of the Property Sheet's Data tab.
The data source can be one of three choices:
- Table: The name of a table in the current database file. The table can be a local table (stored in the database itself) or can be linked to another Access database or an external data source such as SQL Server.
- Query: The name of a query that selects data from one or more database tables.
- SQL Statement: A SQL
SELECTstatement that selects data from a table or query.
When a form is unbound—the Record Source property is blank and the data is obtained with VBA code—you can't have bound controls on the form. (Bound controls have their Control Source property set to a field in a table.)
Specifying how to view the form
Access uses several properties to determine how a form is viewed. The Default View property determines how the data is displayed when the form is initially opened:
- Single Form: Displays one record at a time. Single Form is the default and displays one record per form page, regardless of the form's size.
- Continuous Forms: Shows more than one record at a time. Continuous Forms tells Access to display as many detail records as will fit onscreen. Figure 18.12 shows a continuous form displaying five records.
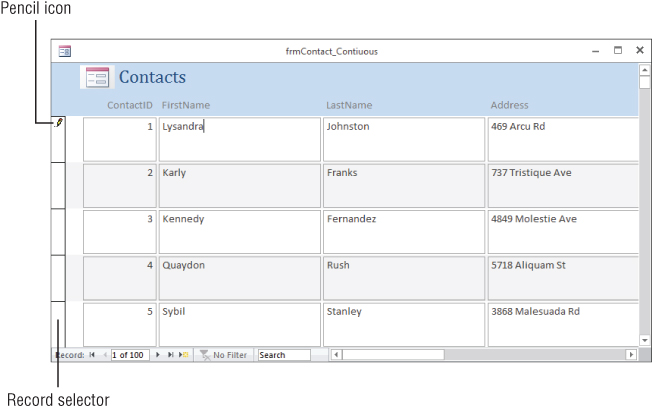
Figure 18.12 The Continuous Forms setting of the Default view property shows multiple records at once.
- Datasheet: Row and column view like a spreadsheet or the standard query Datasheet view.
- Split Form: Provides two views of the data at the same time, letting you select a record from a datasheet in the upper section and edit the information in the lower section of the split form.
There are three separate properties to allow the developer to determine if the user can change the default view. These include Allow Form View, Allow Datasheet View, and Allow Layout View. The default setting is Yes for Allow Form View and Allow Layout View and No for Allow Datasheet View. If you set the Allow Datasheet View property to Yes, the Datasheet view commands (in the Views group of the Ribbon, the form's View Shortcuts, and right-click pop-up menu) will be available and the data can be viewed as a datasheet. If you set the Allow Form View property to No, the Form view commands won't be available.
Removing the Record Selector
The Record Selectors property determines whether the Record Selector (the vertical bar shown in Figure 18.12 on the left side of a form) is displayed. The Record Selector is important in multiple-record forms or datasheets because it points to the current record. A right arrow in the Record Selector indicates the current record, but changes to a pencil icon when the record is being edited. Though the Record Selector is important for datasheets, you probably won't want it for a single record form. To remove the Record Selector, change the form's Record Selectors property to No.
Looking at other form properties
Tables 18.3 through 18.5 list the most commonly used form properties and offer a brief description of each. You'll learn more about most of these properties when they're used in examples in this chapter and other chapters throughout this book.
Adding a Form Header or Footer
Although the form's Detail section usually contains the majority of the controls that display data, there are other sections in a form that you can add:
- Form header: Displayed at the top of each page when viewed and at the top when the form is printed
- Form footer: Displayed at the bottom of each page when viewed and at the bottom of the form when the form is printed
The form header and footer remain on the screen, while any controls in the Detail section can scroll up and down.
You select the header and footer options in the Header/Footer group on the Design tab of the Ribbon (with the form open in Design view, of course).
Working with Section Properties
The Form properties discussed above apply to the entire form. Each section of the form has its own set of properties that affect the appearance and behavior of the section. The three form sections—Detail, Form Header, and Form Footer—share the same properties, with a few exceptions.
The Visible property
The Visible property is a Yes/No property that determines if the section is shown or hidden. All three sections' visible properties are set to Yes by default. The Detail section should remain visible in all but the strangest forms because that's where most of the controls will be. The Form Header and Form Footer sections may be hidden if they're not needed. Generally, the form header is used to display a title and possibly an image. Showing the form header on a continuous form helps the user stay oriented while using the form. The form footer is useful for showing summary or status information, like the current date and time.
The Height property
The Height property determines how tall the section is. The most common way to change the Height property is to grab the edge of the section with your mouse and drag up or down to decrease or increase the height. With the Property Sheet visible, you can see the Height property value change when you drag the edge and release it in its new location. If you want a specific height, change the Height property value instead of dragging the edge of the section.
The Back Color property
The Back Color property determines the color of the background of the controls. You can change the Back Color property by using the drop-down control on the Property Sheet. Access gives you many different built-in colors to choose from.
There's also a build button on the Property Sheet that displays the familiar color palette including Theme Colors and Standard Colors. The More Colors button at the bottom of the color palette allows you to specify any color you want.
Alternatively, you can type in the color you want. The Back Color property accepts a six-digit hexadecimal number. Hexadecimal consists of the numbers 0 through 9 and the letters A through F (16 choices in all). You precede the hexadecimal number with a pound sign (#), such as #000000 for black and #FFFFFF for white. This method of setting Back Color is useful if you're trying to match a color and you already know that color's hexadecimal code.
Many developers prefer to keep the Back Color property of the Detail section to plain white. It's important that the color of the Detail section doesn't distract the user from the purpose of the form. However, a conservative Back Color can add depth to your form and provide a consistent brand across all your forms.
The Special Effect property
The Special Effect property can be set to Flat, Raised, or Sunken. Flat is the default value, and Raised and Sunken provide a beveled effect at the edges of the section.
The Display When property
The Display When property can be set to Always, Screen Only, and Print Only. This allows you to hide or show a section when printing. You may want to show the Form Header and Form Footer sections on the screen, but only get the Detail section if the form is printed. You can achieve this by setting the Display When properties of the Form Header and Form Footer to Screen Only and then by leaving the Detail section set to the default, Always.
The printing properties
Most of the remaining section properties, such as Auto Height, Can Grow, and Can Shrink, are more applicable to reports than forms. They allow you to dynamically control the height of sections based on the data those sections contain. They have no effect on how your form displays on the screen and are rarely used.
Changing the Layout
In this section, you'll learn how to change a form's layout using Layout view. You'll add, move, and resize controls, as well as change a few other characteristics while viewing the form's data.
With a form open in Layout view, select the Arrange tab in the Form Design Tools area of the Ribbon. The Arrange tab includes controls for selecting a form's initial layout, including the default positions of controls on the form. The Arrange tab is context sensitive. The view you see in Figure 18.13 is the result of selecting a number of controls on the form. A somewhat different view may be seen if other controls or form sections (header, footer, and so on) are selected.

Figure 18.13 The Layout tab of the Ribbon for Layout view.
Changing a control's properties
In previous versions of Access, you had to make changes to the form in Design view. In Layout view, you can change these properties while looking at data instead of empty controls. Click the Property Sheet command in the Form Layout Tools Design tab's Tools group to display the Property Sheet for the selected control.
Setting the tab order
You may notice that when you use the Tab key to move from control to control, the cursor jumps around the screen. The route taken by the Tab key may seem strange, but that's the original order in which the controls were added to the form.
The tab order of the form is the order in which the focus moves from control to control as you press Tab. The form's default tab order is always the order in which the controls were added to the form. Moving controls around on the form means you'll need to change the form's tab order. Even though you may make heavy use of the mouse when designing your forms, most data-entry people use the keyboard, rather than the mouse, to move from control to control.
Select Tab Order from the Design tab's Tools group when you're in Design view to display the Tab Order dialog box, shown in Figure 18.14. This dialog box shows the controls in the form arranged in the current tab order. Controls such as labels, lines, and other non-data controls don't appear in the Tab Order dialog box.

Figure 18.14 The Tab Order dialog box.
The Tab Order dialog box lets you select one or more rows at a time. Multiple contiguous rows are selected by clicking the first control and dragging to select multiple rows. After highlighting rows, the selected rows can be dragged to their new positions in the tab order.
The Tab Order dialog box has several buttons at the bottom. Auto Order places the controls in order from left to right and from top to bottom, according to their position in the form. This button is a good starting place when the tab order is very disorganized. The OK button applies the changes to the form, while the Cancel button closes the dialog box without changing the tab order.
Each control has two properties related to the Tab Order dialog box. The Tab Stop property determines whether pressing the Tab key lands you on the control. The default is Yes. Changing the Tab Stop property to No removes the control from the tab order. When you set the tab order, you're setting the Tab Index property values. Moving the fields around in the Tab Order dialog box changes the Tab Index properties of those (and other) controls.
Modifying the format of text in a control
To modify the formatting of text within a control, select the control by clicking it, and then select a formatting style to apply to the control. The Format tab of the Ribbon (shown in Figure 18.15) contains additional commands for changing the format of a control.

Figure 18.15 The Format tab of the Ribbon for Layout view.
To change the fonts for the Category control, make sure you're in Layout view, and then follow these steps:
- Select the Category Text Box control by clicking on it.
- Change the Font Size to 14, and then click the Bold button in the Format tab's Font group. The control may not automatically resize when changing certain font properties. If you see only a portion of the text box, the control may require resizing to display all the text.
Using the Field List to add controls
The form's Field List displays a list of fields from the table or query on which the form is based. Use the Add Existing Fields button on the Design tab to open it if the Field List is not currently visible. Drag fields from the Field List to the form's surface to add bound controls to the form. Select and drag them one at a time, or select multiple fields by using the Ctrl key or Shift key. The Field List in Layout view works the same as the Field List in Design view, which is described in detail in Chapter 17.
Click the Add Existing Fields command in the Design tab's Controls group to display the Field List, shown in Figure 18.16. By default, the Field List appears docked on the right of the Access window. This window is movable and resizable and displays a vertical scroll bar if it contains more fields than can fit in the window.

Figure 18.16 Adding fields from the Field List in a form's Layout view.
Access adds a control that's appropriate for the data type of the bound field. For example, dragging a text field to the form's surface adds a text box, while an OLE data field adds a Bound OLE Object control.
To add fields from the Field List to a new form, follow these steps:
- Select the Create tab on the Ribbon, and then select the Blank Form command in the Form group to open a new form in Layout view. The new form is not bound to any data source.
- If the Field List isn't displayed, select the Design tab of the Ribbon, and then select Add Existing Fields from the Tools group.
- Double click the ProductID and Cost fields in the Field List to add them to the form.
Converting a Form to a Report
To save a form as a report, open the form in Design view and choose File ![]() Save As. The entire form is saved as the report. If the form has headers or footers, these are used as the report's Header and Footer sections. If the form has page headers or page footers, these are used as the report's Page Header and Page Footer sections. You can now use the report in Design view, adding groups and other features without having to re-create general layout all over again. You'll learn more about reports in later chapters.
Save As. The entire form is saved as the report. If the form has headers or footers, these are used as the report's Header and Footer sections. If the form has page headers or page footers, these are used as the report's Page Header and Page Footer sections. You can now use the report in Design view, adding groups and other features without having to re-create general layout all over again. You'll learn more about reports in later chapters.