
Chapter 7
Linking to External Data
IN THIS CHAPTER
- Examining the types of external data and methods for working with them
- Linking an Access database to external data
- Using linked tables
- Splitting an Access database
In Chapter 6, you learned about the types of external data that you can import to and export from Access. You also learned when to import and export and when to link. This chapter describes the methods for using external data in Access through a live, updating link to the data.
Note that, because the point of this chapter is to show how Access works with external data, there are examples of external data that you need to copy to your machine. Unfortunately, when working with external data, Access requires an exact path to each file—it can't work with relative paths. That means that when you copy Chapter07.accdb to your machine, it won't work until you relink the various external files. We show you how to do that in this chapter. For now, be aware that the following tables are linked to the files indicated:
| Table | External File Type | Filename |
| ContactsFixed | Text File | ContactsFixed.txt |
| Customers | Excel 8.0 | CollectibleMiniCars.xls |
| CustomerTypes | HTML | CustomerTypes.html |
| Products | Excel 8.0 | CollectibleMiniCars.xls |
| tblSales | Access | Chapter07_Link.accdb |
| tblSalesLineItems | Excel 8.0 | tblSalesLineItems.xls |
| tblSalesPayments | Access | Chapter07_Link.accdb |
The data linked to Access applications comes in a variety of formats. There is no practical way to document every possible type of linking operation in a single chapter. So, this chapter discusses the essential steps required to link to external data and gives a few examples demonstrating how these processes are performed in Access, instead of filling page after page with examples that may or may not be relevant to your work.
As you'll soon see, knowledge of the external data format is critical to a successful linking operation. You must have some notion of the external data format before you can successfully import data into your Access application or incorporate the data into an Access database through linking. This chapter points out many of the issues involved if you choose to link to external data; it's intended to serve as a guide as you perform these operations in your Access applications.
Linking External Data
As the database market continues to grow, the need to work with information from many different sources will escalate. If you have information captured in a SQL Server database or an old Excel spreadsheet, you don't want to reenter the information from these sources into Access. Also, the processes or policies at your company may require that the data live in these external files, and you don't want to risk having duplicate data that gets out of sync. Ideally, you want to open an Access table containing the data and use the information in its native format, without having to copy it or write a translation program to access it. In many cases, the capability of accessing information from one database format while working in another is often an essential starting point for many business projects.
Using code to copy or translate data from one application format to another is both time-consuming and costly. The time it takes can mean the difference between success and failure. Therefore, you want an intermediary between the different data sources in your environment.
Access can simultaneously link to multiple tables contained within other database systems. After an external file is linked, Access stores the link specification and uses the external data as if it were contained in a local table. Access easily links to other Access database tables as well as to non-Access database tables that support ODBC. A recommended practice is to split an Access database into two separate databases for easier use in a multiuser or client-server environment. Splitting your database in this manner is discussed in detail later in this chapter.
Identifying linked tables
In the “Ways of working with external data” section in Chapter 6, you saw a list of database tables and other types of files that Access links to. Access displays the names of linked tables in the object list and uses a special icon to indicate that the table is linked, not local. An arrow pointing to an icon indicates that the table name represents a link data source. Figure 7.1 shows several linked tables in the list. (The icon indicates that the file is linked. The icon also indicates which type of file is linked to the current Access database. For example, Excel has an X in a box and HTML tables have a globe symbol.)

Figure 7.1 Linked tables in an Access database. Notice that each linked table has an icon indicating its status as a linked table.
After you link an external database table to your Access database, you use it as you would any other table. For example, Figure 7.2 shows a query using several linked tables: tblCustomers (a local Access table), tblSales (a linked Access table), tblSaleLineItems (from an Excel file), and Products (from another Excel file). As you can see, there's nothing that distinguishes the fact that the tables are from external sources—Access treats them no differently from any other tables.

Figure 7.2 A query using externally linked tables.
This query shows the potential benefit of linking to a variety of data sources and seamlessly displays data from internal and linked tables. Figure 7.3 shows the datasheet returned by this query. Each column in this datasheet comes from a different data source.

Figure 7.3 The Datasheet view of externally linked data.
Figure 7.3 illustrates an important concept regarding using linked data in Access: Users won't know, nor will they care, where the data resides. All they want is to see the data in a format they expect. Only you, the developer, understand the issues involved in bringing this data to the user interface (UI). Other than the limitations of linked data (explained in the next section), users won't be able to tell the difference between native and linked data.
Limitations of linked data
Although this chapter describes using linked data as if it existed as native Access tables, certain operations can't be performed on linked data. Plus, the prohibited operations depend, to a certain extent, on the type of data linked to Access.
These limitations are relatively easy to understand. Linked data is never “owned” by Access. External files that are linked to Access are managed by their respective applications. For example, an Excel worksheet is managed by Excel. It would be presumptive—and dangerous—for Access to freely modify data in an Excel worksheet. For example, because many Excel operations depend on the relative positions of rows and columns in a worksheet, inserting a row into a worksheet might break calculations and other operations performed by Excel on the data. Deleting a row might distort a named range in the Excel worksheet, causing similar problems. Because there is no practical way for Access to understand all the operations performed on an external data file by its respective owner, Microsoft has chosen to take a conservative route and not allow Access to modify data that might cause problems for the data's owner.
The following list describes the limitations of linked data:
- Access data: There are no limitations to what you can do with the data in linked tables. You can't delete or rename the source table. Nor can you change the fields or data types of the source table.
- Excel data: Existing data in an Excel worksheet can't be changed, nor can rows be deleted or new rows be added to a worksheet. Excel data is essentially treated as read-only by Access.
- Text files: For all practical purposes, data linked to text files is treated as read-only in Access. Although the data can be used in forms and reports, you can't simply and easily update rows in a linked text file, nor can you delete existing rows in a text file. Oddly enough, you can add new rows to a text file; presumably, this is because new rows won't typically break existing operations the way that deleting or changing the contents of an existing row might.
- HTML: HTML data is treated exactly as Excel data. You can't modify, delete, or add rows to an HTML table.
- Outlook contacts: Outlook contacts can be displayed in Access forms and reports, but they can't be added, deleted, or changed.
- ODBC: ODBC is a data access technology that uses a driver between an Access database and an external database file, such as SQL Server or Oracle. Generally speaking, because the linked data source is a database table, you can perform whatever database operations (modifying, deleting, adding) you would with a native Access table, provided you've defined a unique index in Access. (We discuss ODBC database tables in some detail in the “Linking to ODBC data sources” section later in this chapter.)
Linking to other Access database tables
Access easily incorporates data located in the other Access files by linking to those tables. This process makes it easy to share data among Access applications across the network or on the local computer. The information presented in this section applies to virtually any Access data file you linked to from an Access database. Later in this chapter, you'll see short sections explaining the differences between linking to an Access table and linking to each of the other types of data files recognized by Access.
After you link to another Access table, you use it just as you use any table in the open database (with the exception that it can't be used in a relationship to other tables not in the source database). Follow these steps to link to tblSalesPayments in the Chapter07_Link.accdb database from the Chapter07.accdb database file:
- Open
Chapter07.accdb. - Select the External Data tab of the Ribbon, and then choose Access as the type of data you want to link. The Get External Data – Access Database dialog box (shown in Figure 7.4) appears.
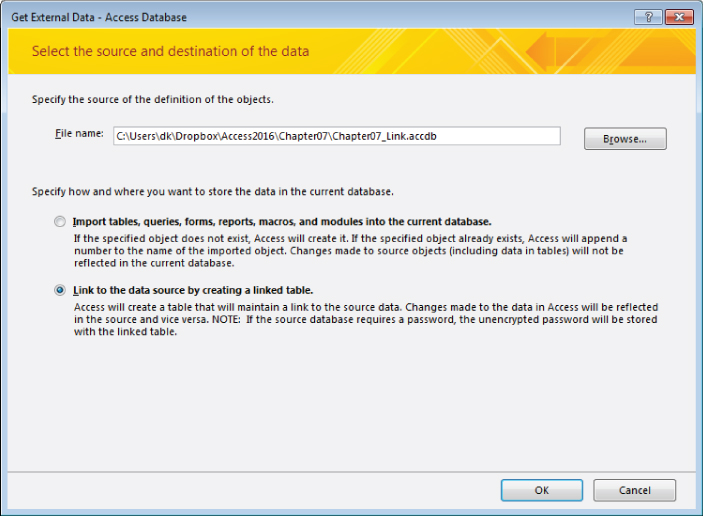
Figure 7.4 Use the Get External Data dialog box to select the type of operation you want to perform on the external data sources.
- Click the Browse button. The File Open dialog box appears.
- Locate
Chapter07_Link.accdband click Open. The File Open dialog box closes and you're taken back to the Get External Data – Access Database dialog box. - Select the option button for linking and click OK in the Get External Data – Access Database dialog box. The Link Tables dialog box enables you to select one or more tables from the selected database (in this case, Chapter07_Link). Figure 7.5 shows the Link Tables dialog box open on
Chapter07_Link.accdb.
Figure 7.5 Use the Link Tables dialog box to select the Access table(s) for linking.
- Select tblSalesPayments and click OK. Double-clicking the table name won't link the table—you have to highlight it and then click OK.
After you link tblSalesPayments, Access returns to the object list and shows you the newly linked table. Figure 7.6 shows tblSalesPayments linked to the current database. Notice the special icon attached to tblSalesPayments. This icon indicates that this table is linked to an external data source. Hovering over the linked table with the mouse reveals the linked table's data source.
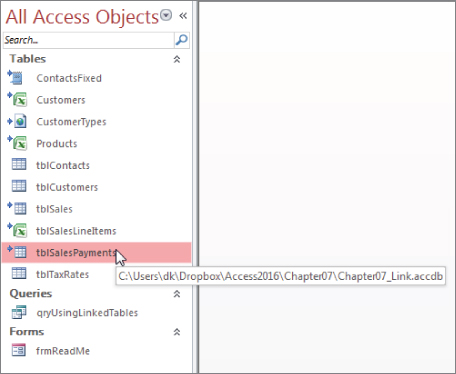
Figure 7.6 The Navigation pane with tblSalesPayments added. Hovering over the linked table icon reveals its source.
Linking to ODBC data sources
One significant advance with regard to data sharing is the establishment of the Open Database Connectivity (ODBC) standard by Microsoft and other vendors. ODBC is a specification that software vendors use to create drivers for database products. This specification lets your Access application work with data in a standard fashion across many different database platforms. If you write an application conforming to ODBC specifications, then your application will be able to use any other ODBC-compliant back end.
For example, say you create an Access application that uses a SQL Server database back end. The most common way to accomplish this requirement is to use the SQL Server ODBC driver. After developing the application, you find that one of your branch offices would like to use the application as well, but they're using Oracle as a database host. If your application has conformed closely to ODBC syntax, then you should be able to use the same application with Oracle by acquiring an Oracle ODBC driver. Not only are vendors supplying drivers for their own products, but there are now software vendors who only create and supply ODBC drivers.
Linking to non-database data
You can also link to non-database data, such as Excel, HTML, and text files. When you select one of these types of data sources, Access runs a Link Wizard that prompts you through the process.
Linking to Excel
Here are the main issues to keep in mind when linking to Excel data:
- An Excel workbook file might contain multiple worksheets. You must choose which worksheet within a workbook file to link to (unless you're using named ranges).
- You may link to named ranges within an Excel worksheet. Each range becomes a separate linked table in Access.
- Excel columns may contain virtually any type of data. Just because you've successfully linked to an Excel worksheet doesn't mean that your application will be able to use all the data contained in the worksheet. Because Excel doesn't limit the types of data contained in a worksheet, your application may encounter multiple types of data within a single column of a linked Excel worksheet. This means that you may have to add code or provide other strategies for working around the varying types of data contained in an Excel worksheet.
Follow these steps to link to the Excel CollectibleMiniCars.xls spreadsheet:
- In the
Chapter07.accdbdatabase, click the Excel button on the External Data tab of the Ribbon. The Get External Data – Excel Spreadsheet dialog box (shown in Figure 7.7) appears.
Figure 7.7 The first screen of the Get External Data – Excel Spreadsheet dialog box.
- Select Link to the Data Source by Creating a Linked Table, and then click Browse. The same Get External Data dialog box is used for both import and link operations, so be sure the correct operation is selected before continuing.
- Locate and open the Excel file. Select the CollectibleMiniCars spreadsheet file from the File Open dialog box and click Open.
- Click OK on the Get External Data - Excel Spreadsheet dialog. The Link Spreadsheet Wizard (see Figure 7.8) is shown. Notice that the Link Spreadsheet Wizard contains options for selecting either worksheets or named ranges within the workbook file. In this example, there are three different worksheets (named Products, Sales, and Customers) within the spreadsheet file.

Figure 7.8 The main Link Spreadsheet Wizard screen.
- Select the Products worksheet. The Link Spreadsheet Wizard walks you through a number of different screens where you specify details such as First Row Contains Column Headings and the data type you want to apply to each column in the Excel worksheet. The last screen of the Link Spreadsheet Wizard asks for the name of the newly linked table.
- Click Finish. The linked table is established and you're returned to the Access environment.
As with so many other things in database development, many decisions involved in linking to external data sources are based on how the data is to be used in the application. Also, the names you provide for fields and other details have a direct impact on your application.
Linking to HTML files
Linking to data contained in HTML documents is not covered in detail in this book because of the rather severe limitations imposed by Access on this process. For example, Access is unable to retrieve data from an arbitrary HTML file. The data must be presented as an HTML table, in a row-and-column format, and the data has to be relatively clean (absent any unusual data or mix of data, such as text, image, and numeric data combined within a single HTML table).
You're likely to encounter problems if more than one HTML table appears on the page, or if the data is presented in a hierarchical fashion (parent and child data).
The process of linking HTML data is similar to linking to Excel spreadsheets:
- Select the More drop-down list on the External Data tab of the Ribbon, and then select HTML Document from the list. The Get External Data – HTML Document dialog box appears.
- Select the Link to the Data Source by Creating a Link Table option, and click Browse. The File Open dialog box appears, enabling you to search for the HTML file you want to link.
From this point on, the process of linking to HTML data is similar to linking to other types of data files, including providing field names and other details of the linked data. Figure 7.9 shows the first screen of the Link HTML Wizard. Click the Advanced button to get to the Link Specification screen (shown in Figure 7.10), where you can provide the field names and other details.

Figure 7.9 The Link HTML Wizard screen showing the data in the HTML file.
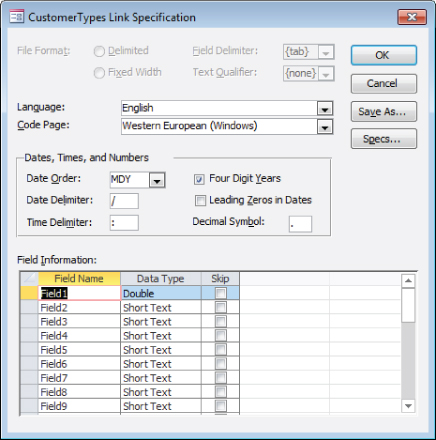
Figure 7.10 The Link Specification screen that is used to name the column headings (field names) for the linked table.
Linking to text files
A far more common situation than linking to HTML files is linking to data stored in plain text files. Most applications, including Word and Excel, are able to publish data in a variety of text formats. The most common formats you're likely to encounter are:
- Fixed-width: In a fixed-width text file, each line represents one row of a database table. Each field within a line occupies exactly the same number of characters as the corresponding field in the lines above and below the current line. For example, a Last Name field in a fixed-width text file might occupy 20 characters, while a phone number field may only use 10 or 15 characters. Each data field is padded with spaces to the right to fill out the width allocated to the field. Figure 7.11 shows a typical fixed-width file open in Notepad.

Figure 7.11 A typical fixed-width text file.
-
Comma-separated values (CSV): CSV files are somewhat more difficult to understand than fixed width. Each field is separated from the other fields by a comma character (,), and each field occupies as much space as necessary to contain the data. Generally speaking, there is little blank space between fields in a CSV file. The advantage of CSV files is that the data can be contained in a smaller file because each field occupies only as much disk space as necessary to contain the data.
CSV files can be difficult to read when opened in Notepad. Figure 7.12 shows a typical CSV text file.
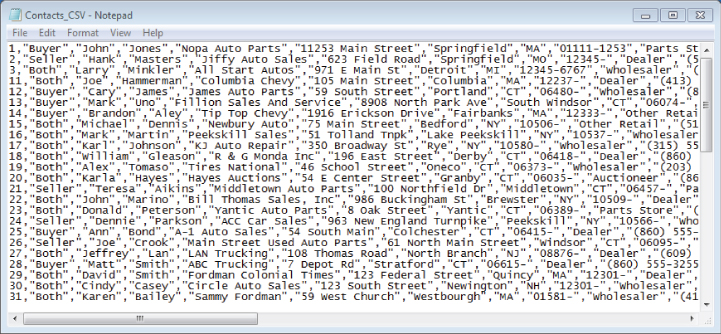
Figure 7.12 CSV data is more compact than fixed-width text, but it's more difficult to read.
Text files often are used as intermediate data-transfer vehicles between dissimilar applications. For example, there might be an obsolete data management system in your environment that's incompatible with any of the link or import data types in Access. If you're lucky, the obsolete system is able to output either fixed-width or CSV files. Linking to or importing the fixed-width or CSV files might be the best option for sharing data with the obsolete system. At the very least, much less time is required to link or import the data than would be involved in re-keying all the information from the obsolete system into Access.
Follow these steps to link to Contacts_FixedWidth.txt or :Contacts_CSV.txt
- Open
Chapter07.accdband select the External Data tab of the Ribbon. - Click the Text File button. The Get External Data – Text File dialog box appears.
- Be sure the Link to the Data Source by Creating a Link Table option is selected, and then click Browse. The File Open dialog box appears.
- Locate the text file (either
Contacts_FixedWidth.txtorContacts_CSV.txt) and click Open. - Click OK on the Get External Data – Text File dialog box. You'll be taken to the Link Text Wizard.
Generally speaking, Access makes a pretty good guess at how the data in the file is delimited. Linking to text data involves nothing more than clicking Next and verifying that Access has correctly identified the data in the file.
Working with Linked Tables
After you link to an external table from another database, you use it just as you would any other Access table. You use linked tables with forms, reports, and queries just as you would native Access tables. When working with external tables, you can modify many of their features (for example, setting view properties and relationships, setting links between tables in queries, and renaming the tables).
One note on renaming linked tables: Providing a different name for the table inside Access doesn't change the name of the file that's linked to the application. The name that Access refers to in a linked table is maintained within the Access application and doesn't influence the physical table that's linked.
Setting view properties
Although an external table is used like another Access table, you can't change the structure (delete, add, or rearrange fields) of an external table. You can, however, set several properties for the fields in a linked table:
- Format
- Decimal places
- Caption
- Input mask
- Unicode compressions
- IME sequence mode
- Display control
To change these properties, open the linked table in Design view. When you open a linked table in Design view, Access warns you that the design can't be modified. Figure 7.13 shows a warning when the Products table is opened in Design view. Despite that warning, the above properties can be changed.

Figure 7.13 Opening linked tables in Design view comes with a warning.
Setting relationships
Linking to external Access tables maintains the relationships that might exist between the external tables. Therefore, when linking to a back-end database, the relationships you've established in the back end, as well as any validation and default values, are recognized and honored by the front-end database. This is a good thing, because it means that the rules you've defined will be enforced regardless of how many front ends are created to use the tables.
Optimizing linked tables
When working with linked tables, Access has to retrieve records from another file. This process takes time, especially when the table resides on a network or in a SQL database. When working with external data, optimize performance by observing these basic rules:
- Avoid using functions in query criteria. This is especially true for aggregate functions, such as
DTotalorDCount, which retrieve all records from the linked table before performing the query operation. - Limit the number of external records to view. Create a query using criteria that limit the number of records from an external table. This query can then be used by other queries, forms, or reports.
- Avoid excessive movement in datasheets. View only the data you need to in a datasheet. Avoid paging up and down and jumping to the first or last record in very large tables. (The exception is when you're adding records to the external table.)
- If you add records to external linked tables, create a form to add records and set the DataEntry property to True. This makes the form an entry form that starts with a blank record every time it's executed. Data entry forms are not pre-populated with data from the bound table. Using a dedicated data entry form is much more efficient than building a normal form, populating it with data from the linked source, and then moving to the end of the linked data just to add a new record.
Deleting a linked table reference
Deleting a linked table from your database is a simple matter of performing three steps:
- In the Navigation Pane, select the linked table you want to delete.
- Press the Delete key, or right-click the linked table and select Delete from the shortcut menu.
- Click OK in the Access dialog box to delete the file.
Viewing or changing information for linked tables
Use the Linked Table Manager to update the links when you move, rename, or modify tables, indexes, or relationships associated with linked tables. Otherwise, Access won't be able to find the data file referenced by the link.
- Select the External Data tab of the Ribbon and click the Linked Table Manager button. The Linked Table Manager (shown in Figure 7.14) appears, enabling you to locate the data files associated with the linked tables in the database.

Figure 7.14 The Linked Table Manager enables you to relocate external tables that have been moved.
- Click the check box next to a linked table and click OK.
- Find the missing file and relink to Access. If all the files are already linked correctly, clicking OK makes Access verify all the linkages associated with all the selected tables.
- If you know all the linked data sources have been moved, select the Always Prompt for a New Location check box, and then click OK. Access then prompts you for the new location, and links all the tables as a batch process. You'll find this operation much faster than linking one or two tables at a time.
Refreshing linked tables
The data in linked tables is kept in sync with the source data automatically by Access. No user intervention is required to have up-to-date data. When a linked table is open in Datasheet view or otherwise being used, Access attempts to restrict access to the source data depending on what kind of data it is. For instance, Access locks linked text files that are in use so that you can't open them in a text editor.
To demonstrate how linked data is synchronized automatically, create a linked table to a text file and edit that text file by following these steps:
- Click Text File from the Import & Link group on the External Data tab of the Ribbon.
- Create a linked text file from the file named
ContactsFixed.txt, a fixed-length text file. The file is well formatted, so Access will guess correctly about where the fields begin. Don't worry about field names for this exercise. - Open the linked table ContactsFixed. Note that it contains 12 records. If you attempt to open
ContactFixed.txtin a text editor, Windows will tell you that it's being used by another process and won't allow you to open it. - Close the ContactsFixed table.
- Add a new row to the text file using your favorite plain text editor, such as Notepad. Don't use Word for this process, because you'll risk saving it in a format that's not plain text. Figure 7.15 shows the new
ContactsFixed.txtfile.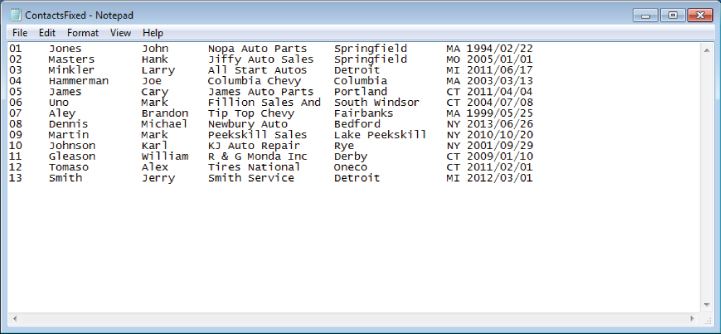
Figure 7.15 A new row in the text file will sync with Access automatically.
- Save the file and close the text editor.
- In Access, open the ContactsFixed linked table. The linked table now contains a 13th row.
Splitting a Database
There are many great reasons to link tables between Access databases. One of the best, and most common, reasons is to split the database. Splitting a database means creating two ACCDB files from one. One of the files, generally called the back end, contains only tables. The other file, the front end, contains queries, macros, code, and UI elements, such as forms and reports. The front end also contains links to all the tables in the back end.
The benefits of splitting a database
There is at least one extremely good reason why you should consider splitting your Access databases. Although you can place a single copy of an ACCDB or MDB file onto a shared computer on the network, the performance degradation from such a design is considerable.
Using an Access database stored on a remote computer involves much more than simply moving data from the remote computer to the local machine. All the form, menu, and Ribbon definitions must be transported to the local computer so that Windows can “construct” the UI on the local computer's monitor. The Windows installation on the local computer must intercept and transmit any keyboard and mouse events to the remote computer so that the proper code will run in response to these events. Finally, the single copy of Access on the remote computer must fulfill all data requests, no matter how trivial or demanding. The impact of all these actions is compounded by increasing the number of users working with the same remotely installed copy of the database.
Fortunately, most of these issues disappear when the database application is split into front-end and back-end components. The local Windows installation handles the UI from information stored in the front-end database. All code is run on the user's desktop computer, rather than on the remote machine. Also, the locally installed copy of Access is able to handle all local data requirements, while only those requests for remote data are passed on to the back-end database.
Before getting into the details of splitting a database, let's consider some of the problems associated with single-file databases. To begin with, unlike some other development systems, all the objects in an Access database application are stored in a single file, the familiar ACCDB or MDB you work with every day. Many other database systems like FoxPro for Windows maintain a number of different files for each application, usually one file per object (form, table, and so on). Although having to deal with multiple files complicates database development and maintenance somewhat, updating a single form or query involves nothing more than replacing the related file with the updated form or query file.
Updating an Access database object is somewhat more complicated. As you've probably discovered, replacing a form or query in an Access database used by a large number of users can be quite a problem. Replacing a form or other database object often requires hours of work importing the object into each user's copy of the database.
A second consideration is the network traffic inherent in single-file Access databases. Figure 7.16 shows an example of the problem. This figure illustrates a common method of sharing an Access database. The computer in the upper-left corner of the figure is the file server and holds the Access database file. Assume for a moment that the entire database is contained within a single ACCDB on the file server, and the database has been enabled for shared data access. Each workstation in Figure 7.16 has a full copy of Access (or the Access RunTime) installed.
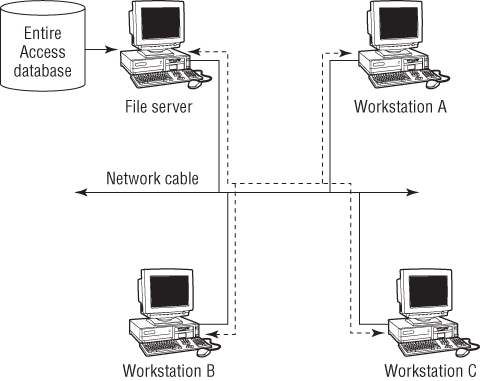
Figure 7.16 A database kept on a file server can generate a large amount of traffic on the network.
Now, what happens when the user on Workstation C opens the database? The Access installation on that machine must locate the ACCDB on the file server, open that file, and start up the application. This means that any splash forms, queries, and other startup activities must take place across the network before the user is able to work with the database. Any time a form is opened or a query is run, the information necessary to fulfill the query must travel across the network, slowing the operation. (In Figure 7.16, the network load is indicated by a thick dashed line.)
The situation shown in Figure 7.16 is made even worse when more than one user is using the same database. In this case, the network traffic is increased by the queries, opening of forms, and other operations performed by each additional user's copy of Access. Imagine the dashed line getting thicker with each operation across the network.
The split-database model is illustrated in Figure 7.17. Notice that the back-end database resides on the server while individual copies of the front-end database are placed on each workstation. Each front-end database contains links to the tables stored in the back-end ACCDB file. The front-end databases also contain the forms, reports, queries, and other user-interface components of the application.

Figure 7.17 A database kept on a file server can generate a large amount of traffic on the network.
The network traffic is reduced in Figure 7.17 because only linking information and data returned by queries is moved across the network. A user working with the database application uses the forms, queries, reports, macros, and code stored in the local front-end ACCDB file. Because the front end is accessed by a single user, response time is much improved because the local copy of Access is able to instantly open the database and begin the startup operations. Only when actually running queries does the network traffic increase.
The second major benefit of the split database design is that updating the forms, reports, and other application components requires nothing more than replacing the front-end database on each user's computer and reestablishing the links to the table in the back-end database. In fact, the design in Figure 7.17 supports the notion of customized front ends, depending on the requirements of the user sitting at each workstation. For example, a manager sitting at Workstation A might need access to personnel information that is not available to the people sitting at workstations B and C. In this case, the front-end database on Workstation A includes the forms, queries, and other database objects necessary to view the personnel information.
Knowing where to put which objects
The local ACCDB contains all the UI objects, including forms, reports, queries, macros, and modules. Keeping the UI components on the local machine dramatically improves performance. You don't need to move forms, queries, or reports across the network—these objects are much more easily manipulated on the local machine than when accessed across the network.
All shared tables should be placed in the back-end database kept on the server, along with all relationships between those tables. The server database is opened in Shared mode, making all its objects accessible to multiple users. The tables in the server database are linked to the front-end ACCDB on each user's Desktop. (There is no problem with simultaneously linking the same table to multiple databases.)
Obviously, with more than one person using the data within a table, the possibility exists that the same record will be edited by multiple users. The Access database engine handles this problem by locking a record as it's edited by a user. A lock contention occurs when more than one user tries to update the same record. Only one user will have “live” access to the record—all other users will either be locked or have their changes held up until the record holder is done making changes.
Using the Database Splitter add-in
The Database Splitter helps you split an application into front-end and back-end databases. This wizard enables you to build and test your database to your heart's content, and then lightens the burden of preparing the application for multiuser access.
As an experiment, let's take a look at splitting the Northwind Traders database into front-end and back-end ACCDB files. You start the Database Splitter by selecting the Database Tools tab of the Ribbon and then clicking the Access Database button in the Move Data group. The opening wizard screen (shown in Figure 7.18) explains the actions of the Database Splitter and suggests that you make a backup of the database before proceeding.

Figure 7.18 The Database Splitter is a simple wizard.
The only other information that the Database Splitter requires is where you want to put the back-end database. Figure 7.19 shows the familiar Explorer-style Create Back-end Database dialog box that lets you specify the location of the back-end ACCDB file. By default, the back-end database has the same name as the original database with a _be suffix added to the name (for example, MyDB_be.accdb).

Figure 7.19 Specify the permanent location of the back-end database in the Create Back-end Database dialog box.
When you click the Split button (refer to Figure 7.19), the Database Splitter creates the back-end database, exports all tables to it, deletes the tables in the local database, and creates links to the back-end tables. In other words, the Database Splitter performs precisely the same steps you'd have to perform manually if the Database Splitter weren't available.
Figure 7.20 shows the Access Database Explorer after splitting the Northwind Traders database. The back-end database contains only the tables exported from Northwind.accdb. Notice that the icons associated with all the tables in Northwind.accdb have been changed, indicating that they're now pointing to copies in the back-end database. You'll have to import any local tables from the back-end database before distributing the front end to the users.

Figure 7.20 The Database Splitter creates links for all tables in the database.