
Chapter 23
Using Access Data Macros
IN THIS CHAPTER
- Creating data macros
- Understanding table events
- Understanding data macro limitations
Beginning with Access 2007, macros have played a significant role in many Access applications. For a very long time, macros were considered the poor cousins of VBA statements. Although in many ways VBA and macros were equivalent in their capabilities, macros have always been considered inferior to VBA for handling an application's logic.
The problems with traditional Access macros were considerable:
- Macros existed as separate database objects, so keeping track of the macro's effect on a particular form was often difficult. Because there was no direct connection between a form (or a report, for that matter) and a macro, it was easy to break the macro by deleting or renaming it. VBA code encapsulated within the form's code module never had this problem.
- There was no way to trap or handle errors in macros. In versions of Access prior to 2007, macros would simply stop running and display an error dialog box if something unexpected happened. These interruptions were not welcomed by users, particularly because there was, most often, nothing a user could do to correct the problem or prevent it from happening again. VBA code has always featured strong error handling and could often provide a default value or instruct the user what to do in the event of a problem.
- Macros were unable to work with code. There was no way for a macro to loop through a recordset—for example, to sum field values or detect out-of-range data. VBA code is well suited for data management tasks and includes all the looping constructs necessary to iterate over recordsets.
In Access 2016, those concerns are all but a distant memory. Macros now offer error handling and temporary variables during a macro's execution. Access 2016 also offers embedded macros. As discussed in Chapter 22, embedded macros eliminate the objection that macros were always external to the form or report they serviced. Chapter 22 also demonstrates that macros in Access 2016 allow for looping and trapping errors.
This chapter specifically covers data macros, which add yet another reason macros in Access 2016 are a more attractive option than ever before.
Introducing Data Macros
A data macro is logic you attach to a table to enforce business rules at the table level. In some ways, a data macro is similar to a validation rule, except that a validation rule is rather unintelligent. Validation rules can't modify data or determine whether corrective action is needed. Data macros are specifically provided to allow you to manage data-oriented activity at the table level.
Most often, data macros are used to enforce business rules—such as a value can't be less than some threshold—or to perform data transformation during data entry. The real value of data macros is that they're in effect wherever a table's data is used, even in web applications that run on SharePoint. That's right—data macros work in both desktop and web applications.
Because data macros work in SharePoint environments, they're especially useful in Access web applications. For example, if a data macro is attached to a sales table in your web application, anytime the sales data is displayed on a web form the data macro is at work, watching for changes to the data and automatically controlling what happens to the table's data.
Data macros are intended to make it easier to ensure consistent data handling throughout your application, even when your application is running on the web. Because data macros are applied at the table level, the exact same action happens each time the table's data is updated. Although the subset of actions available to data macros is considerably smaller than standard macros, when carefully crafted and implemented, data macros are a powerful addition to Access applications.
Understanding Table Events
There are five different macro-programmable table events: BeforeChange, BeforeDelete, AfterInsert, AfterUpdate, and AfterDelete.
To see these events in the Ribbon, start up the Chapter23.accdb database and open tblProducts in Datasheet view. On the Ribbon, you'll see a Table tab. Select that tab and you'll see the events shown in Figure 23.1: BeforeChange, BeforeDelete, AfterInsert, AfterUpdate, and AfterDelete.

Figure 23.1 Every Access table includes five data-oriented events that can be selected when in Datasheet view.
These events are designated as “before” and “after” events. The “before” events occur before changes are made to the table's data, while the “after” events indicate that successful changes have been made.
“Before” events
The “before” events (BeforeChange and BeforeDelete) are very simple and support only a few macro actions. They support the program flow constructs (Comment, Group, and If) and just the LookupRecord data block. The only macro data actions they provide are ClearMacroError, OnError, RaiseError, SetLocalVar, and StopMacro.
The BeforeChange event is similar to the BeforeUpdate event attached to forms, reports, and controls. As its name implies, BeforeChange fires just before the data in a table is changed by the user, a query, or VBA code.
BeforeChange gives you a chance to look at new values in the current record and make changes if needed. By default, references to a field within a BeforeChange or BeforeDelete data macro automatically refer to the current record.
BeforeChange is an excellent opportunity to validate user input before committing values to a table. A simple example is shown in Figure 23.2. In this case, the default value of the Description field in tblProducts_BeforeChange is set to Description. If the user fails to change the Description field while adding a new record to the table, the BeforeChange event updates the field to “Please provide description.”
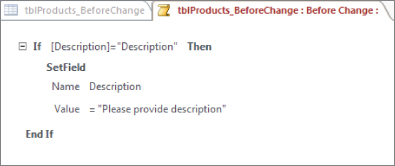
Figure 23.2 Using BeforeChange to update a field.
The BeforeChange event can't interrupt the user with a message box or stop the record from updating in the underlying table. All BeforeChange can do is set a field's value or set a local macro variable's value before the record is added or updated in the table.
BeforeChange fires for both updates to existing records and new record insertions into the table. Access provides the IsInsert property that tells the macro whether the current change is the result of inserting a new record or is because a record is being updated.
Figure 23.3 illustrates how IsInsert can be used within an If block to ensure the BeforeChange fired as the result of a new record inserted into the table.

Figure 23.3 Using IsInsert to determine if BeforeChange fired as the result of adding a new record.
Figure 23.3 also illustrates that program-flow blocks (like If) can be nested. The outer If block checks the value of IsInsert, while the inner If conditionally sets the Description field value.
The BeforeDelete event is parallel in almost every regard to BeforeChange, so no examples are given here. Use BeforeDelete to verify that conditions are appropriate for deletion. As with BeforeChange, the BeforeDelete event can't prevent a record's deletion, but it can set a local variable or raise an error if conditions warrant.
“After” events
The “after” events (AfterChange, AfterInsert, and AfterDelete) are more robust than their “before” counterparts. Each of these events supports the entire family of data macro actions (DeleteRecord, SetField, SendEmail, and so on), so it's likely that you'll frequently use these events as the basis of your data macros.
Figure 23.4 shows a typical use of the AfterInsert event. The AfterInsert event fires whenever a new record is added to a table. The new record has already been committed to the table, and AfterInsert is used to update a table named tblProductActivityLog.
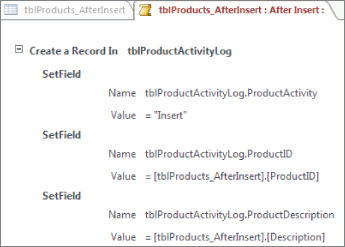
Figure 23.4 Using AfterInsert to add a record to tblProductActivityLog.
In Figure 23.4, notice that three fields (ProductActivity, ProductID, and ProductDescription) in tblProductActivityLog are being updated as part of a CreateRecord data block. The ProductID is an AutoNumber field in tblProducts_AfterInsert. The CreateRecord block has already added the record to the table, so the new record's ProductID value is available to this data macro. Therefore, when the SetField macro action updates the ProductID field in tblProductActivityLog, the new product record's ID is successfully added to the log table.
The AfterInsert data macro runs whenever a record is added to the table. Similar data macros can be added to the table's AfterUpdate and AfterDelete to log other changes to the table.
The most useful aspect of the “after” events is that they can use the ForEachRecord macro block to iterate over recordsets provided by tables or queries. This capability makes these events ideal for scanning a table for consistency, adding a record to a log table, or performing some other compute-intensive updates.
Using the macro designer for Data Macros
Data macros use the same macro designer used to create embedded and user interface macros. Once you master the macro designer, you'll use it for all macro development and macro management. The primary difference is that the Action Catalog (described in the next section) contains different actions, depending on the context.
Adding data macros to a table is quite easy. In fact, an Access table doesn't even have to be in Design view—you can add data macros to a table displayed as a datasheet, if you like. The data macros you construct for a table are in effect immediately, so you can easily work on a macro and observe how well the macro works without compiling or switching between Design view and Datasheet view.
In the Chapter23.accdb database, start by opening tblProducts in Datasheet view. On the Ribbon, you'll select the Table tab to expose table's data events (see Figure 23.1).
Double-click the After Update command to open the macro designer (shown in Figure 23.5). Initially, at least, there's not much to look at.

Figure 23.5 The macro designer for the table's AfterUpdate event.
The large blank area to the left is the macro design area. This is where you place macro actions. On the right side is the Action Catalog, a hierarchical list of all macro actions currently available. The only indication of which table event is being programmed is in the main Access window caption and in the tab above the macro design area.
With a macro open in the design area, the Ribbon contains several tools you use when working with the macro. Notice that you can collapse or expand macro sections, save the macro currently under construction, and close the macro designer.
You'll notice that the Ribbon you see in Figure 23.6 is exactly the same seen when working with embedded or standard macros. However, some options are not available to you. All the items in the Tools group, for example, are grayed out. This is because data macros don't provide the option of single-stepping through macro actions or converting to VBA code. Data macros are intended to be relatively simple, short, and to the point, rather than large and complex.
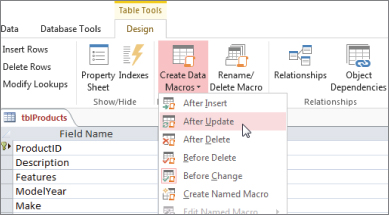
Figure 23.6 Selecting a table event when a table is in Design view.
Incidentally, if your table is in Design view, you can get to the data macro designer by selecting the Create Data Macros command from the Design tab (see Figure 23.6).
In either case, the macro designer opens as shown in Figure 23.5. When the Access tabbed interface is used, the table's name and selected event appear in the macro designer's tab. If the overlapping windows interface is selected, this information appears in the Access main window's caption.
In Figure 23.4 and again in Figure 23.6, notice the Named Macro option. A named macro is just like a data macro attached to a table event. The only difference is that a named macro is free floating and not specifically tied to a particular event. A named macro is meant to be called from an event macro and typically implements logic that is common to a table's fields. Consider the business rule described earlier. If more than one data macro in a table might change a product's wholesale cost, you might create a named macro to handle updating the RetailPrice field. The named macro could then be called by any of the table's other data macros so that every macro within the table handles the update in the same way.
Understanding the Action Catalog
The Action Catalog on the right side of the macro designer serves as the repository of macro actions you add to your data macros. The contents of the Action Catalog depend entirely on which table event has been selected, so its appearance varies considerably while you work with Access macros.
Program flow
At the top of the Action Catalog in Figure 23.5 are certain program flow constructs you apply to your macros. When working with data macros, the only program flow constructs available are comments, groups, and If blocks.
Comments help document your macros and should be used if the macro's logic is not easily understood. Macro comments are not executable—they're there simply to provide some text describing the goings-on in the macro.
A group (also called a macro group) provides a way to wrap a number of macro actions as a named entity. The group can be independently collapsed, copied, and moved around within a macro. A macro group is not, however, an executable unit; instead, it's simply meant to provide a convenient way to establish a block of macro actions to simplify your view of the macro in the macro designer.
The If block adds branching logic to a macro. You've seen several examples of the VBA If…Then…Else construct in other chapters, and a macro If is no different.
Data blocks
If you go back and look at Figure 23.5 again, you'll see Data Blocks under the Program Flow constructs. Each of the data block constructs includes an area for adding one or more macro actions. A data block construct performs all the macro actions as part of its operation. In other words, you typically set up the data block you want to perform (for example, EditRecord) and then add the actions you want to execute as part of the block.
Data blocks may also be nested. You could, for example, set up a ForEachRecord and then run the CreateRecord block, adding records to another table with data contained in the records returned by the ForEachRecord.
The data blocks macro actions are:
CreateRecord: TheCreateRecordaction provides a way to add a record to the current table (which is rarely done) or to another table (which is more typical). An example of usingCreateRecordis building a log of all changes to the tblProducts table (similar to Figure 23.4). TheCreateRecordmacro action can add a new record to a table, populating fields in the record with data passed from the current table. The reasonCreateRecordis not often used to add a record to the current table is that recursion can occur. Adding a new record to the current table triggers events such asAfterInsert(described in the “‘After’ events” section, earlier in this chapter), which may run theCreateRecordaction again and again.EditRecord: As its name implies,EditRecordprovides a way to change the content of an existing record in the current, or another, table.EditRecordis ideal for situations such as adjusting inventory levels when a product is sold or returned or calculating sales tax or shipping costs when the quantity field has been provided.ForEachRecord: TheForEachRecordaction is a looping construct. Given the name of a table or query,ForEachRecordcan perform an operation on every record in the recordset. The action can be an update using theSetFieldaction (described in the next section), can copy data, or can perform a mathematical operation on the data in the recordset. TheForEachRecordblock has a macro action included within the block to make it easy to specify the action you want this block to perform. And you can stack multiple macro actions within theForEachBlockto perform more-complex operations.LookupRecord: TheLookupRecordaction is quite simple and easy to understand.LookupRecordreturns a record found in a table and provides a macro action area for specifying the actions you want to perform on the returned record.
Data actions
The next group of actions in the Action Catalog is the Data actions; these are the actions a data macro can take. You've already read that a data macro consists of one or more actions that are executed as a single unit in response to a table event. You need a good understanding of the variety of macro actions available to data macros.
Here are the data macro actions:
DeleteRecord: As its name implies,DeleteRecorddeletes a record in a table (without confirmation from the user). Obviously,DeleteRecordmust be used carefully to prevent deleting valuable data from the application. A typical use ofDeleteRecordwould be as part of an archiving operation, where data in a table is copied into another table (perhaps a linked SQL Server table) and then deleted from the current table.CancelRecordChange:EditRecordandCreateRecordboth make irrevocable changes to a record.CancelRecordChange, in conjunction with anIfblock, allows a data macro to cancel the changes made byEditRecordandCreateRecordbefore the changes are committed to the database.ExitForEachRecord: TheForEachRecordloops through a recordset returned from a table or query, enabling the data macro to make changes to the recordset's data or scan the data for “interesting” values. There are many situations where a data macro may need to escape from aForEachRecordloop before it has run to the end of its recordset. For example, consider a data macro that searches for a certain value in a table, and once the value is found, there is no need to continue the loop. TheExitForEachRecordis typically executed as part of anIfblock (also discussed in the next section) and is executed only when a certain condition is true.LogEvent: Every Access 2016 application includes a hidden USysApplicationLog table (this table is hidden by virtue of the USys prefix in its name). USysApplicationLog is used to record data macro errors and can be used to log other information as well. TheLogEventmacro action is specifically designed to add a record to USysApplicationLog anytime you want from a data macro. The only field in USysApplicationLog that can be written usingLogEventis Description, a memo type field. The other fields in USysApplicationLog (Category, Context, DataMacroInstanceID, ErrorNumber, ObjectType, and SourceObject) are provided by the macro itself.SendEmail: This macro action, obviously, sends an e-mail using the default Windows e-mailer (usually Outlook). The arguments forSendEmailareTo,CC,BCC,Subject, andBody.SendEmailis quite useful in certain situations, such as automatically dispatching an e-mail when an error condition occurs, or when a product's inventory level falls below some threshold.SetField: TheSetFieldaction updates the value of a field in a table. The arguments toSetFieldinclude the table and field names and the new value to assign to the field.SetFieldis not available toBeforeChangeandBeforeDeletetable events.SetLocalVar: Access 2016 macros are able to use local variables for passing values from one part of a macro to another. For example, you might have a macro that looks up a value in a table and passes the value as a variable to the next macro action.SetLocalVaris an all-purpose variable declaration and assignment action that creates a variable and assigns a value to it.StopMacro: TheStopMacroaction interrupts the currently executing macro, causing it to terminate and exit. Most often used in conjunction with anIfdata block, or in the destination of anOnErrormacro action, there are no arguments toStopMacro.StopAllMacros: This macro action is parallel toStopMacro, except that it applies to all currently executing macros. Macros may run asynchronously because table events might launch multiple macros at one time, or a macro might call a named macro as part of its execution.RunDataMacro: This macro action is very simple. Its only argument is the name of some other data macro that Access runs.RunDataMacrois useful in situations where a certain data macro performs some task that another data macro finds useful. Instead of duplicating the macro's actions, it's simpler just to call the macro and allow it to perform its actions as a single operation.OnError: TheOnErrormacro action is the heart of Access macro error handling.OnErroris a directive that tells Access what to do in the event an error occurs during a macro's execution. The first argument (GoTo) is required and is set to either Next, Macro Name, or Fail.Nextdirects Access to simply ignore the error and continue execution at the macro action following the action that caused the error.- Unless another
OnErroris positioned within the data macro,OnError GoTo Nexttells Access to ignore all errors in the data macro and continue execution regardless of whatever errors occur. TheMacro Namedirective names a macro you want to jump to in the event of an error. The destination ofMacro Nameis a named macro, which is just a collection of macro actions not attached to a table event. TheMacro Namedestination could be a named macro within the current table or in another table. RaiseError: TheRaiseErrormacro action passes an error up to the user interface layer. An example is usingRaiseErroron aBeforeChangeevent to validate data before it's committed to the database.RaiseErrorpasses an error number and description to the application, adding the error details toUSysApplicationLog.ClearMacroError: Once an error has been handled by theRaiseErrormacro action or by theOnError GoTomacro action, theClearMacroErroraction can be used to reset the macro error object and prepare Access for the next error.
Creating Your First Data Macro
Now that you have some orientation on the macro designer and the Action Catalog, it's time to create your first data macro.
For this walk-through, let's assume that your company uses a standard markup of 66.66 percent on its products. This means that a product's wholesale cost is multiplied by 1.6666 to yield the default selling price of an item. Your company has found that a 66.66 percent markup provides the margin necessary for you to offer volume discounts, special sales, and significant discounts to selected buyers while remaining profitable.
The problem to be solved with a data macro is updating the retail price of a product anytime the product's cost is changed. Although this could be done quite easily with code or a macro behind Access forms, consider the issue if there were dozens of different forms where the product's cost might be changed. The same code or macro would have to be added in many different places, contributing to development and maintenance costs. Also, there is always the chance that one or more forms would not be updated should your company ever decide on a different approach for setting the default retail price of its products.
Using a data macro attached directly to the tblProducts table, for example, simplifies development and maintenance of the application's forms and reports. Because the business rule (multiplying cost by 1.66) is enforced at the data layer, every form, report, and query using the tblProducts table's data benefits from the data macro.
- Open the tblProducts table in Datasheet view.
- Select the Table tab on the Ribbon, and choose the
BeforeChangeevent. At this point, Access will activate the macro designer. - Double-click or drag the Group program flow action onto the macro's design surface. Here, you're creating a new macro group. Give the macro group a name as shown in Figure 23.7.

Figure 23.7 Add a Group to the macro and give it a name.
- While in the newly created group, double-click the Comment program flow action to place a comment onto the macro's design surface. With this comment, enter some friendly text describing what you're doing here (see Figure 23.8).
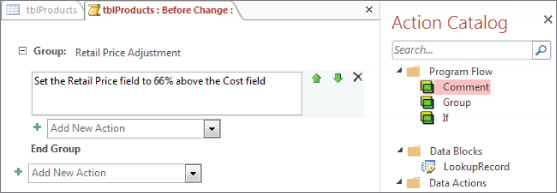
Figure 23.8 Add a Comment describing the actions taken in this macro.
- Now double-click the
Ifprogram flow action to place a new logic check onto the macro's design surface. As you can see in Figure 23.9, you're evaluating the Cost field to ensure the value is greater than zero. This check will ensure the rest of the macro only triggers if the conditions you specified are met.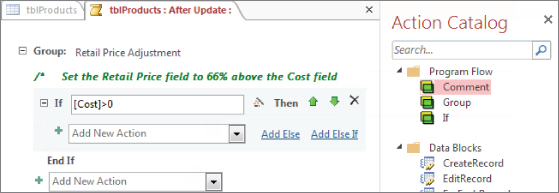
Figure 23.9 The If block conditionally executes macro actions based on logic you provide.
- If the condition we specified evaluates to true, we want to edit the record. In that case, double-click the
SetFieldaction to add it to theIfblock. Here, you need to identify the field you want edited and the value you want to use. Figure 23.10 illustrates that we want to set the [RetailPrice] field to the value returned by [Cost]*1.66.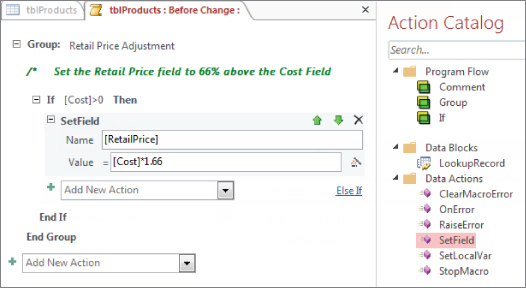
Figure 23.10 Adding the SetField action tells Access to change the record if the condition specified is true.
- At this point, the logic for our macro is complete. The last step is to click the Save command to finalize your data macro (see Figure 23.11).

Figure 23.11 Click Save to finalize the macro and have it take effect.
To test the macro, simply open tblProducts and enter a positive value in the Cost field of any record (as demonstrated in Figure 23.12). The RetailPrice field will automatically calculate per the actions provided by the BeforeChange data macro you just created.
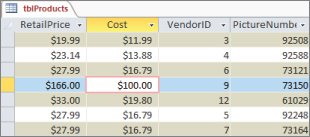
Figure 23.12 Entering a positive cost will now automatically update the RetailPrice field.
Again, this data macro will be in full effect even when edits are made via an Access form in a desktop database or an Access web application.
Managing Macro Objects
At this point, you should have a solid sense of how the macro designer works. In this section, let's dig deeper and explore some of the options for managing macro objects once they're added to a macro's design.
Collapsing and expanding macro items
Notice in Figure 23.11 that each macro item is accompanied by a collapse/expand button to the left of its name in the designer. These buttons allow you to view or hide parts of the macro. In Figure 23.13, you see the same macro with the Group level collapsed.

Figure 23.13 You can collapse and expand your macro items to simplify the surface of the macro designer.
Collapsing items helps when you need to review large macros and want to see only a subset of the macro at one time. Note that you can also use the Collapse/Expand commands found in the Ribbon.
Moving macro items
You may find it necessary to change the order of the actions you place in your macro. Access provides several methods for adjusting the items within the macro designer.
Macro items (blocks, actions, and so on) can be copied and pasted within the macro. Simply click any given macro item and press Ctrl+C or Ctrl+X to copy or cut the item, respectively, and then place your cursor in another location within the macro designer and press Ctrl+V.
Alternatively, macro items can be dragged into a new position with the mouse. This process is a little tricky because it's very easy to drag the wrong item away from its proper position. Carefully position the mouse pointer near the top of the target item, click with the mouse, and drag the item to its new location.
Access also provides the convenient up and down arrows (see Figure 23.14) that allow you to quickly move any macro item where you need it.
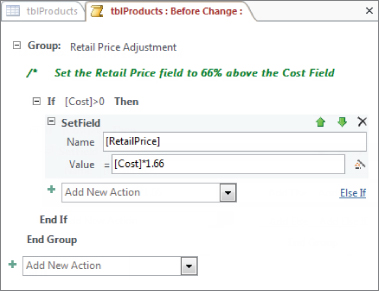
Figure 23.14 The order of macro items can be changed by using the up and down arrows next to the target item, by clicking and dragging items, or by copying and pasting.
Saving a macro as XML
A completely hidden feature of Access data macros is the ability to copy them from the macro designer and paste them into a text editor as XML. Access internally stores macros as XML, and copying a macro actually means copying its XML representation.
There are a couple of reasons you may want to save a macro as XML:
- To e-mail the macro to someone.
- To archive it as a backup. Because each table contains only one copy of each event macro (
AfterUpdate, for example) there's no easy way to set aside a copy of the macro before embarking on changes to the macro's logic.
Figure 23.15 shows the XML of the same macro you see in Figure 23.14 pasted into Windows Notepad.
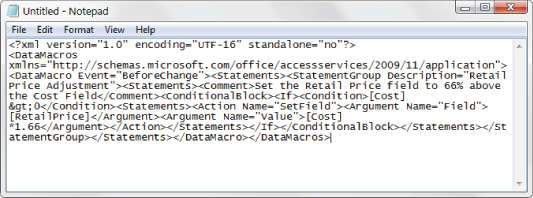
Figure 23.15 Saving a macro as XML.
To get the XML, simply go into the macro designer, press Ctrl+A to select all the actions, and then press Ctrl+C to copy all the actions. At this point, you can paste into an e-mail message, Notepad, or some other text editor.
The XML saved in a text file can be pasted right into the macro designer surface, and Access will display it as usual. The paste action works exactly as it does in Word or a plain text editor. The pasted macro actions appear exactly where the cursor is when the paste is initiated.
Recognizing the Limitations of Data Macros
As powerful as they are, data macros can't do everything. For example, data macros have no user interface at all. Data macros can't display a message box and can't open a form or report. Your ability to communicate with the user interface from a data macro is very limited, so data macros can't be used to notify users of problems or changes to data in tables. Displaying a user interface (such as a message box) would extract a serious performance penalty, particularly during bulk updates or inserts. Data macros are meant to run invisibly, with the highest possible performance.
Data macros are attached directly to Access tables and not to individual fields. If you have a situation where more than a few fields must be monitored or updated, the macro may become quite complex. Using the If block construct is a good way to conditionally execute blocks of macro statements.
The macro designer supports only one macro at a time. You must come to a stopping point on the current macro before closing it and opening another data macro.
Similarly, the macro designer is modal. You can't leave the macro designer without closing and saving (or not saving) the current macro. This restriction makes it difficult to view a table's data when working on a data macro's logic. As always, careful planning is a good idea when considering adding a data macro to a table.
Data macro execution doesn't occur on the back end in a split-database paradigm. Although the data macro resides in the table in the back-end database, the data macro is only executed in the front end.
Data macros can't work on multi-value or attachment fields. If it's important to use logic to control these data types, you must use traditional user interface macros or VBA.
Access 2016 data macros are not supported on linked tables. If the table in an Access database is linked to SQL Server, you can't write data macros for the table. You must use traditional user interface macros or VBA code for this purpose.
Data macros can't call VBA procedures. One of the primary objectives for data macros is to make them portable to SharePoint when an Access application is upsized to a web application. Any calls to VBA procedures are sure to fail because there is no way to convert VBA to JavaScript in the SharePoint environment.
Data macros don't support transactions. Every field and record update is executed immediately, and there's no way to roll back multiple table changes.
Finally, data macros are not compatible with versions of Access earlier than 2010. Anyone using Access 2007 (with Service Pack 1 installed) will be able to open and read tables containing data macros, but they will not be able to write to those tables.