
Chapter 24
Getting Started with Access VBA
IN THIS CHAPTER
- Working with VBA
- Reviewing VBA terminology
- Understanding VBA code basics
- Creating your first procedure
- Adding branching constructs
- Learning looping constructs
- Understanding objects and collections
- Exploring the Visual Basic Editor
Most Access developers use macros now and then. Although macros provide a quick and easy way to automate an application, writing Visual Basic for Applications (VBA) modules is the best way to create applications. VBA provides data access, looping and branching, and other features that macros simply don't support—or at least not with the flexibility most developers want. In this chapter, you learn how to use VBA to extend the power and usefulness of your applications.
Introducing Visual Basic for Applications
Visual Basic for Applications (VBA) is the programming language built into Microsoft Access. VBA is shared among all the Office applications, including Word, Excel, Outlook, PowerPoint, and even Visio. If you aren't already a VBA programmer, learning the VBA syntax and how to hook VBA into the Access event model is a definite career builder.
VBA is a key element in most professional Access applications. Microsoft provides VBA in Access because VBA provides significant flexibility and power to Access database applications. Without a full-fledged programming language like VBA, Access applications would have to rely on the somewhat limited set of actions offered by Access macros. Although macro programming also adds flexibility to Access applications, VBA is much easier to work with when you're programming complex data-management features or sophisticated user-interface requirements.
If you're new to programming, try not to become frustrated or overwhelmed by the seeming complexity of the VBA language. As with any new skill, you're much better off approaching VBA programming by taking it one step at a time. You need to learn exactly what VBA can do for you and your applications, along with the general syntax, statement structure, and how to compose procedures using the VBA language.
This book is chock-full of examples showing you how to use the VBA language to accomplish useful tasks. Each of the procedures you see in this book has been tested and verified to work correctly. If you find that a bit of code in this book doesn't work as expected, take the time to ensure that you've used the example code exactly as presented in this book. Often, the most difficult problems implementing any programming technique stem from simple errors, such as misspelling or forgetting to include a comma or parentheses where required.
Understanding VBA Terminology
Before we plunge into our VBA coverage, here's a review of some basic VBA terminology:
- Keyword: A word that has special meaning in VBA. For example, in the English language, the word now simply indicates a point in time. In VBA,
Nowis the name of a built-in VBA function that returns the current date and time. - Statement: A single VBA word or combination of words that constitutes an instruction to be performed by the VBA engine.
-
Procedure: A collection of VBA statements that are grouped together to perform a certain task. You might, for example, write a complex procedure that extracts data from a table, combines the data in a particular way, and then displays the data on a form. Or, you might write three smaller procedures, each of which performs a single step of the overall process.
There are two types of VBA procedures: subs (subroutines) and functions:
- Subroutines perform a task or tasks and then just go away.
- Functions perform a task and then return a value, such as the result of a calculation.
- Module: Procedures are stored in modules. If statements are like sentences and procedures are like paragraphs, then modules are the chapters or documents of the VBA language. A module consists of one or more procedures and other elements combined as a single entity within the application.
- Variable: Variables are sometimes tricky to understand. Because Access is a database development tool, it makes sense that VBA code has to have some way of managing the data involved in the application. A variable is nothing more than a name applied to represent a data value. In virtually all VBA programs, you create and use variables to hold values such as customer names, dates, and numeric values manipulated by the VBA code.
VBA is appropriately defined as a language. And just as with any human language, VBA consists of a number of words, sentences, and paragraphs, all arranged in a specific fashion. Each VBA sentence is a statement. Statements are aggregated as procedures, and procedures live within modules. A function is a specific type of procedure—one that returns a value when it's run. For example, Now() is a built-in VBA function that returns the current date and time, down to the second. You use the Now() function in your application whenever you need to capture the current date and time, such as when assigning a timestamp value to a record.
Starting with VBA Code Basics
Each statement in a procedure is an instruction you want Access to perform.
There are literally an infinite number of different VBA programming statements that could appear in an Access application. Generally, however, VBA statements are fairly easy to read and understand. Most often, you'll be able to understand the purpose of a VBA statement based on the keywords (such as DoCmd.OpenForm) and references to database objects in the statement.
Each VBA statement is an instruction that is processed and executed by the VBA language engine built into Access. Here's an example of a typical VBA statement that opens a form:
DoCmd.OpenForm "frmMyForm", acNormalNotice that this statement consists of an action (OpenForm) and a noun (frmMyForm). Most VBA statements follow a similar pattern of action and a reference either to the object performing the action or to the object that's the target of the action.
DoCmd is a built-in Access object that performs numerous tasks for you. Think of DoCmd as a little robot that can perform many different jobs. The OpenForm that follows DoCmd is the task you want DoCmd to run, and frmMyForm is the name of the form to open. Finally, acNormal is a modifier that tells DoCmd that you want the form opened in its “normal” view. The implication is that there are other view modes that may be applied to opening a form; these modes include Design (acDesign) or Datasheet (acFormDS) view, and Print Preview (acPreview, when applied to reports).
Creating VBA Programs
Access has a wide variety of tools that enable you to work with tables, queries, forms, and reports without ever having to write a single line of code. At some point, you might begin building more sophisticated applications. You might want to “bulletproof” your applications by providing more intensive data-entry validation or implementing better error handling.
Some operations can't be accomplished through the user interface, even with macros. You might find yourself saying, “I wish I had a way to …” or “There just has to be a function that will let me ....” At other times, you find that you're continually putting the same formula or expression in a query or filter. You might find yourself saying, “I'm tired of typing this formula into …” or “Doggone it, I typed the wrong formula in this ....”
For situations such as these, you need the horsepower of a high-level programming language such as VBA. VBA is a modern, structured programming language offering many of the programming structures available in most programming languages. VBA is extensible (capable of calling Windows API routines) and can interact through ActiveX Data Objects (ADO), through Data Access Objects (DAO), and with any Access or VBA data type.
Getting started with VBA programming in Access requires an understanding of its event-driven environment.
Modules and procedures
In this section, you'll create a simple procedure. First, we'll take you through the steps to create the procedure, including creating a module, inputting the statements, and running the procedure. Then, we'll describe each of the elements of the procedure in greater detail. The procedure you'll create in this section displays the result of squaring a number.
To create the SquareIt procedure, follow these steps:
- Select the Create tab of the Ribbon, and click the Module button. The Visual Basic Editor (VBE) will open with a blank code pane, as shown in Figure 24.1.

Figure 24.1 Creating a module presents a blank code pane.
- In the code pane, type the following statements:
Sub SquareIt()

    Dim lNumber As Long

    lNumber = 2

    MsgBox lNumber & " squared is " & lNumber ^ 2

End Sub - Place your cursor anywhere inside the code you just typed and choose Run Sub/Userform from the Run menu. You should see a message box similar to Figure 24.2.

Figure 24.2 Running the code displays a message box.
- Click OK to dismiss the message box and return to the VBE.
- Choose File
 Save and name the module when prompted (see Figure 24.3).
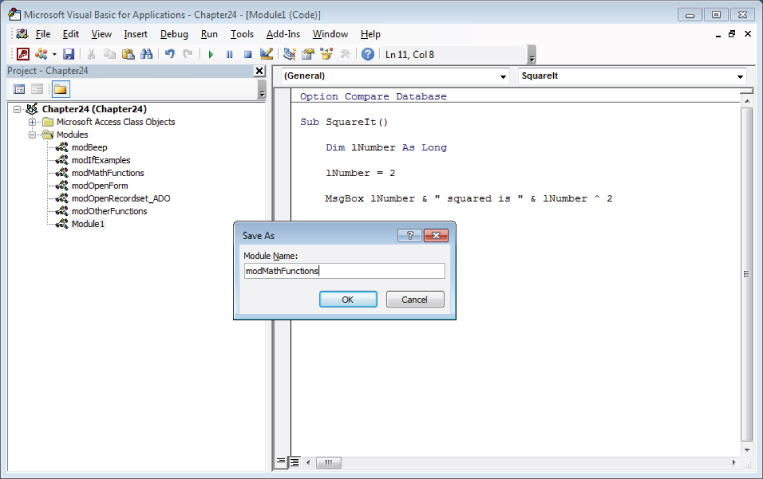
Figure 24.3 Saving the database prompts you to save any unsaved modules.
If you followed the preceding steps, you created a procedure and ran it. Congratulations! In the next several sections, we'll discuss each of these steps in more detail.
Modules
The first step you performed above was creating a new module. Modules are containers that hold your procedures. In this example, we created a standard module. The other type of module you can create is called a class module.
Standard modules
Standard modules are independent from other Access objects, like forms and reports. Standard modules store code that is used from anywhere within your application. By default, these procedures are often called global or public because they're accessible to all elements of your Access application.
Use public procedures throughout your application in expressions, macros, event procedures, and other VBA code. To use a public procedure, you simply reference it from VBA code in event procedures or any other procedure in your application.
Standard modules are stored in the Module section of the Navigation pane. Form and report modules (see the next section) are attached to their hosts and are accessed through the Form Property Sheet or Report Property Sheet.
Class modules
The other type of module is called a class module. A class defines how an object behaves. You can create your own classes, called custom classes, but the most common class module you'll use is a class module that's bound to a form or report.
In the above example, you created a standard module using the Ribbon. For class modules that are bound to a form or report, the module is created automatically by Access whenever you add VBA code to the form or report.
The most important difference between standard modules and class modules is that class modules support events. Events respond to user actions and run VBA code that's contained within the event procedure.
Module sections
You may have noticed that when you created the module, there was already code in it. Depending on the options you have set for your environment, Access will insert code into new modules automatically.
The area above the first procedure in a module is called the declaration section. The declaration section is used to store options and variables that will apply to every procedure in the module. Two common option declarations are Option Compare Database and Option Explicit. Option Compare Database determines how two strings are compared to each other and directs VBA to use the same comparison method that the database uses. The other options for comparing strings are Option Compare Text and Option Compare Binary. Basically, Option Compare Text doesn't care whether the letters are uppercase or lowercase and Option Compare Binary does care. It's a little more complicated than that, but Option Compare Database is usually the best option.
Option Explicit directs VBA to warn you if you have undeclared variables. By setting this option, you're telling VBA that you intend to explicitly declare any variables that you'll use. You'll learn more about declaring variables later.
Everything below the declarations section is known as the procedure section or code section. This section contains the subprocedures and functions of the module. It's important to understand the differences between these two sections because you can't put statements that belong in the declaration section into the code section, nor can you put code in the declaration section. If you do, the VBE will let you know that it's not allowed.
Procedures and functions
The next step you completed after creating a module to hold your procedure was to create the procedure itself. It's a simple procedure that does some simple math and displays the result. Each statement is structured according to the language's syntax, meaning that the spelling of keywords and the order of the words in the statement is important.
Subprocedures
A subprocedure (or sub) is the simplest type of procedure in a VBA project. A subprocedure is nothing more than a container for VBA statements that typically perform a task such as opening a form or report or running a query.
Subprocedures have two required statements: Sub procname and End Sub. If those were the only two statements you had, it would be a pretty uninteresting sub, but it would be legal. In our example, the procedure is started with the Sub SquareIt() statement. The procedure ends with the End Sub statement.
When determining the name of your procedure, there are a few rules that you must follow. The most important rules to remember are that the name must begin with a letter, can't contain most punctuation, and can't be more than 255 characters long. Rules aside, you should pick names for your procedures that describe what they do in a way that will be obvious to you when you read them later. Procedure names like GetData() will likely be hard to understand later, but ReadDataFromEmployeeTable() will be crystal clear. You probably don't want to push the 255-character limit on procedure names, but don't be afraid to make long, descriptive names.
Variable declaration
The first statement in our simple subprocedure is a variable declaration statement. It starts with the Dim keyword, which is short for dimension. The variable's name, lNumber, comes next. Variable names follow the same rules as procedure names, described in the previous section. The As keyword follows the name, which is followed by the data type. In this case, lNumber was declared as a Long Integer data type.
Variables hold data that you can use later in your procedure. When you declare a variable with the Dim keyword, you're telling VBA to reserve a spot in the computer's memory to store that data. The amount of memory that VBA will reserve depends on the data type. In this example, you told VBA to hold enough memory to store a Long Integer, or 32 bits of memory.
The As datatype portion of the variable declaration statement is optional. You could declare lNumber with the statement:
Dim lNumberWhen you omit the data type, VBA will determine an appropriate data type when you assign a value to the variable. That may seem like a handy service VBA is providing, but it's not a very good practice. VBA will assign a data type to the variable based on the first time you use it, but it doesn't know all the plans you have in mind for that variable. It may end up assigning a data type that's too small for what you need. Having VBA assign data types is also slower than if you assign them as you write the code.
Variable assignment
By declaring a variable with the Dim statement, you've reserved a place in memory where you can store data for later use. The next line in the procedure stores the number 2 in the variable lNumber. Here's what that line looks like in the procedure:
lNumber = 2Assigning values to variables is easy. There are really only two things you need to remember:
- You must assign a value that is appropriate for the variable's data type. In this case, you're storing a number without a decimal in a variable declared as
Long. If you tried to store data that isn't appropriate for the variable's data type, VBA would do its best to convert the value into the appropriate data type. If you tried to store the value8.26, for example, in aLongvariable, VBA would convert it to8by truncating the number to remove the decimals. If VBA were unable to convert the data, you'd get an error. -
The variable name goes on the left of the equal sign, and the value goes on the right. Everything on the right of the equal sign is evaluated before it's assigned to the variable. For this example, there's not much to evaluate because it's simply the number
2. Consider the following statement, which computes the product of two numbers and assigns it to a variable.dProduct = 3 * 6.1In that statement,
3is multiplied by6.1, and the result,18.3, is assigned to the variable. That's still pretty straightforward, but consider yet another example.bIsEqual = dProduct = 18.3In this statement,
bIsEqualis a variable declared as Boolean, anddProductis a variable declared as Double. But there are two equal signs. The first equal sign is the assignment operator—setting a variable equal to a value. Any other equal signs (there's only one other, in this case) are comparison operators. Comparison operators returnTrueorFalse. IfdProductwere equal to18.3, thenbIsEqualwould get the valueTrue. Everything to the right of the first equal sign (the assignment operator) is evaluated first, and the result is assigned to the variable.
Functions
A function is very similar to a subprocedure, with one major exception: A function returns a value when it ends. A simple example is the built-in VBA Now() function, which returns the current date and time. Now() can be used virtually anywhere your application needs to use or display the current date and time. An example is including Now() in a report header or footer so that the user knows exactly when the report was printed.
Now() is just one of several hundred built-in VBA functions. As you'll see throughout this book, the built-in VBA functions provide useful and very powerful features to your Access applications.
In addition to built-in functions, you might add custom functions that return values required by your applications. An example is a data transformation routine that performs a mathematical operation (such as currency conversion or calculating shipping costs) on an input value. It doesn't matter where the input value comes from (table, form, query, and so on). The function always returns exactly the correct calculated value, no matter where the function is used.
Within the body of a function, you specify the function's return value by assigning a value to the function's name (and, yes, it does look pretty strange to include the function's name within the function's body). You then can use the returned value as part of a larger expression. The following function calculates the square footage of a room:
Function SquareFeet(dHeight As Double, _
    dWidth As Double) As Double


  'Assign this function's value:
  SquareFeet = dHeight * dWidth


End Function
This function receives two parameters: dHeight and dWidth. Notice that the function's name, SquareFeet, is assigned a value within the body of the function. The function is declared as a Double data type, so the return value is recognized by the VBA interpreter as a Double.
The main thing to keep in mind about functions is that they return values. The returned value is often assigned to a variable or control on a form or report:
dAnswer = SquareFeet(dHeight, dWidth)
Me!txtAnswer = SquareFeet(dHeight, dWidth)
If the function (or subroutine, for that matter) requires information (such as the Height and Width in the case of the SquareFeet function), the information is passed as arguments within the parentheses in the function's declaration.
Working in the code window
Unlike designing a table or dropping controls in the sections of a report, a module's code pane is a very unstructured place to work. VBA code is simply text, and there aren't a lot of visual cues to tell you how to write the code or where to put particular pieces of the code. In this section, we'll describe some features of the code window and some techniques to keep your code organized and readable.
White space
In the code already presented in this chapter, you may have noticed some indentation and some blank lines. In the programming world, this is known as white space. White space consists of spaces, tabs, and blank lines. With very few exceptions, VBA ignores white space. The following two procedures are identical as far as the VBA compiler is concerned.
Function BMI(dPounds As Double, lHeight As Long) As Double


    BMI = dPounds / (lHeight ^ 2) * 703
End Function


Function BMI(dPounds As Double, lHeight As Long) As Double
BMI = dPounds / (lHeight ^ 2) * 703
End Function
In the first function, a blank line was inserted after the Function statement, and another blank line was inserted before the End Function statement. Also, a tab was inserted before the single statement within the procedure. All the white space elements were removed in the second function. Despite the difference in appearance, the VBA compiler reads the two functions identically, and the two functions return the same result.
In some programming languages, white space is important and meaningful. That isn't the case for VBA. The purpose of white space is to make your code more readable. Different programmers format their code with white space in different ways. Whatever formatting conventions you choose to use, the most important thing is to be consistent. Consistency in formatting will help you read and understand your code more easily, even if you're reading months or years later.
Line continuation
The VBE window can expand to be as wide as your screen. Sometimes your statements are so long that they extend beyond the window even when it's as wide as it can be. VBA provides a way to continue the current line onto the next line. When used with long statements, this can help make your code more readable. The line continuation characters are a space followed by an underscore. When the VBA compiler sees a space and an underscore at the end of the line, it knows that the next line is a continuation of the current one. Figure 24.4 shows a simple procedure with one very long statement. The statement extends beyond the code pane window, and you must scroll to read it.

Figure 24.4 A long statement extends beyond the code window.
Use the line continuation characters to break the long statement into multiple lines. This will allow you to see the whole statement. The statement in Figure 24.4 could be rewritten as the following statement:
Function GetDatedFooter() As String


    GetDatedFooter = "This report was printed on " _
        & Format(Now, "dd-mmm-yyyy") & _
        " and changes made to the data after that " & _
        "date won't be reflected."


End Function
The underscore is typically referred to as the line continuation character, but the space that comes before it is equally important. You need both characters, space and underscore, to continue a line. The line continuation character can't be used in the middle of a string. Notice in the above example that the long string is broken up into four smaller strings and concatenated together with ampersands. To spread a long string over multiple lines, it must be broken up so that the line continuation character can be used.
Multi-statement lines
Another way to improve the readability of your code is by putting two or more statements on one line. VBA uses the colon to separate statements on the same line. If you have a lot of short statements that are taking up a lot of vertical space in the code pane, you can put a few of them on the same line to clean up the code. In the following example, many similar statements are grouped together.
    i = 12: j = 45: k = 32
    l = 87: m = 77: n = 2
    o = 89: p = 64: q = 52
Those nine statements are assigning numbers to nine different variables. If they were written out one after the other, they would eat up a lot of the code window. By putting three statements on each line, less space is wasted. This technique is useful when you have small statements that are all doing roughly the same operation. If your statements are long or diverse, it actually hinders the readability of the code and should be avoided.
IntelliSense
Suppose that you know you want to use a specific command, but you can't remember the exact syntax. Access includes four features (collectively known as IntelliSense) to help you find the proper keyword and determine the correct parameters as you create each line of code:
-
Complete Word: Any time you're typing a keyword, you can press Ctrl+spacebar to get a list of keywords. The list automatically scrolls to the keyword that matches what you've already typed. If there is only one match, you don't see the list and the word is simply completed for you. Figure 24.5 shows what happens when you type “do” and press Ctrl+spacebar.
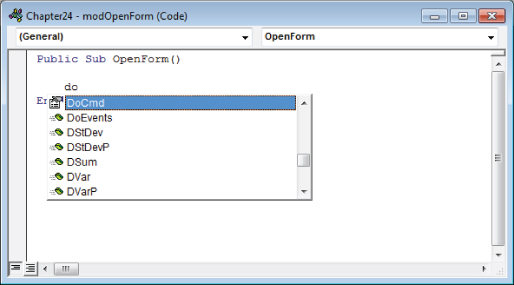
Figure 24.5 Complete Word shows a list of keywords.
If you were to type “doc” instead of just “do,” the keyword
DoCmdwould be completed rather than a list because there is only one keyword that starts withdoc. -
Auto List Members: Auto List Members is a drop-down list that is automatically displayed when you type the beginning of a keyword that has associated objects, properties, or methods. For example, if you enter
DoCmd.Open, a list of the possible options displays, as shown in Figure 24.6. Scroll through the list box and press Enter to select the option you want.
Figure 24.6 Access Auto List Members help in a module.
In this example, the
OpenFormmethod is selected. (Actions associated with an object are called methods.) After you choose an item in the list, more Auto List Members help is displayed. Or, if parameters are associated with the keyword, the other type of module help, Auto Quick Info (see the next bullet), is displayed, as shown in Figure 24.7.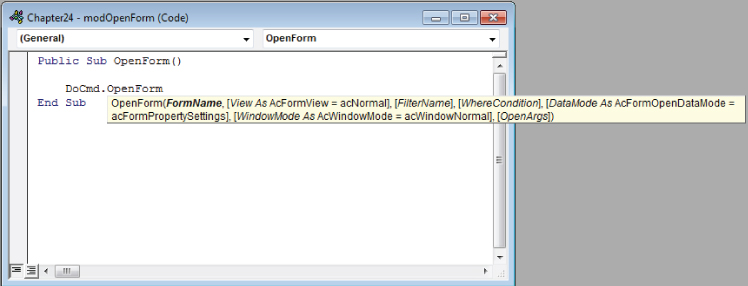
Figure 24.7 Access Auto Quick Info help in a module.
-
Auto Quick Info: Auto Quick Info guides you through all the options (called parameters) for the specific item. The bold word (
FormName) is the next parameter available for theOpenFormmethod. Figure 24.7 shows that there are many parameters available for theOpenFormcommand. The parameters are separated by commas. As each parameter is entered, the next parameter is highlighted in bold. The position of parameters is significant; they can't be rearranged without causing problems. Press the Esc key to hide Auto List Members help.Not every parameter is required for every VBA command. Parameters surrounded by square brackets (such as
Viewin Figure 24.7) are optional. Access provides reasonable defaults for all optional arguments that are omitted from the statement using the command. - Auto Constants: Auto Constants is a drop-down list that displays when you're on a parameter that requires a built-in constant. In Figure 24.7, the Auto Quick Info shows that the second parameter is
Viewand is described as[View As acFormView = acNormal]. The brackets around the parameter indicate that it's an optional parameter.acFormViewis a family of built-in constants that you can use for this parameter. The default constant,acNormal, is used if you omit this parameter. Figure 24.8 shows the list ofacFormViewconstants available. Simply select the one you want and type a comma. The constant and the comma are inserted into the statement, and you're ready for the next parameter.
Figure 24.8 Access Auto Constants help in a module.
Compiling procedures
After code has been written, you should compile it to complete the development process.
The compilation step converts the English-like VBA syntax to a binary format that is easily executed at run time. Also, during compilation, all your code is checked for incorrect syntax and other errors that will cause problems when the user works with the application.
If you don't compile your Access applications during the development cycle, Access compiles the code whenever a user opens the application and begins using it. In this case, errors in your code might prevent the user from using the application, causing a great deal of inconvenience to everyone involved.
Compile your applications by choosing Debug ![]() Compile from the VBE's menu. An error window appears if the compilation is not successful. Figure 24.9 shows the result of an unsuccessful compile due to a misspelling of a variable name. It doesn't tell you that you misspelled a variable; rather, it reports that it can't find where you declared a particular variable. That can mean that you simply forgot to declare it, but it usually means you spelled it differently in the code from how you spelled it in the declaration statement.
Compile from the VBE's menu. An error window appears if the compilation is not successful. Figure 24.9 shows the result of an unsuccessful compile due to a misspelling of a variable name. It doesn't tell you that you misspelled a variable; rather, it reports that it can't find where you declared a particular variable. That can mean that you simply forgot to declare it, but it usually means you spelled it differently in the code from how you spelled it in the declaration statement.

Figure 24.9 The compiler reports errors.
Saving a module
Modules differ from other Access objects in that there isn't an explicit way to save a newly created, individual module. New modules that are created don't display in the Navigation pane until they're saved, and the modules that are displayed there open in the VBE when double-clicked.
Modules are saved by saving the database and responding to the prompts that Access displays. In the VBE, choose File ![]() Save to save the database. You'll be prompted to save all unsaved modules and other unsaved objects. You aren't prompted to save modules that have already been saved, even if they've been changed. Those modules are simply saved with the name you provided previously.
Save to save the database. You'll be prompted to save all unsaved modules and other unsaved objects. You aren't prompted to save modules that have already been saved, even if they've been changed. Those modules are simply saved with the name you provided previously.
Class modules that are attached to a form or report are saved when the form or report is saved.
Understanding VBA Branching Constructs
The real power of any programming language is its capability to make a decision based on a condition that might be different each time the user works with the application. VBA provides two ways for a procedure to execute code conditionally: branching and looping.
Branching
Often, a program performs different tasks based on some value. If the condition is true, the code performs one action. If the condition is false, the code performs a different action. An application's capability to look at a value and, based on that value, decide which code to run is known as branching (or conditional processing).
The procedure is similar to walking down a road and coming to a fork in the road; you can go to the left or to the right. If a sign at the fork points left for home and right for work, you can decide which way to go. If you need to go to work, you go to the right; if you need to go home, you go to the left. In the same way, a program looks at the value of some variable and decides which set of code should be processed.
VBA offers two sets of conditional processing statements:
If…Then…Else…End IfSelect Case…End Select
The If keyword
The If keyword can be used in a few different ways, but they all check a condition and, based on the evaluation, perform an action. The condition must evaluate to a Boolean value (True or False). If the condition is true, the program moves to the line following the If statement. If the condition is false, the program skips to the statement following the Else statement, if present, or the End If statement if there is no Else clause.
The If…Then construct
An If statement can take a few different forms. The first form is the If…Then construct. It is a one line statement where the condition and the action are all in the same statement. In the following example, the sState variable is set if the sCity variable contains certain data.
If sCity = "Dallas" Then sState = "Texas"VBA first evaluates sCity = "Dallas" and determines if the conditional is true or false. If it's true (that is, if sCity has been assigned the value Dallas), the portion of the statement after the Then keyword is executed. In this case, the sState variable is assigned the value Texas. If the conditional is false, the program moves on to the next line in the procedure and the sState variable doesn't change.
The If…End If construct
The next form is the If…End If construct. This construct, and the ones that follow, are commonly known as If blocks because they can contain more than one line of code (a block of code), unlike the If…Then construct that can only execute one line. The previous example can be rewritten as an If…End If.
If sCity = "Dallas" Then
   sState = "Texas"
End If
This example is exactly the same as the one before it. If the conditional statement is true, the single line in the If block is executed. The difference is when the conditional is false. In that case, the program braches to the line immediately following the End If statement and program execution continues.
The benefit of the If…End If construct is that you can execute multiple statements when a conditional is true. In the next example, two variables are assigned values when the conditional is true.
If sCity = "Dallas" Then
  sState = "Texas"
  dTaxRate = 0.075
End If
If the conditional is true, both statements are executed. Otherwise, the program branches to the line just below End If and continues executing.
The If…Else…End If construct
In the previous examples, one or more statements are executed when the conditional is true and nothing happens when the conditional is false. The Else keyword can be included in an If block to identify statements that should run when the conditional is false.
If sCity = "Dallas" Then
    sState = "Texas"
    dTaxRate = 0.075
Else
    sState = "Michigan"
    dTaxRate = 0.05
End If
When the conditional is true, the first two statements are executed (setting sState to Texas and dTaxRate to 0.075). Then the program branches to the line below End If and continues executing. The two statements between Else and End If aren't executed.
If the conditional is false, however, the program branches to the statement below the Else statement and skips the first two. It's very common to see a construct like this that executes certain lines of code when a condition is met and certain other lines when it's not.
You must use an If block to use an Else statement. Else statements do not work with the first construct (the If…Then construct).
The If…ElseIf…End If construct
The final If construct is yet another If block type of construct. Instead of only one conditional, there are multiple conditionals. The ElseIf statement defines as many other conditionals as you need.
If sCity = "Dallas" Then
    sState = "Texas"
    dTaxRate = 0.075
ElseIf sCity = "Detroit" Then
    sState = "Michigan"
    dTaxRate = 0.05
Else
    sState = "Oregon"
    dTaxRate = 0.0625
End If
The program flows through an If…ElseIf…EndIf construct much like it does through the others. If the first conditional is true, the statements in the first section are executed and the program branches to the line just below the End If. If the first conditional is false, the program branches to the second conditional (the first ElseIf) and tests that conditional. If none of the conditionals is true, the statements in the Else section are executed. The Else statement is optional when using ElseIf. If you omit the Else statement and none of the conditionals is true, no statements in the If block are executed.
Nested If statements
Nesting statements refers to putting statements inside a block of other statements. In the case of If, nesting means that one If block is inside another If block.
If sState = "Michigan" Then
    If sCity = "Detrioit" Then
        dTaxRate = 0.05
    ElseIf sCity = "Kalamazoo" Then
        dTaxRate = 0.045
    Else
        dTaxRate = 0
    End If
End If
The outer If block tests the sState variable. If that condition is true, the inner If block is executed and the sCity variable is tested. If the conditional in the outer If block is false, the program branches to the line below the End If statement that matches the If statement being evaluated. Proper indenting, though not required, is helpful to see which Else and End If statements go with which If statements.
Boolean values and conditionals
If statements are wonderful, and you'll see them in almost every piece of code you write. However, there are two situations in which they're misused. Consider this code fragment:
If bIsBuyer = True Then
    bIsInPurchasing = True
Else
    bIsInPurchasing = False
End If
This is a simple If…Else…End If construct where the conditional checks to see if the Boolean variable bIsBuyer is True. Based on the result of that conditional, another Boolean variable is set to True or False. There's nothing wrong with the code—it will compile and run just fine—but there is a way to simplify the code and make it more readable. First, comparing a Boolean variable to True or False is unnecessary because the variable already is true or false. The first line can be simplified to:
If bIsBuyer ThenAssuming bIsBuyer is True, then in the first example, the compiler evaluates bIsBuyer = True, which reduces to True = True, and of course that returns True. In the simpler example, bIsBuyer is evaluated and returns True. Because bIsBuyer is a Boolean variable, comparing it to a Boolean value is redundant.
The second simplification step is to remove the If statement altogether. Whenever you're setting a Boolean value in an If block, you should consider whether the Boolean value can be set directly.
bIsInPurchasing = bIsBuyerThis one line of code does the same things as the five lines we started with. If bIsBuyer is True, bIsInPurchasing will also be True. If bIsBuyer is False, bIsInPurchasing will also be False. There may be situations in which you need to set one variable to the opposite of the other. VBA provides the Not keyword to convert Booleans from True to False and vice versa.
bIsInPurchasing = Not bIsTruckDriverThe variable bIsTruckDriver is evaluated as either true or false and the Not keyword returns the opposite. If bIsTruckDriver is True, bIsInPurchasing will be assigned the value False.
When you have many conditions to test, the If…Then…ElseIf…Else conditions can get rather unwieldy. A better approach is to use the Select Case…End Select construct.
The Select Case…End Select statement
VBA offers the Select Case statement to check for multiple conditions. Following is the general syntax of the Select Case statement:
Select Case Expression


    Case Value1
        [Action to take when Expression = Value1]


    Case Value2
        [Action to take when Expression = Value2]


    Case ...


    Case Else
       [Default action when no value matches Expression]


End Select
Notice that the syntax is similar to that of the statement. Instead of a Boolean condition, the If…ThenSelect Case statement uses an expression at the very top. Then, each Case clause tests its value against the expression's value. When a Case value matches the expression, the program executes the block of code until it reaches another Case statement or the End Select statement. VBA executes the code for only one matching Case statement.
Figure 24.10 shows Select…Case used by frmDialogContactPrint to decide which of several reports to open.

Figure 24.10 Using the Select Case statement.
The code in Figure 24.10 shows the expression in the Select Case is Me![grpTypeOf-Print]. This expression represents a group of option buttons on the form. When evaluated, it returns a 1, 2, or 3 depending on which option button is selected. The value in each Case statement is then compared to the expression's value and, if there is a match, any statements between the matching Case statement and the next Case statement (or the End Select statement) are executed.
Using the Case Else statement is optional, but it's always a good idea. The Case Else clause is always the last Case statement of Select Case and is executed when none of the Case values matches the expression at the top of the Select Case statement.
The Case statement can be inequality comparisons by incorporating the Is keyword.
Select Case dTaxRate
    Case Is < 0.03
        MsgBox "Low taxes"
    Case Is > 0.07
        MsgBox "High taxes"
    Case Else
        MsgBox "Average taxes"
End Select
By including the Is keyword, you can make a comparison in the Case statement. In this example, the dTaxRate variable is evaluated in the Select Case statement. In the first Case statement, the value is compared to 0.03 and if it's lower, the code under that Case statement is executed. If dTaxRate is in between 0.03 and 0.07, the Case Else statement will be executed because neither of the first two Case statements would be true.
The Case statement also accepts multiple values. You can separate multiple values in the same Case statement with a comma. You can also specify a range of values using the To keyword. The following example shows both of these techniques:
Select Case dSalesAmt
  Case 0.99, 1.99
    dCommissionPct = 0.1
  Case 2 To 4.99
    dCommissionPct = 0.15
  Case Is >= 5
    dCommissionPct = 0.17
End Select
Looping
Another powerful process that VBA offers is looping, the capability to execute a single statement or a group of statements over and over. The statement or group of statements is repeated until some condition is met.
VBA offers two types of looping constructs:
Do…LoopFor…Next
Do…Loop constructs are used when you need to repeat a statement or group of statements and you don't know how many times you need to repeat them. For…Next constructs are used when you already know how many times to repeat the statements.
Loops are commonly used to process records within a recordset, change the appearance of controls on forms, and a number of other tasks that require repeating the same VBA statements multiple times.
The Do…Loop statement
Do…Loop is used to repeat a group of statements while a condition is true or until a condition is true. This statement is one of the most commonly used VBA looping constructs:
Do [While | Until Condition]
    [VBA statements]
    [Exit Do]
    [VBA statements]
Loop
Alternatively, the While (or Until) may appear at the bottom of the construct:
Do
    [VBA statements]
    [Exit Do]
    [VBA statements]
Loop [While | Until Condition]
Notice that Do…Loop has several options. The While clause causes the VBA statements within the Do…Loop to execute as long as the condition is true. Execution drops out of the Do…Loop as soon as the condition evaluates to false.
The Until clause works in just the opposite way. The code within the Do…Loop executes only as long as the condition is false.
Placing the While or Until clause at the top of the Do…Loop means that the loop never executes if the condition is not met. Placing the While or Until at the bottom of the loop means that the loop executes at least once because the condition is not evaluated until after the statements within the loop have executed the first time.
Exit Do immediately terminates the Do…Loop. Use Exit Do as part of a test within the loop:
Do While Condition1
    [VBA statements]
    If Condition2 Then Exit Do
    [VBA statements]
Loop
Exit Do is often used to prevent endless loops. An endless loop occurs when the condition's state (true or false) never changes within the loop.
In case you're wondering, Condition1Condition2Do…Loop.
Figure 24.11 illustrates how a Do loop may be used. In this particular example, a recordset has been opened and each record is processed within the Do loop. In this example, the last name field is printed in the Immediate window, but the data is not modified or used in any way.

Figure 24.11 Using the Do…Loop statement.
The While and Until clauses provide powerful flexibility for processing a Do…Loop in your code.
The For…Next statement
Use For…Next to repeat a statement block a set number of times. The general format of For…Next is:
For CounterVariable = Start To End
    [VBA Statements]
    [Exit For]
    [VBA Statements]
Next CounterVariable
The following procedure uses the built-in Beep function to emit a sound a set number of times. The For…Next loop determines the number of beeps.
Sub BeepWarning()
    Dim lBeep As Long
    Dim lBeepCount As Long


    lBeepCount = 5


    For lBeep = 1 To lBeepCount
        Beep
    Next lBeep


End Sub
In this procedure, lBeep is the counter variable, 1 is the start, and lBeepCount is the end. When the program reaches the For line, lBeep is set to 1. As long as lBeep is less than or equal to lBeepCount, the statements inside the For…Next block are executed. When the Next line is reached, lBeep is increased by one and again compared to lBeepCount. If lBeep is still less than or equal to lBeepCount, the loop is executed again. When lBeep becomes greater than lBeepCount, the loop is complete and the remaining code in the procedure is executed.
An alternate form of For…Next is:
For CounterVariable = Start To End Step StepValue
    [Statement block]
Next CounterVariable
The only difference here is that the StepValue is added to the first statement. The Step keyword followed by an increment causes the counter variable to be incremented by the step value each time the loop executes. For example, if Start10 and End100 and StepValue10, the counter variable starts at 10 and increments by 10 each time the loop executes. As you saw in the previous example, when Step is omitted, the default is to increment CounterVariable
Most of the time, a For…Next loop counts upward, starting at an initial value and incrementing the counter variable by the amount specified by the step value. In some cases, however, you might need a loop that starts at a high start value and steps downward to an end value. In this case, use a negative number as the step value. The Step keyword is required when looping backward. If you omit it, the For statement will see that CounterVariableEnd and the loop won't be executed.
For Each…Next is a special implementation of For…Next for looping through collections. For Each…Next is discussed in the next section.
Up until this point, you've been working with simple variables such as Booleans, Longs, and Strings. The following section explains the special syntax to use when working with objects instead of simple variables.
Working with Objects and Collections
Very often, you have to work with objects such as the controls on a form or a recordset object containing data extracted from the database. VBA provides several constructs specifically designed to work with objects and collections of objects.
An object primer
Although Access is not object oriented, it's often referred to as object based. Many of the things you work with in Access are objects and not just simple numbers and character strings. Generally speaking, an object is a complex entity that performs some kind of job within an Access application. Access uses collections to aggregate similar objects as a single group.
For example, when you build an Access form, you're actually creating a Form object. As you add controls to the form, you're adding them to the form's Controls collection. Even though you might add different types of controls (such as buttons and text boxes) to the form, the form's Controls collection contains all the controls you've added to the form.
You'll see many, many examples of working with individual objects and collections of objects in this book. Understanding how objects differ from simple variables is an important step to becoming a proficient Access developer.
Each type of Access object includes its own properties and methods, and shares many other properties (such as Name) and methods with many other Access objects.
Collections are usually named by taking the name of the objects they contain and making it plural. The Forms collection contains the Form object. The Reports collection contains the Report object. There are exceptions, however, such as the Controls collection. While the Controls collection does contain Control objects, each Control object is also another type of object. A Control object can be a Textbox object, a Combobox object, or any one of several more specific object types.
Collections have just a few properties. These are the two most important properties associated with Access collections:
Count: The number of items contained with the collection. A collection with aCountof0is empty. Collections can contain virtually any number of items, but performance degrades when theCountbecomes very large (in excess of 50,000 objects).Item: Once you have objects stored in a collection, you need a way to reference individual objects in the collection. TheItemproperty points to a single item within a collection.
The following example demonstrates setting a property on just one item in a collection:
MyCollection.Item(9).SomeProperty = Valueor:
MyCollection.Item("ItemName").SomeProperty = Valuewhere MyCollectionSomePropertyValue
This short example demonstrates a few important concepts regarding collections:
-
There are different ways to reference the items stored in a collection. In most cases, each item stored in a collection (such as a form's
Controlscollection) has a name and can be referenced using its name:MyForm.Controls("txtLastName").FontBold = TrueAs a consequence, each object's name within a collection must be unique. You can't, for example, have two controls with the same name on an Access form.
The alternate way to reference an object in a collection is with a number that indicates the item's ordinal position within the collection. The first item added to a collection is item 0 (zero), the second is item 1, and so on.
- Collections have default properties. You may have noticed that the last code fragment didn't use the
Itemproperty to get at thetxtLastNamecontrol. TheItemproperty is the default property for most collections and is often omitted. The following two lines of code are the same.MyForm.Controls.Item(1).Text = "Name" MyForm.Controls(1).Text = "Name" - A collection might contain many thousands of objects. Although performance suffers when a collection contains tens of thousands of objects, a collection is a handy way to store an arbitrary number of items as an application runs. You'll see several examples of using collections as storage devices in this book.
Properties and methods
Objects have properties and methods. They also have events, which we'll discuss thoroughly in Chapter 26.
Properties
Properties let you read and change simple values that are the characteristics of the object. The Label object has a Caption property. The Caption property is the string that is displayed in the label. The Label object also has Height and Width properties that hold numbers determining the object's size. These are examples of properties that hold simple values.
Properties can also return other objects. As you've seen, the Form object has a Controls property. But isn't Controls a collection object? Yes, it is. And for each collection object, there is a property that returns it. When you write MyForm.Controls.Count, you're using the Controls property of MyForm to get access to the Controls collection object. Fortunately, the Access object model is so well designed that you don't have to worry about what is a simple property and what is a property returning an object. When you see two dot operators in a single statement, you can be sure you're accessing another object. Typing a dot operator after a simple value property won't give you any options.
Methods
You can also access an object's methods through the dot operator. Methods differ from properties because they don't return a value. Methods can generally be put into two categories:
- Methods that change more than one property at once
- Methods that perform an action external to the object
The first type of method changes two or more properties at once. The CommandButton object has a method called SizeToFit. The SizeToFit property changes the Height property, the Width property, or both so that all the text in the Caption property can be displayed.
The second type of method performs some action outside its parent object. It usually changes a few properties on the way. The Form object has an Undo method. The Undo method has to go outside of the form and read the undo stack from Access to determine what the last action was. When this method is called after a text box is changed, the text box's Text property is changed back to its previous value.
The With statement
The With statement enables you to access an object's properties and methods without typing the object's name over and over. Any properties or methods used between With and End With automatically refer to the object specified in the With statement. Any number of statements can appear between the With and End With statements, and With statements can be nested. Properties and methods will refer to the object in the innermost With block that contains them.
For example, consider the code using the following For…Next looping construct. This code loops through all members of a form's Controls collection, examining each control. If the control is a command button, the button's font is set to 12 point, bold, Times New Roman:
Private Sub cmdOld_Click()
  Dim i As Integer
  Dim MyControl As Control


  For i = 0 To Me.Controls.Count - 1
    Set MyControl = Me.Controls(i) 'Grab a control
    If TypeOf MyControl Is CommandButton Then
      'Set a few properties of the control:
      MyControl.FontName = "Times New Roman"
      MyControl.FontBold = True
      MyControl.FontSize = 12
    End If
  Next
End Sub
Don't be confused by the different expressions you see in this example. The heart of this procedure is the For…Next loop. The loop begins at zero (the start value) and executes until the i variable reaches the number of controls on the form minus one. (The controls on an Access form are numbered beginning with zero. The Count property tells you how many controls are on the form.) Within the loop, a variable named MyControl is pointed at the control indicated by the i variable. The If TypeOf statement evaluates the exact type of control referenced by the MyControl variable.
Within the body of the If…Then block, the control's properties (FontName, FontBold, and FontSize) are adjusted. You'll frequently see code such as this when it's necessary to manipulate all the members of a collection.
Notice that the control variable is referenced in each of the assignment statements. Referencing control properties one at a time is a fairly slow process. If the form contains many controls, this code executes relatively slowly.
An improvement on this code uses the With statement to isolate one member of the Controls collection and apply a number of statements to that control. The following code uses the With statement to apply a number of font settings to a single control:
Private Sub cmdWith_Click()
  Dim i As Integer
  Dim MyControl As Control


  For i = 0 To Me.Controls.Count - 1
    Set MyControl = Me.Controls(i)  'Grab a control
    If TypeOf MyControl Is CommandButton Then
      With MyControl
        'Set a few properties of the control:
        .FontName = "Arial"
        .FontBold = True
        .FontSize = 8
      End With
    End If
  Next
End Sub
The code in this example (cmdWith_Click) executes somewhat faster than the previous example (cmdOld_Click). Once Access has a handle on the control (With MyControl), it's able to apply all the statements in the body of the With without having to fetch the control from the controls on the form as in cmdOld_Click.
In practical terms, however, it's highly unlikely that you'll notice any difference in execution times when using the With construct as shown in this example. However, when working with massive sets of data, the With statement might contribute to overall performance. In any case, the With statement reduces the wordiness of the subroutine, and makes the code much easier to read and understand. It also saves tons of typing when you're changing a lot of properties of an object.
Think of the With statement as if you're handing Access a particular item and saying “Here, apply all these properties to this item.” The previous example said, “Go get the item named x and apply this property to it” over and over again.
The For Each statement
The code in cmdWith_Click is further improved by using the For Each statement to traverse the Controls collection. For Each walks through each member of a collection, making it available for examination or manipulation. The following code shows how For Each simplifies the example:
Private Sub cmdForEach_Click()
  Dim MyControl As Control


  For Each MyControl In Me.Controls
    If TypeOf MyControl Is CommandButton Then
      With MyControl
        .FontName = "MS Sans Serif"
        .FontBold = False
        .FontSize = 8
      End With
    End If
  Next
End Sub
The improvement goes beyond using fewer lines to get the same amount of work done. Notice that you no longer need an integer variable to count through the Controls collection. You also don't have to call on the Controls collection's Count property to determine when to end the For loop. All this overhead is handled silently and automatically for you by the VBA programming language.
The code in this listing is easier to understand than in either of the previous procedures. The purpose of each level of nesting is obvious and clear. You don't have to keep track of the index to see what's happening, and you don't have to worry about whether to start the For loop at 0 or 1. The code in the For…Each example is marginally faster than the With…End With example because no time is spent incrementing the integer value used to count through the loop, and Access doesn't have to evaluate which control in the collection to work on.

Figure 24.12 frmWithDemo is included in Chapter24.accdb.
Exploring the Visual Basic Editor
To be a productive Access developer, you need to know your way around the Visual Basic Editor (VBE). This section explores the features of the VBE and how to use them.
The Immediate window
When you write code for a procedure, you might want to try the procedure while you're in the module, or you might need to check the results of an expression. The Immediate window (shown in Figure 24.13) enables you to try your procedures without leaving the module. You can run the module and check variables.

Figure 24.13 The Immediate window.
Press Ctrl+G to view the Immediate window, or choose View ![]() Immediate Window in the VBA code editor.
Immediate Window in the VBA code editor.
Running the BeepWarning procedure is easy. Simply type BeepWarning into the Immediate window and press Enter. You might hear five beeps or only a continuous beep because the interval between beeps is short.
The Project Explorer
The Project Explorer is a window within the VBE that displays all the modules in your project, both standard modules and form and report modules. It provides an easy way to move between modules without going back to the main Access application.
To view the Project Explorer, press Ctrl+R or choose View ![]() Project Explorer from the VBE's menu. By default, the Project Explorer is docked to the left side of the VBE window, as shown in Figure 24.14.
Project Explorer from the VBE's menu. By default, the Project Explorer is docked to the left side of the VBE window, as shown in Figure 24.14.

Figure 24.14 The Project Explorer shows all the modules in your database.
The Project Explorer shows your project at the top of a collapsible list. The project name is the same as the database name without the ACCDB extension. Beneath the project name is one or more folders. In Figure 24.14, you can see that our project has a folder for Microsoft Access Class Objects and one for Modules. The Class Objects folder holds class modules that are associated with a form or report, while the Modules folder holds standard modules.
There are three icons at the top of the Project Explorer:
- View Code: Clicking View Code puts the focus into the code pane—the large area where you write and edit VBA code. It offers little advantage over just moving your mouse and clicking in the code pane.
- View Object: Clicking View Object displays the object associated with the module. If you're in a module associated with a form or report, that form or report will be displayed. It's a handy shortcut for moving back to the main Access window. This button has no effect on standard modules.
- Toggle Folders: Modules are displayed in folders by default. To remove the folders and display all the modules as one list, click Toggle Folders. Click it again to return to folder view. With proper naming conventions, showing folders in the Project Explorer is unnecessary. If you prefix all your standard modules with mod, they'll all be grouped together in either view.
The Object Browser
The Object Browser is a window in the VBE that lets you see all the objects, properties, methods, and events in your project. Unlike the Immediate window and the Project Explorer, the Object Browser is not docked by default and usually covers up the entire code pane.
The Object Browser is a useful tool for finding properties and methods. In Figure 24.15, the search term font was entered in the search box. The Object Browser displays all the elements that contain that string.
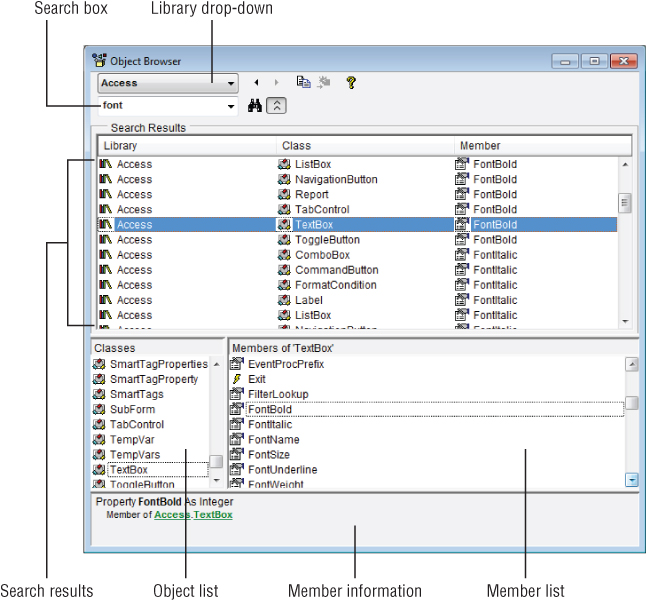
Figure 24.15 Search the Object Browser to find properties and methods.
The Object Browser has a Libraries drop-down box to limit the search. You can also search “All Libraries” if you're not sure which library to look in. In Figure 24.15, the search was limited to the Access library. The Access library contains the Access object model and is the library you'll use the most when developing Access applications.
The search shown in Figure 24.15 found quite a few entries. The Class column shows the object's name, and the Member column shows the property or method. The bottom section of the Object Browser lets you scroll through all the objects and see all their properties and methods.
VBE options
Many of the most important features in Access affect only developers. These features are hidden from end users and benefit only the person building the application. Spend some time exploring these features so that you fully understand their benefits. You'll soon settle on option settings that suit the way you work and the kind of assistance you want as you write your VBA code.
The Editor tab of the Options dialog box
The Options dialog box contains several important settings that greatly influence how you interact with Access as you add code to your applications. These options are accessed by choosing Tools ![]() Options from the VBE menu. Figure 24.16 shows the Editor tab of the Options dialog box.
Options from the VBE menu. Figure 24.16 shows the Editor tab of the Options dialog box.

Figure 24.16 The Editor tab of the Options dialog box.
Auto Indent
Auto Indent causes code to be indented to the current depth in all successive lines of code. For example, if you indented the current line of code with two tabs, the next line of code that you create when you press Enter will automatically be indented the same amount.
Auto Syntax Check
When the Auto Syntax Check option is selected, Access checks each line of code for syntax errors as you enter it in the code editor and displays a message box when it finds one. Many experienced developers find this behavior intrusive and prefer to keep this option disabled. With Auto Syntax Check disabled, lines with syntax errors are colored red, but no message box is displayed. The benefit of the message box is that it gives you a little more information about the error it found, although often these messages are hard to understand.
Require Variable Declaration
This setting automatically inserts the Option Explicit directive into all new VBA modules in your Access application. This option is not selected by default. It's almost universally accepted that Option Explicit should be used and this option should be enabled. Any modules created before this option is set will not be updated to include Option Explicit. The good news is, you can simply type the directive into those modules.
Auto List Members
This option pops up a list box containing the members of an object's hierarchy in the code window. In Figure 24.6, the list of the DoCmd object's members appeared as soon as we typed as the period following DoCmd in the VBA statement. You select an item from the list by continuing to type it in or scrolling the list and pressing the spacebar.
Auto Quick Info
When Auto Quick Info has been selected, Access pops up syntax help (refer to Figure 24.7) when you enter the name of a procedure (function, subroutine, or method) followed by a period, space, or opening parenthesis. The procedure can be a built-in function or subroutine or one that you've written yourself in Access VBA.
Auto Data Tips
The Auto Data Tips option displays the value of variables when you hold the mouse cursor over a variable with the module in break mode. Auto Data Tips is an alternative to setting a watch on the variable and flipping to the Debug window when Access reaches the break point.
The Project Properties dialog box
All the code components in an Access application—including all the modules, procedures, variables, and other elements—are aggregated as the application's VBA project. The VBA language engine accesses modules and procedures as members of the project. Access manages the code in your application by keeping track of all the code objects that are included in the project, which is different and separate from the code added into the application as runtime libraries and wizards.
Each Access project includes a number of important options. The Project Properties dialog box (shown in Figure 24.17) contains a number of settings that are important for developers. Open the Project Properties dialog box by choosing Tools ![]() Project Name Properties (where Project Name is the name of your database's project).
Project Name Properties (where Project Name is the name of your database's project).
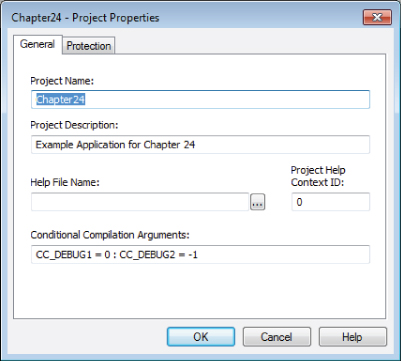
Figure 24.17 The Project Properties dialog box contains a number of interesting options.
Project name
Certain changes in an application's structure require Access to recompile the code in the application. For example, changing the code in a standard module affects all statements in other modules using that code, so Access must recompile all the code in the application. Until the code is recompiled, Access “decompiles” the application by reverting to the plain-text version of the code stored in the ACCDB file and ignoring the compiled code in the ACCDB. This means that each line of the code must be interpreted at run time, dramatically slowing the application.
Sometimes insignificant modifications, such as changing the name of the project itself, are sufficient to cause decompilation. This happens because of the hierarchical nature of Access VBA. Because all objects are “owned” by some other object, changing the name of a high-level object might change the dependencies and ownerships of all objects below it in the object hierarchy.
Access maintains a separate, independent project name for the code and executable objects in the application. Simply changing the name of the ACCDB file is not enough to decompile the code in an Access application. By default, the project name is the same as the name of the ACCDB, but it's not dependent on it. You can assign a unique name to the project with the Project Name text box in the General tab of the Project Properties dialog box.
Project description
The project description is, as its name implies, a description for the project. Because this area is so small, it isn't possible to add anything of significance that might be helpful to another developer.
Conditional compilation arguments
Compiler directives instruct the Access VBA compiler to include or exclude portions of code, depending on the value of a constant established in the module's declarations section. Code lines that begin with # are conditionally compiled.
One of the limitations of using compiler directives is that the constant declaration is local to the module. This means that you have to use the #Const compiler directive to set up the constant in every module that includes the #If directive. This limitation can make it difficult to remove all the #Const compiler directives to modify the code at the conclusion of development.
For example, consider a situation in which you want to use conditional compilation to include certain debugging statements and functions during the development cycle. Just before shipping the application to its users, you want to remove the compiler directives from the code so that your users won't see the message boxes, status bar messages, and other debugging information. If your application consists of dozens of forms and modules, you have to make sure you find every single instance of the #Const directive to make sure you successfully deactivated the debugging code. (This is why it's such a good idea to apply a naming convention to the identifiers you use with the #Const directive.)
Fortunately, Access provides a way for you to set up “global” conditional compilation arguments. The General tab of the Project Properties dialog box contains the Conditional Compilation Arguments text box, where you can enter arguments to be evaluated by the conditional compilation directives in your code.
As an example, assume you've set up the following sort of statements in all the modules in your application:
#If CC_DEBUG2 Then
  MsgBox "Now in ProcessRecords()"
#End If
Instead of adding the constant directive (#Const CC_DEBUG2 = True) to every module in the application, you might enter the following text into the Conditional Compilation Arguments text box:
CC_DEBUG2 = -1This directive sets the value of CC_DEBUG2 to –1 (True) for all modules (global and form and report class modules) in the application. You need to change only this one entry to CC_DEBUG2=0 to disable the debugging statements in all modules in the application.
Separate multiple arguments with colons—for example: CC_DEBUG1=0 : CC_DEBUG2=-1.
Project protection
The Protection tab contains a check box that, when checked, asks for a password when you (or someone else) tries to open the module. You must supply a password (and confirm it) when using this option. Don't forget your password, because there's no official way to get it back.