Lesson 7. Manage Security and Privacy
Goals
![]() Understand password types and their usage
Understand password types and their usage
![]() Manage secrets saved in Keychain
Manage secrets saved in Keychain
![]() Enable and manage iCloud Keychain
Enable and manage iCloud Keychain
![]() Manage system security and user privacy
Manage system security and user privacy
The primary purpose of a multiple-user operating system is to provide all users with a secure work environment. macOS offers a relatively secure out-of-the-box experience for most situations. Yet some situations call for greater security than the defaults afford. This lesson focuses on the built-in advanced security features of macOS and how best to manage and troubleshoot these features.
Reference 7.1 About Password Security
Most computer systems and services rely on passwords as the primary method for verifying a user’s authenticity. There are other, more elaborate systems for proving a user’s identity, such as biometric sensors and two-factor random key authentication, but these approaches require additional hardware. It’s a pretty safe bet that every computing device is attached to an alphanumeric input device such as a keyboard, so passwords are still the most relevant security authentication method.
About Passwords Used by macOS
If you look closely at the security system used by macOS, you discover that it uses a variety of passwords at different levels to secure the computer. Most users are familiar only with their account password, but the Mac can also have a firmware password, a master password, many resource passwords, and several keychain passwords.
Individual users may use several types of passwords, each with a specific purpose:
![]() Local account password—Each local user account has a variety of attributes that define the account. The local account password is the attribute used to authenticate users so that they can log in to macOS. For security reasons, a user’s local account password is stored as encrypted data in the account record.
Local account password—Each local user account has a variety of attributes that define the account. The local account password is the attribute used to authenticate users so that they can log in to macOS. For security reasons, a user’s local account password is stored as encrypted data in the account record.
![]() Apple ID and password—This is a user name and password combination that can be used to authorize many Apple services, including iCloud and various online stores. The creation and use of an Apple ID requires an Internet connection. In addition to providing secure access to Apple services, a user’s Apple ID can reset a lost local account password, as covered in Lesson 8, “Manage Password Changes.”
Apple ID and password—This is a user name and password combination that can be used to authorize many Apple services, including iCloud and various online stores. The creation and use of an Apple ID requires an Internet connection. In addition to providing secure access to Apple services, a user’s Apple ID can reset a lost local account password, as covered in Lesson 8, “Manage Password Changes.”
Note
OS X El Capitan allowed you to create local user accounts that use their Apple ID password as their computer login. macOS Sierra still supports existing accounts with this feature enabled. However, in Sierra you can no longer create new users with this feature enabled.
![]() Legacy FileVault password—Versions of Mac operating systems prior to OS X Lion 10.7 supported home folder–based encryption. If an earlier system is upgraded or migrated with Legacy FileVault user accounts, the home folders remain encrypted. The password for a Legacy FileVault user account can be reset only by using a known master password. Resetting and disabling Legacy FileVault user accounts is covered in Lesson 8, “Manage Password Changes.”
Legacy FileVault password—Versions of Mac operating systems prior to OS X Lion 10.7 supported home folder–based encryption. If an earlier system is upgraded or migrated with Legacy FileVault user accounts, the home folders remain encrypted. The password for a Legacy FileVault user account can be reset only by using a known master password. Resetting and disabling Legacy FileVault user accounts is covered in Lesson 8, “Manage Password Changes.”
![]() Keychain password—With the exception of the user’s account password, macOS protects all other important authentication assets in encrypted keychain files. Each keychain file is encrypted with a keychain password. The system attempts to keep keychain passwords synchronized with the user’s local account password. However, you can maintain unique keychain passwords separate from an account password as well. Maintaining synchronization between a user’s keychain password and account password is covered in Lesson 8, “Manage Password Changes.”
Keychain password—With the exception of the user’s account password, macOS protects all other important authentication assets in encrypted keychain files. Each keychain file is encrypted with a keychain password. The system attempts to keep keychain passwords synchronized with the user’s local account password. However, you can maintain unique keychain passwords separate from an account password as well. Maintaining synchronization between a user’s keychain password and account password is covered in Lesson 8, “Manage Password Changes.”
![]() Resource password—This is a generic term that describes a password used by nearly any service that requires you to authenticate. Resource passwords include email, website, file server, application, and encrypted disk image passwords. Many resource passwords are automatically saved for the user by the keychain system. Details on keychain features are covered later in this lesson.
Resource password—This is a generic term that describes a password used by nearly any service that requires you to authenticate. Resource passwords include email, website, file server, application, and encrypted disk image passwords. Many resource passwords are automatically saved for the user by the keychain system. Details on keychain features are covered later in this lesson.
There are also system passwords, which are not associated with an individual user. Again, each has a specific purpose:
![]() Master password—The master password is used to reset standard, administrator, and Legacy FileVault user accounts when users forget their account password. Use of the master password is covered in Lesson 8, “Manage Password Changes.”
Master password—The master password is used to reset standard, administrator, and Legacy FileVault user accounts when users forget their account password. Use of the master password is covered in Lesson 8, “Manage Password Changes.”
![]() Firmware password—The firmware password protects the Mac during startup. By default, anyone can subvert system security settings simply by using one of the commonly known startup-interrupt keyboard shortcuts. For example, anyone can hold down the Option key during startup to select an alternate operating system, thus bypassing your secure system. Setting the firmware password prevents unauthorized users from using any startup-interrupt keyboard shortcuts. Setting a firmware password is covered in Lesson 8, “Manage Password Changes.”
Firmware password—The firmware password protects the Mac during startup. By default, anyone can subvert system security settings simply by using one of the commonly known startup-interrupt keyboard shortcuts. For example, anyone can hold down the Option key during startup to select an alternate operating system, thus bypassing your secure system. Setting the firmware password prevents unauthorized users from using any startup-interrupt keyboard shortcuts. Setting a firmware password is covered in Lesson 8, “Manage Password Changes.”
About Keychain
Much as service workers might keep a keychain containing all the keys needed during their workday, macOS keeps all your resource passwords, certificates, keys, website forms, and even secure notes in encrypted storage. Every time you allow macOS to remember a password or any other potentially sensitive item, it saves it to the keychain system. Only your account password remains separate from all the other items saved to your keychains.
Because so many important items are saved via the keychain architecture, the keychain files themselves are encrypted with a very strong algorithm. They are impenetrable unless you know the keychain’s password. In fact, if you forget a keychain’s password, its contents are lost forever. Not even the software engineers at Apple can help you—the keychain system is that secure. Yet probably the single best feature of the keychain architecture is that it’s entirely automatic using the default settings. Most users never know just how secure their saved passwords are, because the system is so transparent.
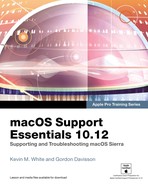
The primary tool you use to manage keychains is the Keychain Access application, found in the /Applications/Utilities folder. With this application you can view and modify nearly any keychain item, including saved resource passwords, certificates, keys, website forms, and secure notes. You can also create and delete keychain files, as well as change keychain settings and passwords. Additionally, you can manage web-specific keychain items from the Safari preferences.
About Local Keychain Files
Keychain files are stored throughout the system for different users and resources. Here are a few of note:
![]() /Users/<username>/Library/Keychains/login.keychain—This keychain appears with the name “login” when using the Keychain Access application. Every standard or administrator user is created with a single login keychain. As a default, the password for this keychain matches the user’s account password, so this keychain is automatically unlocked and available when the user logs in. If the user’s account password does not match the keychain’s password, it does not automatically unlock during login.
/Users/<username>/Library/Keychains/login.keychain—This keychain appears with the name “login” when using the Keychain Access application. Every standard or administrator user is created with a single login keychain. As a default, the password for this keychain matches the user’s account password, so this keychain is automatically unlocked and available when the user logs in. If the user’s account password does not match the keychain’s password, it does not automatically unlock during login.
Tip
Users can create additional keychains if they want to segregate their authentication assets. For example, you can keep your default login keychain for trivial items and then create a more secure keychain that does not automatically unlock for more important items.
![]() /Users/<username>/Library/Keychains/<UUID>—This keychain folder is also created for every user account. This folder contains the keychain database used by the iCloud Keychain service. Use of iCloud Keychain is detailed later in this lesson. Even if the iCloud Keychain service has not been turned on, this local keychain database is still created. When the iCloud Keychain service is not enabled, this keychain appears with the name Local Items in the Keychain Access application. Alternatively, if the iCloud Keychain service is enabled, this keychain appears with the name iCloud in the Keychain Access application. The chosen UUID (universally unique identifier) name of the folder does not match the user’s local account UUID, but this item is associated with the user due to its location in the user’s home folder.
/Users/<username>/Library/Keychains/<UUID>—This keychain folder is also created for every user account. This folder contains the keychain database used by the iCloud Keychain service. Use of iCloud Keychain is detailed later in this lesson. Even if the iCloud Keychain service has not been turned on, this local keychain database is still created. When the iCloud Keychain service is not enabled, this keychain appears with the name Local Items in the Keychain Access application. Alternatively, if the iCloud Keychain service is enabled, this keychain appears with the name iCloud in the Keychain Access application. The chosen UUID (universally unique identifier) name of the folder does not match the user’s local account UUID, but this item is associated with the user due to its location in the user’s home folder.
![]() /Library/Keychains/System.keychain—This keychain appears with the name System in the Keychain Access application. This keychain maintains authentication assets that are not user specific. Examples of items stored here include Wi-Fi wireless network passwords, 802.1X network passwords, and local Kerberos support items. Although all users benefit from this keychain, only administrator users can make changes to it. You’ll also find additional keychains in this folder for use by Legacy FileVault and the Apple Push service.
/Library/Keychains/System.keychain—This keychain appears with the name System in the Keychain Access application. This keychain maintains authentication assets that are not user specific. Examples of items stored here include Wi-Fi wireless network passwords, 802.1X network passwords, and local Kerberos support items. Although all users benefit from this keychain, only administrator users can make changes to it. You’ll also find additional keychains in this folder for use by Legacy FileVault and the Apple Push service.
![]() /Library/Keychains/FileVaultMaster.keychain—This keychain doesn’t appear in the Keychain Access application by default, but it is created when the system master password is set, so it can be unlocked only with that password. This keychain, as the name implies, is used by the Legacy FileVault and FileVault system disk encryption mechanisms. Managing and troubleshooting Legacy FileVault and the master password are covered in Lesson 8, “Manage Password Changes.”
/Library/Keychains/FileVaultMaster.keychain—This keychain doesn’t appear in the Keychain Access application by default, but it is created when the system master password is set, so it can be unlocked only with that password. This keychain, as the name implies, is used by the Legacy FileVault and FileVault system disk encryption mechanisms. Managing and troubleshooting Legacy FileVault and the master password are covered in Lesson 8, “Manage Password Changes.”
![]() /System/Library/Keychains/—Most of the items in this folder do not appear in Keychain Access application by default. The one item you will see in Keychain Access from this folder is System Roots. This keychain stores root certificates that are used to identify trusted network services. Once again, all users benefit from these items, but as a default in macOS, these items cannot be modified.
/System/Library/Keychains/—Most of the items in this folder do not appear in Keychain Access application by default. The one item you will see in Keychain Access from this folder is System Roots. This keychain stores root certificates that are used to identify trusted network services. Once again, all users benefit from these items, but as a default in macOS, these items cannot be modified.
Note
Both Apple and third-party developers create keychains for securely storing a variety of data. Thus, keychain files with seemingly random names can be found throughout the system. It’s best to leave these files alone unless you are specifically instructed by a trusted source to take action to resolve an issue.
Reference 7.2 Manage Secrets in Keychain
To manage all keychain items, including saved passwords, start by opening /Applications/Utilities/Keychain Access. The default selection shows the contents of the user’s login keychain, but you can select another keychain from the list to view its items.
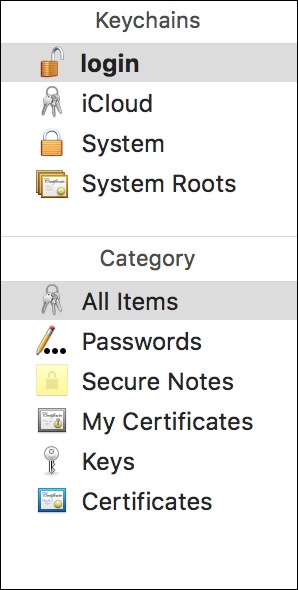
Simply double-click a keychain item to view its attributes. If the item is a password, you can reveal the saved password by selecting the “Show password” checkbox. You’ll find that this and other changes often prompt you for the keychain’s password. This is a safety measure to ensure that only the keychain’s owner can make changes. Once you have authenticated, you can change any attribute in the keychain item dialog, including any saved passwords. You can also click the Access Control tab to adjust application access for the selected item.
Note
The iCloud authentication mechanisms create many keychain items that you may not recognize. Many of these are in the form of certificates or keys, the contents of which should not be tampered with. In short, refrain from “cleaning out” keychain secrets that seem unfamiliar.
To easily search through keychain items in Keychain Access, you can filter the list by selecting a keychain Category view on the left, or you can search for a specific item via the Spotlight search in the upper-right corner of the toolbar.
Tip
The safest place to store secure text on your Mac is in keychains. In Keychain Access, you can create a new secure note by choosing File > New Secure Note Item.
Manage Safari Keychain Items
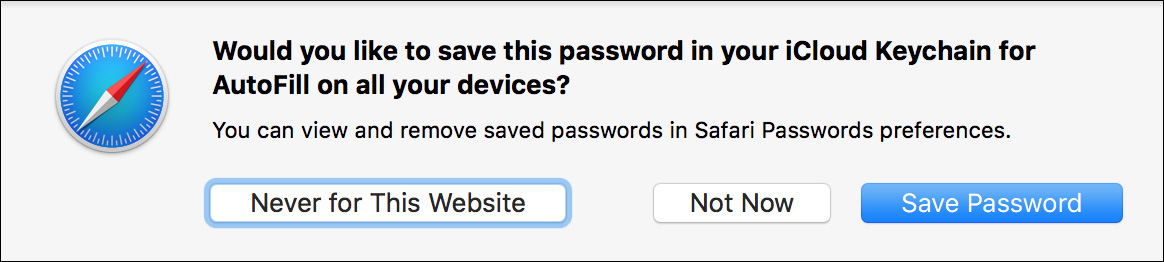
The built-in macOS web browser Safari is a great example of where a user would interact with the keychain system on a daily basis. By default, the AutoFill system in Safari automatically prompts the user to start saving web-form information and site passwords. Further, the latest version of Safari includes new AutoFill features such as the ability to suggest secure website passwords and store credit card purchasing information.
Note
Despite the dialog’s text, Safari AutoFill doesn’t require the iCloud Keychain service. If the iCloud Keychain service isn’t enabled, Safari will save secret information to the Local Items keychain.
When the user revisits a site or navigates to a new site with similar form information, Safari AutoFill automatically fills in information for the user, as long as the keychain file is unlocked. Safari also pulls information from the user’s contact information, if allowed.
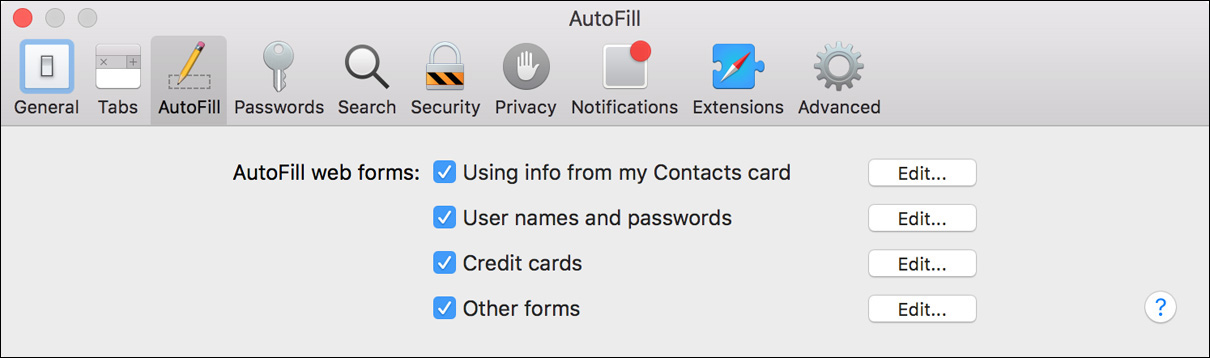
You can find the Safari AutoFill settings by choosing Safari > Preferences from the menu and then selecting the AutoFill tab. These settings give you fine-grained control over what items are automatically saved and filled. Further, Edit buttons allow you to inspect and manage individual items such as website passwords and saved credit cards.
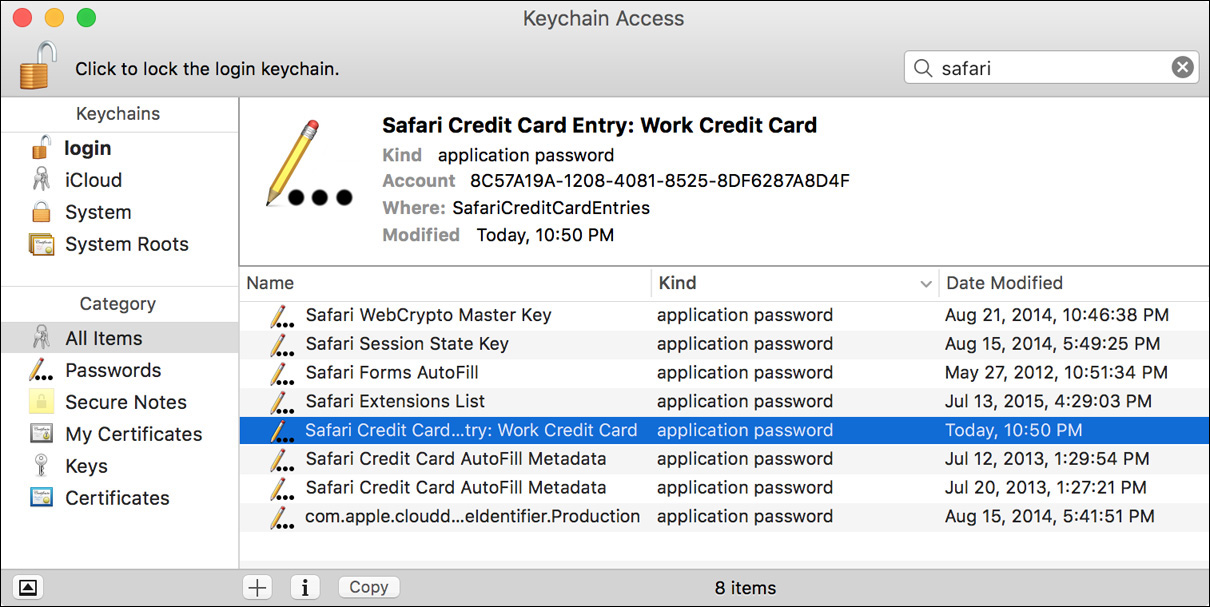
With the exception of the user’s contact information, which is stored in the Contacts application, all Safari AutoFill data is securely stored in the keychain system. Thus, you can also view and manage the AutoFill items from the Keychain Access application. The easiest way to find these items in Keychain Access is to enter Safari in the Spotlight search field. Again, double-clicking any item in Keychain Access allows you to inspect that item. However, you can actually see more information about AutoFill items in the Safari preferences.
Note
Some websites remember your authentication inside a web cookie, so you might not see an entry in a keychain file for every website that automatically remembers your account. Website cookies can be viewed and deleted from the Security tab of Safari Preferences.
Reference 7.3 Use iCloud Keychain
Previous Mac system versions featured Keychain synchronization through the Apple MobileMe service. Although otherwise functional, this service lacked a very important feature: iOS compatibility. Many of the same secrets are used across the two platforms, so having your secrets shared automatically between devices is hugely convenient. It’s even handier given the limited screen size and absence of a physical keyboard on iOS devices, which make managing secrets even more difficult.
Enter iCloud Keychain, supported on Mac computers with OS X Mavericks 10.9 and later and iOS devices with iOS 7.0.3 and later. This service automatically shares your commonly used secrets between devices via iCloud.
More Info
iCloud services are designed with strong personal security in mind, as detailed in Apple Support article HT202303, “iCloud security and privacy overview.”
About iCloud Keychain
As covered previously in this lesson, the system automatically maintains two keychains for each local user account: the legacy login keychain and the Local Items/iCloud keychain. Again, the Local Items keychain is renamed iCloud if the iCloud Keychain service is enabled. Note that the previous Keychain Access screenshots in this lesson show the iCloud keychain, as it is the default for users signed in to iCloud via an Apple ID with two-factor authentication.
As the name implies, contents in the iCloud keychain are also stored on the Apple iCloud servers and then automatically pushed to other configured Apple devices. Thus, this service not only provides a secure mechanism for accessing your secrets from any Apple device connected to the Internet, but also acts as a secure backup for your important secrets.
Note
Only standard or administrator user account types can take advantage of iCloud Keychain.
At this point, you may notice differences in content between the user’s login keychain and the user’s Local Items/iCloud keychain. The differences between these two user keychains are caused by technical differences in the keychain storage system. Items in the user’s login keychain are stored using an older method that is compatible only with legacy Mac applications. Items in the user’s Local Items/iCloud keychain are stored using a newer method compatible only with newer Mac applications and with iOS.
For users upgrading from older versions of the Mac operating system, a background process automatically migrates items from any legacy keychains to the iCloud keychain. Obviously, only the items in the iCloud keychain are saved to iCloud and subsequently pushed to other appropriately configured devices. As new secrets are saved or created on behalf of the user, the keychain system automatically saves compatible items to the iCloud keychain and legacy items to the user’s login keychain.
Note
Although macOS supports multiple local user keychains, only items saved in iCloud Keychain will be available to other iCloud Keychain–enabled devices.
Importantly, items in the iCloud keychain will never migrate back to the local keychain files. This step would be unnecessary anyway, because as long as your devices can see the iCloud keychain, they can access its content without copying items to a legacy local keychain. Again, if the user chooses to disable the iCloud Keychain service, the iCloud keychain will be renamed Local Items, and the user can choose to keep the secret items intact locally.
Lastly, the user’s Local Items/iCloud keychain is accessed using the same password as the user’s login keychain. In other words, the password used to unlock and manage the user’s login keychain is also used to unlock and manage the Local Items/iCloud keychain. Thus, changes to the login keychain password are automatically applied to the Local Items/iCloud keychain. For this reason, the Keychain Access application does not allow you to change the Local Items/iCloud keychain password.
Create an iCloud Security Code
Keeping the contents of your iCloud keychain safe is of paramount importance. After all, once it’s enabled, your secrets are stored in a manner that makes them accessible to anyone on the Internet who knows your credentials. In short, no matter how strong your Apple ID password is, single-factor authentication is still not good enough for the iCloud Keychain service. This is why the iCloud Keychain service is only enabled by default when you use an Apple ID that has two-factor authentication turned on. Alternatively, when you first enable the iCloud Keychain service using an Apple ID without two-factor authentication, the system prompts you to choose an iCloud Security Code that is used to further protect your valuable secrets.
Note
It’s important to recognize that the iCloud Security Code is a separate security mechanism from two-step verification or two-factor authentication for Apple ID. Again, only Apple IDs lacking two-factor authentication are prompted to set up an iCloud Security Code.” For more information about two-factor authentication see Apple Support article HT204915, “Two-factor authentication for Apple ID,” article HT205075; “Availability of two-factor authentication for Apple ID;” and HT207198, “Switch from two-step verification to two-factor authentication.”
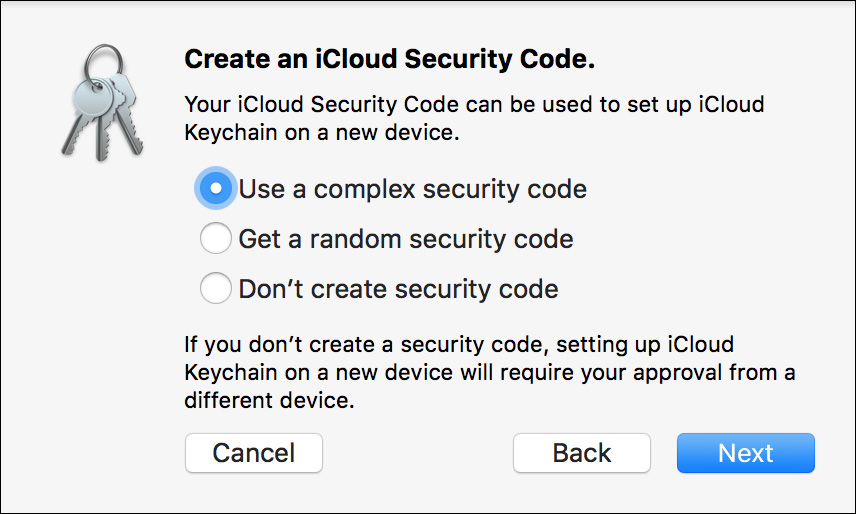
Enabling the iCloud Keychain service using an Apple ID lacking two-factor authentication prompts you to select one of the following security code options:
![]() Code plus verification—The default iCloud Security Code mechanism is a simple code paired with SMS text message verification. This requires that you select a six-digit numeric code and provide a phone number that can receive SMS text messages for further verification.
Code plus verification—The default iCloud Security Code mechanism is a simple code paired with SMS text message verification. This requires that you select a six-digit numeric code and provide a phone number that can receive SMS text messages for further verification.
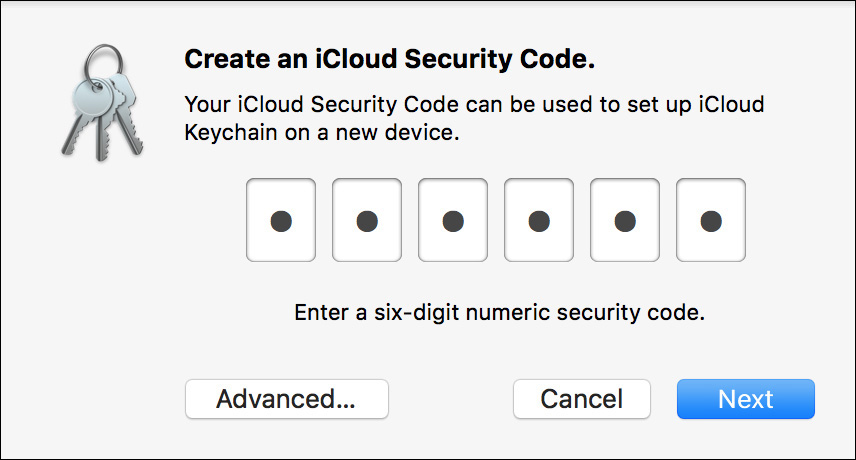
![]() An advanced option to manually set a complex iCloud Security Code. You can create a code up to 32 characters long, but it’s your responsibility to keep track of this code in a safe place.
An advanced option to manually set a complex iCloud Security Code. You can create a code up to 32 characters long, but it’s your responsibility to keep track of this code in a safe place.
![]() An advanced option to have a random complex iCloud Security Code generated and then paired with an SMS text message verification. The system first randomly generates a 32-character code, but again, it’s your responsibility to keep track of this code in a safe place. Then you provide a phone number that can receive SMS text messages for further verification.
An advanced option to have a random complex iCloud Security Code generated and then paired with an SMS text message verification. The system first randomly generates a 32-character code, but again, it’s your responsibility to keep track of this code in a safe place. Then you provide a phone number that can receive SMS text messages for further verification.
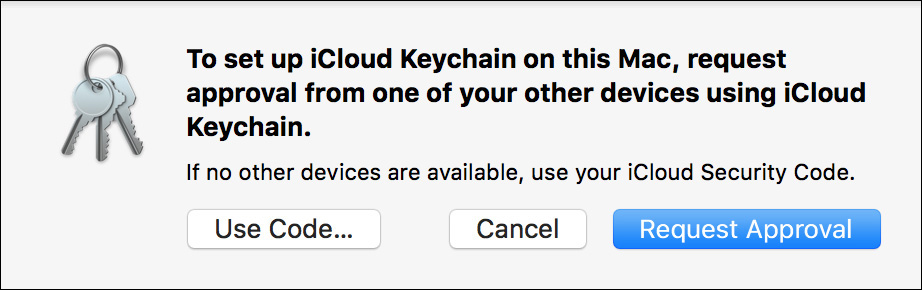
As the preceding dialog states, you do not have to use an iCloud Security Code for initial setup of the iCloud Keychain service. If you choose not to, enabling the iCloud Keychain service on any additional devices requires physical access to another device that has already been configured for the service.
After you have made your choice for the iCloud Security Code, the iCloud Keychain service is enabled for your first device. As described earlier, the iCloud keychain appears in Keychain Access and is made available to all compatible applications and services.
Authorize Device for iCloud Keychain
Again, if you sign into another device using an Apple ID with two-factor authentication, the iCloud Keychain service is automatically enabled. For Apple IDs without two-factor authentication you can grant access for additional devices via a simple device authorization mechanism. The idea is that any device currently configured with the iCloud Keychain service is a trusted device. Thus, any trusted device can be used to verify additional devices for the iCloud Keychain service.
For example, after setup of the iCloud Keychain service on a Mac, when you attempt to enable this service on an iPad, you have to approve this action from the original Mac. Alternatively, if you set up an iCloud Security Code, you can use the code as additional verification instead of device-based authorization.
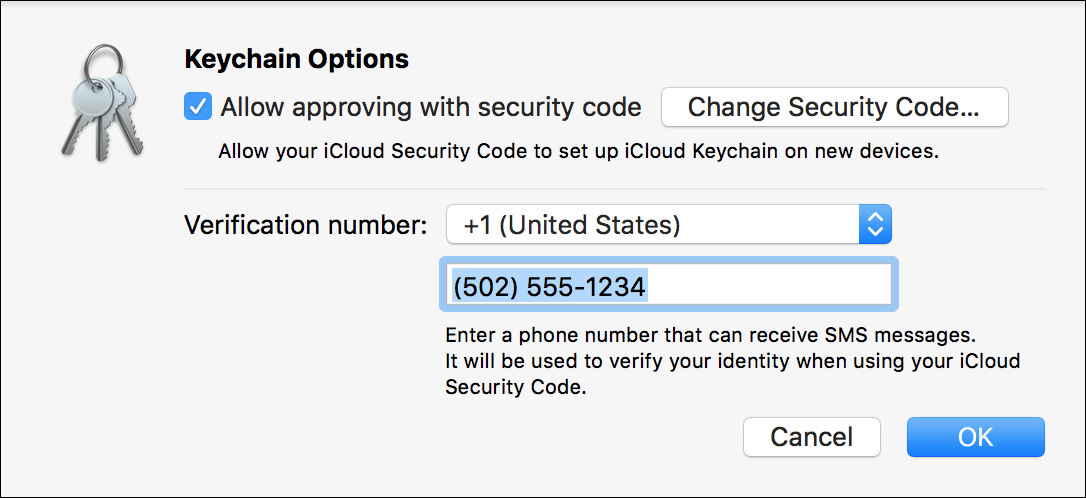
Manage iCloud Keychain Security
If at any point you want to verify or change the iCloud Security Code settings, you can do so from the iCloud preferences. Clicking the Options button to the right of the Keychain item in the iCloud preferences displays a pane showing the current iCloud Security Code settings and allows you to change these settings, including the SMS verification phone number. Note that you can also choose to disable the use of a security code if you want to allow iCloud Keychain access only via device authorization.
If you have an Apple ID with two-factor authentication, there is no Options button next to the Keychain item in the iCloud preferences.
Reference 7.4 Manage System Security
In addition to account passwords and keychain items, there are systemwide security preferences that affect all users on the Mac. Several of these options are disabled by default because the average Mac user would probably consider them inconveniences. However, if your environment requires greater security, these additional security features are indispensable.
Security & Privacy: General Settings
The Security & Privacy preferences pane is a combination of both system settings and personal settings that allow you to tailor the security features of macOS. As with all other system settings, administrator authentication is required to make changes to any items that may affect the system or other users. When using Security & Privacy preferences, note that system settings are dimmed when the lock is present, but personal settings are always available.
The General settings pane provides another location, besides the Users & Groups preferences, for users to change their password.
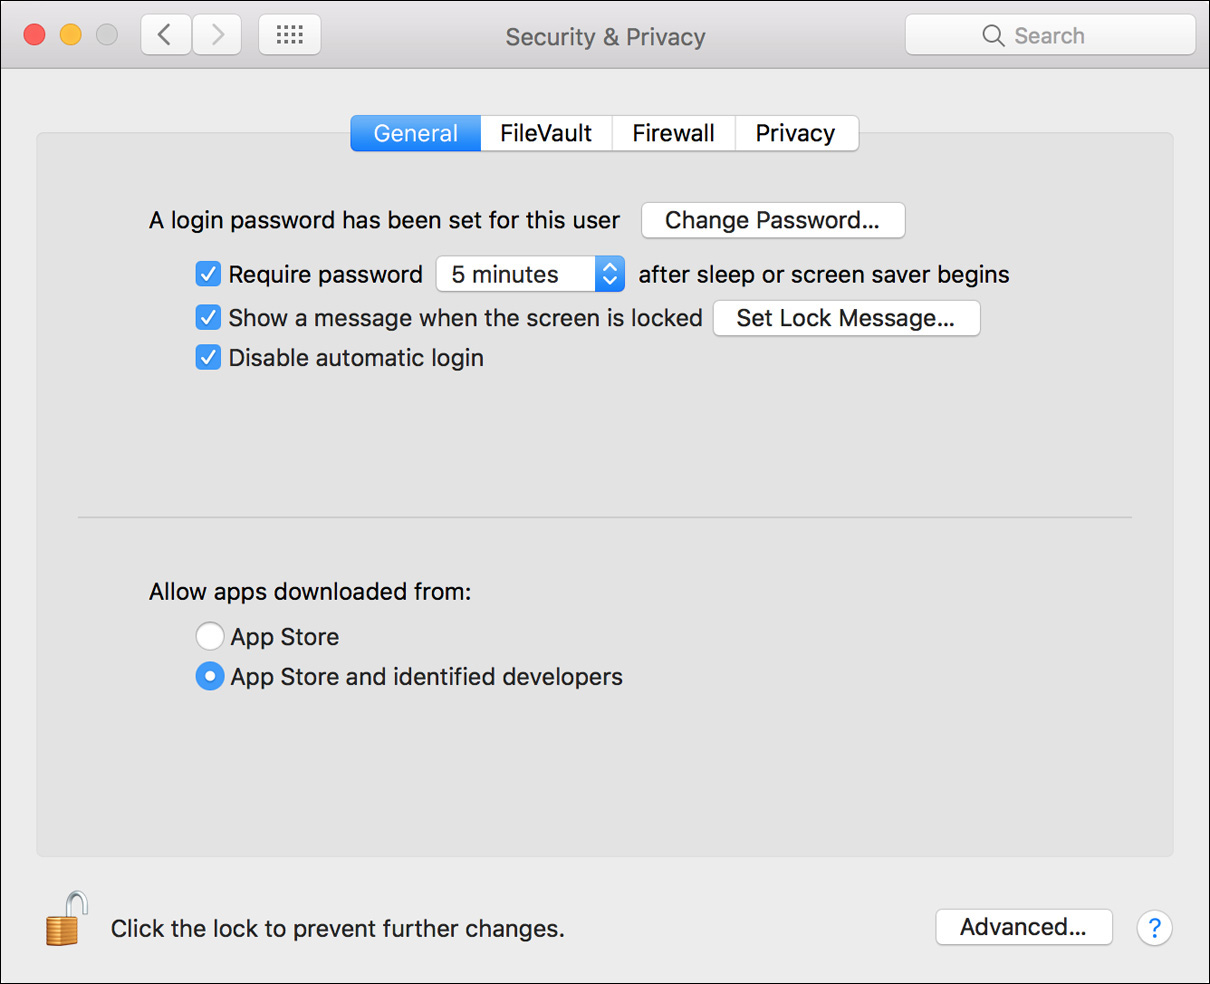
You can also choose to require a password to wake the computer from sleep or screen saver mode and to define a delay before this requirement sets in. Both standard and administrator users can set this for their account, but an administrator cannot set this for every account from Security & Privacy preferences. The exception is that systems with FileVault system disk encryption always require a password on wake. Such systems do not show the option to disable that requirement.
Administrators can also configure a custom message to show at the login window or when the screen is locked. When setting the message, you can press Option-Return to force a new line. However, the system allows for only three lines of text.
The final login option is the ability to disable automatic login for all accounts. This system setting is also always required on systems with FileVault system disk encryption. Those systems do not show the choice to disable automatic login.
Finally, at the bottom of the General pane, you’ll find settings for a significant security feature of macOS, dubbed Gatekeeper. This allows administrators to restrict applications downloaded from the Internet based on the trustworthiness of the source. Lesson 16, “Install Applications,” covers this topic in greater detail.
Security & Privacy: Advanced Settings
Additional security settings are available to an administrator who unlocks Security & Privacy preferences and then clicks the Advanced button in the lower-right corner.
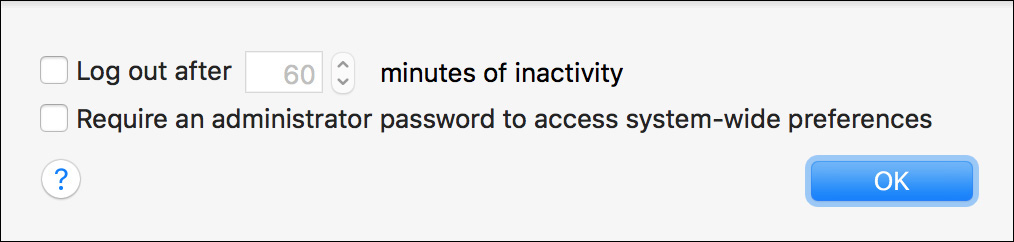
Administrators can choose to require that users automatically log out of accounts after a certain amount of inactivity and that all system preferences with locking access require an administrator password every time. For example, the default setting allows an administrator user to change Date & Time preferences without actually authenticating. Enabling this option requires an administrator to enter his or her password to use Date & Time preferences.
Security & Privacy: FileVault Settings and Legacy FileVault Settings
This pane is where you enable and configure FileVault system disk encryption (also known as FileVault 2). If a Mac has been upgraded from a system prior to OS X Lion 10.7, you may also see Legacy FileVault settings in the Security & Privacy preferences. This is technology used prior to the current FileVault to encrypt individual users’ home folders. Lesson 10, “Manage FileVault,” covers both of these topics in greater detail.
Security & Privacy: Firewall Settings
This pane is where you enable and configure the personal network firewall settings. Lesson 23, “Manage Host Sharing and Personal Firewall,” covers this topic in greater detail.
Use Find My Mac
From a security standpoint, one of the most significant features of iCloud is Find My Mac. This service helps you locate a lost Mac by allowing you to remotely access the computer’s Location Services service. In addition to locating a lost Mac, the service allows you to remotely lock, erase, and display a message on the Mac.
Tip
iCloud can also be used to locate a lost iPhone, iPod touch, or iPad. This service is collectively known as Find My iPhone, which is also the name of a free iOS app that can be used to find both Mac computers and iOS devices.
Several prerequisites must be met to use Find My Mac:
![]() The Mac system must have Wi-Fi enabled and have an active Internet connection. If Wi-Fi is disabled, the Mac computer’s location cannot be resolved.
The Mac system must have Wi-Fi enabled and have an active Internet connection. If Wi-Fi is disabled, the Mac computer’s location cannot be resolved.
![]() The Mac system must have Location Services enabled. If this service hasn’t already been enabled during Setup Assistant or from the Security & Privacy preferences, you will be prompted to enable it when you turn on Find My Mac.
The Mac system must have Location Services enabled. If this service hasn’t already been enabled during Setup Assistant or from the Security & Privacy preferences, you will be prompted to enable it when you turn on Find My Mac.
![]() The Mac system must have a local Recovery HD partition.
The Mac system must have a local Recovery HD partition.
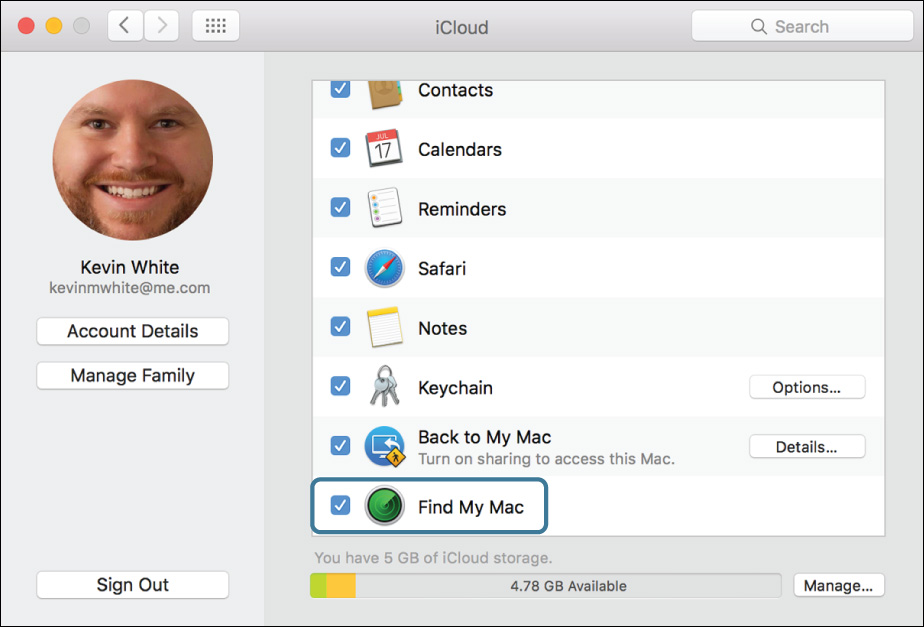
![]() The Mac system must be configured for iCloud with Find My Mac enabled. As covered in Lesson 2, “Set Up and Configure macOS,” the initial system setup includes prompts to enable Find My Mac. You can also configure or disable Find My Mac at any time from iCloud preferences. Although multiple users can sign in to most iCloud services on a single Mac, only one iCloud account per device can be enabled for Find My Mac.
The Mac system must be configured for iCloud with Find My Mac enabled. As covered in Lesson 2, “Set Up and Configure macOS,” the initial system setup includes prompts to enable Find My Mac. You can also configure or disable Find My Mac at any time from iCloud preferences. Although multiple users can sign in to most iCloud services on a single Mac, only one iCloud account per device can be enabled for Find My Mac.
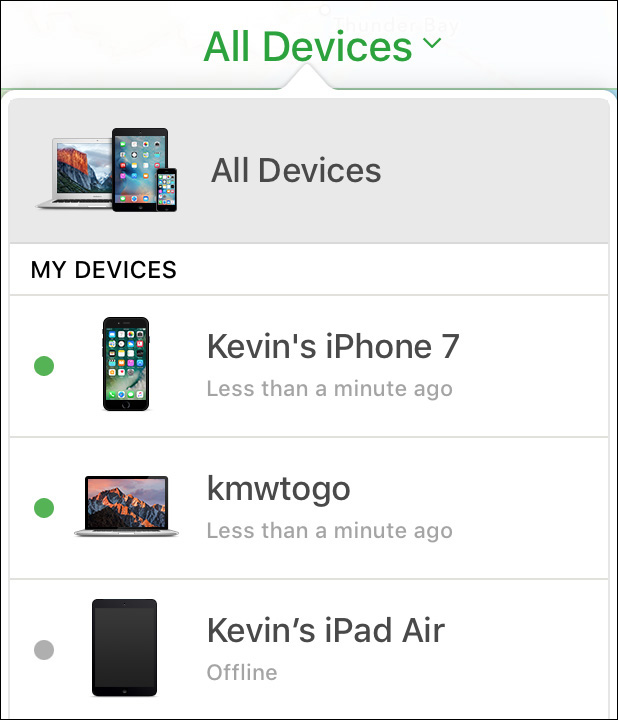
Once you configure Find My Mac, you search for a lost device from another computer by accessing the iCloud website: www.icloud.com. Log in with the appropriate iCloud account, and then select Find iPhone on the iCloud homepage. As you can tell from the name, the “Find” services use the same Location Services technology for both iOS and Mac devices, but an iPhone is more vulnerable to loss than a Mac.
If Find My iPhone is successful, the web interface displays a map with the relative location of all the devices configured for this iCloud account. Selecting a located device on the map allows you to play a sound, send a message, or lock or wipe a device. You can even see the power status in the upper-right corner of the device’s view. For example, the following screenshot shows that the portable Mac is almost fully discharged.
Tip
OS X El Capitan 10.11 and later support iCloud Family Sharing, which allows a group of iCloud accounts to access each other’s devices when using Find My Mac. This allows you to easily locate a device from another user’s device or iCloud account as long as they are part of your iCloud Family Sharing group. However, to prevent unintended actions, the lock and erase commands require additional authentication by the iCloud account that enabled Find My Mac on the device. You can find out more about iCloud Family Sharing at www.apple.com/icloud/family-sharing/.
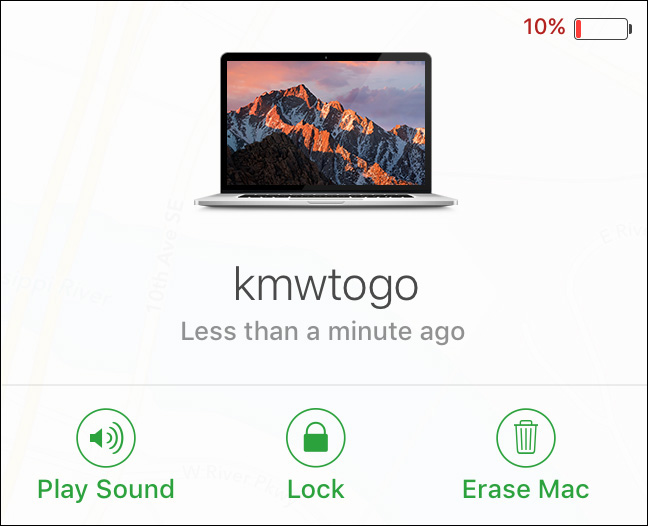
Both the remote lock and erase functions immediately restart the selected Mac system. The remote lock lets you set a new four-digit PIN for the Mac, and upon restart the Mac prompts you for the new number. If a remote erase is issued, upon restart a Mac protected by FileVault system disk encryption will delete the encryption keys necessary to decrypt the system disk, whereas other Mac computers simply delete the system partition.
Enabling Find My Mac on a system will also enable the guest account for local login. It’s a trap for thieves. The intent is that a stolen Mac will be locked when found. The culprit can choose Guest User as a login option upon system startup or wakeup, which allows limited access to the system. Assuming the default settings, the thief would be allowed only to select a Wi-Fi network and use Safari. This enables the stolen Mac to get back online so that the owner can use Find My Mac to locate it.
Note
Disabling the Find My Mac feature does not also disable the guest account. Thus, if you intend to permanently disable Find My Mac, you should also disable the Guest User account in the Users & Groups preferences if you’ll have no need for it.
Reference 7.5 Manage User Privacy
A primary tenet of Apple design is to create devices and services that protect the user’s information. As such, macOS includes a variety of privacy measures that are enabled as a default for every user. However, these measures may prevent functionality that the user would benefit from. In this case, the user may choose to allow access to private information by adjusting settings in a variety of locations covered here.
More Info
You can find out more about Apple’s deep commitment to personal privacy at www.apple.com/privacy/.
More Info
Managing privacy for Siri and Spotlight are detailed in Lesson 14, “Use Metadata and Search Technologies.”
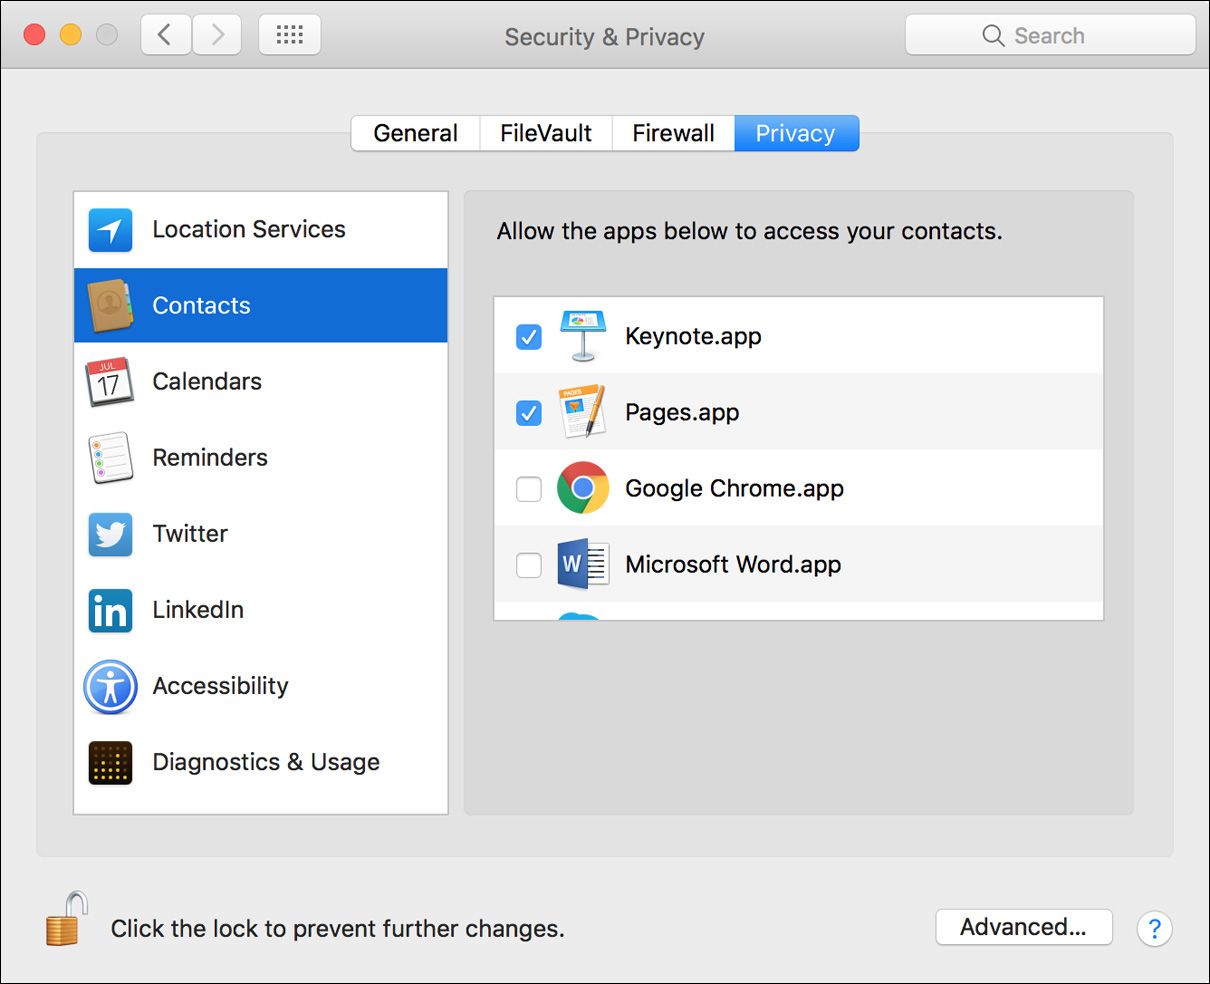
Security & Privacy: Privacy Settings
This pane gives both administrators and standard users the ability to adjust various services’ access to personal information. However, in cases where an administrator has specified a privacy selection (enabled or disabled), this choice will override the standard user’s ability to make that selection. For example, if an administrator has disabled the ability for Google Chrome to access Contacts information, it will remain disabled for all standard users as well.
When a new application requests information that is considered personal, the system automatically asks you for permission. For example, the Maps application asks you to allow Location Services so that the Mac system can be located for the default map view. Any Mac with Wi-Fi capabilities can use Location Services to identify its location. Thus, Wi-Fi must be enabled to use Location Services.
Tip
Anytime an application takes advantage of Location Services, the Location Services status menu appears near the upper-right corner of the screen. The menu item appears as a northeast compass arrow, similar to that seen in the Privacy pane of the Security & Privacy preferences.
From the Privacy pane, a user can view all the applications that have asked for this information and choose to allow or disallow further attempts to collect information. Examples of the types of services an application may request include Location Services, Contacts, Calendars, Reminders, and Twitter, LinkedIn, and Facebook information.
The list of items in the Privacy pane varies based on configured services. For example, the Twitter service appears only after the user has configured Twitter in Internet Accounts preferences.
Enabling access for assistive applications in previous versions of macOS was found in the separate Accessibility or Universal Access preferences. In macOS Sierra, you’ll find the Accessibility settings listed in the Privacy pane of the Security & Privacy settings.
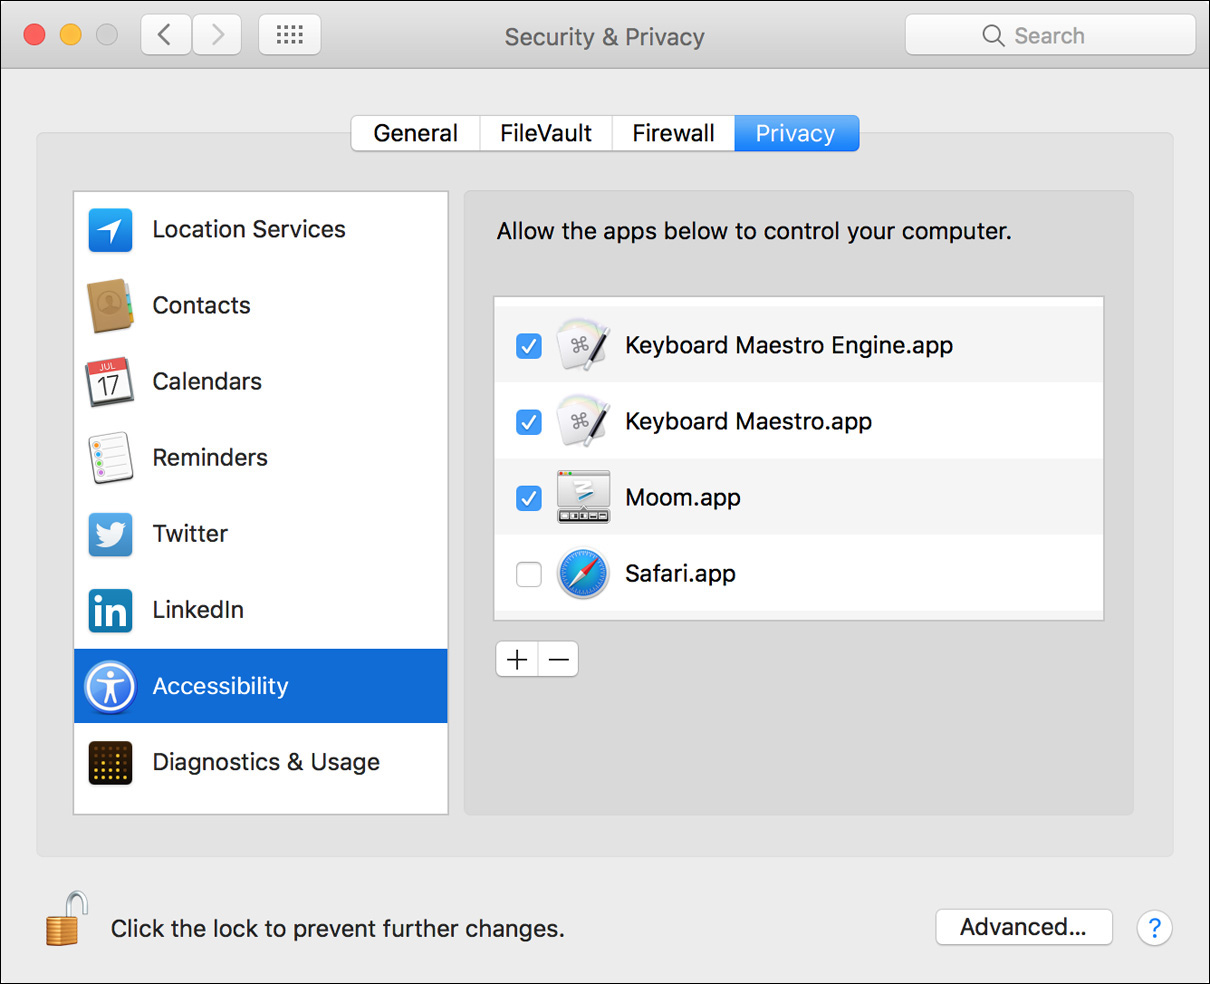
In macOS you must manually enable access for assistive applications by application. This is because, through the Accessibility mechanism, these assistive applications will be granted access to control computer input and modify the interface behavior. In other words, a malicious or poorly written assistive application has the potential to cause all kinds of trouble throughout the system. Thus, an administrator user must individually allow assistive applications to control the system.
The final privacy setting in the list, Diagnostics & Usage, allows administrators to disable the reporting of diagnostic information to Apple. The primary source of information sent with this option is application hangs or crashes. This information helps Apple resolve recurring issues faster.
About Dictation Privacy
The macOS Dictation feature is enabled and managed via the Dictation pane of the Keyboard preferences. This feature supports a variety of languages, including multiple regional dialects of widespread languages like English and Spanish. When the system is set to one of these languages or dialects in Language & Region preferences, it helps this feature automatically enter the correct text. Further, the Dictation function supports basic text-related spoken commands for formatting and punctuation.
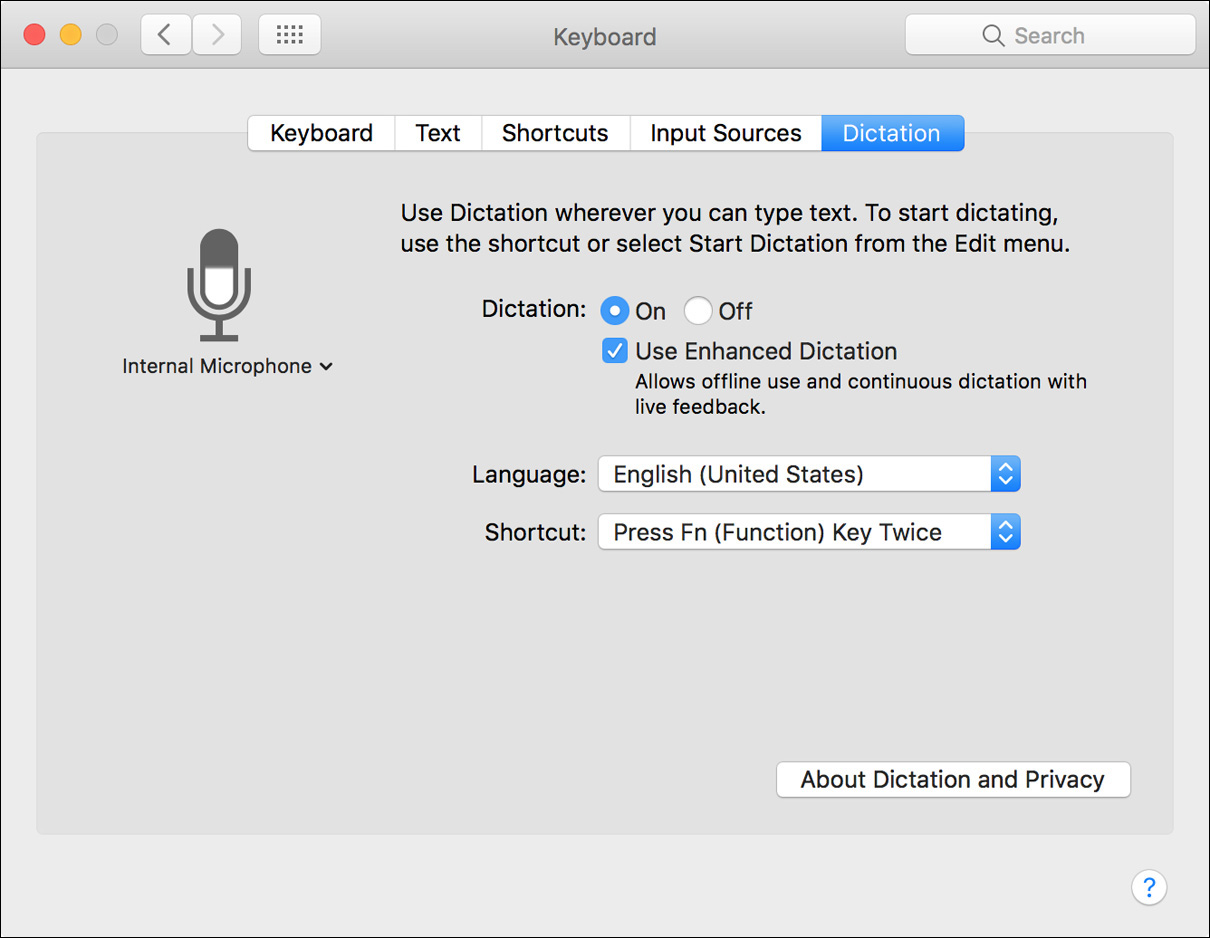
The default behavior for the macOS dictation feature actually sends the spoken audio to Apple servers across the Internet. This may seem like an excessively complex solution, but it’s the only way to create a dictation system that contains a huge library of words and doesn’t require any user training or excessive local storage. Because of this round-trip between the Mac and Apple servers, the transcription response could be a few seconds.
Also, from a security perspective, this server-based dictation method isn’t ideal, because you are literally sending your words directly to Apple’s servers. Further, the server-based dictation in macOS also sends other user information, like your Address Book contacts, to provide more accurate transcription. Apple never uses this information for any purpose beyond improving the server-based dictation service, but this may still be unacceptable for those requiring greater privacy.
Alternatively, macOS offers the Enhanced Dictation option, which relies on locally stored assets to perform the transcription. Selecting the Use Enhanced Dictation checkbox downloads the dictation assets, which require roughly 760 MB. In this case, all transcription is completed by the local Mac, and nothing is ever transmitted to the Apple servers.
Obviously, the Enhanced Dictation option provides a completely private method for taking advantage of the macOS dictation feature. Further, when this feature is enabled, user data and recent voice input data are removed from Apple servers. Finally, as a bonus, when the transcription is completed entirely on the local Mac, the dictation system can provide more immediate text feedback as you dictate.
More Info
You can find out more about the macOS Dictation feature from Apple Support article HT202584, “Use your voice to enter text on your Mac.”
About Safari Privacy
With regard to privacy, another growing area of concern is the ever-expanding reach of website tracking systems. As more user services blossom across the Internet, those looking to take advantage of personal information invent more sophisticated techniques for gathering this data. Although the default web browser, Safari, can’t prevent you from giving away your personal information, it can try to block the “hidden” methods used to gather information about your web usage.
You can find additional privacy settings in the Safari preferences window. From here you can manage existing website cookies or adjust automatic blocking of cookies. Cookies are bits of information about your web history that can be used to track your presence on the Internet. Other Safari privacy options include the ability to further limit Location Services and website tracking.
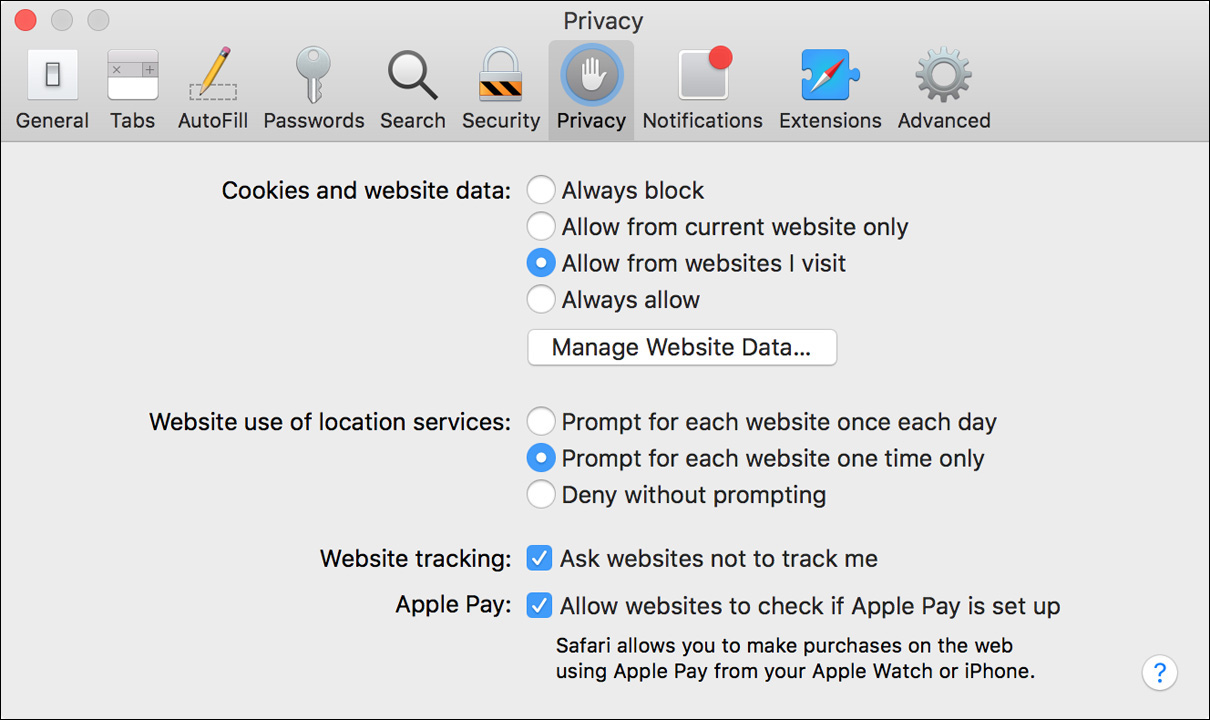
Exercise 7.1 Manage Keychains
![]() Prerequisite
Prerequisite
![]() You must have created the Chris Johnson account (Exercise 5.1, “Create a Standard User Account”).
You must have created the Chris Johnson account (Exercise 5.1, “Create a Standard User Account”).
By default, when users log in to their account, their keychain is automatically unlocked and remains unlocked until they log out. However, in environments where more security is desired, it’s possible to configure the keychain to lock after a period of inactivity or when the computer goes to sleep.
In this exercise, you will explore various keychain management techniques.
Configure the Keychain to Lock Automatically
1 Log in as Chris Johnson (password: chris, or whatever you chose when you created the account).
2 In the Finder, open the Utilities folder by choosing Go menu > Utilities or by pressing Command-Shift-U.
3 In the Utilities folder, open Keychain Access.
4 Choose Keychain Access menu > Preferences (or press Command-Comma).
5 Select “Show keychain status in menu bar.”
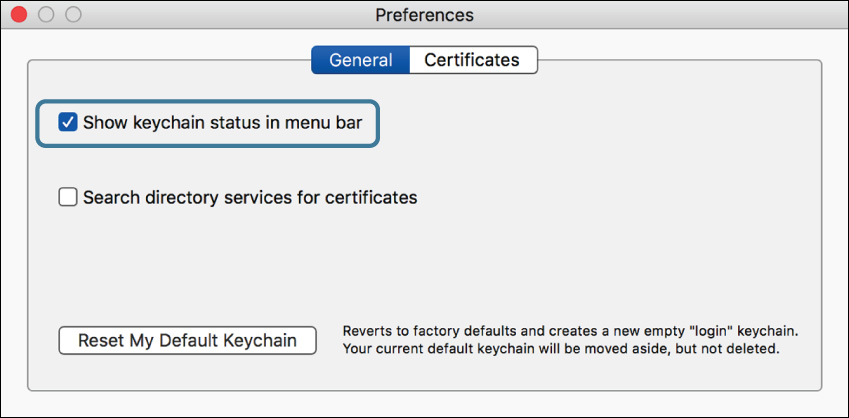
This places a Lock icon in the menu bar, making it more convenient to perform various security-related functions.
6 Close the Preferences window.
7 Choose Edit menu > Change Settings for Keychain “login.”
8 Select both “Lock after 5 minutes of inactivity” and “Lock when sleeping.”
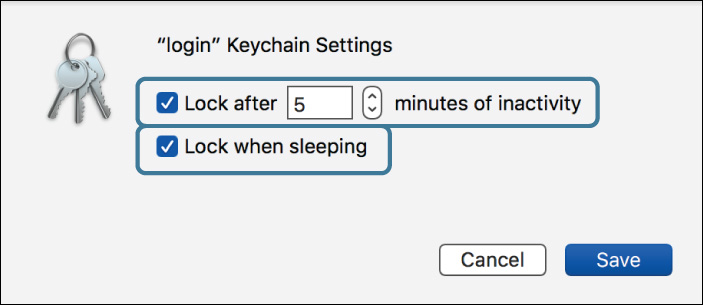
9 Click Save.
10 Open System Preferences, and select the Security & Privacy pane.
11 If necessary, deselect the “Require password” option.
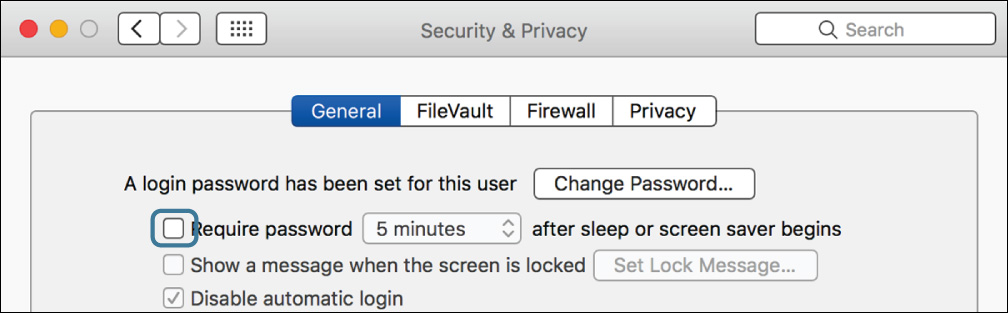
12 If you are prompted to enter Chris Johnson’s password (chris, or whatever you chose when you created the account), do so and click OK.
This is a per-user preference setting, so administrator authorization is not required.
13 If a confirmation dialog appears, click Turn Off Screen Lock.
14 Choose Apple menu > Sleep.
15 Wake the computer by pressing any key.
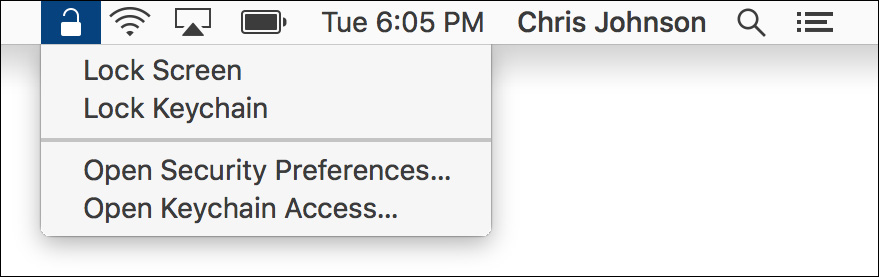
16 Click the keychain status (lock icon) menu bar item.
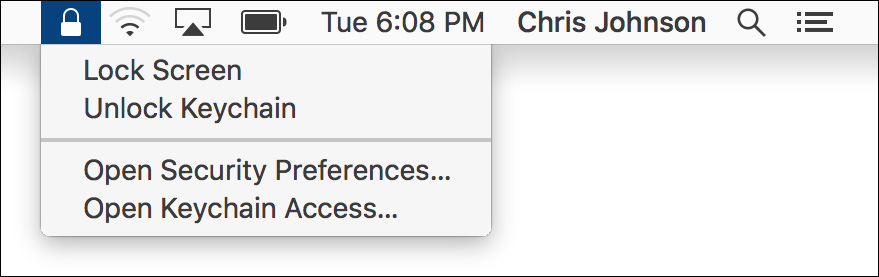
Notice that the lock icon appears locked, not open, indicating that the keychain is now locked.
17 Under the keychain status menu bar item, choose Unlock Keychain.
18 Enter Chris’s password and click OK.
The lock icon opens and your keychain unlocks.
Configure the Login Session to Lock
Instead of locking only the keychain, you can configure the entire login session to lock on sleep or after a period of inactivity.
1 If necessary, open System Preferences, and select the Security & Privacy pane.
2 Select “Require password,” and choose “immediately” from the pop-up menu.

Note
There are many other ways to activate this lock. Among other options, you could use the Desktop & Screen Saver preferences to configure a hot corner to activate the screen saver, or if your keyboard has a media eject key or power button, press Control-Shift-(media eject or power) to put your display to sleep.
4 Wake the computer by pressing any key.
You see an unlock screen similar to the login screen, but with only Chris’s account shown.
5 Enter Chris’s password and press Return.
Your session unlocks. Note that when you entered the password, the keychain unlocked along with the login session.
To simplify the rest of the exercises, you can now relax these security measures.
6 If you want, you can either deselect the “Require password” option or change the lock period in the Security & Privacy preferences. If necessary, click Turn Off Screen Lock in the confirmation dialog.
7 Quit System Preferences.
8 In Keychain Access, choose Edit menu > Change Settings for Keychain “login.”
9 If you are prompted to, enter Chris’s password to unlock the keychain.
10 Deselect both “Lock after 5 minutes of inactivity” and “Lock when sleeping.”
11 Click Save.
Store a Password in a Keychain
Your keychain already has a number of automatically created entries. In this section, you will create an entry manually.
1 Open the StudentMaterials/Lesson7 folder. Remember that you created a shortcut to StudentMaterials in your Dock.
2 Open the file named “Chris’s private files.dmg.”
This disk image is encrypted, so the system prompts you for the password to open it.
3 Select “Remember password in my keychain.”
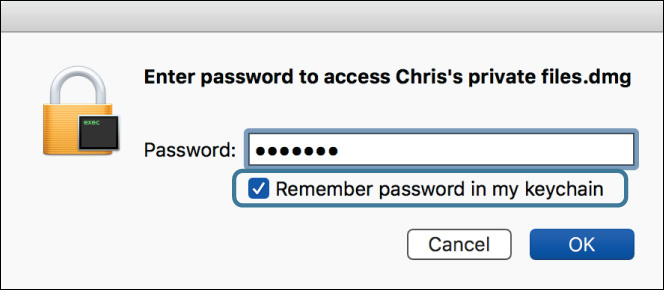
4 Enter the password private.
5 Click OK.
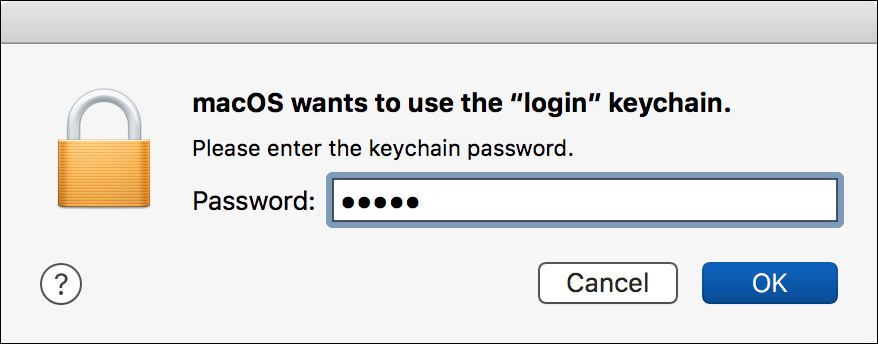
6 If you are prompted to enter the keychain password, enter Chris’s account password (chris, or whatever you chose when you created the account), and click OK.
7 Select the disk image on your desktop, and press Command-E to eject it.
8 Open the disk image again.
Since the password is now stored in your keychain and the keychain is unlocked, the image opens without asking you for the password.
9 Eject the disk image again.
Retrieve a Password in a Keychain
Even though passwords are stored to make them conveniently available for applications, there may be times when a user needs to retrieve a stored password. For example, a user who wants to use webmail on a different computer may want to retrieve her email password in order to do so. In this section, you will use the keychain to retrieve a forgotten password.
1 If necessary, open Keychain Access from the Utilities folder. Remember that you can reach this folder in the Finder by choosing Go menu > Utilities or pressing Command-Shift-U.
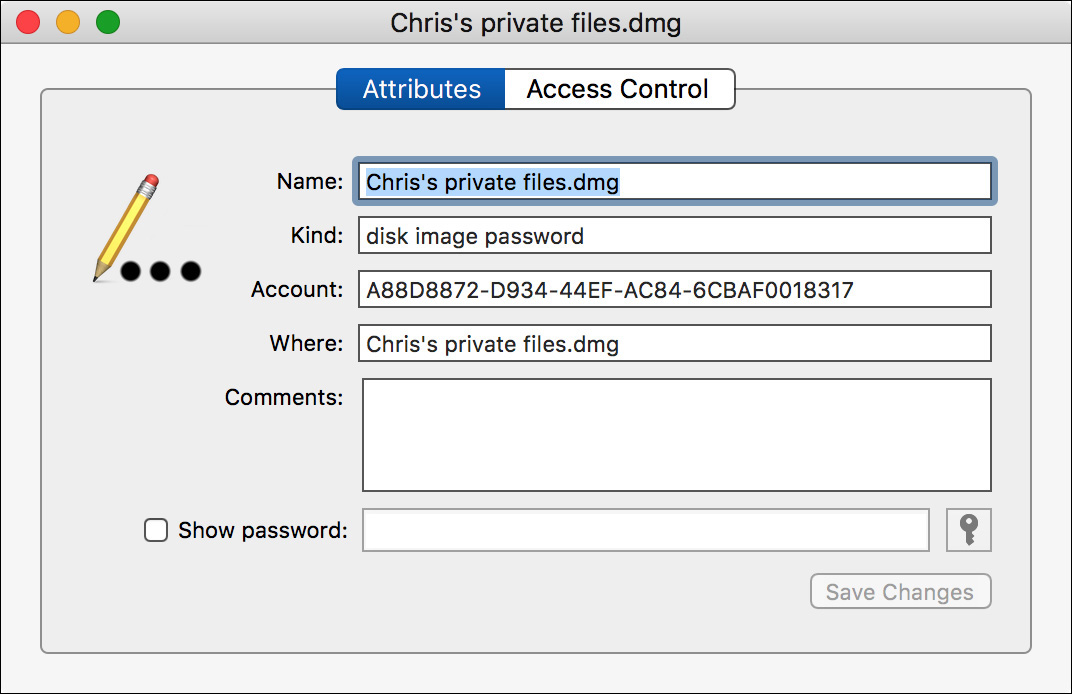
2 Double-click the password entry named “Chris’s private files.dmg.” Use the search filter at the upper-right corner of Keychain Access if you need to.
A window opens, displaying information about this password entry.
3 Click the Access Control tab.
The Access Control pane displays information about what applications or system components are allowed access to the keychain entry. In this case, the diskimages-helper application can automatically access the password, but if any other application requests access, the system asks the user for confirmation first.
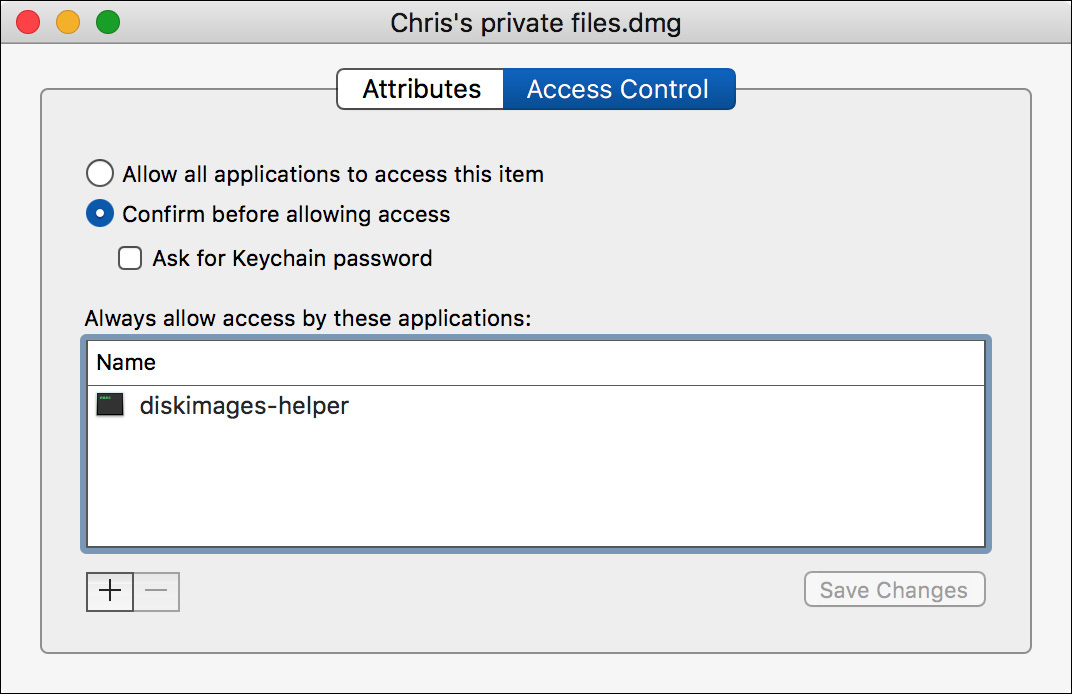
Normally, the application that created a keychain entry is the only one that is allowed automatic access to it, but you can change this policy as needed.
4 Click the Attributes tab.
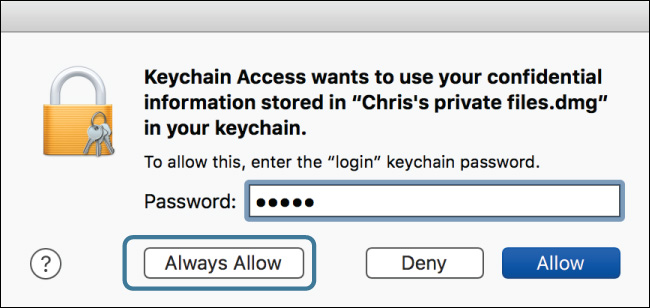
5 In the Attributes pane, select Show Password.
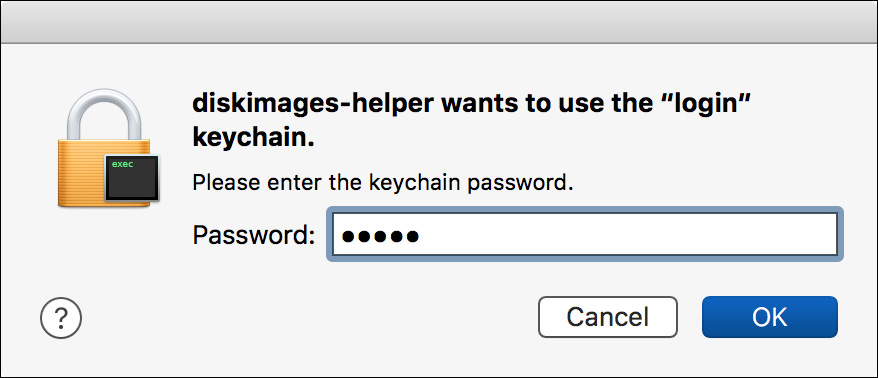
A dialog informs you that Keychain Access wants to use your confidential information stored in “Chris’s private files.dmg” in your keychain. Even though your keychain is unlocked, this item’s access policy requires confirmation before anything other than diskimages-helper is allowed to read the password.
6 Enter Chris’s account password, and click Always Allow.
The disk image password becomes visible.
7 Click the Access Control tab.
Keychain Access has now been added to the “Always allow access” list for this item. If you had clicked Allow instead, Keychain Access would have been allowed access to the password but would not have been added to this access control list. Since it has been added to the list, Keychain Access can now display the password without asking for confirmation.
8 Close the “Chris’s private files.dmg” window.
Move a Password to the System Keychain
Normally, resource passwords are stored in a user’s own keychain and are only accessible by that user. However, it is possible to move them to the System keychain, making them accessible to all users.
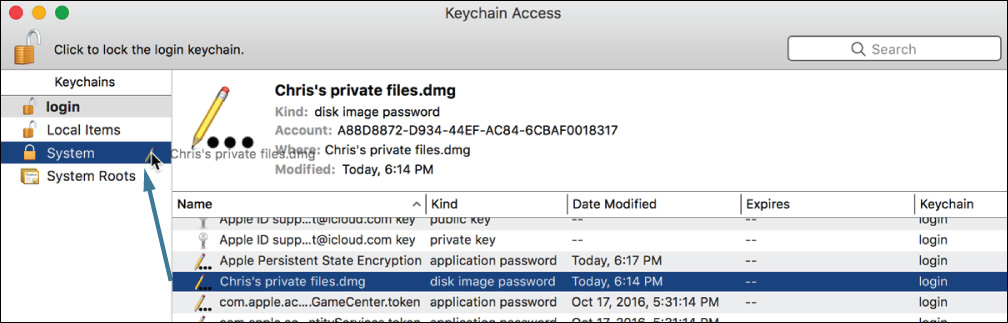
1 Find the “Chris’s private files.dmg.” keychain item again, and drag it to the System keychain in the Keychains section of the sidebar.
2 Authenticate as Local Admin (password: ladminpw, or whatever you chose when you created the account) to allow the change to the System keychain.
3 When prompted to allow kcproxy to use the confidential information in “Chris’s private files.dmg,” click Allow. kcproxy is a tool that Keychain Access uses to move entries into the System keychain.
“Chris’s private files.dmg” disappears from your login keychain.
4 Click the System keychain.
“Chris’s private files.dmg” is now listed here, along with several automatically created items, and any Wi-Fi passwords stored on your Mac.
5 Quit Keychain Access and log out of the Chris Johnson account.
6 Log in as Mayta Mishtuk (password: mayta, or whatever you chose when you created the account).
7 Open the file /Users/Shared/StudentMaterials/Lesson7/Chris’s private files.dmg.
Mayta’s Finder preferences have not been customized to allow easy access outside her home folder; however, you can reach this file by choosing Go menu > Computer (Command-Shift-C) and then opening the Macintosh HD > Users > Shared > StudentMaterials > Lesson7 folder.
The disk image opens. Because the keychain item’s access controls allow diskimages-helper full access to the item, you are not prompted to authenticate or allow access.
8 Eject the disk image and log out of the Mayta Mishtuk account.