Lesson 6. Manage User Home Folders
Goals
![]() Understand user home folder layout and contents
Understand user home folder layout and contents
![]() Delete users and archive home folder content
Delete users and archive home folder content
![]() Migrate and restore a user’s home folder
Migrate and restore a user’s home folder
Aside from the initial account attributes, such as the account name and password, every other item the user is likely to create or need is stored in that user’s home folder. As mentioned earlier, the default location for a locally stored user home folder is /Users/<name>, where <name> is the user’s account name.
Reference 6.1 About User Home Folders
When a new user account is created, the system generates a home folder that contains several default folders. Users can create additional folders to store their items, but it’s best practice for them to keep all personal files in their home folder using the default locations. Most applications suggest an appropriate default folder, whereas others don’t even ask users and simply use the assigned default folder.
All the contents of the default folders inside a user’s home folder are viewable only by that user, with the exception of the Public folder. Other users can view the contents of the Public folder, but they cannot add items or make changes, except to put files in the Drop Box folder. Others can add files there, but they cannot see its contents.
It’s important to note that, by default, other users are able to view items at the root (or beginning) level of any user’s home folder. This is necessary in order to allow other users to navigate into the Public folder. However, this also means that if you store any items at the root of your home folder, other users will be able to see those items. Of course, you can change all these defaults by adjusting file and folder access permissions, as outlined in Lesson 11, “Manage Permissions and Sharing.”
The default items in a macOS user’s home folder are:
![]() Desktop—Although many Mac users store files on the desktop, it’s not recommended. Along with adding to visual clutter, having an excessive number of items on the desktop may slow system login and Finder actions. More appropriate folders are provided for most user items, as covered here.
Desktop—Although many Mac users store files on the desktop, it’s not recommended. Along with adding to visual clutter, having an excessive number of items on the desktop may slow system login and Finder actions. More appropriate folders are provided for most user items, as covered here.
![]() Documents—This is the default storage location for any document type that does not have a dedicated folder. For example, Microsoft Office prefers this folder as the default location for all its user documents and Entourage/Outlook profiles. Putting items here is a better alternative than cluttering up the desktop—or is at least a good start.
Documents—This is the default storage location for any document type that does not have a dedicated folder. For example, Microsoft Office prefers this folder as the default location for all its user documents and Entourage/Outlook profiles. Putting items here is a better alternative than cluttering up the desktop—or is at least a good start.
Note
With macOS Sierra a user can choose to store their Desktop and Documents folders in iCloud Drive. If this option is enabled, these two folders will appear in the Finder sidebar under iCloud Drive and will not appear in the default home folder location. You can learn more about iCloud Desktop and Documents in Lesson 17, “Manage Documents.”
![]() Downloads—Internet applications use this folder as the default location for storing downloaded files. Sequestering all Internet downloads to this folder also makes it easier for virus and malware protection utilities to identify potentially harmful files.
Downloads—Internet applications use this folder as the default location for storing downloaded files. Sequestering all Internet downloads to this folder also makes it easier for virus and malware protection utilities to identify potentially harmful files.
![]() Library—Earlier versions of Mac operating systems showed this folder, but since OS X Lion 10.7, it has been hidden from the default Finder view. This folder is a collection point for many user resources. This includes, but is not limited to, user-specific preference files, fonts, contacts, keychains, mailboxes, favorites, screen savers, widgets, and countless other application resources.
Library—Earlier versions of Mac operating systems showed this folder, but since OS X Lion 10.7, it has been hidden from the default Finder view. This folder is a collection point for many user resources. This includes, but is not limited to, user-specific preference files, fonts, contacts, keychains, mailboxes, favorites, screen savers, widgets, and countless other application resources.
The quickest way to reveal the user’s Library folder is to manually go to the folder in the Finder. While holding down the Option key, choose Go > Library to reveal the user’s hidden Library folder. You can learn more about hidden items in Lesson 12, “Use Hidden Items, Shortcuts, and File Archives.”
![]() Movies—This is the obvious default location for movie files, and it is therefore often preferred by applications such as iMovie.
Movies—This is the obvious default location for movie files, and it is therefore often preferred by applications such as iMovie.
![]() Music—This is, naturally, the default location for music files, so it’s often preferred by applications such as GarageBand, Logic, and iTunes. It is also the default location for synced iOS application resources and backups, which are managed by iTunes. Further, any movies that are part of an iTunes library end up in this folder, as opposed to the default Movies folder.
Music—This is, naturally, the default location for music files, so it’s often preferred by applications such as GarageBand, Logic, and iTunes. It is also the default location for synced iOS application resources and backups, which are managed by iTunes. Further, any movies that are part of an iTunes library end up in this folder, as opposed to the default Movies folder.
![]() Pictures—The default location for picture files, which is often preferred by applications such as Photos and Aperture.
Pictures—The default location for picture files, which is often preferred by applications such as Photos and Aperture.
![]() Public—The default location for users to share files with other users. Everyone who has access to the Mac, either directly or via remote access, can view the contents of this folder. This folder contains a Drop Box folder, where others can place files that only the owner of the home folder can see.
Public—The default location for users to share files with other users. Everyone who has access to the Mac, either directly or via remote access, can view the contents of this folder. This folder contains a Drop Box folder, where others can place files that only the owner of the home folder can see.
Optional items commonly found in a Mac user’s home folder are:
![]() Applications—This optional folder must be created manually, but the system recognizes it as a special folder. As the name implies, this is the preferred location for users to install their own applications.
Applications—This optional folder must be created manually, but the system recognizes it as a special folder. As the name implies, this is the preferred location for users to install their own applications.
![]() Sites—This legacy folder might appear for home folders that have been upgraded or migrated from earlier versions of the Mac operating system. It was the default location for personal websites when Web Sharing was enabled. OS X Mountain Lion 10.8 and later do not support enabling Web Sharing via Sharing preferences; however, other local users can still view the contents of this folder.
Sites—This legacy folder might appear for home folders that have been upgraded or migrated from earlier versions of the Mac operating system. It was the default location for personal websites when Web Sharing was enabled. OS X Mountain Lion 10.8 and later do not support enabling Web Sharing via Sharing preferences; however, other local users can still view the contents of this folder.
Reference 6.2 Delete User Accounts
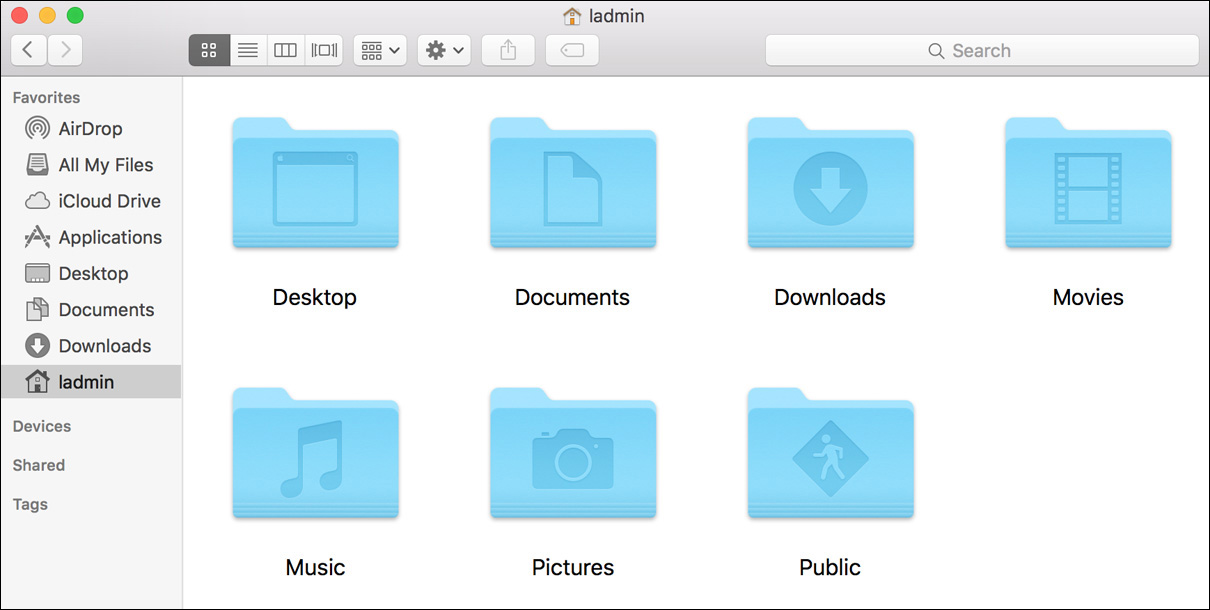
Deleting a user account in macOS is even easier than creating one. To delete a user account, simply select it from the list of users in the Users & Groups preferences and then click the Delete (–) button at the bottom of the list. An administrator needs to make only one choice when deleting a user account: what to do with the user’s home folder contents.
If a user has a particularly large home folder, the “delete user account” dialog may take several minutes to appear.
The administrator deleting the user account can choose one of three options:
![]() Save the home folder in a disk image—This option creates an archive of the user’s home folder as a disk image file. The disk image file is saved in the /Users/Deleted Users folder, with the account name as the name of the disk image file. Retaining the home folder as a disk image makes it easy to transport it to other systems or to import archived items to another user’s home folder.
Save the home folder in a disk image—This option creates an archive of the user’s home folder as a disk image file. The disk image file is saved in the /Users/Deleted Users folder, with the account name as the name of the disk image file. Retaining the home folder as a disk image makes it easy to transport it to other systems or to import archived items to another user’s home folder.
Keep in mind you must have sufficient free disk space available on the local system disk—essentially, enough to duplicate the original home folder—to create the archive disk image. This process can take quite a bit of time, depending on the size of the folder.
![]() Don’t change the home folder—This option leaves the user’s folder unchanged, except for its name. It simply appends “(Deleted)” to the home folder’s name, letting you know that the user account no longer exists. The deleted user’s home folder maintains the same access restrictions as a normal user home folder. Subsequently, however, even though this is a much quicker and more space-efficient method compared to the archival option, an administrator will have to manually adjust file ownership and permissions to access the items. Further, there is the potential that a newly created user account may be granted access to the deleted user’s home folder content. Both of these issues can be resolved using methods covered in Lesson 11, “Manage Permissions and Sharing.”
Don’t change the home folder—This option leaves the user’s folder unchanged, except for its name. It simply appends “(Deleted)” to the home folder’s name, letting you know that the user account no longer exists. The deleted user’s home folder maintains the same access restrictions as a normal user home folder. Subsequently, however, even though this is a much quicker and more space-efficient method compared to the archival option, an administrator will have to manually adjust file ownership and permissions to access the items. Further, there is the potential that a newly created user account may be granted access to the deleted user’s home folder content. Both of these issues can be resolved using methods covered in Lesson 11, “Manage Permissions and Sharing.”
![]() Delete the home folder—This option deletes the home folder contents immediately. The items are not stored in a Trash folder before they are deleted, so they cannot easily be recovered if you use this method.
Delete the home folder—This option deletes the home folder contents immediately. The items are not stored in a Trash folder before they are deleted, so they cannot easily be recovered if you use this method.
More Info
The method used to delete a user’s home folder is equivalent to a quick erase. Thus, the contents are potentially recoverable using third-party data recovery tools if you don’t have FileVault enabled. macOS Sierra no longer supports securely erasing a deleted user’s home folder. If data security is a concern in your environment, then you should enable FileVault as detailed in Lesson 10, “Manage FileVault.”
Reference 6.3 Migrate and Restore Home Folders
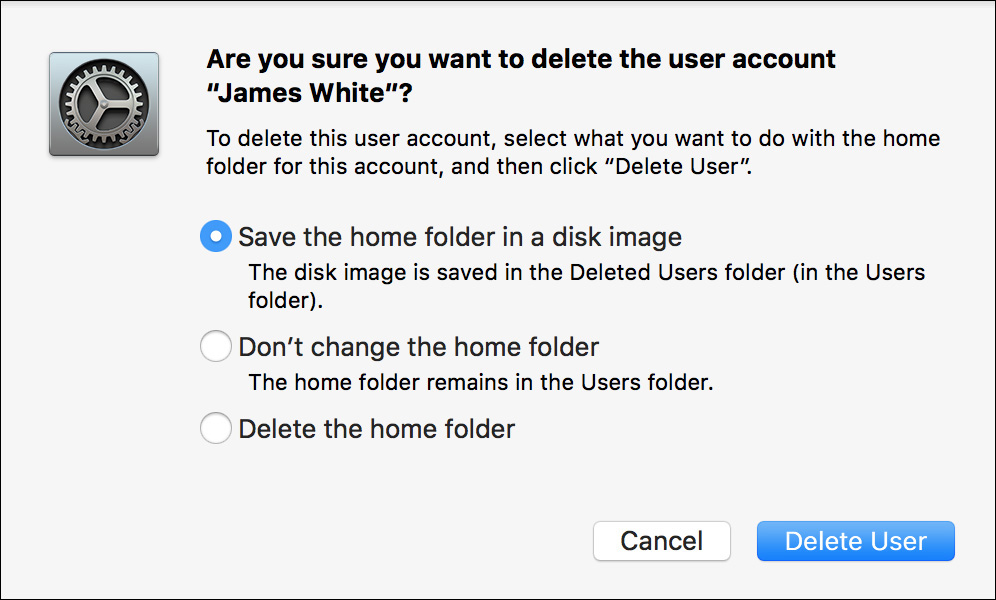
Usually, the best way to move or restore a user’s account and home folder is with Apple Migration Assistant. But it’s not always the best solution, and you may have to manually restore a user’s account. In this section, you’ll explore both Migration Assistant and the manual steps for restoring a home folder.
About Migration Assistant
This handy application is a huge time-saver that enables you to easily transfer all the settings, user accounts, and data from another Mac or Windows computer to your new Mac system.
With Migration Assistant, you can migrate:
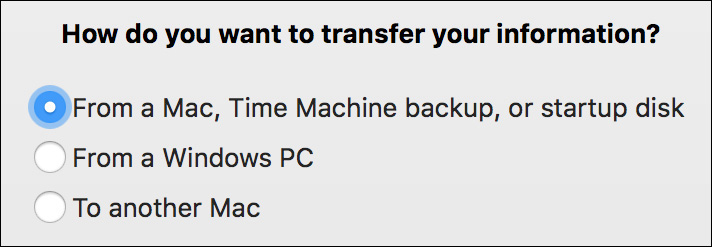
![]() From another Mac computer, Time Machine backup, or startup disk—This option scans the local network looking for other Mac computers running Migration Assistant and ready to transfer their information. If you don’t have a local network, you can directly connect two running Mac computers via Ethernet, FireWire, or Thunderbolt, and the two of them will create a local network. Alternatively, this option will also scan all locally mounted disks and the local network looking for Time Machine backups. Finally, it will also scan all locally mounted disks for a previous system. This includes any external disks or other Mac computers in target disk mode connected via FireWire or Thunderbolt. Using target disk mode is further detailed in Lesson 9, “Manage File Systems and Storage.”
From another Mac computer, Time Machine backup, or startup disk—This option scans the local network looking for other Mac computers running Migration Assistant and ready to transfer their information. If you don’t have a local network, you can directly connect two running Mac computers via Ethernet, FireWire, or Thunderbolt, and the two of them will create a local network. Alternatively, this option will also scan all locally mounted disks and the local network looking for Time Machine backups. Finally, it will also scan all locally mounted disks for a previous system. This includes any external disks or other Mac computers in target disk mode connected via FireWire or Thunderbolt. Using target disk mode is further detailed in Lesson 9, “Manage File Systems and Storage.”
More Info
See Apple Support article HT204350, “Move your content to a new Mac.”
![]() From a Windows PC—This option will scan the local network looking for Windows PCs running Migration Assistant and ready to transfer their information. This allows migration from Windows XP SP3 or later, assuming those systems have Windows Migration Assistant installed; it can be downloaded from the Apple Support website.
From a Windows PC—This option will scan the local network looking for Windows PCs running Migration Assistant and ready to transfer their information. This allows migration from Windows XP SP3 or later, assuming those systems have Windows Migration Assistant installed; it can be downloaded from the Apple Support website.
More Info
See Apple Support article HT204087, “Move your data from a Windows PC to a Mac.”
As covered in Lesson 2, “Set Up and Configure macOS,” Migration Assistant runs as part of macOS Setup Assistant on new or newly installed Mac systems. However, you can also run this application at any point by opening /Applications/Utilities/Migration Assistant.
Note
Before using Migration Assistant, always check for Apple software updates on both the source and destination computers. This process ensures that you are using the latest copy of Migration Assistant on all computers.
Note
Migration Assistant can migrate a Legacy FileVault–protected user account to a Mac only during the initial Setup Assistant process.
Clicking the Continue button will start the Migration Assistant process; however, you will have to first authenticate a user with administrator rights to start the process. Further, starting the Migration Assistant process will quit all running applications and log out all user accounts.
The Migration Assistant process has three modes: transfer from another Mac source, transfer from a Windows PC source, or transfer to another destination Mac. The first two options assume that you are transferring from another computer source to this Mac as the destination, whereas the last option assumes you are transferring from this Mac as the source to another destination Mac via network. In this case you will need to open Migration Assistant on the destination Mac as well.
If you choose to transfer from another computer source, Migration Assistant scans all attached disks and the local network for any possible migration sources. Alternatively, you can enter a specific Time Machine server as the source by clicking the Other Server button at the bottom of the Migration Assistant screen.
Once a source is selected, Migration Assistant scans the contents and presents you with a list of items you can migrate. If multiple disks are available on a system, you can choose to migrate that data as well. However, the migration process does not create new partitions on the new system; instead, it creates folders on the new system with the contents of the migrated disks.
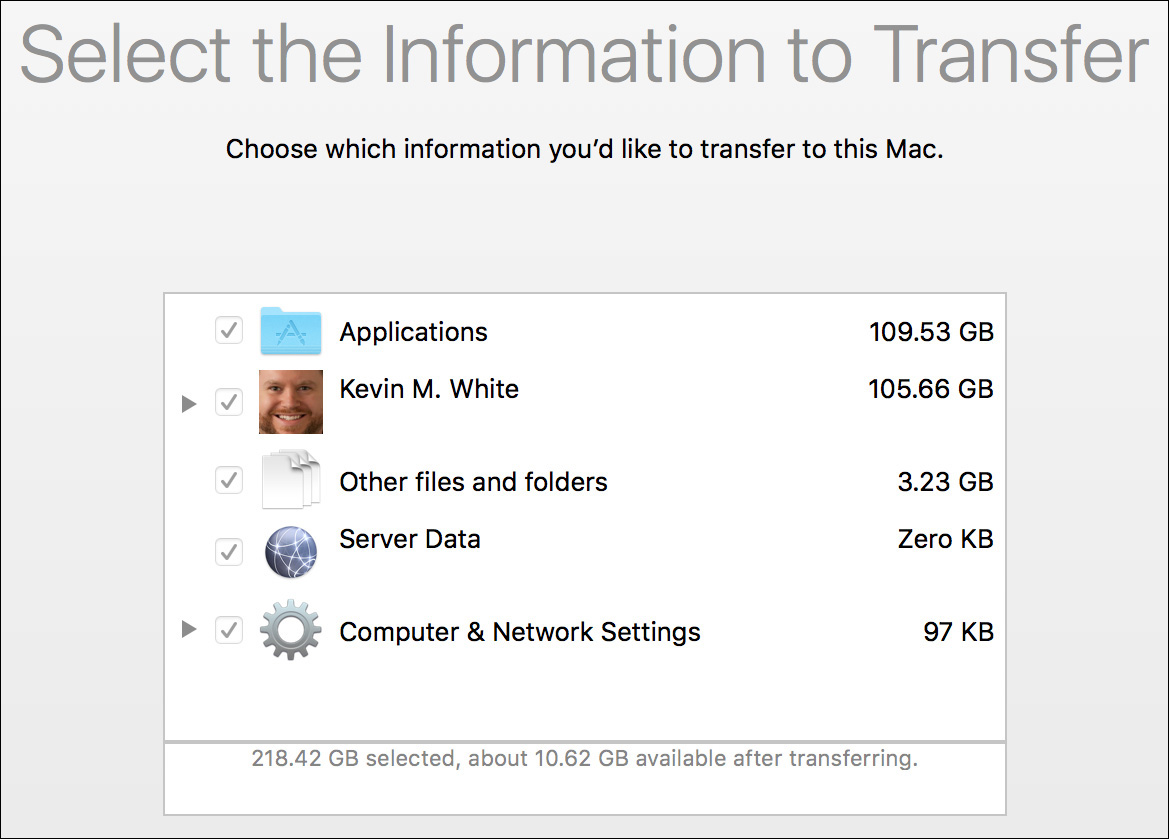
Once you make your selections, you can begin the transfer process. The more data you have selected to transfer, the longer the process will take. Mature systems with lots of data can take several hours to migrate.
Manually Restore a User’s Home Folder
In certain situations, you may need to erase and install a new system to repair or update a Mac. Unfortunately, you can’t always count on the user having a recent Time Machine backup of the system. Thus, erasing the system disk would also destroy any user accounts on the Mac. In this case, because you’re working only with a single Mac, as opposed to moving from one Mac to another, and you don’t have a Time Machine backup, Migration Assistant isn’t going to work for you.
If you find yourself in a situation like this, where Migration Assistant won’t fit your needs, you can manually move the user’s home folder data. Although this doesn’t require another Mac, it does require that you temporarily copy the user’s home folder to another “backup” storage disk. Once you have additional backup storage available, log in to the user’s account and, in the Finder, simply drag the home folder to the backup disk. As long as you copy the root of the user’s home—the folder with the user’s account name—then the Finder copies the entirety of the home folder in one move.

If you are creating a copy of another user’s home folder contents, you are prompted to authenticate as an administrator user to continue. This is because the default file-system permissions often prevent one user from accessing another user’s content. Administrator users are allowed to temporarily override permissions in the Finder if they authenticate.
Once you are sure you have a complete copy of the user’s home folder on the backup storage, you can erase the system disk and repair it. With the new system in place and working, first start by creating an administrator account with a different name from the user account to be restored. You must set up this other administrator account because the proper method for manually restoring a user’s home folder requires that the user account not yet exist on the system.
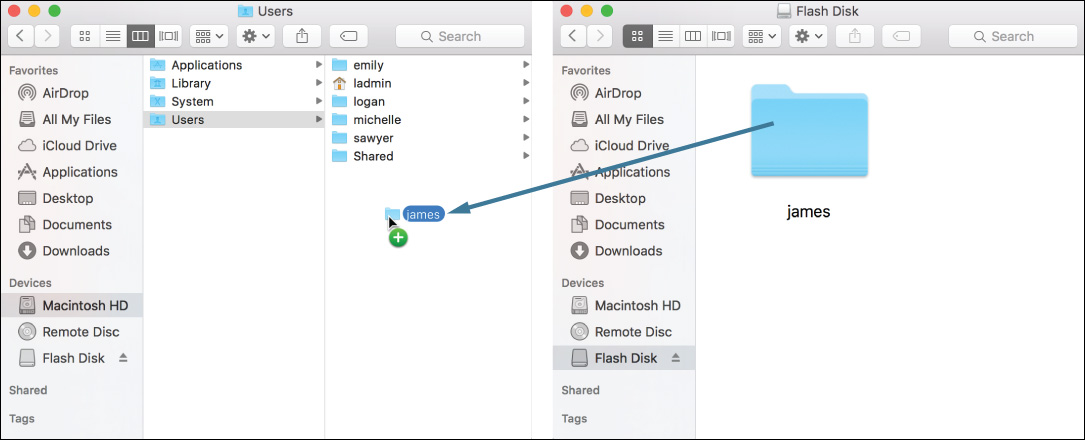
To complete the home folder restore, in the Finder, copy the backup of the user’s home folder into the /Users folder, making sure the home folder’s name is titled appropriately.
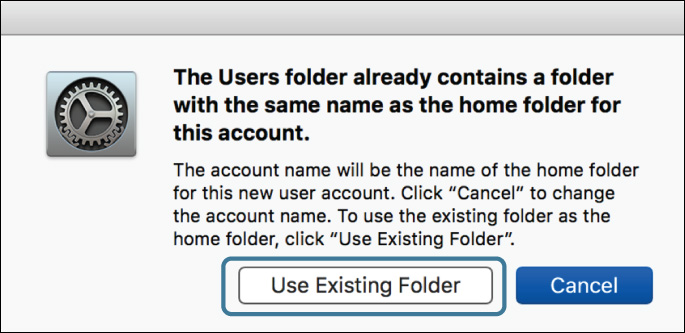
Finally, in the Users & Groups preferences, create the user’s account; be sure to use the same account name. Upon creation of the new user account, if the names match, the system will recognize this and prompt you to use the existing folder.
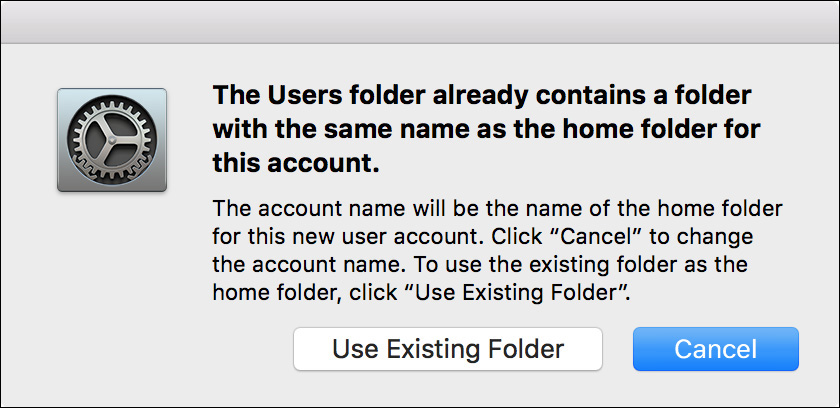
If you click the Use Existing Folder button, the system will associate the manually restored home folder with the newly created user account. This includes setting the proper home folder permissions so that the new user has access to the restored home folder content. If you click the Cancel button, the system will stop the creation of the new user account.
Exercise 6.1 Restore a Deleted User Account
![]() Prerequisite
Prerequisite
![]() You must have created the Local Admin account (Exercise 2.1, “Configure a New macOS System for Exercises,” or Exercise 2.2, “Configure an Existing macOS System for Exercises”).
You must have created the Local Admin account (Exercise 2.1, “Configure a New macOS System for Exercises,” or Exercise 2.2, “Configure an Existing macOS System for Exercises”).
In this exercise, you will create a user account and populate the home folder for the user. Then, you will delete the account, preserving the contents of the home folder. Finally, you will create a new account, ensuring that the new user gets the old user’s home folder contents. Besides illustrating how to restore a deleted user account, this technique can be used for changing a user’s short name. It also provides an alternative to the Migration Assistant method for moving user accounts between computers.
The scenario is that HR asked you to create an account for Marta Mishtuk. Her real name is Mayta Mishtuk, so you’ll need to fix the error.
Create Marta Mishtuk’s Home Folder
1 If necessary, log in as Local Admin (password: ladminpw, or whatever you chose when you created the account).
2 Open System Preferences, and select the Users & Groups pane.
3 Click the Lock icon, and authenticate as Local Admin.
4 Click the Add (+) button under the user list.
5 Enter the account information for Marta Mishtuk:
New Account: Standard
Full Name: Marta Mishtuk
Account Name: marta
Password: marta
Verify: marta
Do not provide a password hint.
6 Click Create User.
7 Control-click Marta’s account, and choose Advanced Options from the shortcut menu.
Now you will take a screenshot of the System Preferences window to record Marta’s account attributes for later reference.
8 Press Command-Shift-4, followed by the Space bar.
Your mouse cursor changes into a camera icon, and the region of the screen it is over is highlighted in blue. If you see a crosshair cursor instead, press the Space bar again.
9 Move the camera pointer over the System Preferences window, and then click to record its contents.
This is one of several ways of taking screenshots in macOS. Command-Shift-3 records the entire screen, Command-Shift-4 (without the Space bar) lets you select a rectangular region to record, and Command-Shift-4 with the Space bar lets you select a single window.
The image is saved to your desktop, named “Screen Shot,” followed by the date and time it was taken.
10 In the Advanced Options dialog, click Cancel, or press Command-Period, which is a way to select Cancel in most macOS dialogs.
11 Log out as Local Admin.
12 Log in as Marta Mishtuk (password: marta).
13 If you are prompted to sign in with your Apple ID, select “Don’t sign in,” click Continue, and then click Skip in the confirmation dialog.
14 If you are prompted to enable Siri, deselect “Enable Siri on this Mac,” and click Continue.
15 If you are prompted to set up Touch ID, click Continue, then click Set Up Touch ID Later, then click Continue in the confirmation dialog.
16 In the Dock, click the Launchpad icon.
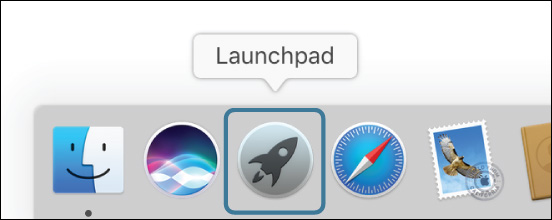
Launchpad gives users an easy way to open applications that aren’t in their Dock, without having to navigate to the Applications folder in the Finder.
17 Click the “Other” application group in Launchpad.
18 In the “Other” group, click the TextEdit icon to open TextEdit.
19 In the Untitled document, enter the text This is Mayta’s project document. (“Mayta” is not a typo.)
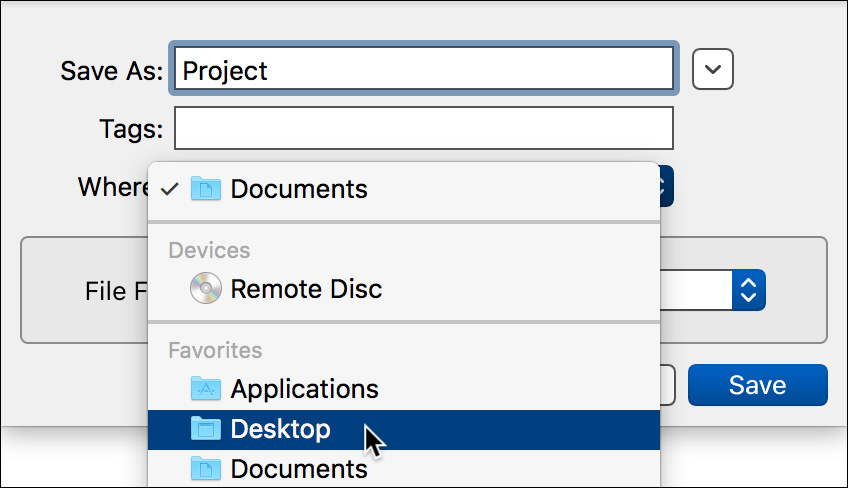
20 Choose File menu > Save (or press Command-S) to save the file.
21 Name the file Project, and save it to Marta’s desktop. You can use the shortcut Command-Shift-D to select the desktop.
22 Quit TextEdit, and log out of the Marta Mishtuk account.
Delete Marta’s Account
You will delete Marta’s account, preserving her home folder in a disk image file. A disk image is a file that contains a file system.
1 Log in as Local Admin.
2 Open Users & Groups preferences in System Preferences, if necessary. Unlock the preferences pane.
3 Delete Marta’s account by selecting her name and then clicking the Delete (–) button.
4 In the dialog that appears, make sure “Save the home folder in a disk image” is selected.

5 Click Delete User.
While Marta’s account is being archived, it is listed in the Users & Groups list as “Deleting Account.”

6 Wait for the archive to complete and Marta’s account to vanish from the list, and then quit System Preferences.
Restore Marta’s Account for Mayta
Marta’s files (actually Mayta’s) have been preserved in a disk image. Now you need to copy them to Mayta’s new home folder so that when the new account is created, she gets her old (the Marta account’s) files.
Note that since disk images are portable and easy to store, you could use this technique to re-create the account on another computer, even long after it has been deleted.
1 Navigate to the folder /Users/Deleted Users.
You can reach this folder by opening Macintosh HD from your desktop, opening the Users folder inside that, and then opening Deleted Users inside that.
If you don’t have permissions to open the Deleted Users folder, you may be logged in as a standard user. Log out, and log back in as Local Admin.
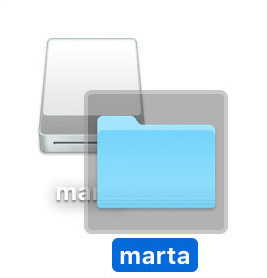
2 Open marta.dmg.
The disk image opens and displays the contents of the marta account’s home folder. However, as Reference 12.1, “Navigate Hidden Items,” discusses, an invisible subfolder named Library contains account settings and preferences for the marta account; to fully restore this account, you need to restore the entire home folder, not just its visible contents.
3 Close the “marta” window (but do not eject the disk image). The disk’s icon is still visible on your desktop.
4 Select (single-click) the “marta” icon on your desktop.
5 From the Finder’s File menu, choose Duplicate (or use the shortcut Command-D).
The Finder copies the contents of the image (including the hidden Library folder) to a folder named “marta” on your desktop.
6 Once the copy finishes, unmount the “marta” volume by clicking the Eject button next to its entry in the Finder sidebar. Note that you may need to scroll to view more of the sidebar to see the icon.
7 Select the new “marta” folder on your desktop, and press Return.
This allows you to edit the folder’s name.
8 Change the folder’s name to mayta, and press Return.

9 In the remaining Finder window, navigate back to the /Users folder. You can do this by clicking the left arrow in the window’s toolbar, by pressing Command-[ (left bracket), or by Control-clicking the folder name in the window’s title bar and choosing Users from the shortcut menu.
10 Drag the “mayta” folder from your desktop to the /Users folder.

The file permissions on the /Users folder do not allow you to add items to it. The Finder asks you to authenticate as an administrator to override this.
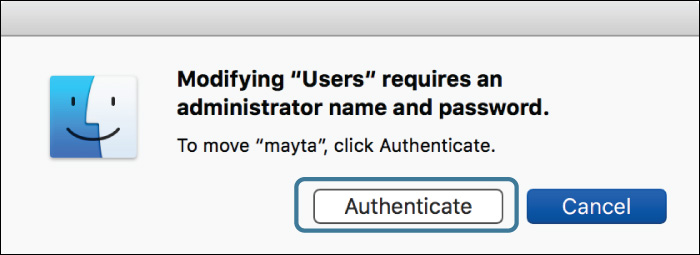
11 Click Authenticate; then enter Local Admin’s password, and click OK.
12 Open the “mayta” folder and then the Desktop folder inside that.
You see Mayta’s Project document. Since you (Local Admin) created this copy of Mayta’s home folder, you own it and have full permission to access it.
Create and Verify Mayta Mishtuk’s Account
You will now create the Mayta Mishtuk user account using the restored home folder as the new account’s home folder.
1 If necessary, open System Preferences, and select Users & Groups.
2 Click the Lock button, and authenticate as Local Admin.
3 Click the Add (+) button to create another account:
New Account: Standard
Full Name: Mayta Mishtuk
Account Name: mayta
Password: If you are performing this exercise in a class, enter mayta in the Password and Verify fields. If you are performing this exercise on your own, select a more secure password for the Mayta Mishtuk account. Be sure to remember the password you have chosen because you need to reenter it periodically while you use this computer.
You may provide a password hint if you want.
4 Click Create User.
A dialog appears that asks whether you want to use the “mayta” folder for this account.
6 Control-click Mayta’s account, and choose Advanced Options from the shortcut menu.
7 Open the Screen Shot file on your desktop, and compare the account attributes of Mayta’s new account with her original account. The user ID of the old account may have been reused for the new account, but the UUID will be different. Each account is assigned a completely new UUID when it is created.
8 Quit Preview.
9 In the Advanced Options dialog, click Cancel, and then quit System Preferences.
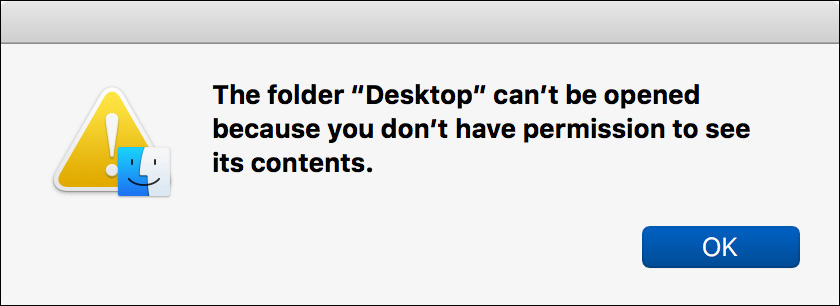
10 Try to reopen the Desktop folder in Mayta’s home folder now. If your Finder window is still displaying the Desktop folder, click the back button, and then double-click the Desktop folder. You no longer have permission because the files are now owned by Mayta’s new account.
11 Close the Finder window.
Verify Mayta Mishtuk’s Home Folder
To make sure Mayta’s files are all here, you can explore her restored home folder.
1 Log out as Local Admin, and log in as Mayta.
2 If you are alerted that the system could not unlock Mayta’s keychain, click Update Keychain Password, and enter marta (the original password for the Marta Mishtuk account).
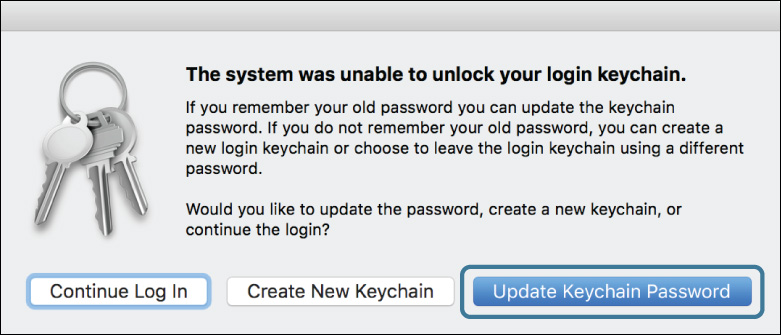
For more information about keychains, see Lesson 7, “Manage Security and Privacy,” and Reference 8.2, “Reset Lost Passwords.”
3 Verify that the Project file is on the desktop.
4 In the Finder, open Mayta’s home folder by choosing Go menu > Home (or by pressing Command-Shift-H).
5 Make sure all the usual subfolders are there: Desktop, Documents, Downloads, Movies, Music, Pictures, and Public.
6 Open the Desktop folder, and verify that you see the Project document.
7 Navigate back to the home folder, and then open the Public folder, where you see a Drop Box folder. For more information about these folders, see Lesson 11, “Manage Permissions and Sharing.”
In addition to the visible folders inside Mayta’s home folder, it should contain an invisible Library folder.
8 Hold down the Option key, and choose Go menu > Library. Note that the Library choice is hidden except when you are holding the Option key.
Mayta’s Library folder contains a large number of subfolders. For more information about this folder and its contents, see Reference 12.1, “Examine Hidden Items,” and Lesson 13, “Manage System Resources.”
9 Close the Library folder, and log out as Mayta Mishtuk.