
From the word go, Fedora provides support for a huge range of printers from many different manufacturers. In this chapter we will look at how to get your printer connected and talking to Fedora, as well as at the software that Fedora uses to manage printers and print jobs.
In keeping with most of the other Linux distributions, Fedora uses CUPS (Common UNIX Printing System) to handle printers. Other systems are supported, such as LPRng, but you will not have access to some of the graphical management tools from within Fedora.
Fedora’s print filter system is the main engine that enables the printing of many types of documents. The heart of that engine is the GNU GPL version of Aladdin’s Ghostscript interpreter, the gs client. The system administrator’s printer configuration tool is the system-config-printer client.
Note
Fedora’s print system can be used to print to local (attached) or remote (network) printers. If you use a local printer, it is represented by a printer device, such as /dev/lp0 or /dev/usb/lp0 (if you have a USB printer). Local and remote printers use print queues defined in your system’s printer capabilities database, /etc/printcap. A document being printed is known as a print job, and you can view and control your list, or queue, of current print jobs in the spool directory, which is /var/spool/cups. Note that you may control only your print jobs; only the root operator can control print jobs of any user on the system.
To add a printer to your system, you use the system-config-printer client to create, configure, and save the printer’s definition. The client saves the definition as an entry in your system’s printer capabilities database, /etc/printcap. Each definition contains a text field with the name of the printer, its host, and name of the print queue. Printed documents will be spooled to the /var/spool/cups directory. A sample printcap definition might look like
# This file was automatically generated by cupsd(8) from the
# /etc/cups/printers.conf file.  All changes to this file
# will be lost.
lp|lp:rm=stinky:rp=lp:¨
CUPS maintains its own database of defined printers under the /etc/cups directory in a file named printers.conf. For example, an associated printer defined in /etc/printcap previously might have the following entry in /etc/cups/printers.conf:
<DefaultPrinter lp>
Info Created by redhat-config-printer 0.6.x
DeviceURI parallel:/dev/lp0
Location HP 648 local printer
State Idle
Accepting Yes
JobSheets none none
QuotaPeriod 0
PageLimit 0
KLimit 0
</Printer>
This example shows the definition for the printer named lp, along with its associated device, description, state, and other information. The various possible fields and entries in this file are documented in the printer.conf man page.
CUPS uses a print server (daemon) named cupsd, also called a scheduler in the CUPS documentation. The server can be controlled, like other Fedora services, by the service command or system-config-services client. How the server works on a system is determined by settings in its configuration file, cupsd.conf, found under the /etc/cups directory. CUPS executables are found under the /usr/lib/cups directory.
The cupsd.conf man page documents more than 80 different settings for the server, which you can configure to match your system, network, or printing environment. Default CUPS-related files and directories are stored under the /usr/share/cups directory. Logging can be set to seven different levels, with information about access and errors stored in log files under the /var/log/cups directory.
Resource requirements can be tailored through other settings, such as MaxCopies to set the maximum number of copies of a print job by a user, MaxJobs to set a limit on the number of active print jobs, and MaxJobsPerUser to set a limit on the number of active jobs per user. The RIPCache setting (8MB by default) controls the amount of memory used for graphics cache during printing.
For example, if you want to limit printing to 20 copies of a document or page at a time and only 10 simultaneous print jobs per user, use settings such as
MaxCopies 20
MaxJobsPerUser 10
Tip
Do not forget to restart the CUPS server after making any changes to its configuration file. Changes are activated only when the service is restarted (when the daemon rereads its configuration file). See the “GUI-Based Printer Configuration Quickstart” section later in this chapter.
Because CUPS does not use the traditional Berkeley-style print spooling system, lpd, you can change the name of the printer capabilities database from the default /etc/printcap. Encryption can be used for printing, with secure access behavior determined by settings in /etc/cups/client.conf. Network access settings include port, connection, IP address, domains, and limits to the number and size of client requests.
Your task as a system administrator (or root operator of your workstation) is to properly define local or remote printers and to ensure that printing services are enabled and running properly. Fortunately, Fedora includes Red Hat’s graphical print service configuration tools that make this job easy. You should use these tools to configure printing, as you learn in this section of the chapter. But first, take a moment to read through a quick overview of the configuration process.
Caution
Do not manually edit your /etc/printcap. Any changes will be lost when the printing service is restarted or if your system is rebooted. If you need to create customized printer entries, save the entries in /etc/printcap.local and then restart the printing service.
You can configure printing services using either the command line system-config-printer-tui program or the system-config-printer-gui graphical interface. Most of the detailed information in this chapter refers to the use of the GUI. The overview sections that follow, however, give you a solid foundation in both configuration approaches. You learn the details of these processes in later sections of the chapter.
Configuring a printer for Fedora is easy but must be done using root permission. Make sure that the cupsd daemon is installed and running. If you elect to use printing support when you install Fedora, the daemon and related software will be installed. If you’re not sure whether cupsd is running, you can use the service command with the name of the service and the status keyword like so:
# service cups status
You will see either
cupsd is stopped
or, if cupsd is running, an acknowledgement, along with its process ID, such as
cupsd (pid 2378) is running...
If cupsd is installed but not running, start the daemon like so:
# /etc/rc.d/init.d/cups start
You can also start the daemon using the service command like so:
# service cups start
If you are using the desktop, select System, Administration, Printing. You will be asked to enter the root password. If not, you are using X as root, which is a bad idea. Log out and then log back in as a regular user! After entering the root password, the printer configuration dialog appears.
You then simply follow the prompts to define your printer and add local or remote printing services. You should print a test page before saving your changes. Use the printer configuration client or the File menu’s Print menu item from a GNOME or KDE client.
Note
The system-config-printer utility is an update to the now-legacy printtool client included with previous Red Hat Linux distributions. Although you might also find related tools (or symbolic links), such as printtool, printconf-tui, and /usr/sbin/printconf-gui installed on your system, you should use the system-config-printer client to manage printers under Fedora.
Local or remote print services can also be configured locally or on a server without the X Window System. To do so, you use Fedora’s text-based system-config-printer-tui printer configuration utility. You have to run this command as root:
# system-config-printer-tui
The screen clears after you press Enter, and you will see the command’s main dialog. (You see this screen in the section titled “Console-Based Print Commands,” which can be found in Chapter 23, “File and Print.”)
Note
If you launch system-config-printer as root when not using X at a console, the system-config-printer-tui interface is used.
You use the Tab key and spacebar to navigate the dialogs and expand lists of devices. You can create a new printer entry by highlighting the New button and pressing Enter. Use the Up or Down cursor keys to select and highlight an existing entry; then highlight the Edit button and press Enter to edit a previously defined printer.
You can then print documents from the command line using the lpr command, view any active jobs using the lpq command, and control the print queue by using the lrpm command.
After defining a printer, you can use the command line to view and control your print jobs, or if root, all print jobs and printers on your system. Table 12.1 contains a partial list of CUPS and related printing commands and drivers included with Fedora.
Table 12.1. Print-Related Commands and Drivers
Name | Description |
|---|---|
| Formats text files for PostScript printing |
| Controls CUPS print job destinations |
| Cancels a CUPS print job |
| Controls CUPS printers |
| Converts TeX DVI files to specific PCL format |
| Controls CUPS printers |
| Converts text files to PostScript |
| Epson Stylus inkjet printer utility |
|
|
| The Ghostscript interpreter |
| Ghostscript BubbleJet printer drivers |
| Ghostscript DeskJet printer drivers |
| CUPS command-line based printer utility |
| Starts a CUPS print job |
| A Berkeley-subset CUPS printer control client |
| General printer filter |
| A Berkeley-compatible CUPS job queue utility |
| Displays CUPS print jobs and printer status |
| PostScript text formatting utility |
| Portable bitmap conversion utilities |
| Text formatting command |
| Duplex printing utility for nonduplex printers |
| Controls CUPS print job destinations |
| Launches printer configuration tool |
| SMB print spooler |
| SMB print shell script |
| SMB printer spooler |
| Portable bitmap to ThinkJet printer conversion utility |
Most Linux systems use PostScript as the default document format for printing. Fedora uses the gs command along with CUPS to manage local and remote print jobs and the type of data transferred during a print job. The gs command is used to translate the document stream into a format accepted by the destination printer (which most likely uses HPCL).
You can use the Ghostscript interpreter gs to display its built-in printer devices by using the gs interpreter with its --help command-line option like this:
# gs --help
Note
Fedora includes graphical clients you can use to view many different types of documents. For example, to display PostScript documents (including compressed PostScript documents) or PostScript images, use the gv client. To display Portable Document Format (PDF) documents, you can use gv or the xpdf client.
The gs command outputs many lines of help text on command-line usage and then lists built-in printer and graphics devices. Another way to get this information is to start gs and then use the devicenames == command like this:
# gs
GNU Ghostscript 7.05 (2002-04-22)
Copyright (C) 2002 artofcode LLC, Benicia, CA. All rights reserved.
This software comes with NO WARRANTY: see the file PUBLIC for details.
Loading NimbusRomNo9L-Regu font from /usr/share/fonts/default/Type1/n021003l.pfb...
2410668 1053956 1642520 347466 0 done.
Loading NimbusSanL-Regu font from /usr/share/fonts/default/Type1/n019003l.pfb...
 2785628 1379834 1662616 358654 0 done.
Using NimbusSansL-Regu font for NimbusSanL-Regu.
[/miff24 /psmono /alc8500 /lp2563 /pkmraw /stp /iwlq /pbm /md1xMono /epson /bjc600 /lbp310
/coslw2p /cdjcolor /bj10v /cdj1600 /djet500 /x11rg16x /atx23 /x11gray4 /st800 /jpeggray /necp6
/psgray /alc2000 /lp8000 /pksm /lxm3200 /jetp3852 /pbmraw /DJ630 /epsonc /bjc800 /lbp320
/coslwxl /cdjmono /bj10vh /cdj500 /laserjet /x11rg32x /atx24 /x11mono /stcolor /pdfwrite /oce9050
/psrgb /cups /lq850 /pksmraw /lx5000 /la50 /pgm /DJ6xx /escp /faxg3 /lips2p /cp50 /cdj550
/mag16 /cdj670 /ljetplus /ljet4pjl /atx38 /bmpmono /sunhmono /pswrite /oki182 /bit /cljet5 /lxm5700m
/tiffcrle /lex7000 /la70 /pgmraw /DJ6xxP /fs600 /faxg32d /bjc880j /declj250 /pj /mag256 /cdj850 /ljet2p
 /lj4dithp /bmpa16 /bmpgray /t4693d2 /epswrite /okiibm /bitrgb /cljet5c /m8510 /tiffg3 /lex5700 /la75
...
Creating a local printer for your Fedora system can be accomplished in six easy steps. You must have root permission to use the system-config-printer client. The cupsd daemon should also be running before you begin (start the daemon manually as shown earlier in this chapter, or use the ntsysv, chkconfig, or system-config-services commands to ensure that lpd is started at boot time).
To launch system-config-printer, select the Printing menu item from the GNOME or KDE desktop panel’s System Settings menu or use the command line of an X terminal window like this:
# system-config-printer &
The Fedora system-config-printer tool walks you through a process to create a new print queue, which effectively defines a new printer on your system. To begin configuration of a local (attached) printer, click the New Printer toolbar button in system-config-printer’s main window. An Add a New Printer configuration dialog appears, as shown in Figure 12.1.
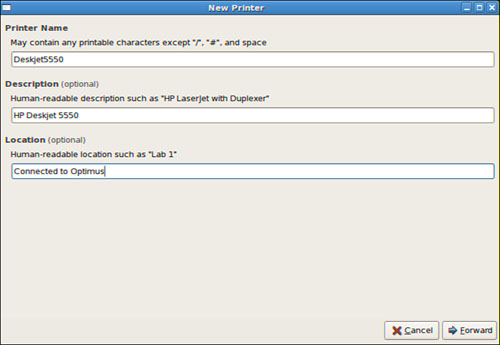
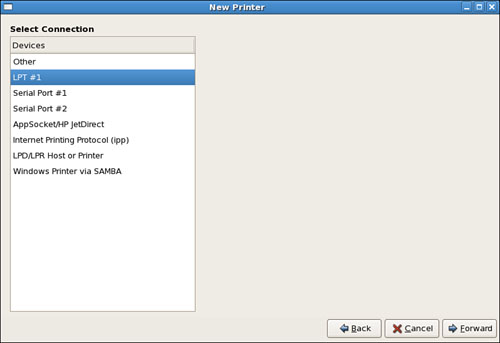
The Printer Name dialog appears. Type a desired name for the new printer (such as lp), enter a short description, and optional location information then click the Forward button. The Connection Type dialog appears, as shown in Figure 12.2. Click the connection type that is appropriate for you. You can configure a local or networked printer supported by the Common UNIX Printing System (CUPS), the lpd daemon on a remote server, a Session Message Block (SMB) server, Internet Printing Protocol (ipp), or a JetDirect interface. To configure a printer attached to your computer, select the locally connected queue type, click to select the printer device (which might be /dev/lp0 or /dev/usb/lp0), and then click Forward. You can also use the Custom Device button to enter a different port, such as /dev/ttyS0, for a serial printer.
The Printer Model dialog shown in Figure 12.3 presents a list of options you can use to choose the manufacturer of your printer, or you can simply choose a generic type of connected printer.
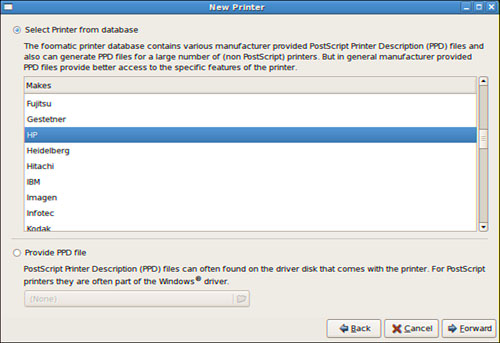
Note that you can configure a printer for Fedora even if it is not attached to your computer. After you select your printer’s manufacturer, a list of printers from that manufacturer (such as HP, as shown in Figure 12.4) appears. Select your printer from the list, and then click the Forward button.

Do not worry if you do not see your printer listed in the selection; it is possible to select a related, although different, printer model and still be able to print to your printer. For example, many HP printers can be used by selecting the DeskJet 500 for monochrome or 500C model for color printing.
Note
You can also browse to http://www.linuxprinting.org/ to find out what drivers to use with your printer or to see a cross-referenced listing of printers supported by each driver. You might also find new and improved drivers for the latest printers on the market.
You can experiment to see which printer selection works best for your printer if its model is not listed. You might not be able to use all the features of your printer, but you will be able to set up printing service. Click Forward when you have made your choice.
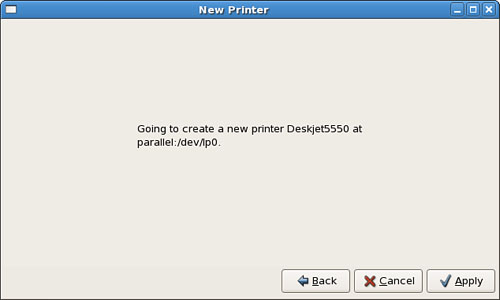
The Finish and Create New Print Queue dialog shows you the printer type, printer device, and selected printer so that you can confirm the information is correct (see Figure 12.5). If you need to change the options, click Back to return to previous dialogs. To create the new print queue, click Finish.
When the print queue has been created, you are asked whether you would like to print a test page. Click Yes to save your new printer setup and to print a test page. If you click No, a test page is not printed, and you have to delete the new printer entry or save or cancel your changes before you quit system-config-printer.
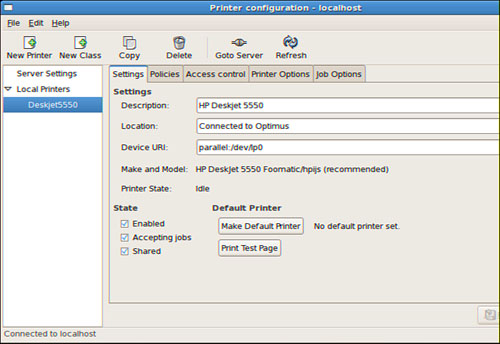
You can see the new printer defined in the system-config-printer main window as shown in Figure 12.6.
Tip
You can also configure multiple print queues for the same printer. Use this technique to test printing using different print drivers with the same printer. Create a new queue, give it a specific name, (such as testpcl3), and select a different printer. Finish the configuration and print a test page to compare the results against other entries to find the best output. You can also use this technique to define a monochrome or color printer entry for the same printer or to use different drivers for different types of media (such as regular or photo paper).
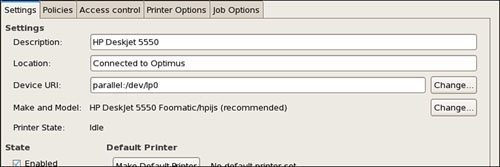
You also use the system-config-printer tool to edit the newly defined printers. To edit the printer settings, highlight the printer’s listing in the printer browser window. You will then be able to select specific settings related to that printer by using the tabs that appear in the right hand side of the dialog box. The Printer Options dialog, part of the printer settings, is shown in Figure 12.7.
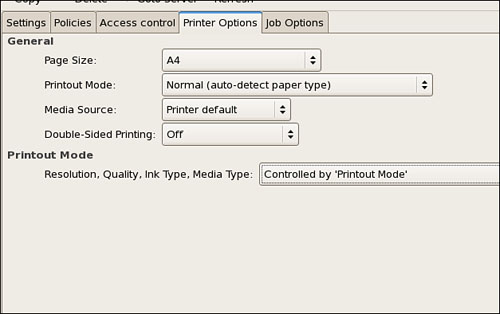
The first tab in this dialog enables you to assign a new name for the printer. In this example, the printer has the name deskjet5550. Other tabs in this dialog enable you to change the queue type or queue options (such as whether to print a banner page or set the image area of a page), to select or update the driver, or to choose available driver options for the printer (shown in Figure 12.8).
Click the Help button to read detailed information about the different options, which are used to force a page eject, support character rendering, and set a different resolution or a default page orientation. Printer/driver notes are available if you are selecting a different driver in the Printer Driver tab.
When you finish editing your printer definition (or queue), click the OK button. Use the Apply command in the Action menu to save the definition and automatically restart the cupsd daemon. This step is extremely important; you have to update the printer settings and restart the cupsd daemon to force it to reread your new settings. Click Quit from the Action menu when finished.
http://www.linuxprinting.org/—Browse here for specific drivers and information about USB and other types of printers.
http://www.hp.com/wwsolutions/linux/products/printing_imaging/index.html—Short but definitive information from HP regarding printing product support under Linux.
http://www.linuxdoc.org/HOWTO/Printing-HOWTO/—Grant Taylor’s Printing HOWTO, with information on using various print services under Linux.
http://www.cups.org/—A comprehensive repository of CUPS software, including versions for Red Hat Linux.
http://www.pwg.org/ipp/—Home page for the Internet Printing Protocol standards.
http://www.linuxprinting.org/cups-doc.html—Information about the Common UNIX Printing System (CUPS).
http://www.cs.wisc.edu/~ghost/—Home page for the Ghostscript interpreter.