Group Policy modeling and maintenance tasks often go hand in hand. Typically, you will:
Use Group Policy modeling to plan a Group Policy implementation or update.
Perform maintenance tasks, including copying and backup of Group Policy objects, to safeguard the Group Policy configuration before changes are made.
Implement your Group Policy plan or update.
Use Group Policy Results to determine the effective Group Policy settings for a user logging on to the network from a specific computer, and make any necessary changes after your review.
Perform maintenance tasks, including copying and backing up Group Policy objects, to safeguard the Group Policy configuration after changes are made.
You won’t always need to perform each of these steps, but you will usually want to perform them in the order listed. Simply put, before you change Group Policy, you should model Group Policy and back up the current Group Policy configuration. After you implement Group Policy or perform updates to Group Policy, you should log and review the results. If necessary, you should make changes and then, when you are finished with the update/review process, back up the Group Policy configuration.
Modeling Group Policy for planning is useful when you want to test various implementation and configuration scenarios. For example, you might want to model the effect of a slow link or the use of loopback processing mode. You can also model the effect of moving users or computers to another container in Active Directory or the effect of changing security group membership for users and computers.
All domain and enterprise administrators have permission to model Group Policy for planning, as do those who have been delegated the Perform Group Policy Modeling Analyses permission. To model Group Policy and test various implementation and update scenarios, complete these steps:
In the GPMC, right-click the Group Policy Modeling node, and then select Group Policy Modeling Wizard.
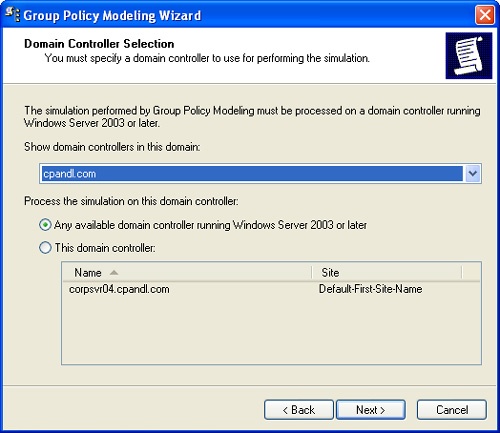
When the Group Policy Modeling Wizard starts, click Next. The Domain Controller Selection page, shown in Figure 3-15, is displayed.
Under Show Domain Controllers In This Domain, select the domain for which you want to model results.
Under Process The Simulation On This Domain Controller, the Any Available Domain Controller option is selected by default. If you want to use a specific domain controller, select This Domain Controller and then choose a specific domain controller. Click Next.
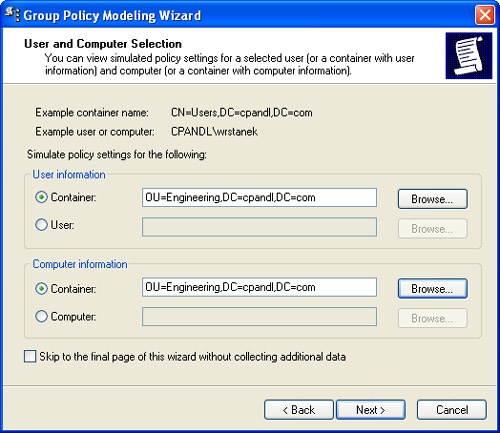
On the User And Computer Selection page, shown in Figure 3-16, select the modeling options for users and computers. In most cases, you’ll want to model policy for a specific container using user and computer information. In this case, the following steps apply:
Under User Information, select Container, and then click Browse to display the Choose User Container dialog box. Choose any of the available user containers in the selected domain. For example, you can simulate policy settings for users in the Engineering OU.
Under Computer Information, select Container, and then click Browse to display the Choose Computer Container dialog box. Choose any of the available computer containers in the selected domain. For example, you can simulate policy settings for computers in the Engineering OU.
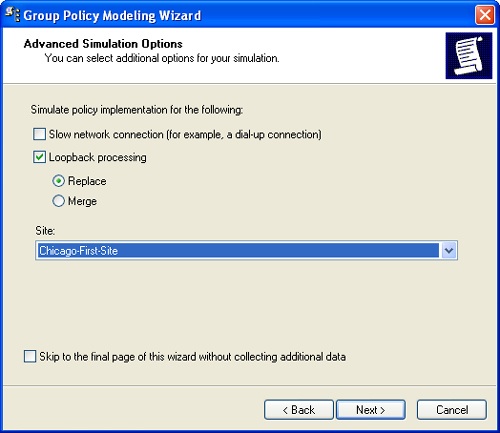
Click Next. The Advanced Simulation Options page, shown in Figure 3-17, is displayed. The advanced options allow you to modify the simulation for network and subnet variations, such as slow link detection, loopback processing, and accessing the network from a particular site. Select any advanced options for slow network connections, loopback processing, and sites as necessary.
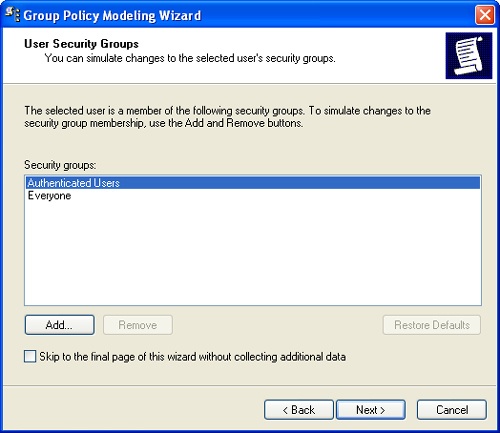
Click Next. If you are modeling user information, the User Security Groups page, shown in Figure 3-18, is displayed. Use the options on this page to simulate what would happen if you were to add a user to a designated security group. By default, the simulation is for a user who is a member of the implicit security groups Authenticated Users and Everyone. If you want to simulate membership in additional groups, you can add the groups here. For example, if you want to see what would happen if a user in the designated container were a member of the Engineering security group, you can add this group to the Security Groups list.
Click Next. If you are modeling computer information, the Computer Security Groups page, shown in Figure 3-19, is displayed. Use the options on this page to simulate what would happen if you were to add a computer to a designated security group. By default, the simulation is for a computer that is a member of the implicit security groups Authenticated Users and Everyone. If you want to simulate membership in additional groups, you can add the groups here. For example, if you want to see what would happen if a computer in the designated container were a member of the Domain Controllers security group, you can add this group to the Security Groups list.
WMI filters can be linked to policy objects. By default, it is assumed that the selected users and computers meet all the WMI filter requirements, which is what you want in most cases for modeling, so click Next twice to skip past the WMI Filters For Users and WMI Filters For Computers pages.
To complete the modeling, click Next, and then click Finish. The wizard generates a report, the results of which are displayed in the Details pane.
As shown in Figure 3-20, the name of the modeling report is generated based on the containers you chose. Click on the name to highlight it for editing. Type a descriptive name for the modeling report, and then press Tab. On the report, click Show All to display all of the policy information that was modeled. You can then work through the various nodes of the report to view the effective settings for users, computers, or both in the selected container and for the selected modeling options.


The GPMC features built-in copy and import operations. The copy feature allows you to copy existing policy objects from one domain to another. The import operation allows you to restore a backup copy of policy objects from one domain and then later import them into another domain. No trust is necessary for the copy and import operation to work. This means the target domain for the import operation can be a parent domain, a child domain, a domain in a different tree or forest, or even an external domain for which no trust exists.
Note
Copy and import operations are only for the policy settings within a policy object. These operations don’t copy a policy object’s links or any WMI filters that might be associated with a policy object.
Using the GPMC copy feature is fairly straightforward. You can copy a policy object and all its settings in one domain and then navigate to the domain into which you want to paste the copy of the policy object. The source and target domains can be any domains to which you can connect in the GPMC and for which you have permission to manage their related policy objects. The specific permissions you need are as follows:
In the source domain, you need Read permission to create the copy of the policy object.
In the target domain, you need Write permission to write the copied policy object. Administrators have this privilege, as do those who have been delegated permission to create policy objects.
You can copy a policy object from one domain to another domain to which you have connectivity and permissions by completing the following steps:
In the GPMC, expand the entry for the forest you want to work with, expand the related Domains node, and then expand the related Group Policy Objects node.
Right-click the policy object you want to copy, and then select Copy.
Access the target domain. Expand the entry for the forest, expand the related Domains node, and then expand the related Group Policy Objects node.
Right-click the target domain’s Group Policy Objects node, and then select Paste.
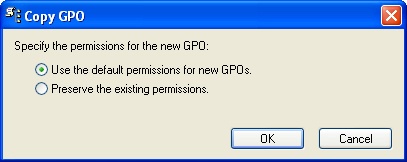
If the source and target domain for the copy operation are the same, you’ll see a dialog box like the one shown in Figure 3-21. Otherwise, the Cross-Domain Copying Wizard starts, and when you click Next, you see a wizard page with similar options.
You can now choose to create a copy of the policy object with the default permissions for the selected domain or copy the existing permissions to the new policy object. In most cases, you’ll want to use the default permissions for new GPOs to ensure that administrators in the target domain can access and work with the copied policy object.
Click OK or Next as appropriate. The rest of the wizard pages have to do with migration tables, which allow you to refine the copied settings so that the proper security groups and UNC paths are used (based on the local environment). For example, you might need to specify that the permissions for EngSec group should be migrated to the EngTeam group in the new policy object, or you might need to specify new locations for folder redirection in the new domain.
More Info
You’ll find detailed information on migration tables in Chapter 4, which also provides additional examples of copying and importing policy objects.
Copying policy objects between domains works fine when you have connectivity between domains and the appropriate permissions. If you are an administrator at a remote office or have been delegated permissions, however, you might not have access to the source domain to create a copy of a policy object. In this case, another administrator can make a backup copy of a policy object for you and then send you the related data. When you receive the related data, you can import the backup copy of the policy object into your domain to create a new policy object with the same settings.
Anyone with the Edit Settings Group Policy management privilege can perform an import operation. To import a backup copy of a policy object into a domain, complete the following steps:
Start the GPMC. Click Start, Programs or All Programs, Administrative Tools, and then Group Policy Management Console. Or type gpmc.msc at a command prompt.
Expand the entry for the forest you want to work with, and then expand the related Domains node by double-clicking it.
Right-click Group Policy Objects, and then select New. In the New GPO dialog box, type a descriptive name for the new GPO and then click OK.
The new GPO is now listed in the Group Policy Objects container. Right-click the GPO, and then choose Edit. This opens the Group Policy Object Editor.
Right-click the New policy object, and choose Import Settings. This starts the Import Settings Wizard.
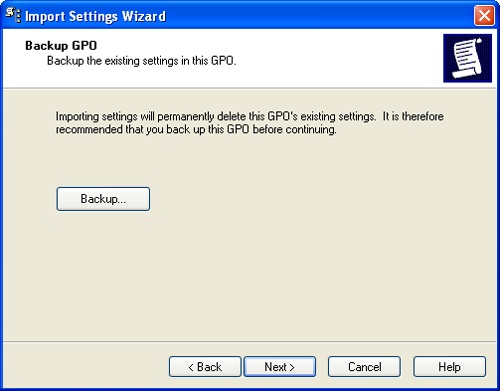
Click Next. Because the import operation overwrites all the settings of the policy object you select, you are given the opportunity to back up the policy object before continuing, as shown in Figure 3-22.
Click Next. Use the options on the Backup Location page to type or browse for the name of the folder containing the backup copy of the policy object you want to import. This is a bit confusing because you were just given the opportunity to back up the current policy object, but what is meant here is the backup folder for the policy object you want to import.
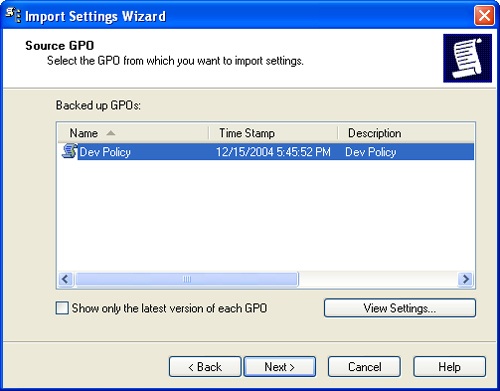
Click Next. If there are multiple backups stored in the designated backup folder, you’ll see a list of them on the Source GPO page, as shown in Figure 3-23. Select the one you want to use by clicking it.
Click Next. The Import Settings Wizard scans the policy object for references to security principals and UNC paths that might need to be migrated. If any are found, you are given the opportunity to create migration tables or use existing migration tables. (You’ll find detailed information on migration tables in Chapter 4.)
Continue through the wizard by clicking Next, and then click Finish. The import process begins. When it is completed, click OK.
Just as you back up other types of critical data, you should back up your policy objects. In fact, we’ll go so far as to say that backing up policy objects should be part of your periodic maintenance routine. Typically, you’ll want to create two types of backups for your policy objects:
Policy object backups that are stored on a designated domain controller and then backed up as part of that computer’s routine system backup
Policy object backups that are stored on removable media, CD-ROM or DVD, or other location that can be stored in a lock box and rotated periodically to storage off site
As with any backup process, you should develop a specific backup strategy for policy objects. Here is an example strategy:
Designate a domain controller in each domain as the policy backup computer. In most cases, you will want this computer to be the PDC emulator for the domain because this is the default domain controller to which the GPMC connects.
Before backing up the designated domain controller using the normal system backup process, create a backup of your domain’s policy objects. You should create a new backup periodically (weekly or monthly, in most cases). Before you change policy settings, you should also create a backup, and then after you’ve finalized policy, you should create another backup.
You should periodically create media backups of your policy objects. This means storing the backups on removable media, CD-ROM or DVD, or another location. You should have designated secure storage on site and periodically rotate backup sets off site.
Using the GPMC, you can back up individual policy objects in a domain or all policy objects in a domain by completing the following steps:
In the GPMC, navigate to the Group Policy Objects container for the domain with which you want to work. Expand the forest, the Domains node, and the related Group Policy Objects node.
If you want to back up all policy objects in the domain, right-click the Group Policy Objects node, and then select Back Up All.
If you want to back up a specific policy object in the domain, right-click the policy object, and then select Back Up.
In the Back Up Group Policy Object dialog box, shown in Figure 3-24, click Browse, and then use the Browse For Folder dialog box to set the location in which the GPO backup should be stored.
In the Description field, type a clear description of the contents of the backup.
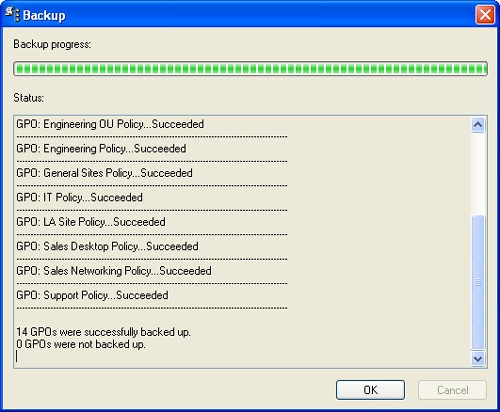
Click Backup to start the backup process.
The Backup dialog box, shown in Figure 3-25, shows the progress and status of the backup. Click OK when the backup completes.

Tip
When doing a full backup, you should be able to back up all policy objects successfully. If a backup fails, check the permissions on the policy and the folder to which you are writing the backup. You need Read permission on a policy and Write permission on the backup folder to create a backup. By Default, members of the Domain Admins and Enterprise Admins groups should have these permissions.
Using the GPMC, you can restore a policy object to the exact state it was in when it was backed up. The GPMC tracks the backup of each policy object separately, even if you back up all policy objects at once. Because version information is also tracked according to the backup time stamp and description, you can restore the last version of each policy object or a particular version of any policy object.
To restore a GPO, you need Edit Settings, Delete, and Modify Security permissions on the policy object and Read permission on the folder containing the backup. By default, members of the Domain Admins and Enterprise Admins groups should have these permissions. You can restore a policy object by completing the following steps:
In the GPMC, navigate to the Group Policy Objects container for the domain with which you want to work. Expand the forest and the related Domains node.
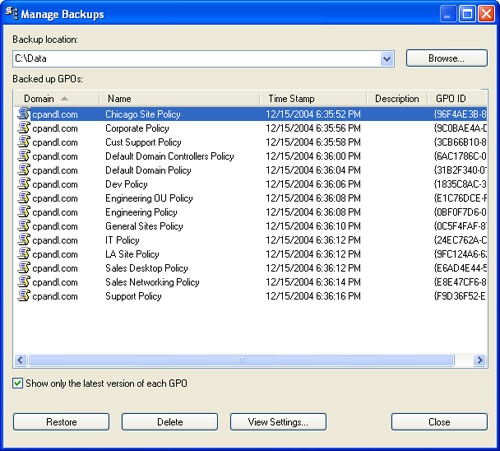
Right-click the Group Policy Objects node and then select Manage Backups. This displays the Manage Backups dialog box, shown in Figure 3-26.
In the Backup Location field, type the folder path to the backup or click Browse to use the Browse For Folder dialog box to find the folder.
All policy object backups in the designated folder are listed under Backup Policy objects. To show only the latest version of the policy objects according to the time stamp, select Show Only The Latest Version Of Each GPO.
Select the GPO you want to restore. If you want to confirm its settings, click View Settings, and then verify that the settings are as expected by using Internet Explorer. When you are ready to continue, click Restore.
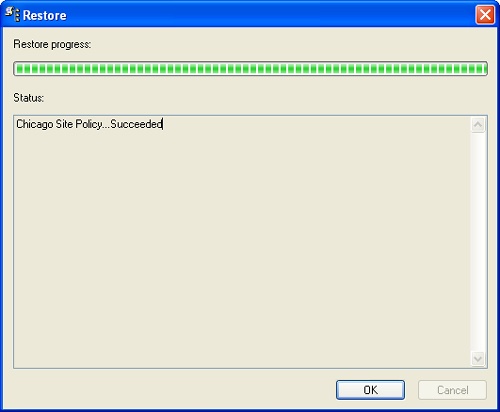
Confirm that you want to restore the selected policy object by clicking OK. The Restore dialog box, shown in Figure 3-27, shows the progress and status of the restore.
Click OK, and then restore additional Policy objects as necessary or click Close.