Introducing cartoon animation
Discovering the importance of the storyboard
Using cartoon sound: Voices, effects, and ambiance
Expressing motion and emotion
Anticipation, weight, and overlapping actions
Walk cycles and coloring tricks
Syncing with music and sound effects
Flash is a powerful tool that continues to grow in popularity as a professional production option for creating high-quality cartoons and animated broadcast graphics. The best thing about Flash cartoons is that you don't always know they were created in Flash when you see them. Flash allows artists to create characters in nearly any style they can dream up. Although Flash makes it especially easy to produce clean, geometric designs, it can also be used for sketchy hand-drawn styles, or even for collage animation that uses source material from photos or video. This is the result of Flash's unique drawing tools, media-friendly authoring environment, and scalability. By "scalability," we mean that a Flash cartoon can be scaled down for delivery on the Web or scaled up to the size and resolution needed for video or film presentation. Creating broadcast cartoons can be extremely complex — specialized techniques are covered in many books and classes — so we focus on some basics to get you started.
Although Flash includes some special techniques, most of the basic principles of animation apply regardless of the authoring environment or production process you choose. You can often learn more about animation principles by watching classic animated films than by looking at 'toons online — at least at those examples created by "animators" who know how to Motion tween but have not spent any time learning techniques for effective character animation.
A growing number of artists with traditional animation skills are making the transition to working directly in Flash, and there are even a few Flash experts who have taken the time to study animation. Individuals able to combine knowledge of classic animation principles with technical aptitude in Flash have the best chance of finding success in this challenging field.
Because Flash output is usually intended for the Web, Flash file size is often a dominant concern. But when creating cartoons for broadcast output, this concern is thrown to the wind. In cartoon land, you create for digital video output via QuickTime or Windows AVI, and these file sizes can be huge. It's common for such projects to expand into the gigabytes, so it's important to have the equipment to handle this kind of work. This means the more RAM and hard drive space you have, the happier you will be. If you try to build a full-length animation masterpiece in one Flash file, you'll be setting yourself up for a rocky and inefficient production process. As you continue to add artwork and animation to your Flash file, it takes longer to render an .swf for preview, and it takes even longer to render a sequence for raster output. You can use several strategies to make your animation more manageable. As we describe in this section, start with a good storyboard and follow through with a series of separate Flash files organized into scenes.
You'll spend many hours working on your animation, so back it up as often as you can! The project file is precious. Make a habit of keeping incremental backups on various hard drive volumes or archived CDs or DVDs so that you won't lose everything when disaster strikes (it will). A good plan is to make a new copy on a different hard drive volume or disk after each major change, rotating through two or three different storage locations. This way, if Flash eats your project file or a disk or drive fails, you can always go back to the version you saved an hour ago (which should be on a different disk) without losing much time. The same versioning logic used in other documents can be applied to your Flash animation files: start with myFile_100, go to myFile_101, myFile_102, and so on as you make small adjustments and revisions. When you get to a significant change or a semifinished version of your file, save it as myFile_200, and so on. This makes it easy to find your way back to a specific phase of the project at any time.
Let's assume that you already have characters and a story and you want to build a cartoon based on that inspired beginning. Although it's okay to experiment and develop characters, never start a serious cartoon project without a storyboard. The storyboard is your roadmap, your plan, your menu of things needed, and your best friend when your project gets complicated. The storyboard can be loose and roughly sketched out, but it should help you start to see the flow of your story and to make decisions about how best to communicate it visually.
Note
You'll find a storyboard template on the CD-ROM, in the ch14 folder. It's an .eps (storyboardMAC.eps or storybPC.eps) template form that includes all the essentials of a basic storyboard. Print it out as is, or import it into Illustrator, or Flash, and modify it to suit your needs.
As you sketch the overall story, you can break up the narrative into workable cartoon scenes. Long before Flash, cartoonists used the term "scene" to describe something quite different than a Flash Scene. By cartoon scenes, we mean phases in a narrative, similar to movie or TV scenes. Remember that cartoons are fast-paced adventures — most cartoon scenes last less than 30 seconds. Generally, a cartoon scene can stand alone, but it needs other scenes to complete the story. Fast-paced as it is, 30 seconds of animation still require between 360 and 720 frames in the Flash Timeline. It becomes unruly if you rely solely upon Flash's Scene feature — you'd do a lot of scrubbing, just trying to cover one scene.
After your cartoon scenes are in order, you can start to establish the camera angles or "shots" for key moments. A shot is a break or change in the camera framing or viewpoint. For example, in a soap opera dialogue scene, the camera will cut back and forth between characters to show each person talking — one scene will include many shots. Although the art of cinematography is beyond the scope of this book, the same tricks used to add drama to live action are involved when deciding shots in a cartoon scene. Always try to introduce variety in the viewpoint; think of ways to add interest with close-ups or extreme angles. If you're looking at a series of shots with characters all in the same basic position within the frame, keeping the same distance from the viewer, you're looking at a scene that will turn out to be pretty dull. If you can cut some visual contrast into the scene while still pushing your narrative forward, you'll have a better chance of keeping your viewers hooked in long enough to connect with your characters and to appreciate your story.
Never create an entire cartoon in one Flash project file (.fla)! Even trying to load the huge files can cause problems for Flash. Instead, create a separate Flash project file for each storyboard scene and use Flash's Scene function to organize shots within a cartoon scene. (This may seem confusing at first, but the utility of this method will become clear as you work on your masterpiece.) In other words: The Flash project file (.fla) is a storyboard scene, and the shots, or Flash Scenes, are nested within the project file.
The single most important work you'll do in your cartoon is not the drawing, but the voices of your characters; the voices give the characters heart and depth. In fact, some animators prefer to record the voices first and then use the performance of the voice actors as inspiration for the animated characters' movements and expressions. Obtaining a voice can be as simple as speaking into a microphone in front of your computer or as complex as having a highly paid professional speaking into a microphone in a studio. The key here is not the type of voice, but the emotion put into it. If you capture a unique voice with the right emotion, it can be taken into an editing program, such as Sound Forge or Acid, and tweaked with effects to render the exact cartoon sound that you're looking for. Audio effects, including adjustments to pitch and timing, can always be added digitally; human emotion cannot. Some online voice resources are
www.voicecasting.comwww.voicetraxwest.comwww.world-voices.com
Another important part of cartoons is the use of sound effects. Many good sound-effects collections are available on CD-ROM and online. You can even find sound effects CDs in bargain bins at your local music store. A couple of the collections that we keep on hand are The Ultimate Digital Sound Effects Library from the Sound Effects Company, and Crashes, Collisions & Catastrophes from Madacy Records. We also recommend any of the Loops for Acid CDs from Sonic Foundry. The sounds included in these collections can be imported into any sound-editing program to be mixed into your own original soundscapes. If you've never worked with someone who specializes in custom sound creation, you might be amazed at the magic they can add to even simple animation.
Note
One source that offers a variety of effects at a range of prices, and RealAudio or MP3 links that allow you to preview them online, is www.radiomall.com. Another popular site that has a subscription-based system for thousands of royalty-free sounds is www.platinumloops.com.
Note
For more artistic ambient sounds or custom sound for branded sites, it's best to find a creative professional who can work with you. It might seem expensive at first, but it will save you money and time in the long run and will add value to your animation. One of our favorite sound designers is also the organizer of an excellent annual Flash conference in Minneapolis. Dave Schroeder works his magic at www.pilotvibe.com.
Sometimes, you just can't find the sound you need. Fortunately, it's not difficult to set up your own little Foley stage or sound effects recording area. A good shotgun microphone (highly directional for aiming at sound) and DAT recorder are ideal, although you can get by with less.
The capture device (audio tape, DAT, miniDV, MD, and so on) should be portable, not only in order to get it away from the whirring sound of hard drives and fans, but also to enable you to take it on location when needed. Another advantage of a battery-powered portable device is that static from power line voltage won't be a problem. After you get started and begin playing around, you'll be surprised at the sounds that you can create with ordinary objects. Squeeze your dish soap bottle, and you might notice that when amplified, it will make a nice whoosh. Great for the fast limb movement of that character doing a karate chop. Crumpled paper can sound like fire — once you get started, you never know what you might put to use around the house. Be creative — innovate!
The voices and the sound effects in a cartoon grab your attention and punctuate action, but listen more closely when you watch an engaging animated piece (or any film), and you will gain appreciation for the subtle art of ambient sounds. These background noises add tone and atmosphere, making a scene rich and believable. Ambient sound should almost be "felt" more than heard so it doesn't distract from your main narrative. Because it is layered behind the more dominant sounds, you can often get away with looping a short sample of ambient sound — think of wind or water sounds or distant city noises, they have some variation but they also tend to have a repetitive rhythm. And of course, don't overdo it. Well-timed silence can be a powerful narrative device, too!
Note
Adobe has recognized the need for a sound tool that is user friendly for creative people who work in Flash and After Effects. The new application is called Soundbooth and should be available in spring of 2007. For more information and trial versions, visit http://labs.adobe.com/technologies/soundbooth.
In the world of film, movies are shot at 24 frames per second (fps); in video and 3-D animation, 30 fps is the norm. But for cartoons, 12 to 15 fps is usually all that's needed. The cartoon language of motion that we've all learned since childhood has taught our minds to expect this slightly jumpy quality of motion in a cartoon. As an animator, this is good for you, because 15 fps means half the amount of hand-drawing work that 30 fps requires. It also means that you can get your cartoon done within your lifetime and maybe take a day off here and there. Actually, there are a lot of scenes in which as few as three drawings per second will suffice — depending on how well you can express motion with your art or drawing. The rule of motion here is that things that move quickly require fewer frames (drawings), while things that move slowly require more frames. This is the main reason you'll hardly ever see slow-motion sequences in cartoons. Broadcast cartoons have lots of fast-paced motion. Fewer drawings are produced more quickly, making the production less costly. These are very significant factors when battling tight budgets and scary deadlines.
The hardest part of animation is expressing motion and emotion. Learning to do this well saves time and makes your work more effective. One of the best exercises you can do in this respect is to simply watch the world around you. Videotaping or downloading cartoons and advancing through them at single-frame speed can give you insight on different ways that the "real world" is translated to cartoon-land. Another good learning trick is to import raster video to your Flash Timeline, so that you can use a live action sequence as your guide and practice drawing on top of it. While this can help you get a feel for the mechanics of motion, it's really just a start. Cartoons are engaging because they so often deviate from, or even defy, the predictable motion we see every day.
Exaggerate everything! After all, this is what makes it a cartoon.
Note
We have included a tutorial in this chapter by Felix Stumpf, who uses video as a reference for his simple but wonderfully engaging hand-drawn animations. To see more of his work, visit www.felixstumpf.de.
Note
Tex Avery was a pioneering animator who created cartoons with overblown and hilarious motion, which revolutionized animation. You can read about him at www.brightlightsfilm.com/22/texavery.html.
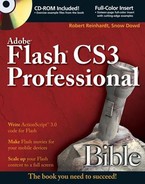
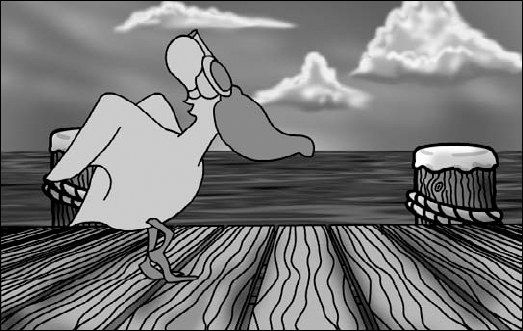
Anticipation is a technique used to indicate that characters are about to do something, such as take off running. Before lunging into the sprint, characters slowly back up, loading all their motion into their feet until their motion reverses and sends them blasting off in the other direction. In a more subtle form, this is shown in Figure 14.1, when Weber the pelican crouches before he takes flight from his perch on the pier.

Keep the weight of objects in mind. This helps to make your cartoon believable. A feather falls more slowly than an anvil. The feather also eases out (slows down) before landing gently on the ground, while the anvil slams into the ground with such force as to make a gashing dent in it. Humor can play a role here by giving extreme weight to things that do not have it (or vice versa), thereby causing a surprise in the viewer's preconceived notion of what should happen — surprise is the seed of humor.
Visualize a jogging Santa Claus, his belly bouncing up and down with each step. Because of its weight, his belly is still on a downward motion when the rest of his body is being pushed upward by the thrust of his leg. This opposing motion is known as overlapping actions. Overlapping action does not only happen in an up-and-down motion; it can happen in any direction. An example of side-to-side overlapping actions is shown in Figure 14.2. Note that, as the bully thrusts forward, Weber's body reacts in the opposite direction . . . only to catch up just in time for the thrust to reverse and go the other way.
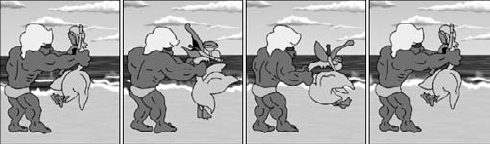
Blurring is a technique or device that animators use to signify a motion that's moving faster than the frame rate can physically show. In film, this manifests itself as a blurred out-of-focus subject (due to the subject moving faster than the camera's shutter can capture). You may have already employed this effect in Photoshop, with the motion blur filter. In cartoon animation, blurring is often (and easily) described with blur lines. Blur lines are an approximation of the moving subject using line or brush strokes that trail off in the direction that the subject is coming from. When used properly, this great device can save hours of tedious drawing. An example of animated motion blur used to indicate a spinning motion is shown in Figure 14.3, which is a sequence in which the word "Weber" turns into Weber the pelican.
Note
To see animated examples of the blurred line effect, look in the R_Bazley folder inside the ch14 folder on the CD-ROM. Richard Bazley has used blurred lines effectively to create a collapsing ceiling and a rush of wind.
Using Video As a Basis for Fluid, Hand-drawn Animation, by Felix Stumpf
There are as many different styles of hand-drawn animation as there are animators. But, if you want to create vivid animation with a realistic look, using video as a visual reference is a great shortcut. Combining fluid, hand-drawn lines with the movement style of live video results in an engaging hybrid that allows room for individual drawing techniques while maintaining lifelike, cinematic scale and motion. Very skilled animators can achieve this type of fluid animation by drawing freehand, but even then, it can be tricky to capture the mannerisms and personality of a real person.
A simple way of capturing these subtle elements, even with very few lines, is to create a series of video stills to use as a template for ink drawings that can be sequenced in Flash and combined with other graphics or sound to complete the scene.
The line animation that I used to introduce myself on my portfolio site (www.felixstumpf.de) was created by importing a still sequence from a video clip shot on a plain background into Photoshop, and then printing the frames out to use under tracing paper as a reference for pen and ink drawings. I find that six drawings per second are usually sufficient to translate the main flow of motion from the video clip to the traced animation.
Note
Shooting on a plain background with lighting that separates the figure from the background makes it much easier to trace the outline of the figure. Most video-editing programs (such as Final Cut or Premiere) will export a series of stills in a format compatible with Photoshop and Flash. I generally use pict files (.pct), but any compatible lossless format will do.
The decision to draw on tracing paper or to import the video stills into Flash or Photoshop and use digital drawing or painting tools to trace over the video image is mostly a stylistic one. With practice, you can create artwork with the same speed and accuracy with analog or digital tools, but you may find that you prefer the look or feel of one over the other for certain projects. I use both methods and the choice is usually dependent on the mood I'm going for in the final piece. Whether I create the line drawings on paper, in Photoshop, or directly in Flash, I use the original video clip (not the still frames) as a guide for positioning and pacing the final image sequence. This is one of the secrets to maintaining lifelike motion in the animated version.
Note
The evolution of the intro to Felix's portfolio site is shown through the clips included in the fstumpf subfolder of the ch14 folder on the CD-ROM. Open video.swf to see the original video footage. Open animation.swf to see how the line drawings are lined up with the video, and open finalversion.swf to see how the polished animation looks with text elements added in Flash.
Figure 14.4, shows a screenshot from the video clip (down-sampled to 8 frames/sec), used as a reference for my drawings. Turning and walking quickly toward the camera while crossing the frame from left to right sets up a dramatic change in scale and position that will give the animated outline more impact.
Figure 14.4. Shooting on a plain background makes it easier to isolate the movement of the figure in the animation.
Figure 14.5 shows my scanned drawings overlaid with the video in Flash to match up with the pacing and position of the original live action. By following the main lines of action but letting some parts of the outline drop out and shift as the figure moves, I am able to add an organic, fluid character to the outline, which makes the interpretation more artistic.
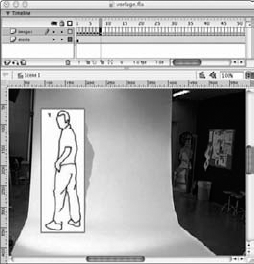
Figure 14.5. Although the pacing and key outlines are sequenced to follow the video template exactly, the sketched lines introduce some looseness.
Figure 14.6 shows a series of stills from the finished animation. The video layer has been removed and the line art translates the original flow nicely.
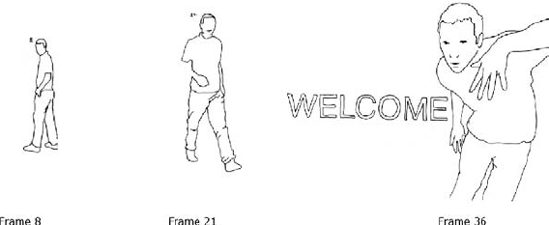
Figure 14.6. Working with line art gives you the freedom to add other graphic elements or text that interact with the animated figure seamlessly.
Tip
The more images you use, the more fluid your animations will look. I've found that a good rule of thumb is to use 6 images (frames) per second for Web and 25 images (frames) per second for film.
Regardless of which drawing environment you prefer, the key to success is to pay careful attention to the proportions and flow of the still sequence and to be as precise as possible in following the main outlines of the figure. If you choose to draw in Flash, you may find it easier to create one traced outline and then modify that outline in each subsequent frame rather than starting the outline from scratch for each frame. Even small distortions will have a big impact on the final impression of the piece and may throw off the unique characteristics of motion that make the character identifiable. On the other hand, once you get the main action translated smoothly, it can be fun to throw in some variation and take a bit of artistic license to make the visuals more realistic or more fanciful — depending on the final look you're going for.
I tend to draw a lot of elements from memory (such as the music player and the rolling paper that the figure interacts with on my portfolio site). This frees me up to invent an environment for the figure and saves a lot of money on props! Combining fluid video-style motion with freehand drawings gives you the benefit of starting with realistic proportions and lifelike movements but still leaves room for invention and imagination expressed in your own unique drawing style.
Tip
As with any other Flash project, it helps to keep elements organized on individual layers: Keep the video on a Guide layer, import or draw the main image sequence on another layer, and place any additional drawn elements on their own layers.
After I have some traced animation sequences completed, I put them together with sketches of other content and use sample music to rough out my ideas for the flow of the complete site. I call these rough files moodboards, and I use them to test my ideas and page designs before I move on to optimizing and integrating final elements in an interactive Flash structure. It takes much less time to prototype a series of screens as a linear animation than it does to build an interactive model, so I can test different versions of my ideas before investing resources on the final project.
Note
One version of my concept for the animation flow with other elements on my portfolio site is illustrated in the moodboard.swf file included in the fstumpf subfolder in the ch14 folder on the CD-ROM. If you compare the moodboard with the final version of my live site, you will notice that the layout is not exactly the same, but the atmosphere is very similar.
Note
Check out the final results of Felix's traced video sketches with other line art elements in his inventive portfolio presentation at www.felixstumpf.de.
In Chapter 11, "Timeline Animation," you learned about two Flash animation methods: frame-by-frame and tweening. This section focuses on traditional cartoonist frame-by-frame techniques, together with traditional cartoonist's keys and inbetween methods, to accomplish frame-by-frame animation. Despite the similarity of terminology, this topic heading does not refer to a menu item in Flash. Instead, it should be noted that animation programs such as Flash have derived some program terminology (and methods) from the vintage world of hand-drawn cel animation. Vintage animators used the methods of keys and inbetweening to determine the action a character will take in a given shot. It's akin to sketching, but with motion in mind. In this sense, keys are the high points, or ultimate positions, in a given sequence of motion. Thus, in vintage animation:
Keys are the pivotal drawings or highlights that determine how the motion will play out.
Inbetweens are the fill-in drawings that smooth out the motion.
In Flash, the usual workflow is to set keyframes for a symbol and then to tween the intervening frames, which harnesses the power of the computer to fill the inbetweens. Although this is fine for many things, it is inadequate for many others. For example, a walk sequence is too subtle and complex to be created simply by shape or motion tweening the same figure — each key pose in the walk requires a unique drawing. So, let's take a look at the traditional use of keys and inbetweens for generating a simple walk sequence that starts and ends according to a natural pace, yet will also generate a walk loop.
Humans are incredibly difficult to animate convincingly. Why? Because human movement is delightfully sloppy — and we are keenly aware of this quality of human movement, both on a conscious and a subconscious level. (Another term for this is body language.) Experienced animators create walk cycles with life not by using perfectly repeating patterns, but rather by using the dynamic quality of hand-drawn lines to add just the right amount of variation to basic movements.
The most difficult aspect of creating a walk cycle is giving the final walk distinctive qualities that support the role that the character plays. This again is something that only gets easier with practice. There is no substitute for drawing skill and time spent studying human movement, but to get started it can be helpful to study a basic walk pattern.
Note
We've included the three walk cycle examples we show in this section on the CD-ROM for you to open and analyze. You will find the files in the Walks folder inside the ch14 folder of the CD-ROM.
Many 3D programs have prebuilt walk cycles that you can modify. We begin with a basic walk made in Poser (a popular 3D character animation program from e-Frontier) and output it as an image sequence that can be traced in Flash. As you can see in Figure 14.7, this walk cycle was composed of ten different poses, but the final result is fairly generic.
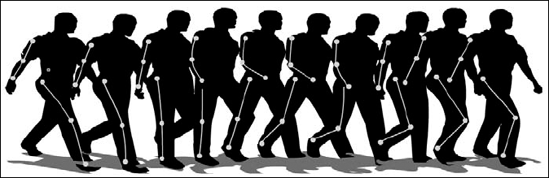
Notice that the main pivot points of the figure create a balanced pattern that can be used as a basis for many other kinds of figures. Also notice that as the figure moves through the cycle, there is a slight up and down movement that creates a gentle wave pattern along the line of the shoulder. This wave motion is what will keep your figure from looking too mechanical. It is important to remember that the final pose in the cycle is not identical to the first pose in the cycle — this is crucial for creating a smooth loop. Although it might seem logical to create a full cycle of two strides and then loop them, you will get a stutter in the walk if the first and last frames are the same. Whatever pose you begin the cycle with should be the next logical "step" after the final pose in your cycle, so that the pattern will loop seamlessly.
Although the figures are shown here with the poses spaced horizontally, you will actually draw your poses on individual frames (best done on a Movie Clip timeline), but align the drawings on top of each other so that the figure "walks in place" as if on a treadmill. Once you have established your walk cycle, you add the horizontal movement by tweening the walk cycle Movie Clip. As shown in Figure 14.8, by using a Motion tween to scale the walk cycle Movie Clip and move it from one corner of the Stage to another, you can create the illusion that the figure is walking toward the viewer.
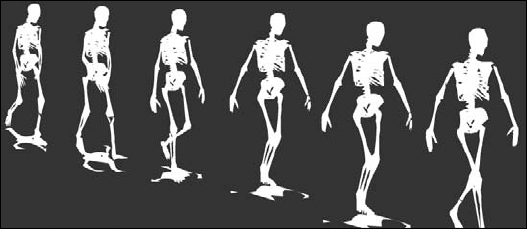
Figure 14.8. A series of angled poses in a walk cycle work well to create the illusion that the figure is walking toward the viewer if the final Movie Clip is scaled as it is Motion tweened from the far corner to the near corner of the Stage.
The speed of the Motion tween has to match the speed of the walk cycle. If the tween is too slow (too little distance or too many frames), the figure will seem to be walking in place. If the tween is too fast (too much distance or too few frames), the figure will seem to be sliding over the ground. Play with the ratio of your Motion tween, and if the figure needs to walk faster or slower, then make adjustments to the walk cycle itself rather than just "pushing" or "dragging" the figure with your Motion tween. Also keep in mind that a figure should seem to walk more quickly as it gets closer to the viewer. In the skeleton walk example, the Motion tween is eased in so that as the figure gets closer (larger), the walk appears to cover more ground.
Achieving realistic human walk cycles can take hours of work and require very complex walk cycles (often 30 or more poses). Fortunately, many cartoons actually have more personality if they use a simplified or stylized walk cycle that suits the way they are drawn. Figure 14.9 shows a walk cycle that only required three drawings to create a serious but childlike stride for an outlined character.
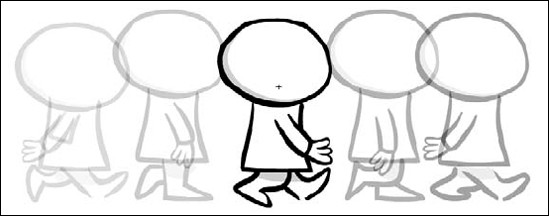
Figure 14.9. A stylized walk cycle created by flipping and reusing the same three drawings for both legs of an outlined character
In the Flash file on the CD-ROM (walkToon.fla), you will notice that the legs, arms, torso, and head of the character are all animated on separate layers. This allows you to reuse the same drawings for both sides of the body — by simply offsetting the pattern so that the legs swing in opposition to each other, with the leg on the far side layered underneath the leg on the near side. This economy of effort is helpful not only because it is faster, but also because it makes it easier to maintain the symmetry of your character if you are trying to keep the motion simple and stylized.
If you open the source file (walkToon.fla), you will notice some spans of nonkeyed frames (repeaters) in the Movie Clip timeline for the cartoon walk. We used these to economize drawing time and to slow the walk of the character. If a speedier walk was called for, we would simply shorten these spans to eliminate repeater frames. A good basic rule about repeaters is to add no more than one repeater frame between keys; adding more causes the smoothness of motion to fall apart. If the motion must proceed more slowly, then you have to draw more inbetweens.
Fortunately, with Flash Onion skinning (the capability to see before and after the current time in a dimmed graphic), which we discuss in Chapter 11, "Timeline Animation," the addition of a few more inbetweens is not an enormous task. In fact, Onion skinning is indispensable for doing inbetweens, and even for setting keys. One pitfall of Onion skinning is the tendency to trace what you're seeing. It takes practice to ignore the onion lines and use them only as a guide. You need to remember that the objective is to draw frames that have slight, but meaningful, differences between them. Although it can mean a lot more drawing, it's well worth it. Because you'll use your walk (and running) cycles over and over during the course of your cartoon, do them well.
Tip
One real timesaver in creating a walk cycle is to isolate the head and animate it separately via layers or grouping. This trick helps to prevent undesirable quivering facial movements that often result from imperfectly traced copies. Similarly, an accessory such as a hat or briefcase can be isolated on a separate layer. Finally, if the character will be talking while walking, make a copy of the symbol and eliminate the mouth. Later, you'll add the mouth back as a separate animation. We describe lip-syncing techniques later in this chapter.
So far, we've covered the mechanics of a walk cycle. But for animators, the great thing about walking — in all its forms — is what it can communicate about the character. We read this body language constantly every day without really thinking about it. We often make judgments about people's moods, missions, and characters based on the way that they carry themselves. Picture the young man, head held high, briskly striding with direction and purpose: He is in control of the situation and will accomplish the task set before him. But if we throw in a little wristwatch checking and awkward arm movements, then that same walk becomes a stressful "I'm late." Or, witness the poor soul — back hunched, arms dangling at his sides. He moves along, dragging his feet as if they each weigh a thousand pounds. That tells the sad story of a person down on his luck. Finally, what about a random pace, feet slipping from side to side, sometimes crisscrossing, other times colliding, while the body moves in a stop-and-start fashion as if it was just going along for the ride? Is that someone who couldn't figure out when to leave the bar? Of course, these are extreme examples. Walks are actually very subtle and there are limitless variations on the basic forms. But if you begin to observe and analyze these details as they occur in everyday life, you'll be able to instill a higher order in your animations. Simply take time to look. It's all there waiting for you to use in your next animation. Then remember that because it's a cartoon, exaggerate!
In traditional animation, characters were first inked in as outlines and then filled with color and shading. Coloring was the most tedious and time-consuming job of all: endless thousands of cels to be hand painted and dried. Most often, armies of low-paid workers in faraway lands did it. But with Flash it's a snap! That's because of Flash's wonderful (and sometimes mysterious) gap-jumping fill tool, the Paint Bucket. With Flash, you never run out of paint, and it dries instantly — a real timesaver to be sure!
Here's a coloring timesaver that you can use for yourself within Flash: Use a fully colored model of your character at the start of a cycle or scene. This will serve as a color model and will be discarded when the cycle or shot is finished. It's very important to keep a model sheet, which is an archive of color models — finished, fully colored characters — to maintain consistent color across the span of the project. (It's also quite useful at the start of future projects.)
Although Flash has the capability to save color sets, it's still difficult to remember which yellow was used on a certain area of the character, especially when there are ten different yellows in the palette. Making such a color mistake — even a slight shade off — will cause unsightly flicker on playback. The Eyedropper tool makes no mistakes. So, to develop good animation habits, start a model sheet. When you begin a scene, copy the appropriate color model and paste it into the cycle, setting it off to the side of the active art in the first frame (if needed, ungroup it). Acquire the color that you need with the Eyedropper tool and then set about the business of filling.
When filling, we've found that the most efficient method is to go through the entire cycle with one color, filling all objects of that color. Then go back to the beginning and sweep through again, doing the next color. This method saves you the tedium of continually having to change the Paint Bucket's color, and also minimizes the possibility of mistakes. If some places fill while others don't, you'll probably need to adjust the Paint Bucket Gap size modifier.
Tip
The Find and Replace feature in Flash makes it easy to do a global swap if you decide that orange would really be a better color than red (or whatever suits your fancy). With your project file open, choose Edit
There are times when the gaps in a line are not visible but the Paint Bucket tool just won't work. In this case, keep looking because the gaps are there. If it just doesn't work, no matter how much you zoom in and click with the Paint Bucket tool, you may need to zoom in and use the Selection tool to close the gap by adjusting a stroke. In a situation in which it's not aesthetically pleasing to do that, use the Brush tool (set to the same fill color and to paint fills only) to fill the gaps manually. Perhaps this would be the case on a head and neck that you don't want connected to the body (remember we discussed the advantages of animating the head separately earlier). You would use the Brush tool to paint a stroke of fill connecting the inked lines and then fill the larger areas with the Paint Bucket tool.
A good way to speed up the coloring process is to allocate one of the mouse buttons (if you have a programmable mouse) to perform the keyboard shortcut for step forward advancing (which is the > key). If you have a pressure-sensitive graphics tablet, you can allocate a button on the pen to do the same. With a setup like this, you can leave the cursor in pretty much the same place and click-fill, click-advance, click-fill, click-advance, and so on.
Another problem that's easily solved is the process of filling areas with white. If you're like most people, you most likely work on the default background color of white, which makes it impossible to distinguish when filling white areas. In this case, it's helpful to create a very light color that you don't plan to use in the final art, something like a light pink. While coloring, temporarily change the background color in the Property inspector or in the Movie Properties dialog box (Modify
Flash Character Design Strategies, by Sandro Corsaro
Flash offers a cheaper, faster, and more malleable approach to creating animation than anything in the history of animation. While traditional animation production can be unforgiving, the Flash authoring environment offers animators a variety of starting points in fulfilling their visions. Many creative types who are experienced with Flash can delve into projects with simple thumbnail sketches or even with just concepts in their heads. Purists, and developers working with larger teams, generally prefer the traditional storyboard route. Whether it is intended for Web or broadcast, creating an efficient Flash animation begins and ends with the strategy of your initial design. That design can be on paper, in Flash, or even in your head. What is crucial is that on some level, there is a clear and concise plan in the design. For the purposes of this tutorial, I will show you two simple examples involving design strategy.
By now you should be familiar with the concept of breaking elements into reusable parts or pieces. For Web purposes, this keeps the file small and saves the artist production time. This systemized approach to animation is the evolution of limited animation — the cut out system that hasn't changed since it was first applied by Hanna-Barbera for television shows such as The Flintstones and Scooby Doo. When Fred would talk, his mouth would be on one layer, while his head and body would be on another. If Fred tilted his head during a rant, his mouth and head would tilt during the animation, while his upper body would be held. Why do you think all those great Hanna-Barbera characters always had some sort of accessory (like a tie or necklace) around their necks? This design strategy was effective even with a constrained budget because it allowed for maximum animation with minimal artwork.
Today, Flash has the potential to revolutionize the production process by building on the animation techniques used in the past. Just like the traditional cel method, inactive Flash layers can be "held" while action layers continue with additional frames of movement. The newest feature of this evolution is that symbols, unlike old-school painted cels, can be flipped, stretched, and squashed without having to redraw the artwork. A traditional painted animation cel of a left arm could not be reused for the right arm. On the simplest level, appendages can be flipped, rotated, and scaled to complete character designs. The model sheet I created in Flash of Da Boss (shown in Figure 14.10) is an example of effective reuse of artwork.
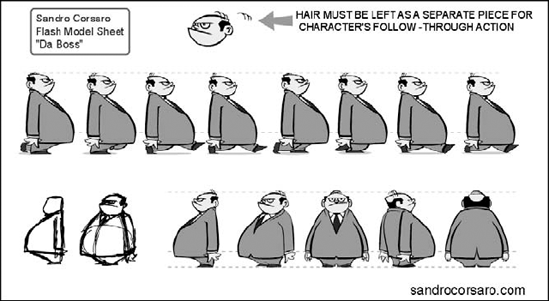
Figure 14.10. By designing the character in reusable pieces, you can simplify your workflow while increasing the options for how the character can be animated.
Note
To see the animated Flash version of the model sheet for Da Boss, open modelSheet.swf from the S_Corsaro subfolder in the ch14 folder on the CD-ROM.
The script called for this character to be constantly pacing his office. When I designed the character, I broke him into three distinct parts, each with its own animation. The first part was the combed-over hair. I kept it as a separate piece from the head, so it could undulate up and down as he paced. This provides a nice secondary action to his walk. Although the hair is a small detail, without the initial planning, attempting to add it later in the animation process would have proven frustrating and time-consuming. The second animation was the inertia of the heavy upper body. As Da Boss walked, his body needed to convey a sense of weight and power. Utilizing the animation principle of stretch and squash, the symbol of his upper body cycles through various shapes in conjunction with his walk.
The final and most dynamic component of the character's movement is the leg cycle taking place on the layer underneath his upper body. Only one leg has actually been drawn — the other is offset and placed on a lower layer to create a looped walk. As the legs move into each keyframe, the first two elements I described previously are adjusted to create the secondary animation. On the low points of the walk, his weight squashes down, while his hair holds (or pauses) for a momentary beat. A progression of movement follows in the next few keyframes to get to the inverse position of this low point.
Besides the basic model movement, a turnaround was also needed for the animators to work with this character. Obviously, some of the views can be flipped, but what about the front and back? Copy and paste your front view to create your back view. Build on your finished artwork to create the new artwork. Figure 14.11 illustrates how the front view of the Da Boss was modified to create the back view. Unlike the traditional animation process, which travels in distinct and separate stages from point A to B to C, think of Flash animation as a more integrated progression as point A becomes B, which transforms into C. Always try to build on your work, rather than start from scratch each time you need a new movement or character.
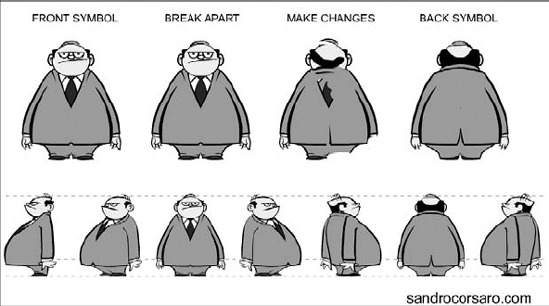
Figure 14.11. With small modifications, the same artwork can be used for the front and back of the character.
Perhaps the most convincing example of the benefits of strategizing your design can be understood by referring to Figure 14.12. These were three different characters intended to be used for broadcast purposes, but the actual animation only had to be created once.
Note
To see how the motion is actually reused in the example shown in Figure 14.12, open reuseWalk.swf from the S_Corsaro subfolder in the ch14 folder on the CD-ROM.
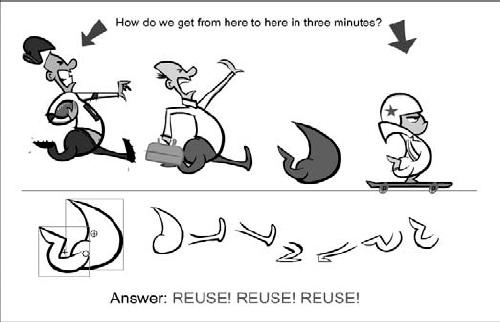
Figure 14.12. When a character is designed strategically, you can reuse your animation as well as your artwork to quickly create other characters.
Because of the strategy involved in the original character design, I was able to transform him into the other two characters, reusing both his Graphic symbols and the actual animation. By tweaking the timing of one leg on the run cycle, and obviously making some other artistic changes, the skateboarder character was created from the same artwork as the character running to catch a bus.
Flash is a very sophisticated authoring environment for animation, but, nonetheless, there is no substitute for knowledge of motion. To create truly compelling and intriguing animation in any genre, you must understand the scientific fundamentals of this art. The best place to learn about the principles of animation is in the daily environment around you. Observe the way things move; then strategize how to translate that movement efficiently using the tools available in Flash.
You can use Flash tweening to help your cartooning. Now that you've created some symbols, such as the walk cycle, here's where you can save a great deal of time making them slink and prance across the view without drawing every tedious frame. The hard manual drawing work is done; now you'll choreograph the character. Once you've built a library of various walks, runs, turnarounds, and standstills (a piece of walk cycle that ends with the character just standing still), you can use computer power to help you tell a story. Remember that you can always create more symbols of the character as needed — you can even steal from other symbols to create new ones.
Use the techniques we discussed earlier in this chapter to get your walking symbol looping, stationary in the middle of the view. Then move the background elements to give the illusion of the camera following alongside the walking character, a sort of dolly. We describe the trick for creating extra long pans later in this chapter. It usually requires a little experimentation to get the motion of the background to match the stride of the step. If the timing isn't correct, you'll notice that the feet will seem to skate across the ground. To fix this, adjust the speed of the background by either increasing or decreasing the number of frames in the tween of the background. Another trick is to set the walking symbol to start at one end of the view and to move to the other by tweening the symbol itself. What's really cool is to use a mixture of both. Again, to get it just right, experiment and look closely at other examples that have the effect you want.
There comes a time when the star of your show must stop walking (or running, or whatever he's doing) and reach into his pocket to pull out a hot rod car and make his getaway. This is where instance swapping comes in. At the end of the tween, create a keyframe on the next frame (the frame immediately following the last keyframe in the tween), and then turn off Motion tweening for that keyframe in the Property inspector. This causes the symbol to stop at whichever frame the cycle ended on in the Timeline. To swap the symbol, follow these steps:
Click the symbol to select it on the Stage.
Open the Property inspector.
Click the Swap Symbol button.
In the Swap Symbol dialog box, select the symbol that you want to replace it with (in this case, the one where he reaches into his pocket).
Click OK.
If you loop the play of the symbol, you can also choose the frame on which the symbol's cycle will start. Other choices are limiting the symbol to play once and playing just a single frame (still).
Note
When you swap a symbol instance on a Motion tween, if the Synchronize box is checked, the old symbol instance will not be replaced with the new one, which is Swap Symbol failure. If you turn off tweening on the frame where you swap the symbol, synchronization is not an issue.
Finally, unless you've drawn all your symbols to perfect scale with each other, this new symbol may not fit exactly. No problem! To fix this, simply enable Onion skinning from the Main Timeline, and set it to show the previous frame (the frame the tween ended on). Now you can align and scale the new symbol to match the ghosted image. We can't begin to tell you how much you'll use this simple instance-swapping function when you create your cartoon. This is one of the unique functions that sets Flash apart from all other cel-type animation programs. After you have a modest library of predrawn actions, the possibilities for combining them are endless.
Although not terribly useful for tweening a walking character, the Flash Motion Guide feature is tops for moving inanimate objects. If your character needs to throw a brick, a straight tween between points and some blur lines will do fine. If he needs to lob that brick over a fence to clang a pesky neighbor, then motion guides are the ticket. Here's how:
Turn the brick into a Graphic symbol if you haven't already. This makes it easier to make changes to the brick later.
Create a Motion Guide layer.
Draw an arc from start to destination. This is best done by drawing a line with the Line tool and then retouching it with the Selection tool until you have bent it into the desired arc. This method keeps the motion smooth. (Using the Pencil tool to draw the Motion guide would create too many points and can cause stuttering in the motion.)
Although your brick is flying smoothly, something's wrong. Again, the computer made things too darned smooth. You could insert a few keyframes in the tween and rotate slightly here and there to give it some wobble. But that's still not convincing. You want this brick to mean business! Here's what to do: Because the brick is already a symbol, go back to the brick symbol and edit it, adding a few more frames. Don't add more than three or four frames; doing so will slow it down. At each of these new frames, mess up the brick a little here and there; differ the perspectives a little from one frame to another. Then, when you go back to your main Timeline, the brick should be twitching with vengeance as it sails toward its target.
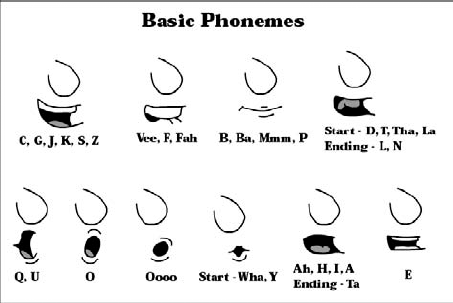
Now here's the part we've all been waiting for . . . a word from our character. If you do it properly, lip-syncing is where a character can really spring to life. You accomplish this by drawing the various mouth positions that are formed for individual phonemes, which are the basic units of sound that make up a spoken word. Then these phonemes are melded together into morphemes, which are distinct units of a word, like a syllable. Morphemes are then strung together over the course of a sentence to present the illusion of a talking, animated character. Most languages, although populated with thousands of words, are really made up from around 30 to 60 distinct sounds, or phonemes. For cartooning, these phonemes can be reduced to about ten basic mouth positions. Some of these positions can be repeated for more than 1 sound because many sounds share roughly the same mouth positions. Although there are more subtleties in the real world, for cartoons, reliance upon transitions between mouth positions is convincing enough.
Earlier, we suggested that the face in an action (walk) cycle should be drawn without a mouth. That's because this method facilitates the use of layers (in the Timeline) for the addition of lip-syncing. To do this, create a layer above the character so that you can freely draw in the mouth positions needed to add lip-syncing. It's also very helpful to put the voice track on another separate layer directly above the Mouth layer. This makes it easy to see the waveform of the sound while you draw, giving important clues to where and when the sound occurs visually.
Since version 4, Flash has had the capability to scrub the Timeline, which means that you can drag the Playhead, or current frame indicator, and hear the sound as you drag. This functionality is limited to streaming sounds, which means that the sounds have their Sync option in the Property inspector set to Streaming. The capability to hear the sound and see the animation in real time is an important tool for lip-syncing. This real-time feedback is critical for getting the timing just right. There's nothing worse than being plagued with OGMS (Old Godzilla Movie Syndrome), in which the mouth doesn't match the sounds coming from it.
You may be asking, "What about using shape morphing to save time in lip-syncing?" Well, shape morphing is a wonderful tool, but for lip-syncing, it's more hassle than it's worth. Your mouth drawings will become very complicated because they consist of lips, tongue, teeth, and facial features. Furthermore, because shape morphing only seems to work predictably on the simplest of shapes out of the box, shape hinting is required. Thus, by the time you've set all hinting (and even hinting heavily still leaves you with a mess at times), you might have had an easier time and obtained a better result (with greater control) if you had drawn it by hand.
In terms of control and expression, it's important to remember to use the full range of expression when drawing the talking mouths. Happy, sad, or confused — these give life to your character. Furthermore, always emphasize mouth movements on those syllables that correspond with spikes of emotion in the voice track. These sections usually have a spike in the waveform that's easily recognized in the voice track. This device helps to convince the viewer that proper sync is happening.
There are a few more tricks to help ease the load. When characters talk, they do not always have to be looking you square in the face. Try lip-syncing the first few words to establish that the character is speaking, and then obscure the character's mouth in some natural way. (Refer to Figure 14.13.) The head and body of a character can move with the words being said, but the mouth can be hidden by changing the angle of the head, or with a prop such as a microphone, or even with a moustache — think about this when designing your character's features. A bit of design savvy can save time without detracting from a character's purpose in the story line.

Figure 14.13. Lip-syncing tricks include economy of effort, such as having a character begin to speak and then turn away naturally (left). Appropriate props and even moustaches can also be used to hide mouths (right).
Many animators use a mirror placed nearby and mouth (act out) the words they're trying to draw. This is extremely helpful when learning to do lip-sync. It is also of great help in mastering facial expressions. Just try not to get too wrapped up in drawing every nuance you see. Sometimes less is more. Another trick that you can use to ease the load is to reuse lip-sync. Do this by copying frames from previous stretches of mouth movements to new locations where the words are the same, and then tweak the copied parts to fit the new dialogue. Still, there is no magic lip-sync button. Even with all these tricks, effective lip-syncing is hard work. It's also one of the more tedious tasks in animation and takes practice to get it right.
Because our brain works to create connections between sound and visual input, it is relatively easy to make movement in your animation match up with audio elements in your soundtrack. If you've already succeeded with lip-syncing work, then this type of syncing is easy. All that's required is a bit of instance swapping set to the beat of the music. If you study your music waveform for visual clues and then scrub it for the sound, you're sure to find the exact section where the change in action (instance swap) needs to go. You don't have to make your sync tight to every note. To keep the shot engaging, sync to the highlights, or hard beats.
Adding sound effects is really the fun part. It's easy and highly effective. Either working from your storyboard, or as you're animating, you'll know where you want to insert a sound effect. For example, when the anvil hits the head, a CLANK is needed there. If the effect you need is on hand, great! Just make sure it has the necessary duration, and then plug it in at the frame where it should start. For broadcast animation, you'll set the sound sync to Streaming for the soundtrack exclusively. In addition to using separate layers for each voice track, it's wise to confine your sound effects to a layer or two. This leads to less confusion; yet using two layers enables more than one sound effect to occur at a time.
Note
For the following Expert Tutorial, we've supplied a short track for your use, lip_track.wav or lip_track.aif, which you'll find in the B_Turner subfolder inside the ch14 folder of the CD-ROM. These tracks include the major sounds used in the English language.
Lip-Syncing Cartoons, by Bill Turner
For animated characters to really come alive, you need to know how to do lip-sync. To get quality lip-sync effects, you either need to draw them yourself or hire someone else to do it for you. Although this tutorial can't possibly cover every circumstance known to human communication, it can get you started on the road to lip service. There are some prequalifications: First, you must be able to draw in Flash, which usually means drawing with a tablet, preferably a pressure-sensitive graphics tablet (such as a Wacom tablet); and second, you need to have a recorded voice track on its own layer in Flash.
Because lip-sync can't be described in a simple a, b, c routine tutorial, you'll be required to improvise — in your style of drawing. I can't tell you how to do that. Style comes from years of practice and experimentation. But if you do know how to draw and you do have a style, then the intention here is to provide a context in which you might discover the basic trick of lip-sync.
The major sounds, known as phonemes, are less numerous than you might think. It's how these sounds meld together to become words and sentences that add an aura of complexity. Although one might surmise, from the alphabet, that there are 26 sounds, there aren't nearly that many. That's because many letters have the same basic mouth shape, movement, and pronunciation. And because we're now in the land of cartoons, we can simplify even further — the really great cartoons are often the simple ones built of tireless simple reinterpretation.
In this tutorial, to keep it simple, you'll deal with the two dominant views of talking heads: profile and face forward. A face forward talking head is probably the easiest to animate in Flash because the mouth can be animated on a layer that's situated in the layer stack above a drawing of a mouthless head. A talking head in profile is more difficult because of the need to redraw the portion of the face that extends down from the nose, to and including the chin, for every frame. Of course, including nose-to-chin movements can also enhance the animation of a face forward talker, and doing so would make for a more expressive animation. But I want to move quickly here.
In Figure 14.14, you see a mouthless head (provided on the CD-ROM in the B_Turner folder for both demonstration and practice) in both of the basic orientations: face forward and profile.
The spoken test line reads, "Zinkle Meyers is very talented on the bongo drums. Flip Flap beats his hands on the smooooth skins. Dig the rhythm. Excellent!" Creating lip-sync for this line requires a number of mouth positions. To demonstrate the concepts, the first sentence of this test line is supplied, already drawn to lip-sync. Your task is to draw the mouth positions for the remainder of the spoken text.
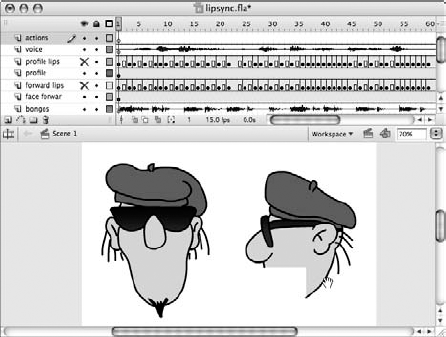
Figure 14.14. A mouthless head in both of the basic orientations: face forward and profile with sound and animation layers for adding lip-sync
Note
To help get you started, Bill Turner supplied a fully functional .fla file for you to work on, with the base character already drawn (lipsync.fla). You can find the file in the ch14/B_Turner folder on the CD-ROM.
The Sync option
If you were setting this file up from scratch, you'd want to start by placing the voice soundtrack on its own layer in the Timeline. You'd rename this layer with a meaningful name, such as "voice," and then, in the Property inspector, you'd set the Sync option to Stream.
Never use Event as the Sync option for any sound that must sync to the Flash Timeline. Otherwise, the timing of the voice will not be locked to the frame rate, meaning that the mouth drawings may not appear simultaneously with their appropriate sounds, thus losing sync.
Getting into sync
The best way to understand lip-sync is to have the sample file open. Note that there is a visible waveform (the little squiggly stuff) that shows where the peaks and valleys of the sound occur across the Timeline. Note, too, that the voice is brought in as a separate asset. It's on its own layer, separate from background sounds or music. It would be impossible to see the voice within the waveform if it was premixed with other sounds before bringing it into Flash. If you're producing a cartoon show, it's best to have each character recorded separately, particularly in cases in which they may talk over each other simultaneously. This separation gives you more control when animating. In fact, the entire animation is broken into layers for ease of editing. There's at least one layer for each major element. You might also note that the bongo soundtrack is set to event. This is useful while authoring because it mutes the track when scrubbing the Timeline to listen for timings in the voice track. If both were set to streaming, it would be more difficult to concentrate on the voice alone. (You must remember to reset this option to Stream when syncing is completed, or you could just delete that layer until after you are done animating the mouth.)
The phonemes
Now for the phonemes, there are several standard mouth positions for most of the major sounds, as shown in Figure 14.15. Although this is not a rigid rule, it does provide a good basis from which to expand into greater mastery of lip-sync. First, you'll note that the word Meyers begins on frame 12 of the animation. The mmmm sound is best represented with the bottom lip tucked slightly under the top lip. Try saying mmmm to see for yourself. In the word Meyers, this mmmm sound lasts two frames and is then followed by the long I sound. Notice that we didn't sync the word as it is spelled, e-y-e, because that's more complicated than it needs to be. The word Meyers is usually pronounced M-I-ER-Z, with the ER being just an ease-out (mouth holds shape but gets slightly smaller as phoneme trails off) of the long I sound. The word ends with the Z phoneme, which is simply drawn with the mouth slightly open, and the tongue at the top of the mouth.
In the next section of speech, the "very talented" part is a fast-moving set of syllables, so every available frame is needed to represent it. Here, you'll notice that most of the movement occurs when the tongue engages the roof of the mouth for both the T and L phoneme. Now, because the T and L are nearly the same mouth position, you can use the luxury of duplicating frames. Similarly, the V sound requires the same basic mouth formation as the M sound, so you could copy this one as well from the Meyers word. Although the B sound, in bongos, uses nearly the same mouth as M and V, we don't copy that one. Here, we draw a new mouth to add a bit of chaos because we don't want the mouth to look like a machine. The logic behind deciding which part to copy and which part to make new drawings for is a large part of the art of lip-sync. In short, it's all about balancing how much new artwork you really want to do, while avoiding obvious repetition.
Now that I've given you an insight into how this is done, I've left the rest of the phrase for you to complete. To accomplish this, you'll probably want to reuse many of the supplied mouth positions to sync the remaining voice. Remember that timing is the most crucial part. You can determine where a new mouth position is needed, or where the mouth needs work, by slowly scrubbing the Timeline. Then, if you need new mouths, simply draw them in. I highly recommend doing this drawing yourself because this practice will start you on your way to becoming a master of lip-sync.
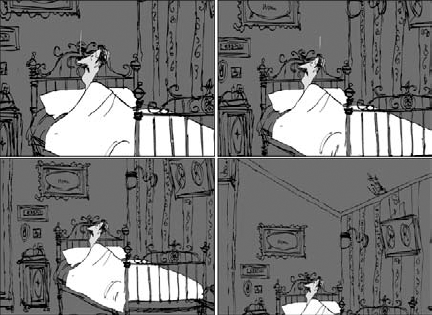
As you have learned in previous chapters, in Flash you work in an area that is called the Stage area. For broadcast animation (or any other kind, for that matter), it is better to think of it as the viewfinder of a camera. The main difference between this camera and the traditional kind, or even those used in 3D animation, is this: You can't move it. So, to give the illusion of camera movement, everything within the view must move. This is not as hard as it might seem with Flash's capability to use animated graphic symbols. A good example is in Richard Bazley's animated short, The Journal of Edwin Carp..
In a scene where the view seems to pan up from Edwin's bed to show a crack in the ceiling, all of the elements on the Stage have to move to create the illusion of a camera move. Here are the steps for creating this effect, as shown in Figure 14.16
A Graphic symbol of the entire scene of animation that was larger than the camera's view was made (so that white space wouldn't show at the edges).
The symbol was placed in the Main Timeline.
The symbol was scaled and placed on the first keyframe to frame the medium view of Edwin in his bed.
The symbol was then scaled and placed on a later keyframe to frame the view of the cracked ceiling.
By tweening between these two keyframed views, the illusion of a camera zoom out and pan up is created as the whole scene moves on the Stage.
Note
We include this scene and several others from The Journal of Edwin Carp, an animated feature film that was done entirely in Flash, on the CD-ROM in the R_Bazley folder inside the ch14 folder.
Note
Richard Bazley describes some of his other clever animation techniques in his tutorial for the Flash MX Bible (Wiley) on "2D Character Animation." This tutorial is archived online for readers who wish to learn more about specialized animation techniques. Go to www.flashsupport.com/archive. If you are interested in getting the full-length animation on DVD, contact Richard Bazley by email at [email protected]
We're all waiting for the day when intensive animation will play as smoothly on the Web as it does when output for offline viewing. That day is getting closer with every build of the Flash Player. Flash 8 introduced a feature to optimize playback of complex vector graphics in MovieClip or Button symbols by caching them as bitmaps, or surfaces, at runtime. The benefit of caching complex vectors as bitmaps is that the Flash Player does not have to tie up the CPU by constantly redrawing these background vectors as other elements are animating in front of them. Your animation will play back faster and smoother. You can apply this option with ActionScript or by selecting a MovieClip (or Button) instance in the Document window and selecting the check box in the Property inspector to Use runtime bitmap caching.
Runtime bitmap caching only optimizes Web playback for Flash movies with complex background images that are static or panned vertically or horizontally. The position, but not the content, of the cached symbol can change without requiring the Flash Player to redraw the vector information. Bitmap caching will fail if the MovieClip (or Button symbol) is larger than 2880 pixels in any direction or if the MovieClip is rotated. You will not notice a significant improvement with bitmap caching on simple vector graphics. Before you publish your final Flash movie, it is always best to test with bitmap caching turned on and turned off to see which delivers the best performance for the specific graphics and animation in your file.
As we mentioned previously, when you're designing with Flash for the Web, use raster (bitmap) images with a careful eye on their file size. But for broadcast output, there's no limit. Not only can you use as many images as you'd like (within system constraints), but also doing so will make a richer, far more attractive finished product. And, unlike the .swf format, when they're output as raster video, even animations built with a lot of bitmaps will play at the proper frame rate. So move, animate, scale, and rotate them — even play sequences of them. The sky and RAM are the only limits.
Beginning with Flash 4, Flash expanded its import capabilities to include raster video — QuickTime and AVI. When using video output for broadcast, you can export to these formats, too, and video that has been embedded in a Flash project file (.fla) will show up when output to .swf format. In the past, Flash did not recognize alpha channels embedded in the QuickTime 32-bit animation codec (which supports traveling mattes, or alphas). The workaround was to use Mask layers on the video in Flash. One of the most impressive features introduced with Flash 8 (Professional edition only) was the capability to import video with an alpha channel. If you can set up a basic blue or green screen and create some nice alpha channels on your video, you can take advantage of all that work when you bring the video into Flash and start layering your video with other elements.
Remember that you also have the option to link the video file rather than save it within the Flash project file (thank goodness) — Flash makes a pointer to it instead. This keeps your file sizes much more manageable. The only drawback to linking video instead of embedding it is that it won't show up when output to the .swf format.
The option of combining video with vector animation has brought tremendous functionality to Flash because animations can be keyed, or composited, over (or behind) live video without having to recomposite in After Effects. To take advantage of this, keep your live video at the same frame rate as the Flash project. Note, however, that Flash will export only the audio from the video clip in some formats, so you may need to reapply sound in a video-editing application. An alternate solution is to bring the video and audio tracks into Flash separately and to synchronize them there before exporting to your chosen format.
Note
You can find an archived version of the "Exporting Animation" chapter from the Macromedia Flash MX 2004 Bible (Wiley, 2004) at www.flashsupport.com/archive. The chapter includes more detailed information about the various options for exporting animation and audio.
The drawing and effect tools in Flash have become more robust with each release. The addition of blend modes and more sophisticated gradient controls that have been available since Flash 8 make it easier for artists to get the effects that were previously only possible in raster applications. Our suggestion is to try working directly in Flash first, but if you need to go back to Photoshop, you'll be happy to know that the two applications work well together. By using layers in Photoshop to create artwork, multiplane shots are easily accomplished in Flash. Using layers is very important to the organization of the animation. It is not uncommon for a single shot to require more than 20 layers to keep things where they need to be in the visual stacking order. When designing backgrounds (or scenery, to be more precise), remember that, at some point, background elements may need to be foreground elements. For instance, the sky will always be in the background, so it is on a layer furthest down in the stack. Other background elements, however, may sometimes need to be in the foreground to facilitate movement of the character, either in front of or behind him. To allow flexibility in how your various elements interact, you should keep them on separate layers.
When creating layered backgrounds, using Photoshop and alpha channels delivers the most versatility. When using Photoshop for scenery elements, it's mandatory to work in layers and to save a master file with all layers intact. Elements can then be exported to individual files (with alpha channels) as needed. (Retaining the master layered Photoshop file gives you maximum options later, if edits or changes occur. It can also be used as a resource for subsequent animations, so don't flatten or discard your master layered Photoshop file. Instead, number and archive it!) Why the alpha channels? When translating the Photoshop elements into Flash vector scenery, they automatically mask themselves — so a little preplanning in Photoshop can save lots of time later.
Whoops! You got to a point where you didn't use layers and now you need a mask. Some situations may be either too complicated or else unforeseeable in the original design. Flash Mask layers can come to the rescue. Here's the good news: You can mask (and animate the mask) interactively with the other elements while in Flash. The bad news is that it might be more difficult to create a precise mask in Flash than to export an alpha channel from the original Photoshop file. A classic example of masking used in character animation is the black circle that closes in on a scene at the end of an animated episode — this simple animated shape mask is easy to add in Flash. Masks also come in handy to create reveals or to make elements seem to grow or shrink as they are gradually unmasked or masked on the Stage.
Long pans are a standard device of animated cartoons; an example is when Fred Flintstone runs through the house and furniture keeps zipping past (that must be one looooong living room). This can be done a couple of ways in Flash. For landscape backgrounds, it's usually best to first create a very wide graphic (bitmap or vector) of the landscape and then to Motion tween it horizontally, with keyframes for stopping and starting as needed within the tween. If something is either falling or ascending, use a tall graphic and Motion tween vertically. Another solid technique is to create art of the objects that will pan (such as clouds) and then loop them as the background layer, across the view. To get smooth results when using looping, don't use easing in or out with the tween setup. Also, to maintain constant speed, maintain the exact number of frames between the keyframes. Then, copy the tween by Alt (Option) dragging the selected tween frames to the desired area in the Timeline. Repeat copying until you've covered the time needed.
Warning
For Web animation, it is best to use Movie Clips for looping animation, but if you are planning to output your animation to video, you have to lay out all animation in keyframes on the main Timeline (or in Graphic symbols). When it's exported to video, only the first frame of any Movie Clips will display, unless you use After Effects or Macromedia Director to translate the .swf file before final output.
Note
You can find an archived version of the "Exporting Animation" chapter from the Macromedia Flash MX 2004 Bible (Wiley, 2004) at www.flashsupport.com/archive. The chapter includes more detailed information about the various options for exporting animation.
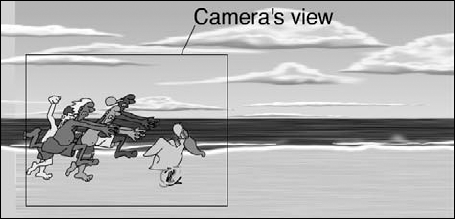
In the Weber cartoon scene of a chase along the beach, a camera pan was created by tweening a symbol of the whole beach scene horizontally. As shown in Figure 14.17, the "camera view" reveals only a small area of the larger background scene.
Tip
The area around the visible Stage in Flash is called the "Pasteboard," and it can be utilized to support workflows that require extra-long graphics that will be tweened across the Stage. This feature is also handy for developers who like to store extra elements off the Stage where they won't be visible in the final .swf. Think of it as the theatre wings of your Flash stage.
To provide 3-D-motion depth during the pan, keep this rule in mind: An object that is farther away appears to move more slowly (than a nearer object) as it moves across the view. This takes some experimenting to get it right, but once mastered, this will add a professional touch to your animations. For example, in a 100-frame pan of a beach scene looking toward the water:
The sky moves very slowly at 100 pixels total.
The water moves more quickly at 125 pixels total.
The character on the beach moves more quickly than the water at 150 pixels total.
A parked car in the immediate foreground moves most rapidly at 250 pixels total.
The multiplane camera was used in early Disney films to give a feeling of depth in the animation of flat artwork. There was physical space between the individual cels when photographed. By using a short depth of field lens, the artwork that was further away from the lens lost focus slightly. (You may have noticed this in still photography yourself.) A good example of this is the pier scene from the Weber cartoon, which is shown in Figure 14.18. Even if you set up your scenery using bitmaps, you can re-create this effect.
In Photoshop, it's a simple case of using incrementally higher doses of Gaussian blur on the layers of your scenery that are farther way. The farther the object is, the more blur that is applied — just be sure that the blur is applied to the alpha channel that Flash will use in compositing. To get the same effect in Flash, gradually apply more intensive levels of blur using the Blur filter. Photographers use this technique to bring attention to the element in the shot that is in focus. Using it in animation enhances the illusion of depth. However, using it in the foreground can also portray atmospheric elements, such as fog.
When you have a shot done, it's often helpful to see it play at full speed. Unfortunately, Flash is unable keep up with all of the sounds, bitmaps, and complicated vectors that go into broadcast-quality animation. Plus, it's impossible — even with the most macho of processors — to play the shot at full speed without hiding a bunch of elements. But, hey, you're the director of this masterpiece — it's time for dailies, and you need to see it all.
The best way to do this and to cut down on file size is to export a raster video at 320 × 240 pixels, using the standard QuickTime Video codec (Mac) or the Microsoft Video 1 codec. These codecs are for draft purposes only, so it may have banding and artifacts from compression, but the point is to generate something that even a machine that's ill-equipped for high-end video output can display easily at full frame-rate speed. This method will be of great help in revealing those areas of the animation that still need further tweaking and work before going out to the final published version. The general movement and pace of the shot will make itself known. Look for errors such as unintended jumpiness in frames, and color shifts or inconsistencies between views. Furthermore, your lip-syncing efforts will either be a glory to behold or a disaster in need of medical attention. Other things, such as sound clipping (pops in high-volume sound) also become apparent here. To put it bluntly, if the preview makes you cringe, then it needs work — if not, you're on your way to final output.
Note
Flash video has become the cross-platform format of choice for video on the Web. If your animation is going to be seen online or in the context of a Flash presentation (such as a kiosk or projection), you will be better off using Flash video than another video format such as QuickTime. With Flash video, your animation can be integrated seamlessly with other Flash elements and no other players will be needed to run the file.
Now, after checking endlessly, you're ready for the final video file of the shot to be rendered. Back it up one more time. Then, when you've safely archived your final project file, it's time to choose the codec that your playback equipment can use and render one out for the tube. Then, when you have rendered all your shots at full screen, you can take them into Premiere or After Effects or Macromedia Director for more detailed editing and tweaking, using all the power that these applications offer. For example, you might want music to play gently in the background across all of your scenes. Although this would be a headache to piece together with separate Flash project files, it's a snap in Premiere. Again, the possibilities are endless.
Note
We describe some suggested workflows for output of character animation in detail in an archived version of the "Exporting Animation" chapter from the Macromedia Flash MX 2004 Bible (Wiley, 2004) at www.flashsupport.com/archive. We put this chapter online because the workflow has not changed significantly since the last edition and we had to make room for coverage of new features.
CineLook Filters for "Classic" Broadcast Animation, by Evan and Gregg Spiridellis
If you've made it to this section of the book, you are by now well aware that Flash is an amazing tool not only for online animation, but also for broadcast animation.
There is one pitfall with using Flash animation for broadcast purposes: Time and time again, we hear that Flash looks too "Flashy" — meaning that it is too "digital" or "perfect" when transferred. The perfectly flat colors that you get from Flash work great in some circumstances, but when they're transferred for broadcast, they come across as a bit cold and lifeless. Looking at big, even blocks of color on a computer monitor is one thing, but traditional animation needs to look more organic.
We've found the solution in the DigiEffects CineLook plug-in for Adobe After Effects. The software is a bit expensive, but if you do a lot of this kind of work, it is worth every penny! It takes your perfect digital files and adds enough imperfection to give your Flash animation a more organic look and feel. In this tutorial, we will explain our process for adding filter effects to a Flash animation file in preparation for broadcast delivery. Although many of the filter effects are very subtle, you can see some of the differences between the original Flash artwork and the final filtered animation in Figure 14.19.
Note
For more information and demo versions of the CineLook plug-in, go to www.digieffects.com
Setting up the file
After installing the CineLook plug-in, you're ready to begin. Start by exporting your Flash movie as a QuickTime or AVI file. Open After Effects and set up a new Composition. The dimensions and duration should match your Flash file. Import your QuickTime or AVI file and drag your movie to the Timeline. Select the movie in the Timeline by clicking its layer, and now you can begin to add filters.
Softening with Gaussian blur
The first thing that we recommend is adding an ever-so-slight Gaussian blur to take the hard "edge" off of the lines in your Flash movie. Go to Effect
Warning
It is very easy to get carried away with these filters! It is important to find the filter effect that best complements your movie and not go overboard with the effects. After all, you want people to congratulate you on your movie, not your filters!
After the initial Gaussian softening, we can proceed with our "film look" filters.
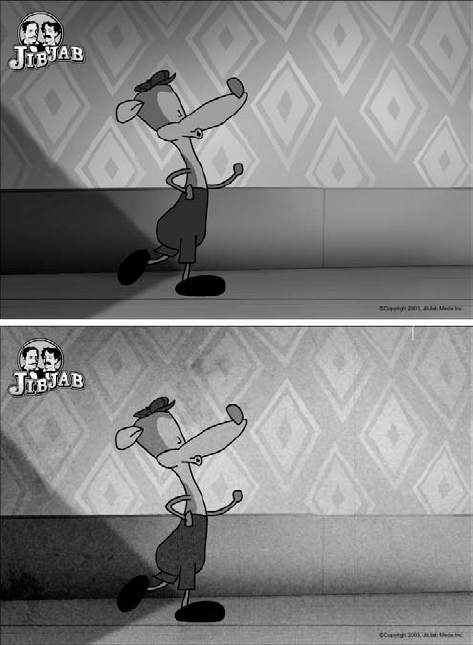
Figure 14.19. Flash artwork that looks too "clean" for broadcast (top) can be modified with filters in AfterEffects to look more organic (below).
Adding DE CineLook filters
Make sure that your movie is still selected in the Timeline, go to Effects
The CineLook plug-in allows you to add and control film grain, adjust color temperatures, and view whether your colors are NTSC safe. There is nothing worse then spending hours perfecting your animation only to find that when it's transferred to television, your colors bleed all over the screen.
The first thing you do is run the NTSC Gamut Warning. This will block out any colors that are not NTSC safe and allow you to make the appropriate adjustments. You can adjust your saturation and color levels until nonsafe colors enter the NTSC spectrum. CineLook gives you seven layers of adjustment for your Red, Green, Blue, and White channels or you can transform your entire file to Black and White.
Next you tackle the film grain. This is by far the biggest advantage of the CineLook plug-in. Color film is processed in three layers: red, green, and blue. CineLook enables you to control the amount of grain and the softness of the grain in each color field. Adding a slight grain effect will help activate the big, flat shapes that Flash is notorious for. If done well, this adjustment may not be overtly noticeable to the average viewer, but it will add a more organic feel to your movie. Of course, if it fits the style of your movie, you can go overboard!
Once you find the right grain level for your current animation, you have the option of saving your settings. This makes it possible to get a uniform look throughout an entire project or apply the same effects to multiple projects.
After polishing your Flash movie with a "film look," you might want to take it one step further and "damage" the film a bit. The FileDamage plug-in is a great tool for making a perfect digital file look more weathered. The descriptively named main categories for adjustment are Flicker, Vertical Scratches, Hair, Dust, and Dirt.
In the old days, shooting film was by no means a precise art form, and it seems that no two consecutive frames ever received the same amount of light. Flicker makes it possible to control the difference in exposure between frames. Select the movie in the timeline, then go to Effects
The first effect you add is Flicker. FileDamage enables you to control the Amount, Speed, and Variation of exposure differences. This might be difficult to see in side-by-side illustrations, but when the movie plays in real time, Flicker is a very natural effect.
Another disadvantage of traditional film developing (in the early days) was that the celluloid was exposed to the elements at almost every stage of the process. FileDamage allows you to control the amount of hair, dust, and dirt that has mucked up the film along the way.
The Vertical Scratches effect is the perfect "Old Time" filter, and FileDamage allows you to control the Number, Speed, Opacity, and Thickness of the scratches.
Finishing up
Once you've gotten the desired look for your movie, save your settings in the Presets section for future use. If you're all set with your filters, save your After Effects file and go to Composition
Note
To see a "live" comparison of the before and after files described in this tutorial, open JibJab_Willy.swf (original file) and JibJab_Willy.mov (filtered file) from the JibJab folder in the ch14 folder on the CD-ROM.
Film filters such as DigiEffects CineLook give you a range of options to take the digital edge off your Flash animation, and when they're done properly, they'll give the impression that you've been scribbling cels in your basement for years!
Note from the authors: We kept this tutorial from the Macromedia Flash MX 2004 Bible (Wiley, 2004) because it provides some great guidelines for the kind of adjustments that you might want to make to your pure Flash animation to get it ready for broadcast. The only thing that has changed since Flash MX 2004 is that there are now more options in the Flash authoring environment for modifying the look of your graphics. You might want to try some of the Flash Filters or Blend modes to soften up your artwork. Ultimately, it is hard to replace expert ready-made filters for adding things like film grain, but keep an eye on the Flash Exchange on Macromedia's site for custom Filters that may soon fill this gap.
Note
We'd like to know what you think about this chapter. Visit www.flashsupport.com/feedback to send us your comments.
Flash can be a powerful tool for creating broadcast-quality cartoons. In such cases, many of the usual file-size concerns related to Flash development are set aside because the final output will not have to be Web-friendly.
The task of a cartoon animator is to express motion and emotion. Anticipation and overlapping actions are basic tools used by cartoon animators to add drama to a character's movement.
Flash tweening, including instance swapping and Motion guides, is one of the most useful Flash cartooning tools.
Lip-syncing, which is critical to fine cartoon animation, is not a push-button task — even with Flash, an animator must understand the relationship between expression and lip-sync, and have a working knowledge of phonemes, as well as syncing with music and sound effects.
The Filters and Blend modes in Flash make it easier to achieve sophisticated-looking animation without having to use other applications for special effects.
After a cartoon is created in Flash, final output may include using either Premiere or After Effects for the final polish that makes it look more like "real film."
The key point of this entire chapter is this: Computers can save time, but only artists can animate!