
When you design forms for distribution to an unknown audience of users, you'll want to be certain your forms use program features and JavaScripts that can be performed by users of Acrobat and Adobe Reader.
If you have a known audience of Acrobat only users such as coworkers in an enterprise environment, you can add JavaScripts for a number of different actions with more dynamic features on forms that can be used only with Acrobat.
You may work in an accounting office where you need to create calculation tapes to show values calculated for auditing purposes, or need to create additional pages on a time and billing form, or perhaps you want to send data from one form to another form for summarizing data.
If all your form recipients use Acrobat, you have some more options for adding these features that can be performed only by the Acrobat users. The real power for dynamic interactivity that can be used by both Adobe Reader users and Acrobat users rests with Adobe LiveCycle Designer. But, if you're an Acrobat Forms author, you still have some opportunities for creating some dynamic type of interactive forms using Acrobat.
Beginning in Chapter 20 we introduce Adobe LiveCycle Designer, where you find the best in regard to dynamic forms. To end this part of the book on Acrobat Forms, we talk about creating JavaScripts that can be used only with Acrobat users.
As we explained in Chapter 18, almost all new content added to a PDF file cannot be performed in Adobe Reader. We talked about adding comments in Adobe Reader via JavaScripts, but other items such as adding fields, creating bookmarks, and adding new pages are accomplished only in Acrobat unless a PDF document is enabled with Adobe Reader usage rights.
When working with an Acrobat only audience you may find adding new fields to a form based on certain actions to be a welcome opportunity. Adding new content that can be used by Adobe Reader users is something you can do with Adobe LiveCycle Designer as we explain in Chapters 26 and 27. When creating Acrobat Forms, you need to limit your forms distribution to Acrobat users if you add JavaScripts to add new fields on a form.
You might work in or serve clients in an accounting office, a law office, an engineering firm, an advertising and marketing agency, or other professional group of users who work with Acrobat Standard or one of the Pro products. Rather than distribute forms to these users for form fill in and returns, you might create forms for utilitarian purposes such as time and billing sheets, day planners, appointment calendars, tracking client histories, or any number of different forms for similar uses.
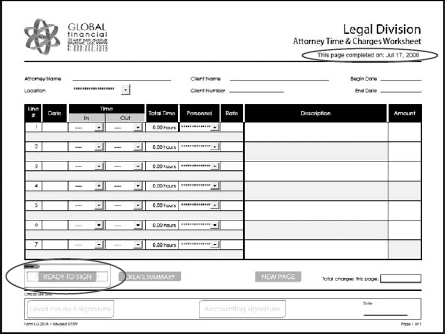
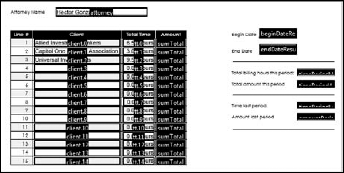
As an example, look at Figure 19.1. This form was designed for a law office to accumulate time and billing information. The form has an In time and an Out time for each row, a total time field to calculate the row total time, a combo box for choosing the individual working on an aspect of the case, an open field for the form user to type the rate that corresponds to the individual selected in the combo box, a description field for typing the service description, and an amount column for calculating the product of the time and rate.
The form contains seven rows for calculating time and billing for a given client for the time period which is one month. Obviously, most law offices need more than seven lines of billing information. Therefore, a button exists on the form to create new pages as needed.
Note
To add more pages to a form, see the section "Spawning Pages from Templates" later in this chapter.
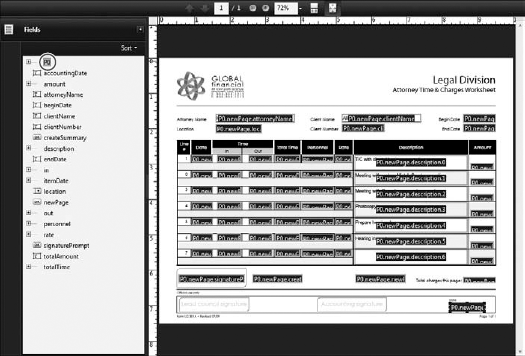
When an attorney completes page one of this form, the New Page button action creates a new page on the form. When a new page is created we're going to do some things with the buttons on the bottom of the page shown in Figure 19.2. The Create Summary button exports data from the form to a summary document. We want to keep this button on all pages on the form so we can export data per client to a summary form.
Note
For information on exporting data from this form to a summary form, see the section "Sending Data to Secondary Forms" later in this chapter.
The New Page button creates a new page in the document. The next page added to the file is identical to page one including the buttons. Therefore, we don't need the Next Page button on subsequent pages.
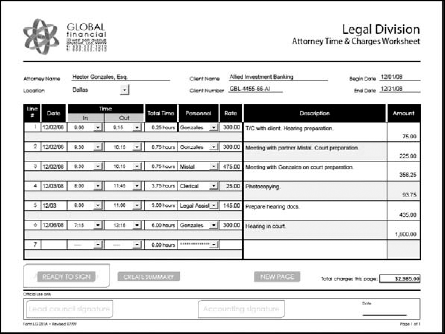

Figure 19.2. The Next Page and Ready to Sign buttons on the first page are no longer necessary when a new page is created.
The Ready to Sign button adds a digital signature to the document. We didn't want to create a digital signature field on the form and have that field duplicated with each new page added to the form. We want only a single digital signature field to appear on the form. Therefore we use JavaScript to create the signature field, but the field is created only when the form user clicks the Ready to Sign button. When the form user clicks this button a new signature field is added on the last page of the form and the button action also deletes the Ready to Sign button. After the form is signed, the form user clicks the Submit Form button to submit the form to the law office accounting department.
Quite a few JavaScripts are added to this form. Some of the scripts work in Adobe Reader such as the calculation scripts in the table and, if the form is enabled with Adobe Reader usage rights, the JavaScripts used to delete fields work. The two things you cannot do in Adobe Reader are adding new fields and creating new pages. You need Acrobat Standard Pro or Pro Extended to perform these tasks.
When you create a new page on a form you use the spawnPageFromTemplate object. As new pages are spawned, you can make a choice for renaming fields or keeping the field names the same on each new page. For a form where you need to add unique data for the data fields, such as our form shown in Figure 19.1, you must instruct JavaScript to rename the fields when new pages are created.
Note
To write JavaScripts to spawn pages from templates and understand how templates are created, see the section "Spawning Pages from Templates" later in this chapter.
In terms of preparing a form for spawning new pages, you need to understand how JavaScript renames fields before you write and test routines that spawn new pages. Hence, we'll tackle the job of working with the calculations formulas and other routines on the example form before we start talking about spawning new pages.
When a new page is spawned from a template and fields on the page are renamed, JavaScript needs a way to easily rename fields. If you have a field such as total on page one and create a new page without renaming the field, the new page contains a second field named total. Any data you add to either field is duplicated in the second field. Therefore it's critical to rename fields when new pages are added to a form.
When JavaScript renames fields you'll see a field name such as P0.newPage.totalField. The first character in the field name is a constant. P appears on all field names when a page is spawned from a template. The 0 is derived from the page number. Since JavaScript is zero based, the first page would have a zero following the constant. The newPage item in the example field name is the name of the template. When you create templates you provide template names. You can use any name you like and the name used for the template is used for part of the field name. The last part of the example name is totalField. This is a field name. Therefore all fields on a page using a similar example would be named P0.newPage. followed by the individual field names.
Let's say you have a field called item and another field called quantity. In a total column you want the product of item and quantity for the event.value. Let's further presume you have a template you named as myTemplate.
When a page is spawned, the item name is changed to P1.myTemplate.item and the quantity name is changed to P1.myTemplate.quantity for page one (this follows page zero). On page two, the names would appear as P2.myTemplate.item and P2.myTemplate.quantity. As each new page is added to the form, the unique identifier is the page number. Therefore you need to write a calculation JavaScript that takes into account the page number in order to write a formula that works on each new spawned page.
The code you would use to calculate a product, might appear as:
1. var oPage = this.pageNum;
2. var oItem = this.getField("P" + oPage + ".mytemplate.item";
3. var oQuantity = this.getField("P" + oPage + ".mytemplate.quantity";
4. event.value = oItem.value * oQuantity.value;
In the first line of code we set the variable oPage to the current page number (this.pageNum). In line 2 we get the field P1.myTemplate.item (if the page number is 1) and in line 3 we get the field P1.myTemplate.quantity (again if the page number is 1). The fourth line of code puts the product value in the target field. As each page is spawned the variable oPage is used to identify the unique page numbers.
You have a bit of a challenge when designing a form like the one shown earlier in Figure 19.1. When you add fields to a form, you can't use a field name like P0.mytemplate.item. Yet the formulas you write need to use such names for the calculations to work. You need to create a little workaround to set up the form properly. Generally, you design a form as follows.
STEPS: Creating a Form for Spawning Pages
Create fields on a form. Your first step is to create a form like you would any other form. You use field names such as item, quantity, total, employee.name, employee.address, and so on. When you create tables you create them the same way as creating any other form. You may have fields with names like total.0, total.1, total.2, and so on.
Write the formulas and button actions. This is the most difficult task because you can't test the formulas. You have to use the field names JavaScript will create when a page is spawned. Try to do the best you can, realizing that you'll make some modifications to the code later.
Add a blank page. Insert a page preceding the page where your fields appear. You can use the File

Copy the button that spawns a new page and paste on the blank page. You can bypass pasting a button into a blank page by using the JavaScript Console to use the same code to spawn a new page. However, adding the button to a new page keeps the JavaScript code accessible in case you use the Console to test other scripts.
Create a template. Navigate to page 2 and create a template from the page containing the form fields. To create a template choose Advanced
Hide the template. Later in this chapter in the section "Spawning Pages from Templates" we cover creating templates. For now, realize that this step needs to be performed in the order shown here. You needed to create a blank new page because you cannot hide all pages on a form. At least one page must be visible. To hide the template click the eye icon in the Page Templates dialog box and click OK.
Spawn a page. Click the button or execute a script that spawns a new page while renaming fields. At this point you have two pages on the form—the blank page and the second page that was spawned from a template.
Delete the blank page. You'll see that there are two pages on the form. When templates are hidden they don't show up as part of the total pages on the form. Open the Pages panel and from a context menu opened on the blank page, choose Delete Pages. Click OK when a dialog box opens to confirm the action.
Rename the fields. Because you had a blank page on the form, the spawned page became page 1 (following page zero). The field names for the page appear as P1.myTemplate.myField. You want to change the P1 to a P0 as shown in Figure 19.3 because you have only one page on the form and the page number is zero. Choose Forms
Test the formulas. Any changes in the formulas must be duplicated on the page template. You can copy/paste fields after showing the template and rename the fields to the original field names you have on the template page.
Note
Renaming fields to P0 in the Fields panel is an optional step. You can leave the fields at P1 but things get more complicated if you do. If the page number is zero and the fields are P1 fields, you have a mismatch and need to compensate by subtracting one from the this.pageNum object. With just a quick change to the parent name you can simplify getting the page number and keeping things straight as you write the JavaScript code.
Tip
You can create all your calculations on page 0 (zero). Show the template page and delete all the fields on this page. When ready to duplicate the fields on page 0 you can select all fields and from a context menu choose Duplicate. The fields are duplicated in the exact same position on the target page. You then need to rename the template fields back to the root names.
On our example form shown in Figure 19.1 we have two columns of combo box fields with options for choosing time in 15-minute increments as shown in Figure 19.4. The time begins at 5:00AM and ends at midnight on a 24-hour clock. In the Total Time column we calculate the amount of time between the In and Out choices. The field formatting and calculation results work the same in Adobe Reader as they do in Acrobat.
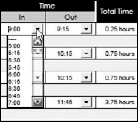
Figure 19.4. The Total Time column calculates the amount of time from selections made in the In and Out combo boxes.
Note
The globalAttorneySpawnRaw.pdf file shown in Figure 19.1 is contained in the Chapter 19 folder on the book's CD-ROM. Use this file to view the field formatting and calculation formulas discussed in this chapter.
The In and Out fields are formatted as None and there are no calculations in these fields. In the Total Time column, we use a Custom Format in the Text Field Properties Format tab. The script we added to the fields in this column was written as:
event.value = util.printf("%.2f", event.value) + "hours"This script is used to format the number with a decimal place and two decimal values. You can add whatever you like between the quotes in the text string. For combo box fields, printf("%.2f" formats a value to a string and sets the face value for combo box fields. We added hours because we're calculating hours and fractions of hours in the fields in this column.
For the Total Time fields we used the following script in a JavaScript Function:
1. function doCalculate()
2. {
3.   var aNameParts = event.targetName.split(".");
4.   var cPostFix = aNameParts.pop();
5.   var cPage = aNameParts.shift();
6.
7. // Test for valid Page. i.e. Skip calculation from raw template
8. if(/⁁Pd/.test(cPage))
9.   {
10.    var aIn = this.getField(cPage + ".newPage.in." + cPostFix);
11.    var aOut = this.getField(cPage + ".newPage.out." + cPostFix);
12.    event.value = (aOut.currentValueIndices -
       aIn.currentValueIndices)/4;
13.  }
14. }
What you see in the first eight lines of code is not needed to calculate the template fields. If we didn't add these lines of code an error would be reported in the JavaScript Console and the calculations for additional pages would duplicate values when we come to calculating the Amount column.
In lines 10 and 11 we get the In and Out times on the current page. The currentValueIndices object returns the options-array indices of the strings that are the value of a list box or combo box. The fields in the combo box are listed as 0, 1, 2, 3, and so on. The currentValueIndices object passes an integer that is the 0-based index of the string in the options array. The actual value is the value assigned to the index position. Therefore, if line 2 in the first combo box is 5:15 and line 7 in the second combo box is 6:45 we can easily subtract the values using the currentValueIndices object without converting the time values to date objects and converting the result to a number. In line 12 we use the currentValueIndices object and since we want to report time in 15-minute intervals, we divide by 4.
In the Total Time fields on the template page we simply called the JavaScript function by adding to the Calculate tab the following:
doCalculate();
Over in the Amount column we set up a function to calculate the product of the Rate times the Total Time. Open the Document Level JavaScripts and click Edit on the doAmountCalcs name. The function name is doAmountCalcs and the script for the function was written as:
1. function doAmountCalcs()
2.  {
3.     var aNameParts = event.targetName.split(".");
4. var cPostFix = aNameParts.pop();
5. var cPage = aNameParts.shift();
6.
7.// Test for valid Page. i.e. Skip calculation from raw template
8. if(/⁁Pd/.test(cPage))
9. {
10. var aRate = this.getField(cPage + ".newPage.rate." +
cPostFix);
11. var aTime = this.getField(cPage + ".newPage.totalTime." +
cPostFix);
12. event.value = (aRate.value * aTime.value);
13. }
14. }We begin by setting up this function to again split the field names and skip calculations on the first page in lines 1 through 8. In lines 9 through line 12 we calculate the product of the rate and total time fields.
At the bottom of the page use again another function. Look in the JavaScript Functions dialog box and click Edit on the doAmountTotals name in the list. The function name we used in the Calculate tab is doAmountTotals(); The script was written as:
1. function doAmountTotals()
2. {
3.   var aNameParts = event.targetName.split(".");
4.   var cPostFix = aNameParts.pop();
5.   var cPage = aNameParts.shift();
6.
7.// Test for valid Page. i.e. Skip calculation from raw template
8. if(/⁁Pd/.test(cPage))
9.   {
10.     var a = this.getField(cPage + ".newPage.amount").getArray();
11.     var total = 0;
12.     for (i = 0; i < a.length; i++)
13.       total += a[i].value;
14.     event.value = total;
15.   }
16. }
This script is similar to the scripts we talked about in Chapter 18 where we set up an array to calculate fields in a column. The only difference here is using the same initial lines of code we used in the preceding scripts to bypass calculating the template page.
By using three functions to make our calculations for the time, time and rate products, and total time values we can easily add the functions to the fields on the first page and the template page. If we have to do any debugging or editing, the functions are assigned to the fields and changes to the functions are immediately updated on all the fields where the functions are assigned.
Note
For more information on using arrays to sum columns of data, see Chapter 18.
A few miscellaneous items remain on the globalAttorneySpawnRaw.pdf form on the book's CD-ROM. The attorney name and the location fields at the top of the form would typically use the same input values from the given form user. Therefore on the template page we simply took the value typed on the first page and used it as an event.value for the remaining fields for attorney name and location for all spawned pages. We used the following script as a custom calculation script in the Calculate tab on the template page for the attorney name field:
1. var attorneyName = this.getField("P0.newPage.attorneyName");
2. event.value = attorneyName.value;
Notice in line 1 we get the precise field name for the first page field and take the value of the field in line 2 and use it for the event.value. The location field combo box field on the template page was created using the same script. In the first line of code we set the attorneyName variable to the combo box field on the first page.
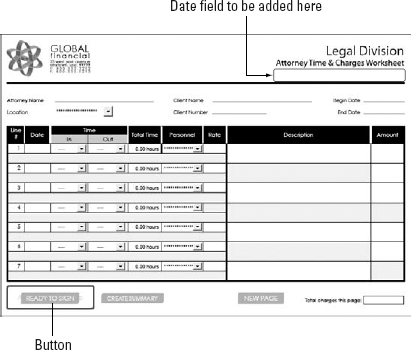
All the scripts up to this point work with Adobe Reader. Some of the next few scripts don't work with Adobe Reader—particularly the script we use to add a new field to the form. In Figure 19.5 you see a place on the form for a digital signature and in the top-right corner of the form we want a date added when the form is signed. Atop the area where we need to add a signature is a button. This button is used to hold the JavaScripts to add new fields on the form. Since this form may have many pages, we want the digital signature and date fields added to just the last page in the file.
We could add these fields to the template page and delete the fields on pages when new pages are spawned so only the last page in the file would contain the two fields. Deleting and adding fields works for Adobe Reader users if the file is enabled with Adobe Reader usage rights. But, because the Reader user cannot spawn new pages, it's just as easy to add the fields when a form recipient is ready to sign the form.
To understand more on how to add fields to a form, do the following.
Note
For these steps we use the globalAttorneySpawnRaw.pdf file in the Chapter19 folder on the book's CD-ROM. There's another file on the CD-ROM named globalAttorneySpawnPopulated.pdf. This form is used later in this chapter in the section "Sending Data to Secondary Forms." To follow these steps use the globalAttorneySpawnRaw.pdf file. The Ready to Sign button field on this form has all the JavaScripts we explain in this section. You can delete the button and add a new button to follow the steps.
STEPS: Adding Fields to a Form Using JavaScript
Open a form in Acrobat. For these steps we use the globalAttorneySpawnRaw.pdf file from the book's CD-ROM.
Add a button field to the form. On the example form a button exists. If you want to follow the steps here, you can delete the Ready to Sign button at the bottom of the form and create a new button. We'll use a button on the first page in the form to walk through the steps. To make the form more functional you'd have to add the button on both the template page and the page in view.
Get the coordinates for the digital signature field. Open the Comment & Markup toolbar and draw a rectangle with the Rectangle Comment tool where you want a signature field to be added on the form. Open the JavaScript Console (Ctrl/

this.getAnnots()[0].rect;
Delete the Rectangle comment. Click the Rectangle comment with the Select Object tool and press Delete.
Create a button and open the Button Field Properties and add a new JavaScript action in the Actions tab. Choose Run a JavaScript from the Select Action drop-down menu and click Add to open the JavaScript Editor. For line 5 look at the JavaScript Console and add the coordinates you see in the Console.
Add the following script:
1. var c = this.addField({
2.   cName: "attorneySignature",
3.   cFieldType: "signature",
4.   nPageNum: this.pageNum,
5.   oCoords: [35,74,176,112]
6. })
Click OK and click Close in the Button Field Properties window.
Save the file with a new filename. Choose File Save As and save the file with a different filename. Keep the file open to follow additional steps in this section.
In line 1 we use the addField object to add a field. In line 2 we define the name for the field. Line 3 sets the field type to a digital signature field. Line 4 determines what page the field is added to and in line 5 we get the coordinates for the field rectangle.
We took care of the digital signature field in the previous steps. We'll add to the same JavaScript by continuing steps to create the text field in the top-right corner of the form. Once again you need to get the coordinates for the text field rectangle. Use Step 3 in the previous steps to determine the coordinates shown where the field appears in Figure 19.6.
Get coordinates for the second field. We use the same steps as line 3 to get new coordinates for the second field. Delete the Rectangle comment after getting the coordinates.
Type the following code after Step 5 from the previous steps. We add the following code in the JavaScript Editor to create a text field. Open the Actions tab, click Run a JavaScript and click Edit to open the script in the JavaScript Editor. Add the following code after line 6:
7.
8. //script that creates the text field
9.   {
10.    var r = [427, 445, 683, 460];
11.    var i = this.pageNum;
12.    var f = this.addField(String("completeDate."+i),"text",i,r);
13.      f.textSize = 10;
14.      f.alignment = "right";
15.      f.textColor = color.blue;
16.      f.fillColor = color.transparent;
17.      f.textfont = font.HelvB;
18.      f.strokeColor = color.transparent;
19.      f.value = String("This page completed on: " +
         util.printd("mmm dd, yyyy", new Date()));
20.   }
Close the JavaScript Editor and close the Button Field Properties Window.
Save the form. Be sure to save the file at this point to follow additional steps later in this chapter.
Click the button. You should see the text field similar to Figure 19.6.
Revert the file. After you click the button and observe the results, chose File
In line 10 we assign the new coordinates to the variable r and in line 12 we assign the current page number to variable i. In line 13 we use the addField object and define the field name "completeDate." After the field name we add a child value to the field name so the name of the field would appear as completeDate.2 if there were three pages in the file (remember, JavaScript is zero based). Following the field name in line 13 the "text" item defines the field type and we use the i value which adds the field to the current page and the r value which is the coordinates for the rectangle.
Lines 14 through 19 define attributes for the field appearance such as type font, type color, fill color of the field, and stroke color. In line 20 we add the field contents. The field displays the text This page completed on: and the date the field was created.
One problem exists after you click the button to add the two fields to a page as shown in Figure 19.6.
The button field containing the JavaScript appears on top of the signature field. We need to delete this field from the form.
When the form is ready to sign, the form recipient clicks the Ready to Sign button that adds the digital signature field and the text field containing the date the form was completed. At this point we no longer need the button field and the New Page button field. The Create Summary button produces a summary from each page, so we need to keep this button on the form.
To delete fields from a form, follow these steps.
STEPS: Deleting Fields on a Form
Open the JavaScript Editor. We continue using the same form from the last series of steps. We'll add code after item 20 in the JavaScript we created to add fields to the form.
At the end of the code listing, add the following code in the JavaScript Editor:
21. var oPage = this.pageNum;
22. this.removeField("P" + oPage + ".newPage.signaturePrompt");
23. this.removeField("P" + oPage + ".newPage.newPage");
Exit the JavaScript Editor and the Button Field Properties Window and click File
Save to update your edits.
In line 21 we assign the current page number to the variable oPage. Note that in the scripts used to add fields we didn't need to use this variable. But now we need to get the fields that were spawned from a template and named using the page numbers. Line 22 deletes the button when the form is ready to sign. We use the removeField object followed by the field name. In line 23 we use a similar script to delete the New Page button.
A few more removeField scripts are used on this form. When a form recipient clicks the New Page button, the Ready to Sign and New Page buttons are no longer needed on the previous page after a new page is added to the form. Rather than keep these buttons on the form we can delete them from the previous page. If a form recipient needs to use the buttons, they appear on the last page in the document because we'll only delete the buttons on the previous page when a new page is spawned.
The script used to delete these buttons is part of the script used to spawn new pages in the document so we'll hold off on explaining the code until we look at creating a button action to spawn new pages.
Up to this point we talked about creating the globalAttorneySpawnRaw.pdf form while taking into account that new pages are added to the file via button action. We've talked about spawning pages from templates quite a bit in the preceding sections, but as yet we haven't looked at creating templates and the code needed to create new pages from a template.
The first thing you need to do when spawning pages from a template is to create a template on your form. In the section "Creating a form for spawning pages" earlier in this chapter we talked about adding a blank page to a form and creating a template from the second page that contains all the field objects and form design.
You can create a template on a single page PDF form but you cannot hide a template unless you have at least two pages in a document. Generally, it's a good idea to hide template pages so a form recipient doesn't inadvertently add data to the templates.
When creating a new template, you navigate to the page you want to use for the template page. The page must be in view in the Document pane. When the page is in view, choose Advanced
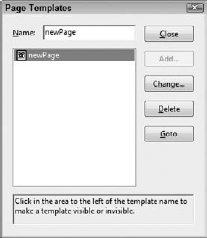
Figure 19.7. Choose Advanced
Note
Page templates can only be added while in Viewer mode. You cannot add page templates while in Form Editing Mode.
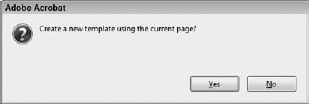
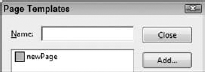
When you type a name for the template, click the Add button and a dialog box opens prompting you to confirm the action as shown in Figure 19.8. Click OK in the dialog box and the page is added as a template.
Notice in Figure 19.7 you see an eye icon adjacent to the template name after you click the Add button. The template name appears in the list after you click OK in the alert dialog box. By default templates are visible. If you want to hide the template click the eye icon and the eye icon is removed from the box adjacent to the template name as shown in Figure 19.9. Click the Close button after hiding a template and you'll notice that the total number of pages in the document does not include templates as pages if you elect to hide a template. If templates are visible they are counted in the total number of pages in the document.
Once you have a template, you can write the code and execute an action to spawn a new page from a template. Essentially, Acrobat duplicates the template page and adds it to the document as a visible page. You have a number of options when spawning pages from templates. One of the most important decisions you need to make when spawning pages on forms is whether to rename fields or not.
Using the globalAttorneySpawnRaw.pdf document we've used in many steps in this chapter, do the following to write a JavaScript to spawn a page from a template.
STEPS: Spawning a New Page from a Template
Open a form in Acrobat. In our example we continue using the globalAttorneySpawnRaw.pdf from the book's CD-ROM. You can use the saved file from earlier steps in this chapter or open the file from the Chapter19 folder on the CD-ROM.
Create a page template. In our example the globalAttorneySpawnRaw.pdf form already contains a template. If you start with a new form you need to create a template and you need to be certain all the field calculations will work on spawned pages as we described in the section "Calculating fields using field names from spawned pages" earlier in this chapter. For now, we're concerned with adding the JavaScript on a form that already has a page template.
Create a button field. On our example form we have a New Page button on the form. You can delete this button and create a new button to follow these steps or examine the JavaScript added to the button action.
Add a JavaScript to the button action and type the following code in the JavaScript Editor.
1. var oPage = this.pageNum;
2. var a = this.getTemplate("newPage"); //newPage is the template
   name
3. a.spawn ({
4.   nPage: this.numPages+1,
5.   bRename:true,
6.   bOverlay:false
7.   });
8. //move to the next page after spawning a new page
9. this.pageNum++;
10. //delete unnecessary buttons from the previous page
11. this.removeField("P" + oPage + ".newPage.signaturePrompt");
12. this.removeField("P" + oPage + ".newPage.newPage");
Exit the JavaScript Editor and the Button Properties window.
Save the file.
The lines of code that relate to spawning a page from a template are lines 2 through 7. Other lines of code do some other things we'll explain after we cover spawning pages. In line 2 we set the variable a to the page template name. This is the name we used in the Page Templates dialog box when we created the template. Line 2 uses the spawn object and we're using the template assigned to variable a. In line 4 we tell Acrobat where the new page will be added to the document. We get the current page number, and +1 means that the new page will follow the current page. In line 5 we tell Acrobat to rename the fields when a page is spawned. The bRename flag can be true or false. In line 6 we tell Acrobat to create a new page as opposed to overlaying the spawned page on top of another page. The bOverlay flag also accepts either true or false.
In line 1 we assign the current page number to the variable oPage so we can use the value in lines 11 through 13. Because the oPage value is the previous page number, what we delete from the form will be deleted from that page. These last two lines of code delete the Ready to Sign and the New Page buttons from the previous page. Because these buttons are part of the template and are added to the new spawned page, we no longer need them on other pages.
When you create new pages from templates, be sure to place the new page in view. When a form recipient clicks a button to spawn a new page, most likely the form recipient wants to interact with the new page. Line 9 in the script takes care of this. Using the code in line 9 advances the page view to the next page.
In the preceding series of steps we talked about spawning pages from templates to append pages to a form. You also can spawn pages from templates and have the data added to page as an overlay by setting the bOverlay flag to true. In a number of circumstances you might want to overlay data on an existing page. You may have a form where you want to add a watermark via a button action, add fields based on conditions, or add a temporary work series of fields to a page for calculating additional results.
In Figure 19.10 we added a calculator tape to the globalAttorneySpawnRaw.pdf form we've used in this chapter for earlier steps. The idea behind this addition to the page is that if an attorney fills in the form the total amount is recorded for all personnel billing time but there's no way to break down the billing for additional personnel performing work on the case. If an attorney wants to check the amount billed by a given individual, a calculator tape is added to the form and the attorney can discuss the amount that a colleague billed for a given time period.
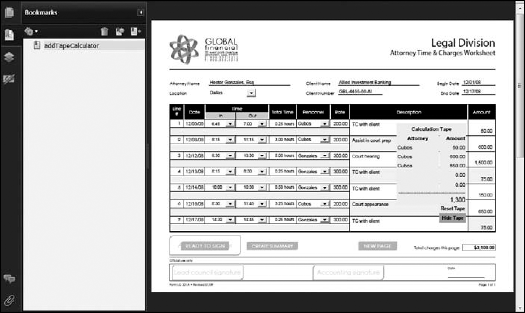
Figure 19.10. A form using a spawn page from template action where the data are overlaid on an existing page.
Note
The JavaScript to perform the calculations in the tape are extensive with several functions added to the document. You can view the scripts added to the form by opening the globalAttorneySpawnCalcTape.pdf file from the Chapter19 folder on the book's CD-ROM.
We won't go into all the scripts to create the fields added to the form to create the calculator tape. You can review the Document Level JavaScript functions and the template page where the calculation scripts are written. There are many on this form used to calculate a total, hide the tape from view, and show the tape.
The action we wrote to spawn a page from a template was written on a bookmark action. Rather than adding buttons to the form, we used a bookmark property. In the Bookmarks panel we created a bookmark and opened a context menu on the new bookmark and chose Properties. When the Bookmark Properties dialog box opened, we clicked the Actions tab and deleted the default action that was added when we created the bookmark. We then added a JavaScript action and typed the following code in the JavaScript Editor:
1. var a = this.getTemplate("5lineTape");
2. a. spawn ({
3.   nPage:this.pageNum,
4.   bRename:true,
5.   bOverlay:true,
6.   })
This script is very similar to the script used for spawning pages from templates when appending new pages. Notice in line 1 we used the name of another template. The only other difference is line 4 where we set the bOverlay flag to true. This line tells Acrobat to add the content from the template ("5lineTape") on the current page in view (line 3).
The Hide Tape button shown in Figure 19.10 hides the tape and all the buttons and shows an invisible button named Show Tape at the top of the page. After using the calculator tape, the form user can hide the tape to view the content behind the tape.
Sometimes you can't get away from paper forms. If you hold an event and want participants to fill out a form while in attendance, you may not be able to set up computer systems for them. Suppose you hold a class or a workshop and you want the attendees to fill in an evaluation form before the class or workshop adjourns. Typically you need to pass out paper forms and ask the attendees to fill in the forms by hand.
You can't circumvent some manual labor in accumulating data. You can type data in a spreadsheet or you can add data in PDF forms. Either method requires you or a staff of people to manually key in the responses.
Many forms have some open-ended questions for comments. If you hold an event and have a number of different speakers, you may want to accumulate the data and keep the forms handy in electronic form to review comments. If you add comments to a spreadsheet, the amount of time to record the data would be much more than recording responses from multiple-choice answers. In this regard, working with PDF forms may be the best solution because you can keep the responses in an electronic file without having to type the comments in a spreadsheet.
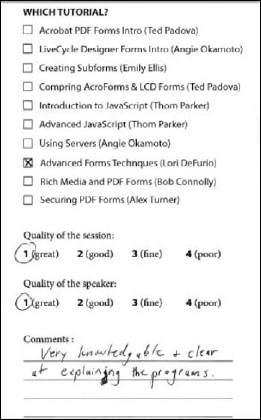
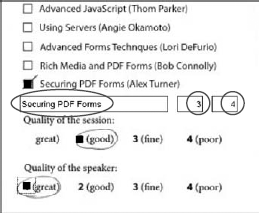
As an example, take a look at Figure 19.11. This form is designed for conference attendees to fill out after attending workshop sessions. The form provides choices for the session attended and responses to evaluate the quality of the session. At the bottom of the form is an area for the form user to add open-ended comments.
To convert the paper forms to PDF forms, begin by scanning them. You can use a low-cost scanner with a document feeder that scans directly to PDF such as the Fujitsu ScanSnap S510 (Windows) or 510 (Macintosh) scanner. If you have lots of forms, you can walk away from the scanner and let the document feeder do the work.
The sample form shown in Figure 19.11 won't work with Acrobat's auto field detection because the second set of questions require a form recipient to circle numbers. The form has no recognizable areas where fields can be auto detected in this area. Therefore you need to add fields to the forms. Once you have the forms scanned you have two options for adding data to the forms. You can add fields to a single file or to individual files. Each method has advantages and disadvantages.
If you scan forms into a single document and add form fields, populating the form is easier than when using individual forms because you don't have to open, save, and close multiple forms. The downside to using a single document is that when you export the data to a spreadsheet program, the data isn't as neatly organized as when you create a spreadsheet from multiple forms.
We'll take a look at using both methods. For the first method where we use a single PDF document from merged forms, do the following.
Note
For these steps we use the mergedFiles.pdf document and the template.pdf document in the Chapter19 folder inside the scannedForms folder on the book's CD-ROM.
STEPS: Populating Scanned Forms in a Single File with Fields
Assemble scanned forms in a single PDF file. In our example the mergedFiles.pdf document on the book's CD-ROM contains 12 pages of individually scanned forms.
Create a blank page for use as a page template. The easiest way to create a page template is to duplicate one of the pages in the document by opening the Pages panel and pressing Ctrl/Option while you drag to another area in the panel. The page is duplicated when you release the mouse button. To create a blank page, click the TouchUp Object tool and press Ctrl/
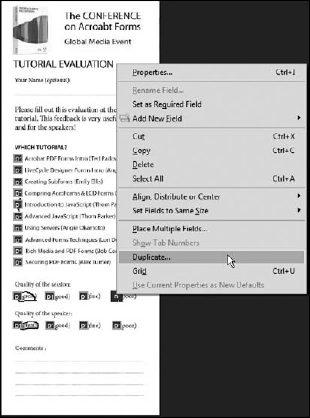
Populate the blank page with fields. You want the fields to be precisely located on the page template so that when spawned, the fields fall into place on the form. The easiest way to do it is to navigate to one of the form pages and create the fields. After the fields are created, select all fields and open a context menu. From the menu choices select Duplicate as shown in Figure 19.12. When the Duplicate Field dialog box opens, choose the page number where the blank page is found. Typically you'll find it best to add the blank page at the end of the document to keep track of the page order. In Figure 19.13 we duplicated the fields on the last page in the document.
Delete the fields on the form page. After duplicating the fields, delete the original fields you added to one of the form pages.
Add a button with a JavaScript to spawn pages from a template to the template page. If you'll use the same form for many events, you can set up the template page with a button containing the JavaScript and add only the template page and button to additional scanned forms. On a button action, write the following script:
1. var a = this.getTemplate("template");
2. for (var i=0; i < this.numPages; i++)
3.   a.spawn({
4.   nPage:i,
5.   bRename:true,
6.   bOverlay:true,
7.   });
8. this.removeField("spawnPage");
Extract the page. If you intend to use the template on other forms, show the template in the Document pane and choose Document
Cut and paste the button. For the document at hand, we'll cut the button from the template page and paste it on the first page in the document. This way, when we hide the template we have access to the button and JavaScript.
Create a page template. Open the blank page and choose Advanced
Click the button on the first page. The fields are added to all pages in the document.

The JavaScript used in these steps is very similar to the scripts we've used for spawning pages from templates in other exercises. We added a loop in this script in line 2 to loop through the total number of pages (this.numPages). We turned the bRename and bOverlay flags on (true) to rename fields and overlay the fields on each page. The button we created we named spawnPage. In line 8 we remove the button field from the file.
Next, go through each page and click the check boxes to match the marks on the scanned forms. After checking all the fields choose Forms
You need to get the files back to single page forms for a better export to a spreadsheet. To do so, you can split the file as we describe later in the section "Splitting files."
Adding fields to a single form is much more work than you'll want to do to analyze data for an event. You have a few options if you need to add fields individually to single forms. You can paste the script to create the fields in the JavaScript Console and run the script when you open each form. This is a bit time consuming and not the best way to handle adding fields to individual forms
The other option you have is to create a batch sequence and run the sequence on a folder of forms. A batch sequence is not limited to running the sequence on multiple forms however. Rather than creating page templates and messing around with button fields, you can use a batch sequence on a single document that has merged forms.
We'll address creating a batch sequence in the next section of this chapter. For now, let's take a look at the JavaScript needed to populate the same form we used in the last exercise.
Note
The 1.pdf file you can find in the scannedForms folder that's inside the Chapter19 folder on the book's CD-ROM contains a field with the JavaScript used to add fields to the example forms also in the same folder. The example forms are named 1.pdf through 12.pdf.
The script we used to add fields to the individual sample forms was written as follows:
1. // add the check box fields for the workshop attended
2. var f = this.addField("workshop","checkbox",0, [25, 486, 36, 497]);
3.   this.addField("workshop","checkbox",0, [25, 463, 36, 474]);
4.   this.addField("workshop","checkbox",0, [25, 441, 36, 452]);
5.   this.addField("workshop","checkbox",0, [25, 419, 36, 430]);
6.   this.addField("workshop","checkbox",0, [25, 397, 36, 408]);
7.   this.addField("workshop","checkbox",0, [25, 375, 36, 386]);
8.   this.addField("workshop","checkbox",0, [25, 353, 36, 363]);
9.   this.addField("workshop","checkbox",0, [25, 331, 36, 341]);
10.  this.addField("workshop","checkbox",0, [25, 309, 36, 319]);
11.  this.addField("workshop","checkbox",0, [25, 287, 36, 298]);
12.    f.style = style.sq;
13.    f.textSize = 18;
14.    f.strokeColor = color.black;
15.
16. // add the check box fields for Quality of Session
17. var g = this.addField("session","checkbox",0, [25, 223, 36, 233]);
18.   this.addField("session","checkbox",0, [87, 223, 97, 233]);
19.   this.addField("session","checkbox",0, [152, 223, 163, 233]);
20.   this.addField("session","checkbox",0, [214, 223, 224, 233]);
21.   this.addField("speaker","checkbox",0, [25, 166, 36, 177]);
22.     g.strokeColor = color.black;
23.     g.style = style.sq;
24.     g.textSize = 18;
25.
26. //add the checkbox fields for the Quality of speaker
27. var j = this.addField("speaker","checkbox",0, [87, 166, 97, 177]);
28.   this.addField("speaker","checkbox",0, [152, 166, 163, 177]);
29.   this.addField("speaker","checkbox",0, [214, 166, 224, 177]);
30.     j.style = style.sq;
31.     j.textSize = 18;
32.     j.strokeColor = color.black;
33.
34. // now give each check box field an export value
35. f.exportValues = ["introAcro", "introLCD", "subforms", "acro_LCD",
    "JS_Intro", "JS_Adv", "servers", "advTech", "richMedia",
                "security"];
36. g.exportValues = ["4", "3", "2", "1"]; 37. j.exportValues = ["4", "3", "2", "1"];
We start this script by using the addField object to add the ten check box fields under the Which Tutorial? heading shown in Figure 19.14. We needed to get all the coordinates for the check box fields individually by drawing comment rectangles and using the script we discussed earlier in this chapter in the section "Using the addField object."
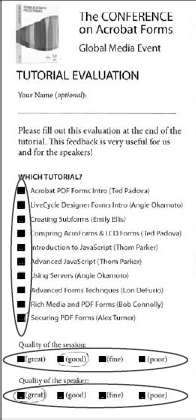
Figure 19.14. The first set of fields added in the script are the ten check box fields in the Which Tutorial? heading.
In line 12 we set the check box style to a square and in line 13 we set the text size for the check box mark to 18 points. The larger size check box style hides the mark on the paper form to make the choice stand out a bit more. We then added a stroke to the check box fields in line 14.
In lines 16 through 24 we added similar lines of code to create the first four check boxes in the Quality of session section, and lines 26 through 32 add the check boxes for the second row of four check box fields.
In lines 35 through 37 we set the export values for each of the check box fields. All the check boxes in the three respective groups are mutually exclusive fields.
To execute the JavaScript action either via buttons or from the JavaScript Console is not the best way to handle it. A better option is to use this script in a batch sequence.
The script described in the last section can be added to a batch sequence and run on a folder of files. As a batch sequence, the code is available to you at any time in Acrobat once you add it as a new sequence. This eliminates a need for saving template files with code to run on the same forms collected at different times.
To create a batch sequence to add fields to multiple forms, do the following.
Note
For these steps we use the button script you find on the 1.pdf form in the scannedForms folder inside the Chapter19 folder on the book's CD-ROM. When we run the batch sequence we use the 1.pdf though the 12.pdf forms also found in the same folder on the book's CD-ROM.
STEPS: Creating a Batch Sequence for Adding Fields to Multiple Forms
Open the 1.pdf file. We'll copy the JavaScript to create the fields for the forms in the scannedForms folder on the book's CD-ROM.
Open the addFields button and open the Actions tab in the Button Properties window.
Copy the JavaScript. Click Run a JavaScript and click Edit in the Actions tab to open the JavaScript Editor. Select all the text and press Ctrl/
Close the 1.pdf form.
Choose Advanced
Document ProcessingBatch Processing.Type a name for a new sequence. Click the New Sequence button and the Name Sequence dialog box opens. Type a name for the sequence. In our example we use addField for the sequence name. Click OK and the Edit Batch Sequence (– addField) dialog box opens as shown in Figure 19.15.
Select Commands. Click the Select Commands button in the Edit Batch Sequence dialog box. The Edit Sequence dialog box opens. Scroll the list until you see JavaScript and below JavaScript you find Execute JavaScript shown in the left panel. Click Execute JavaScript and click Add to move Execute JavaScript to the right panel as you see in Figure 19.16.
Add a JavaScript. Double-click the Execute JavaScript text in the right panel to open the JavaScript Editor.
Paste the text copied in Step 3. Press Ctrl/
Click OK in the Edit Sequence dialog box. You return to the Edit batch Sequence dialog box shown earlier in Figure 19.15.
Set the Output options. Chose Ask when Sequence is Run from the two drop-down menus in the Edit Batch Sequence dialog box. Click Output Options to open the Output Options dialog box. Here you can make selections for naming conventions and choose to overwrite files or not. Make your choices and click OK.
Click OK in the Edit Batch Sequence dialog box. Your new sequence is shown in the Batch Sequences dialog box as shown in Figure 19.17.
Run the Sequence. Click Run Sequence in the Batch Sequences dialog box. Make choices for the files to include in the sequence and target location for the saved files.
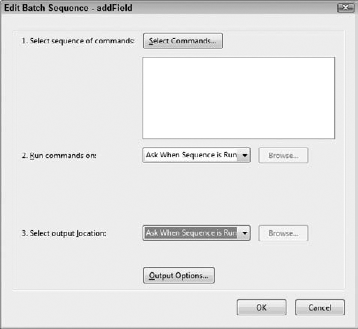
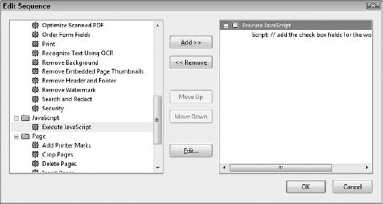

Figure 19.17. Click OK in the Edit Batch Sequence dialog box and you return to the Batch Sequences dialog box.
The main disadvantage you have with using scanned forms is that you have no way to use the scanned form and create a dataset file. When you create the dataset file from a form you have to use the form that you used to create the dataset file to populate the other forms. You can't edit the form after a dataset file has been created because the form has been enabled with Adobe Reader usage rights. Therefore you can't use a PDF Portfolio to aggregate the data the same as when distributing forms.
Note
For more information on creating datasets and aggregating data, see Chapter 14.
If you followed steps in the last section, you have a file that has all the fields needed to fill in the form. If you add all the data or you use the same method we described in the section "Using scanned forms in a single file" you end up with all the data added in a single document. As we explained earlier, getting data to a spreadsheet from a single file isn't as attractive as exporting data from multiple files.
You can create single files from the merged forms after adding data to each form using the Split Document command. After filling in the data on the file, choose Document
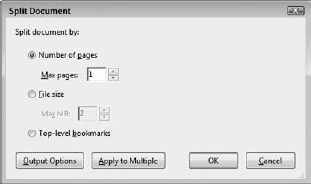
Enter 1 for the maximum number of pages. You have some attributes you can control that are found by clicking Output Options. In the Output Options dialog box make choices for file naming and overwriting switches. Click OK in the Output Options and OK again in the Split Document dialog box and the file is split into separate PDF files.
When you have separate files you can use the Merge Data into Spreadsheet command to add the data to a spreadsheet. The data arrangement is much more manageable than when sending data to a spreadsheet from a merged file.
Another function available to Acrobat only users is the ability to export data to other forms. If you turn back to Figure 19.1 and revisit the globalAttorneySpawnRaw.pdf file we used in several exercises in this chapter, you see the first page in a document populated with data. This form is intended for the form user to create individual pages for calculating time and billing for each client on separate pages. This provides the form user the opportunity to extract a given page and send it to a client to summarize a given month's billing information. Rather than mixing up clients on the same page, each page is used for a single client.
If the form user wants to summarize an entire month showing total billing hours and amounts charged to a client, a summary on the original form isn't practical. Because we want the flexibility to send billing information for a given client, we don't want to mix other data on a client's page. The best solution is to create a separate PDF file that holds summarized information for total billing hours and charges for all clients in a given billing period. We can create a summary form and send the data from the original billing form to calculate summary data for the billing period as you can see in Figure 19.19.
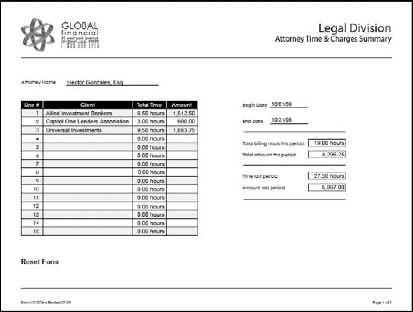
Because an attorney may have several cases in a given month, each individual client page can be reopened after once spawning a page from a template and additional data can be added to the page. The button at the bottom of the original billing form sends the summary data to the summary form at precisely the same location to update the totals. If additional data are later added to the billing form, the summary page can be updated to reflect additional billing by overwriting the same line on the summary form.
The original billing form provides for identifying various individuals participating on a case. We could break out individual billing for the attorney, but we'll keep it simple so you can copy and paste a less complicated routine.
We set up a summary form with a table of fields with columns for the client name, the total billing time. and the total charges as shown in Figure 19.20. The data are derived from the original billing form as well as the data for the attorney name, begin date, and end date for the billing period. The total billing hours for the period and the total amount for the period are calculated fields on the summary form. The fields for containing data from the last period are open entry fields for user-supplied data.
Note
You can examine the globalAttorneySummary.pdf file found in the Chapter19 folder on the book's CD-ROM. We also use the globalAttorneySpawnPopulated.pdf form from the book's CD-ROM to send data to the summary form.
After we created the summary form, we added one document level JavaScript to the form. In the JavaScript functions dialog box we added the following script:
this.disclosed = true;
This one line of code is necessary to open the form from a JavaScript action used on the original form.
Another important issue is the location of the forms. Both the original billing form and the summary form need to be contained in the same folder. If the files are in different folders you'll get an error message and Acrobat won't be able to populate the summary form with data from the billing form.
On the original billing form we added a Calculate button to the form on the page template. When new pages are spawned from a template, the Calculate button is added to each page. This makes it easy to script the routine to send data from the current page to the summary form.
Note
The globalAttorneySpawnPopulated.pdf file in the Chapter19 folder on the book's CD-ROM is a file with data used to populate the summary form. The Calculate Summary button contains the JavaScript to send data to the summary form.
You may recall from the earlier exercise in the section "Appending pages to a document" that we removed the buttons on the previous page for spawning new pages. We also removed the button we used when the form user is ready to sign and submit the form. We don't want these two buttons on any page but the last page in the document. In regard to the Calculate button we assign properties to hide the field when printed. It's used on each page in the form to update the summary form, but we don't need to display it when a form is printed.
To populate the summary form with data from a given page on the billing form we used the following JavaScript on the Calculate button:
1. this.slave = app.openDoc("globalAttorneySummary.pdf",this);
2. this.bringToFront();
3. var oPage = this.pageNum;
4.
5. // send attorney name to slave
6. var oAttorney = this.getField("P0.newPage.attorneyName");
7. var sAttorney = this.slave.getField("attorney");
8. sAttorney.value = oAttorney.value;
9.
10. // send the client name to the slave
11. var oClient = this.getField("P" + oPage + ".newPage.clientName");
12. var sClient = this.slave.getField("client." + oPage);
13. sClient.value = oClient.value;
14.
15. // send amount to slave
16. var oAmount = this.getField("P" + oPage + ".newPage.totalAmount");
17. var sAmount = this.slave.getField("sumTotal." + oPage);
18. sAmount.value = oAmount.value;
19.
20. // calculate total time & send to slave
21. var oTime = this.getField("P" + oPage + ".newPage.totalTime");
22. var a = oTime.getArray();
23. var sum = 0;
24. for (i =0; i < a.length; i++)
25. sum += a[i].value;
26. var sTime = this.slave.getField("tt." + oPage);
27. sTime.value = sum;
28.
29. // send begin date to slave
30. var oBegin = this.getField ("P0.newPage.beginDate");
31. var sBegin = this.slave.getField("beginDateResult");
32. sBegin.value = oBegin.value;
33.
34. // send end date to slave
35. var oEnd = this.getField ("P0.newPage.endDate");
36. var sEnd = this.slave.getField("endDateResult");
37. sEnd.value = oEnd.value;Although this script is a bit long, it's broken up into very short routines. Beginning in line 1 we set a variable slave to the openDoc() object that's used to open our summary data file. In our example the file is globalAttorneySummary.pdf. In line 2 we bring the target file to the front of the Document pane where it stays as data are added to the form. In line 3 we get the current page number. As the button is duplicated across pages, the oPage value is always the page number of the current page.
In lines 5 through 13 we send the attorney name and the client name to the target file. Notice we get the current attorney name on page 1 ("P0.newPage.attorneyName") only. Each page that is spawned from the template uses the attorney name from the first page so the form user doesn't have to retype a constant value. We use the same treatment in lines 29 through line 37 for the begin date and the end date. These three values are constant so we don't need to loop through fields picking up the same name. In line 7 we get the attorney field name on the summary form. Notice how the variable slave is used in this line of code. In line 8 we simply say that the target value is equal to the current value from the billing form.
Beginning in line 20 we need to do a little calculation to sum the total time. The billing form has no field that sums the time in a separate field, so we leave that task to the button action. We set up an array to calculate the total time for the current page only a[i].value. In line 26, as we do for all the data sent to the summary form, we get the target field "tt." + oPage. This means that we use the current page number that is the oPage value and use that value for the child name in the target field. For example, if we're on page 1, the tt value is tt.0. Because there is only one target field named tt.0, the data from the zero page is sent to that field. When we move to page 2 in the billing form we send the time data to tt.1 and so on. All the summary data fields on the billing form use the current page number, and the target form table fields have child values matching the page numbers up to 15 pages.
Let's again roll back to an earlier section in this chapter and revisit the section "Working with scanned forms." We can create a summary form for the scanned forms assembled in a single PDF document after populating fields spawned from a template page. Of course, this only makes sense if you work routinely with a similar form where you need to scan the form and add data using Acrobat. The process is complex, but once you've set up the JavaScripts it's a simple matter of copying and pasting the scripts to new scanned forms assembled in a single PDF document.
Earlier in Figure 19.12 we looked at creating fields on a template page and spawning the template using the bOverlay flag to create form fields on pages created from scanned paper forms. If you want to create a summary form where data are sent from the original scanned forms to a summary document we need to add several new scripts to the form.
Note
In this section we use three files to follow the detailed explanation of what we need to add to the forms. Look in the Chapter19 folder on the book's CD-ROM and find the workshopForms.pdf file. This file has additional JavaScripts to send data to a summary file. The workshopFormsPopulated.pdf is the same form after we spawned pages from a template and filled in the form fields. The workshopSummary.pdf form is the target file where we'll send the data from the populated form.
The first step in setting up the original forms document is add a few new fields on the template page and modify the script in the check box fields. In Figure 19.21 you can see one page of the form we used in Figure 19.12. On this form we added a few text fields. One text field holds the value of the workshop session full name. In our earlier script we used abbreviated names for the workshop names as export values in the check box fields where the form user checks the workshop attended. The first new field added to the form holds the full workshop name. Adjacent to the workshop name are two more text fields. These two fields hold the export value for the Quality of the session and the Quality of the speaker export values.
For the workshop field we added it on the template page and then edited each check box script on the template page. The code we used for the first check box is as follows:
1. var oPage = this.pageNum;
2.
3. var f = this.getField("P" + oPage + ".template.tutorialName");
4. f.value = "Introduction to Acrobat";
We simply get the workshop field (line 3) and add the full workshop name to the field (line 4). For each check box we changed the name in line 4. If you reuse a similar form for a variety of different classes or workshops, you have to edit the check box fields on the template page if you change workshop names when holding new conferences.
The two text fields that hold the values of the check box fields use a JavaScript Function to calculate the values of the export values of the session and speaker assessments. For the Quality of the session fields we added the following JavaScript at the Document Level:
1. function doSession()
2. {
3.   var aNameParts = event.targetName.split(".");
4.   var cPage = aNameParts.shift();
5.
6. // Test for valid Page. i.e. Skip calculation from raw template
7. if(/⁁Pd+/.test(cPage))
8.   {
9.   // Get the ID of the Session
10.     var oSesIDFld = this.getField(cPage + ".template.tutorial");
11.  // Get the score for the Session
12.     var oSesScoreFld = this.getField(cPage +
        ".template.qualitySession");
13.
14. // Only do calculation if session ID and Score are set
15.
16. if(!isNaN(oSesScoreFld.value) && !isNaN(oSesIDFld.value))
17. { // Write evaluation score to field on individual
evaluation sheet
18. event.value = oSesScoreFld.value;
19. }
20. else
21. event.value = "";
22. }
23. }In this script we split the name parts so we don't need to use the ("P" + oPage + ".templateName.fieldname") convention we used in many other scripts in this chapter. We split the name and use line 7 to identify the different field names. The /⁁Pd+/ part of the line of code takes the P + the page number. If the page numbers were fewer than ten we would use /⁁Pd/ without the + in the code. Adding the + means we have more than nine potential fields to calculate. cPage takes care of everything else and we use it in the remaining code.
In line 10 we get the tutorial name. If the name is not checked, then the calculation is not performed (line 16). If it is checked, the value we assign to the variable oSessScroreFld becomes the event.value for this field.
We added doSession(); (the function name you find in line 1) as a custom calculation script in the Calculate tab in the Text Field Properties window for the session score field. We then copied this script and pasted into a new function we called doSpeaker(); and just changed the oSess items to oSpkr. In line 12 we retrieved the speaker check box fields. Then we added the function to the text field where we calculate the speaker values.
These two functions place the export value of 4, 3, 2, or 1 in the respective fields. This made it easier to sum the total values and average the data per speaker when we send the data to the summary form.
To make this form easy to reuse, you would add the fields and functions to a blank page and save the file as a template. When you scan new forms, use the File
On the workshopForms.pdf file you find two buttons. One button is used to spawn pages from the template. The code for this button is identical to the code we used in the section "Working with scanned forms."
The second button contains the script used to perform several calculations. We need to sum the quality of the session and the quality of the speaker fields and calculate the average for the values. We then need to send the workshop name and the average values to the summary form. This script is very complicated so we'll break it down into several subroutines.
On the Send data to summary form button, we added the following script:
1. //export data to summary form
2. // loop through tutorial name and send to slave doc
3. // First we have to collect all the data for each session
4. var aSesNames = [];
5. var aSesScores = [];
6. var aSpkrScores = [];
7.
8. for(var i=0;i<this.numPages;i++)
9. {
10. // Setup Session Names
11.   var oSesIDFld = this.getField("P" + i + ".template.tutorial");
12.   var oSesNameFld = this.getField("P" + i +
         ".template.tutorialName");
13.   if(!isNaN(oSesIDFld.value))
14.   {
15.     aSesNames[oSesIDFld.value] = oSesNameFld.value;
16.     var oSesScoreFld = this.getField("P" + i +
           ".template.sessionTotal");
17.     if(aSesScores[oSesIDFld.value] == null)
18.       aSesScores[oSesIDFld.value] = {Count:1,
             Total:oSesScoreFld.value};
19.     else
20.     {
21.       aSesScores[oSesIDFld.value].Count++;
22.       aSesScores[oSesIDFld.value]. Total += oSesScoreFld.value;
23.     }
24.
In lines 4 to 6 we set up variable names for the session name, the quality of the session, and the quality of the speaker fields. In line 8 we loop through all pages in the document. In lines 11 and 12 we get the workshop name check box (tutorial name) and the workshop name field and set them to the variables shown in these lines of code. In line 13 we check to see if the value for the check box is zero. If it is not we proceed with the calculations. In lines 15 through line 22 we count the instances of each workshop identical name.
25.    var oSpkrScoreFld = this.getField("P" + i +
          ".template.speakerTotal");
26.    if(aSpkrScores[oSesIDFld.value] == null)
27.      aSpkrScores[oSesIDFld.value] = {Count:1,
            Total:oSpkrScoreFld.value};
28.    else
29.    {
30.      aSpkrScores[oSesIDFld.value].Count++;
31.      aSpkrScores[oSesIDFld.value].Total += oSpkrScoreFld.value;
32. } 33. } 34. }
The preceding routine counts the number of instances per workshop for the session values and the speaker values.
35. // Now it's time to loop through these and calculate the averages
36. for(var i=0;i<aSesScores.length;i++)
37. {
38.   if(aSesScores[i] != null)
39.   aSesScores[i].average = aSesScores[i].Total/aSesScores[i].Count;
40. }
41.
42. for(var i=0;i<aSpkrScores.length;i++)
43. {
44.   if(aSpkrScores[i] != null)
45.   aSpkrScores[i].average =
         aSpkrScores[i].Total/aSpkrScores[i].Count;
46. }
The preceding routine then calculates the averages for each session quality and each speaker quality.
47. // Now Open up the summary document and enter the data
48. this.slave = app.openDoc("workshopSummary.pdf",this);
49.
50. var dstFld;
51. var dstID = 0;
52. var len = Math.max(aSesScores.length,aSpkrScores.length);
53. for(var i=0;i<len;i++)
54. {
55.   if(aSesNames[i] != null)
56.   {
57.     dstFld = this.slave.getField("workshop." + dstID);
58.     dstFld.value = aSesNames[i];
59.
60.     if(aSesScores[i] != null)
61.     {
62.       dstFld = this.slave.getField("qualitySession." + dstID);
63.       dstFld.value = aSesScores[i].average;
64.     }
65.
66.    if(aSpkrScores[i] != null)
67.    {
68.      dstFld = this.slave.getField("qualitySpeaker." + dstID);
69.      dstFld.value = aSpkrScores[i].average;
70.    }
71.
72.    dstID++;
73.    }
74. } 75. 76. this.slave.bringToFront();
The last part of the script takes the values calculated for the workshop names, the session quality averages, and the speaker quality averages and sends the data to the summary form shown in Figure 19.22. The last line of code brings the slave document to the front of the Document pane.

Remember from our earlier calculation for the attorney summary form in the section "Setting up summary forms" we need to add a Document Level JavaScript to the summary form. Again, the code is:
this.disclosed = true;
The summary form shown in Figure 19.22 shows data collected from six workshop evaluations. Additional lines are available for calculating summaries for up to ten workshops. But notice that you don't have to calculate data for the maximum. Nothing is added to the summary form when there are fewer than ten workshop evaluations to calculate.
To make the form more functional for repeated events, the Speaker and Speaker email columns are not added to the JavaScript when populating the form. Because speakers may change along with the e-mail addresses, these fields are open and available for the form user to type in the data. Because we need only up to ten entries for each column, there's no reason to edit the code each time you want to calculate a summary.
The bottom half of the form is for evaluations by the event's producers. This table contains fields for subjective information; therefore no additions were made when the data were exported from the forms file. The speaker column on the bottom of the form gets the same values from the speaker column on the top of the form. The overall rating is a calculation of the average of the session and speaker values. The remaining fields are open-ended for the form user to fill in. The calculation we used for the Overall Rating fields was as follows:
1. var f = this.getField("qualitySession.0");
2. var g = this.getField("qualitySpeaker.0");
3. if (f.value !=0)
4.   event.value = (f.value + g.value)/2;
5. else
6.   event.value = "";
We've used a similar script many times in this chapter and Chapter 18. For each of the ten fields in the Overall Rating column we changed the child name to reflect the names for the respective fields in the top table. In line 4 we average the session quality and speaker quality values.
Obviously going through all the steps to create a summary report is not advantageous if you have only one event where you want to calculate similar data. This approach makes more sense when you have a series of events and want to use the same scripts for repeated evaluations.
To make the procedure easy, all you need to do is to add the template file and assemble the forms as we described in the previous section. You need to add the two button fields to a new form. One button spawns the fields from the template and the other button creates the summary file.
The only edit you need to make in the JavaScript is to make changes on the template for the check box export values and check box JavaScripts if the workshop titles change. The JavaScript for these fields is only three lines of code with the workshop name appearing in the fourth line of code. Just make these changes and you can use the same form repeatedly for many events.
If you have to add more evaluation questions, you'll have to edit the JavaScripts in more depth. This requires carefully reviewing the routines and making edits to assign variables, calculate results, and send the data to the summary form.
Hundreds of plug-ins are available for Acrobat that can help you with various editing jobs. A limited number of them are helpful with JavaScripting. You can find a few great tools for creating dialog boxes and custom buttons at WindJack Solutions (http://windjack.com). These plug-ins write the JavaScript for you from selections you make in dialog boxes. You also can find a number of tools at www.pdfscripting.com that are ready made to help you with various forms editing tasks all based on JavaScript.
In addition to purchasing third-party developer tools you can customize your Acrobat workspace by adding buttons and menu commands that are helpful when creating forms. Adding buttons for tools in Acrobat is a bit more complex, but adding menu commands is a relatively easy task you can do, and you can easily copy/paste scripts that add new commands to any menu you want.
Menu items are added with the addMenuItem object in JavaScript. You can easily view menu names in the JavaScript Console by typing the following code in the JavaScript Console and pressing the Num Pad Enter key or Ctrl + Enter for laptop computers:
app.listMenuItems();
After you press the Num Pad/Ctrl Enter key, a list of menu names is reported in the JavaScript Console. You can add new menu commands to the parent menu names and the submenu names you see reported back in the JavaScript Console.
We find a couple of commands particularly helpful and use them regularly when designing forms in Acrobat. These include:
Total Fields: Counting the total fields on a form is helpful especially if there's a chance that fields are placed on top of other fields. If you expect your form to contain 50 fields and you have 65 fields on a form, you can use a simple script to calculate the total number of fields on a form open in the Document pane.
Total Templates: You can easily find the total templates with the Advanced
List Field Names: You can easily view field names in the Fields panel when in Form Editing Mode, but this requires you to toggle views between Form Editing Mode and normal Viewer Mode. If working in the JavaScript Console and adding scripts to fields, you can stay in Viewer mode and easily view field names in the JavaScript Console while editing scripts.
Get Annots Coordinates: In Chapter 18 we talked about adding comments via JavaScript and in this chapter we covered adding fields using JavaScript. In both cases we need to find the coordinates for where the annotations and/or the fields are added to a form. With a simple menu command, you can easily view coordinates in the JavaScript Console.
Note
You can copy the file tools.js found in the Chapter19 folder inside the placeJS_Folder on the book's CD-ROM to your Acrobat JavaScript folder. For the directory path, see the end of this section.
Here's the code you'll find in the tools.js text file:
1. // add the functions
2. function totalFields(){
3. app.alert("Total Fields: " + this.numFields);
4. }
5.
6. function totalTemplates(){
7. app.alert("Total Page Templates: " + this.numTemplates);
8. }
9.
10. function fldNames(){
11. for(var i=0; i<this.numFields; i++)
12. {
13. var fName = this.getNthFieldName(i);
14. var f = this.getField(fName);
15. console.println("Name: " + f.name + ", Value: " + f.value);
16. }
17. }
18.
19. function getCoordinates(){
21. console.println(this.getAnnots()[0].rect);
22. }
23.
24. // add the menu items
25. app.addMenuItem ({cName: "Number of Fields",
26. cParent: "Tools", cExec: "totalFields()"
27. });
28.
29. app.addMenuItem ({cName: "Number of Page Templates",
30. cParent: "Tools", cExec: "totalTemplates()"
31. });
32.
33. app.addMenuItem ({cName: "Get Field Names",
34. cParent: "Tools", cExec: "fldNames()"
35. });
36.
37. app.addMenuItem ({cName: "Get Annotation Coordinates",
38. cParent: "Tools", cExec: "getCoordinates()"
39. });In lines 2 through 22 we set up the functions for four menu commands. The names listed in each function should be self-descriptive. In lines 24 through 39 we add the menu items for the four functions. The cParent item tells Acrobat in what menu to place the new commands. The cExec item executes the function from the list in lines 2 through 22.
We could add menu items in a submenu using the app.addSubMenu item, but the Tools menu is such a short menu, adding only four items keeps the menu short and makes the commands easily accessible.
When you save the file, you must use a .js extension for the filename. Again, we reiterate that you need to use a text editor. Do not use a word processor to write the code. Doing so places unwanted characters in the text file and the script won't work properly.
After saving the file you need to copy the file to your Acrobat JavaScripts folder. On Windows the directory path is: C:/Program Files/Adobe/Acrobat 9.0/Acrobat/Javascripts.
On the Macintosh you need to copy the script to the Acrobat JavaScript folder inside your application package. If you use the Acrobat User Data folder inside the log-on Library folder the script won't be loaded by Acrobat. On Macintosh, do the following.
STEPS: Adding a Folder Level JavaScript on the Macintosh
Open the Applications folder. Open the Macintosh HD or whatever name you use for your hard drive name.
Open the Applications folder.
Open the Adobe Acrobat 9 Pro folder.
Show the application package contents. Control + click on the Adobe Acrobat Pro file name to open a context menu. From the menu commands, choose Show Package Contents. You'll then see a folder named Contents.
Copy the file to the JavaScripts folder. Inside the MacOS folder you'll find the JavaScripts folder. Copy the file to this folder.
Once you copy the file to the Javascripts (Windows) or JavaScripts (Macintosh) folder, quit Acrobat if the program is open. Relaunch the program and wait a few moments. The JavaScript may take a moment to load in Acrobat. Click the Tools menu and you should see the new menu commands added to the menu as shown in Figure 19.23.
Each of the four menu items in Figure 19.23 requires you to have a file open in the Document pane to report the findings of each function. For the Get Field Names and Get Annotation Coordinates menu commands you need to open the JavaScript Console (Ctrl/
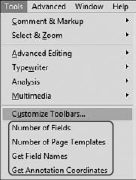
Another menu item you'll find helpful is adding a URL or several URLs as commands. If you frequently want to search the Internet for forms information or JavaScript, you can stay in Acrobat and launch a URL from a menu command.
We follow the same process as described in the previous section for writing the JavaScript and copying the .js file to the JavaScripts folder. The following script is added to the Help menu, and when selected, launches the URL specified in line 4 in your default Web browser.
Note
In the Chapter19 folder inside the place_JS folder you'll find the helpMenu.js file. Copy this file to your Acrobat JavaScripts folder to see the menu command appear in the Help menu.
1. app.addMenuItem({
2.   cName: "JavaScript Development Center",
3.   cParent: "Help",
4.   cExec: "app.launchURL('http://www.adobe.com/devnet/
        acrobat/javascript.html'),",
5.   nPos: 16
6. });
In line 5 you see nPos: 16. This line of code specifies the placement of the menu command in the Help menu. After copying the file to your Acrobat JavaScripts folder and launching Acrobat the menu command appears as shown in Figure 19.24.
Tip
If you want a custom menu command to appear in the first position on a menu use nPos: 0.
This script opens a Web page on Adobe's Web site (see Figure 19.25) where you can find information on JavaScript and download the most recent version of the JavaScript for Acrobat API Reference document. Typically the latest version of the document is released some time after a new Acrobat version release. Check this site frequently after you upgrade Acrobat and download the latest document when it becomes available.
You can use JavaScript to add and delete fields on a form. Adding fields requires using Acrobat or Adobe Reader when forms are enabled with Adobe Reader usage rights.
You can append new pages to a document from page templates only in Acrobat.
You can spawn new pages to overlay data on existing pages using JavaScript.
You can write JavaScripts and add the scripts to a Batch Sequence to add fields to a folder of forms. This is particularly helpful when using scanned paper forms.
Using JavaScript you can add data from one form to a secondary form.
You can use JavaScript to add custom menu commands to Acrobat.