
Businesses have procedures in place that use a variety of software programs to help them achieve their business goals. Every organization has its own customized implementation of the hardware and software needed to reach those goals. The inherent problem with most systems is that the products from different vendors don't integrate well with one another. Usually this translates into additional data entry work for employees or some migration work for information services.
What if we could collect the necessary information from an employee or customer one time and have it populate each of those appropriate products as needed? What if we could rout that information to the next person in the chain of command for approval, if necessary, without the need for us to fill out additional forms or computer screens? This is exactly the type of thing that LiveCycle ES can do.
Perhaps you have only heard of LiveCycle ES, and wondered what people were talking about. You may even work with a component of LiveCycle ES but wondered what else it could do. If you are asking yourself, "What is LiveCycle ES?" that is the question we hope to answer in this chapter.
This chapter is not intended to teach you how to work with the components in LiveCycle Enterprise Suite (ES). Several books this size would be needed to cover all of the solution components available. We are going to introduce the LiveCycle Enterprise Suite and explore its capabilities.
Global Finance is the company we have utilized for most of our form designs throughout this book. We continue to explore their business needs here in the LiveCycle ES chapter as well. We built many forms for Global Finance in the preceding chapters, one of which was a Purchase Order form that dynamically adjusts with buttons to add and remove rows of data.
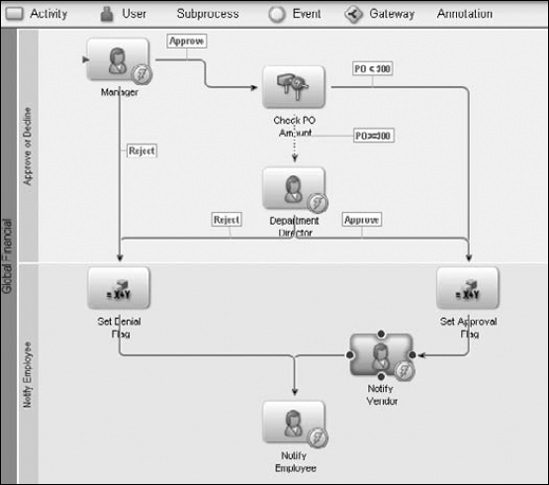
Global Finance requires that all purchase orders be submitted to the employee's manager for approval. If the amount of the purchase order is less than $500 the manager's approval is sufficient for accounting to process the request. If the purchase order amount is more than $500 then the director of the department is required to review the PO before sending it to accounting for processing. Accounting then assigns an authorization number to the PO and notifies the vendor. If either the manager or the department head denies the PO, the employee who completed the original PO is to be notified. If the accounting department receives the PO with all of the appropriate approvals, a PO number is assigned and sent to the vendor and the employee receives notification.
Let's first examine the paper-centric process to discuss the potential for delays or problems. An employee submits a PO for $515 to the manager for review on Monday. The manager should review the PO and submit it to the department director for approval. How many of these situations are common enough to cause a delay in that workflow?
The manager submits directly to accounting: The manager assumes because the amount is only $15 over their approval threshold, accounting will approve it without needing approval from the department director.
The manager, director, or accounting personnel are out on vacation: The PO sits pending approval until the following Monday when they return.
The employee bypasses the supervisor: The employee submits it directly to the director or accounting department without getting initial approval from the manager.
The PO is completed but forgotten in a pile of paperwork on someone's desk.
The data is incomplete: Lacking the appropriate information, the form must be returned to the employee for more information to resume processing.
When any delay occurs in the paper process the only way to know where the paperwork is hung up is to begin asking questions. This, of course, relies on the fact that someone has noticed they didn't receive the approval or denial notification in a timely fashion. Worse yet, the requested items on the purchase order items aren't missed until the first time they are needed. Now the delay in the paper process is delaying other employees' work.
When this same process is deployed through LiveCycle ES we can address and prevent many common delays to the workflow. The business process design has built-in rules that employees cannot ignore or circumvent. Using the preceding example from above for a purchase order of $515, what happens to each of those same problem scenarios?
The manager cannot submit directly to accounting: The business process dynamically chooses the appropriate person to route the PO based on the dollar amount it contains. No guessing or skipping of any step in the process takes place because the dollar amount is near the approval threshold. If the amount is under $500 it goes to accounting, and if it is over $500 it goes to the department director, with no exceptions.
Someone on vacation does not cause delays: Two potential solutions are available to remedy this problem. Both would be implemented because one requires human interaction, and the other does not.
The vacationing party sets their out-of-office status in LiveCycle ES: This alerts the system to route to an alternate manager or director who can process the PO in their absence.
The vacationing party forgets to set their out-of-office status in LiveCycle ES: The business process waits the allotted amount of time, 48 hours in this case, and then routes to an alternate for approval. When a process is escalated, such as in this situation, the action the process takes can vary greatly. A reminder e-mail may be sent, or the supervisor may be notified or asked to complete the approval.
The employee cannot bypass the manager. Because the Submit button is controlled by the business process, the employee has no way to circumvent the system.
The PO cannot be forgotten in a pile of papers: Using LiveCycle ES you have no paperwork to lose. The information is all routed electronically. If an employee would like to know where the PO is delayed, they can track their own PO to see where it is in the process pending approval.
The data cannot be submitted if it is incomplete: Using an electronic form with required fields prevents the document from beginning the workflow if it is incomplete.
Taking the time to create an effective electronic workflow may cost a little more up front with the purchase of the server components and licensing, but the return on that investment can save you even more time and money in the long run.
We know, it sounds great but justifying an electronic workflow to management generates many questions. How much training do my employees need to use the new process? How complicated is it to document and explain to the employees who are not computer savvy? The paper form we currently use is self explanatory and everyone likes what we have. We don't experience any major delays with the current PO system so why change it?
Our purchase order example is only one form. How many forms does your business use every day? How much time is spent walking that form from one office to another for approval? How much additional time is wasted because the employee waits for that approver to finish a phone call so they can discuss the request? What about the hand-written paper form that can't be entered into the accounting system because it's illegible? We are sure that if you look at your existing paper-based processes with a little bit of objectivity you can find room for improvement.
Note
For more information on the costs associated with paper workflows, see Chapter 2.
Beginning with the employee who needs to submit a purchase order we walk though the LiveCycle process step by step to show you how easy and efficient it is for the form recipient. We provide information to fuel that conversation with management on how easy the process can be.
STEPS: Exploring the Purchase Order Process in LiveCycle ES
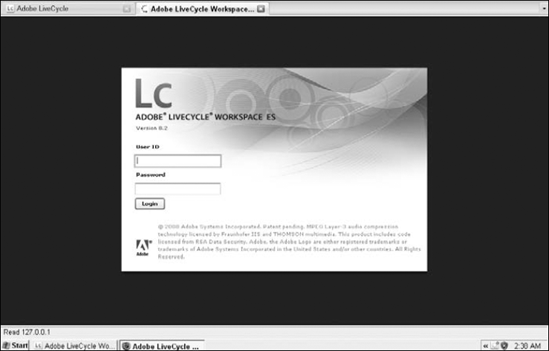
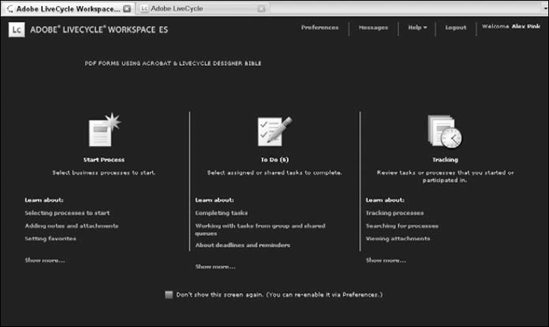
Alex logs into the LiveCycle ES Workspace to create a purchase order. The employee needs to have access to all of their forms in one convenient and secure location. Figure 34.1 shows the login page.
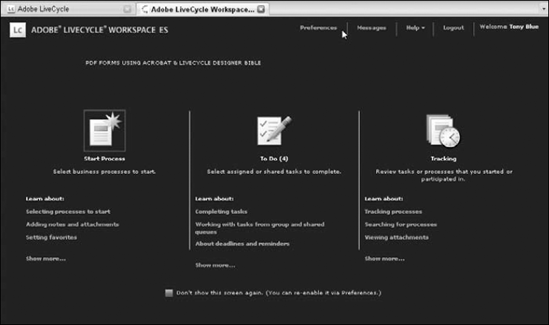
The welcome page displays. As Figure 34.2 shows the employee is allowed to Start a Process, Look at their To Do List, Track items they participated in, Change Preferences or Read Messages. The Workspace is an easy-to-use Web page, even for individuals who use the system only occasionally.
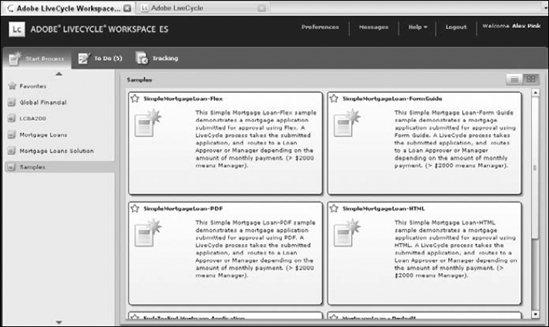
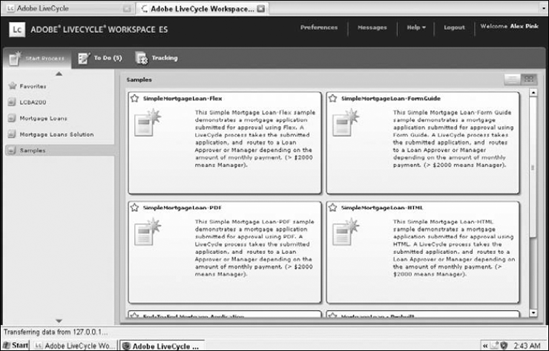
Alex selects the Start Process icon. The categories appear on the left side of the screen, with process cards available on the right as shown in Figure 34.3.
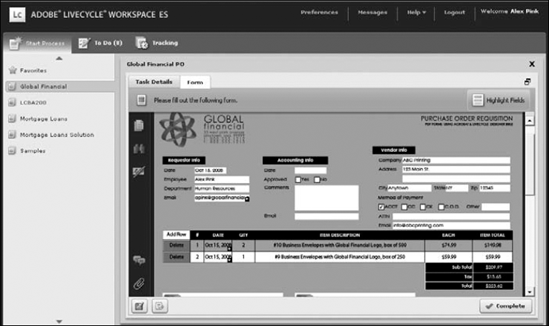
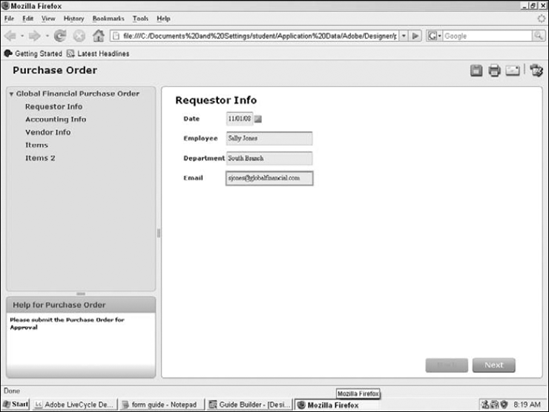
Alex selects the PO process card to begin filling in the form. The PDF form loads on the right side of the screen for the employee to complete as shown in Figure 34.4. The form design contains all the calculations necessary to complete the form. Data validation exists to prevent incorrect data entries, and required fields must be filled in before submitting the form.
Alex completes the form by clicking Complete. Clicking Complete in the lower-right corner of the workspace screen returns Alex to the Category view. This routes the form to Alex's manager for review. Alex can track the PO progress by looking at the tracking information available in the workspace.
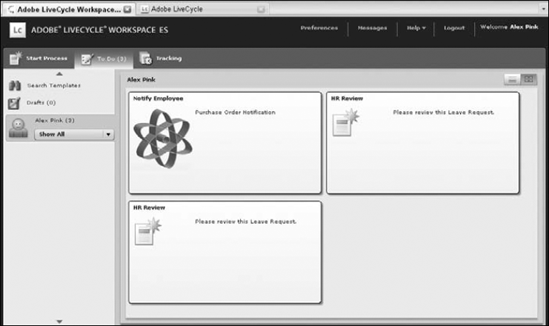
Tony (Alex's manager) logs into the workspace to look for documents pending approval. Any process started by another employee that needs Tony's approval appears as an item in the To Do list.
Tony's To Do List shows the number of pending items on the welcome page. Figure 34.5 shows that Tony has five items to attend to.
Tony selects the To Do Icon. The To Do list opens with cards for each of the tasks with instructions and other information available.
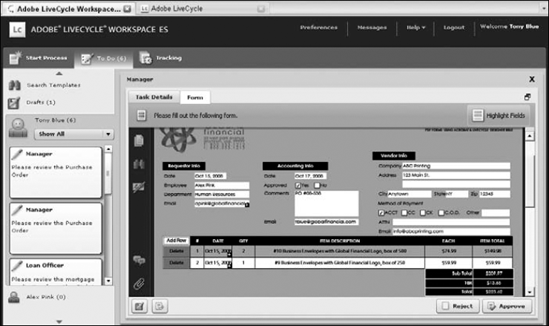
Tony selects a task by clicking it. The PDF form opens for review. Tony adds any necessary information to the form, then approves or denies it using the buttons in the lower-right corner of the workspace as shown in Figure 34.6.
The LiveCycle ES Server routes the PO for the next step. If the amount is under $500 the purchase order appears in the accounting department's To Do list. If the amount is over $500, it appears in the department director's To Do list.
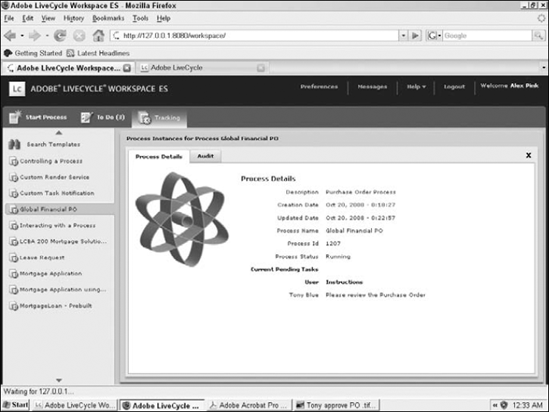
Alex wonders how the PO is progressing. Alex logs into the workspace and selects the tracking link. Next Alex selects the category from the left, and if necessary changes the date range to filter the list as shown in Figure 34.7.
Alex selects the task she is concerned with. The tracking information shows which steps of the process have been completed and their status as shown in Figure 34.8.
Accounting approves the Purchase Order. LiveCycle ES e-mails the vendor with the purchase order attached and notifies Alex of the approval and the PO number that was assigned. The accounting system is updated with the transaction information.
Alex views the approval notification. Alex receives a To Do item indicating the approval and showing the PO number that was assigned as shown in Figure 34.9.


LiveCycle ES makes working with forms easier to manage than paper-based workflows. The process is sure to follow business rules, and you can avoid common pitfalls in the electronic routing. Form designs also can change over time. With LiveCycle ES the forms that are currently in process are allowed to finish, while any new processes are immediately deployed with the newest version of the form. You don't need to gather and destroy the old printed documents or worry about missed paper copies appearing in the workflow months after a change has occurred. Now that you have a good understanding of how LiveCycle ES can work, we will get into what LiveCycle ES is.

LiveCycle ES (LCES) is an enterprise server platform based on Java 2 Platform Enterprise Edition (J2EE) for developing, building and deploying Web-based enterprise applications. LCES runs as a J2EE service on a J2EE application server using a Service Oriented Architecture (SOA) that allows this platform to lie on top of the existing infrastructure. SOA is an architecture style intended to define how two services interact, allowing one service to perform a function on behalf of the other. Each service is self-contained and loosely coupled so they remain independent of one another.
LCES is designed to automate and streamline complex business processes that involve multiple departments, intricate business rules, and back-end systems. LCES is not a replacement for current systems. It is a complementary set of services that enable straight-through processing, affording you the ability to manage information more accurately, improve quality of service, and decrease costly cycle times. LiveCycle ES can separate the data from the presentation in a process, thus allowing independent storage of both the forms and the data at any point in the workflow. The data can then be remerged with the existing form or another form if needed later in the workflow.
LCES provides all the tools needed to design, implement, and automate the documents and processes both inside and outside the firewall. LiveCycle ES combines PDF, Flex, Flash, and HTML technologies to provide a unified developer experience.
A benefit to using LiveCycle ES is that the end user does not need any additional purchased software to participate in a deployed process. The client software applications available to deploy your LCES applications are readily available client applications.
The hardest decision may be which client your application should be deployed in. You may find the answer varies in different phases of the process. Luckily LCES happily obliges your indecisiveness. If you build forms using LiveCycle Designer you can use the same basic form design with some adjustments when rendering in the following client applications:
Adobe Reader: The freely distributed Adobe PDF viewer application intended for users who need to view and print PDF files. Adobe Reader is available for an ever-increasing number of platforms and languages.
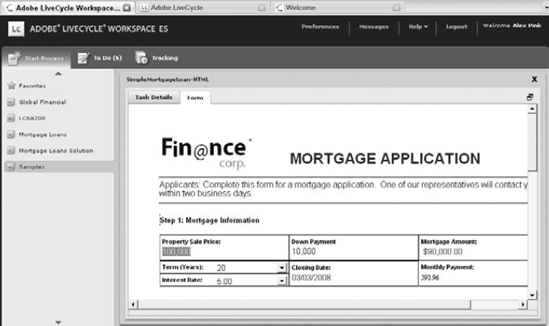
Adobe Flash Player: The freely distributed Adobe Flash viewer application is designed for playing SWF files built with Flash, Flex, and other third-party products. The Flash Player is built into some Web browsers and is available as a plug-in for many others. Forms designed with Form Guides can be rendered as Flash content as shown in Figure 34.10.
Note
For more information on Adobe Reader, see Chapter 2.
HTML browser: Web browsers are available from a variety of vendors, designed to display pages written in Hyper Text Markup Language (HTML). The browser enables interaction with text, images, and multimedia made available from a Web page. An XDP form can be rendered as HTML using LiveCycle ES Forms as shown in Figure 34.11.
Adobe AIR: The newest member in the ES Client group, Adobe AIR is a cross-platform runtime environment for rich Internet applications that can be deployed as a desktop application. Content originally developed for the Web can be ported to the desktop using Adobe AIR.
The LCES Foundation is included with the purchase of any of the LCES solution components. It includes the underlying server capabilities that support the deployment and management of your applications. The Foundation allows integration with the company's existing infrastructure. The Foundation also provides exception handling, orchestration, and invocation methods.
The common architectural foundation or runtime environment is the service container. It supports the solution components and services. The service container enables linking multiple solution components in a process. You can easily add, remove, and update. services The service container provides flexibility, extensibility and simplified deployment. How a service is invoked becomes transparent to the service container; it always provides a consistent way to interact with the services.
You can enable integration with common IT infrastructures. Some of the services included are: e-mail, file utilities, LDAP, Web services, FTP, JDBC, and more. Some examples of the foundation integration include looking up employee information in LDAP or placing files in a network folder for automated processing.
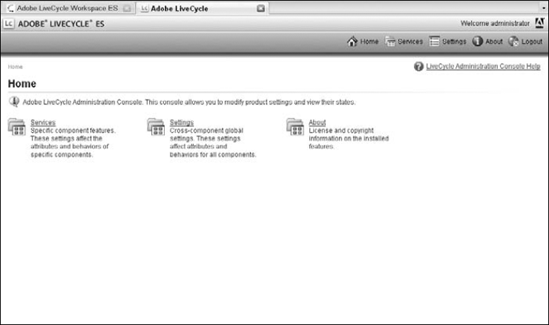
The administration tools offer a Web interface for the LiveCycle ES Administration Console as shown in Figure 34.12. The Administration Console offers endpoint, archive, and user management. Other administration tools allow you to configure server settings including port numbers, and apply service packs and patches to LiveCycle ES. You also can track stalled processes with the administration tools.
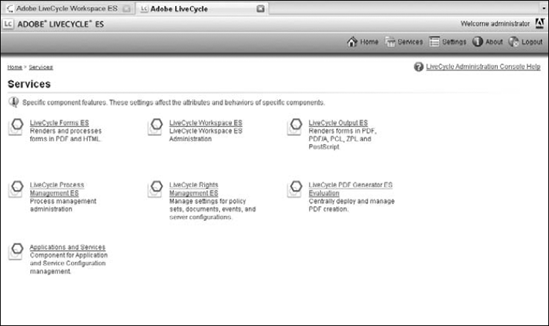
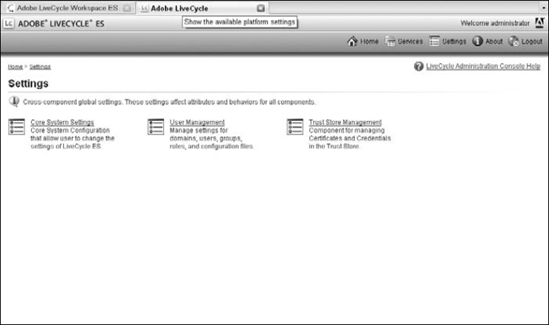
Items in the LiveCycle ES Administration Console are logically grouped into one of two categories: Services or Settings. The Services page gives you access to any of the solution components installed, as shown in Figure 34.13. The Settings page provides access to items that affect the entire LiveCycle ES Server installation, rather than a specific component. You can change items such as users, ports, and credentials in the Settings page as shown in Figure 34.14.
The About link in the upper-right corner of the Administration Console provides specific information as to the version of LiveCycle you are running as shown in Figure 34.15. This page includes any patches, service packs, and specific components that are installed.
The Central repository is where forms, process diagrams, images, fragments, policies, and other assets are stored for retrieval when needed. The Central repository also handles version control as items are updated. Any dependencies between a process and assets are tracked by LCES for assembly into the application or an archive.

The solution components are not programs; they are set of related operations that are deployed as services. A program is a standalone piece of software that can run independently of other software programs. The solution components share the Foundation, allowing you to activate only the components necessary to achieve the goals of your application.
Unlike in some previous releases, components can be easily added later by running the configuration manager. The components are categorized into the following groups.
This group of components offers options to capture enterprise data with interactive form fields. They may be utilized together or independently in the business process:
Adobe LiveCycle Forms ES: LiveCycle Forms ES can render XDP forms as PDF in Reader, as a Flash-based Form Guide, or an HTML Web page. It assembles PDF forms into packages. Form fragments are retrieved and placed into forms at runtime. This component creates Flash-based forms at runtime from form guides defined in XDP templates. It can handle file attachments for PDF and HTML forms. This component includes LiveCycle Data Services to retrieve data and allow merging with form templates at runtime.
Adobe LiveCycle Reader® Extensions ES: Adobe Reader has some additional functionality that allows filling in form fields, digital signatures, and comments, and the ability to save. These features are disabled for normal PDF documents. When Reader extensions are applied to a document, Reader turns the appropriate functionality on for use with the enabled document.
Adobe LiveCycle Barcoded Forms ES: With this component you can capture form data using 2D barcodes that can be decoded and extracted to XML format for automated processing. Barcodes can help bridge the gap between paper and electronic forms if you're still using fax or mail.
Adobe LiveCycle Data Services ES: This component promotes data exchange between Flex and AJAX application interfaces with LiveCycle ES and backend systems. Data Services allows RIAs to generate PDF files.
Security is often overlooked with digital documents. Protect your electronic files using the information assurance components:
Adobe LiveCycle Rights Management ES: This component was formerly known as Policy Server. It applies persistent protection to a document regardless of file distribution method or storage location. Permission settings and policy changes are dynamic. You can use this component to watermark confidential information with usernames to ensure compliance with company policies or enable document auditing to track viewing and printing. You can revoke an outdated file and replace it with a link to the new document, and apply rights management to documents in PDF, Microsoft Office, or CAD formats.
Adobe LiveCycle Digital Signatures ES: With this component you can certify forms for authenticity and security. You can add blank signature fields to documents, apply digital signatures, and verify and clear signature fields in automated processes.
For documents that do not require interactive form fields this group of solution components can be used to create your files:
Adobe LiveCycle PDF Generator ES: This component automates the creation and assembly of PDF documents from most native formats. The server-side PDF creation tool supports PDF/X and PDF/A formats. You can assemble files into PDF packages, renumber pages, add headers and footers, watermarks, and metadata. You also can convert PDF files to PostScript, TIFF, or JPEG formats and create searchable PDF files from image formats using OCR.
Adobe LiveCycle PDF Generator 3D ES: You can create and assemble PDF documents from engineering product data rendered in 3D format.
Adobe LiveCycle Output ES: With this component you can populate forms with XML data to dynamically generate personalized documents on demand in print or electronic formats. You can convert PDF to postscript, multipage TIFF files, and JPEG formats. Output ES allows control of printer-specific settings such as paper tray selection, duplex, stapling, sorting, and collating.
Adobe LiveCycle Production Print ES: This component populates forms with XML to dynamically generate personalized documents for high-volume production environments. Some examples include statements, bill production, and enrollment forms. Production Print can process thousands of pages per minute. Post processing includes batch sorting, batch splitting, printing multiple pages on a single piece of paper (imposition), and marking for insertion machines.
The workflow tools in the process management group help you automate human centric business processes. Monitor active processes and gather real time event information using these tools:
Adobe LiveCycle Process Management ES: This component was previously known as LiveCycle Workflow. Process Management allows you to design workflows that mirror existing business processes. In addition to setting the business logic needed at each decision point you can assign tasks to users, specify the type of form to be rendered, provide task instructions, set up rules for reminders, escalate an unfinished task to supervisors to handle, and set deadlines.
Adobe LiveCycle Business Activity Monitoring ES: You can monitor, analyze, and tune your LCES applications. Turn on this component to receive real-time event and data integration information for a deployed process.
Content management systems to help organize your forms, data files, and other assets used a business process. Version control and file locking prevent editing by multiple users with these tools:
Adobe LiveCycle Content Services ES: Store, manage, and collaborate on the content used in your LCES applications. Content Services offers check-in and check-out services for documents, versioning, auditing, metadata extraction, and searches. Three interfaces are offered to work with Content Services: LiveCycle Contentspace ES (Web interface), Microsoft Office plug-in, and shared folders.
Adobe LiveCycle ES Connectors for ECM: Extend your LCES applications to integrate with existing enterprise content management systems. Currently components are available for IBM File Net, EMC Documentum, and IBM Content Manager. Processes defined in LiveCycle can utilize content stored in the external ECM system.
The development tools available for LiveCycle ES include: Adobe LiveCycle ES Workbench, Adobe Flex Builder, Adobe LiveCycle Designer ES, and the LiveCycle ES Software Development Kit (SDK). We focus on Adobe LiveCycle ES Workbench and Adobe LiveCycle Designer ES because they are included with most of the solution components. Flex Builder is available as a separate purchased tool.
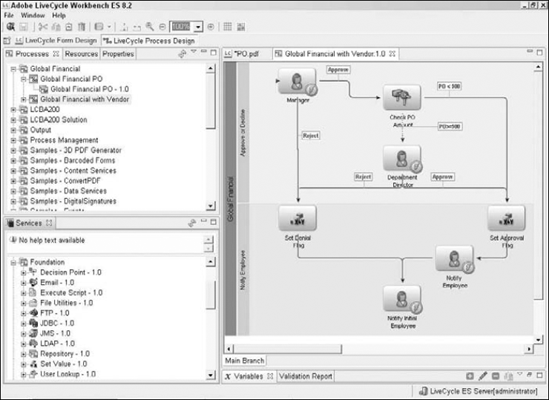
LiveCycle Workbench ES, as shown in Figure 34.16, is an integrated Development Environment (IDE) based on Eclipse.
Originally supported by a group of software vendors, the Eclipse Project was created by IBM in November 2001. In January 2004 the Eclipse Foundation was created as an independent not-for-profit corporation to allow a vendor-neutral, open community to develop around Eclipse. The open source community focuses on creating an open development platform.
Workbench is the process diagram development tool. With Workbench you can use modeling components to visually create a business process diagram, set routes, and set conditions to control the business logic. Workbench is divided into three main tools:
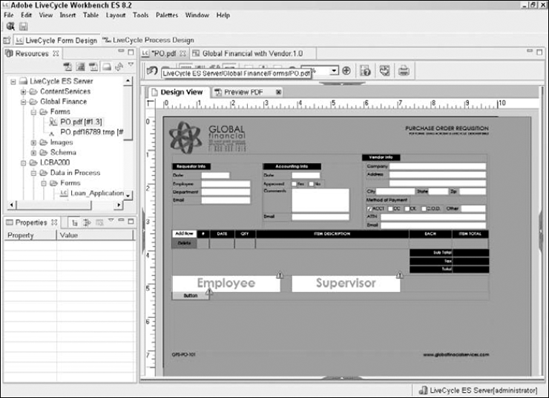
Editors: Use the Editors to create or edit objects such as form designs or workflow diagrams as shown in Figure 34.16. Below Figure 34.17 shows a form design open in the Workbench using LiveCycle Designer as the editor.
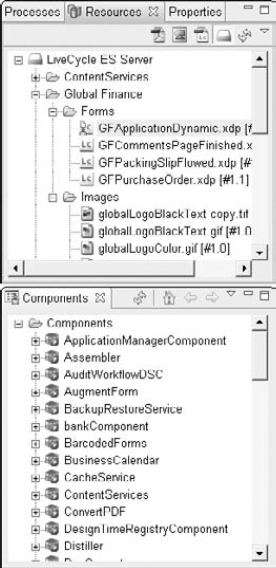
Views: Views are tabs within a window containing supporting elements for work done in the editor. Figure 34.18 shows the workbench with Processes and Services open on the left side of the Workbench area.

Views can be moved to any of the four sides of the workbench. If a side already contains another view, they can share the space and dock the tabs in the same window space as shown in Figure 34.19. Or they can split the available window area and stack on top of each other as shown in Figure 34.20.
When a view does not have enough space allocated to work effectively you can double-click the tab name to maximize any view. Double-clicking the tab again returns it to its previous location. Some of the views available in Workbench include:
Processes: As you create your business processes you name them and organize them into categories. These categories appear in a hierarchical view with each process nested under the category it belongs to.
Variables: The variables view is displays all defined variables in the currently selected process.
Components: A hierarchy view of all of the services available within each of the solution components you have installed in your development environment.
Resources: The directories, images, forms, and archives you have stored in the repository.
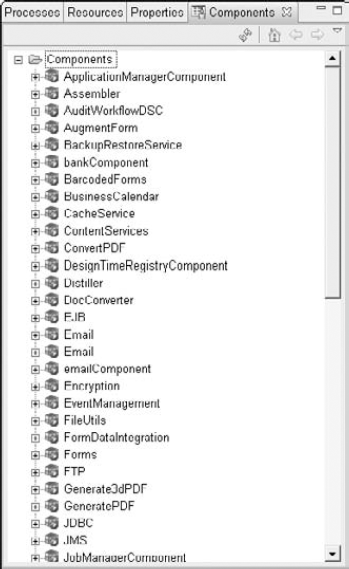
Figure 34.19. Views with the Resources and Components docked in the same window sharing the available area
Note
It is important to point out some variances in terminology between the development tools on the server and the desktop tools of Acrobat and Designer. In Designer we call the area where items like the Library and Hierarchy are located palettes and those palettes reside in palette wells. In Acrobat we call these areas Navigation Panels. In LiveCycle Workbench these areas are called views. They contain objects and properties we need when working in the environment.
Perspectives: Perspectives are a named, organized collection of editors and views designed to optimize your work area for a particular task. Adobe LiveCycle Workbench ES contains two built-in perspectives:
LiveCycle Form Design Perspective: Optimizes the views for form design using LiveCycle Designer as the form design editor inside the workbench, surrounded by the Resources and Properties views. When you work with LiveCycle Designer inside Workbench, the additional views around designer limit the work area as shown in Figure 34.21.
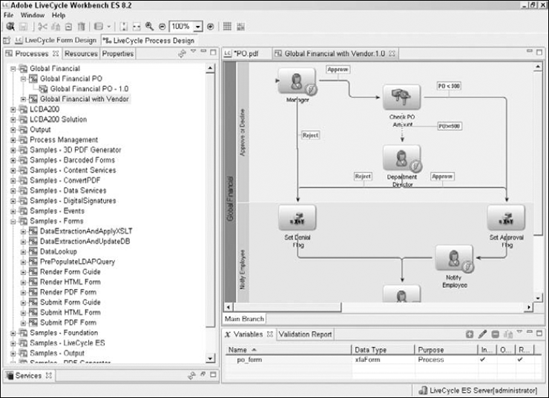
LiveCycle Process Design Perspective. This view optimizes the interface for designing workflow or process diagrams. The editor window allows you to add modeling elements to the canvas. You define routes for your process diagram by connecting the modeling elements. You can change the views on the left to more process design-related items as shown in Figure 34.22.
LiveCycle Designer is the form design tool that creates Extensible Markup Language (XML)-based forms that can be stored as an XML Data Package (XDP) or a Portable Document Format (PDF) file. Designer is a graphical design interface that allows drag and drop field creation. Form designs can include tables and subforms that dynamically adjust their contents based on user interaction or data merged with the form.
Another Eclipse based development tool, Adobe Flex Builder contains editors for working with MXML, ActionScript, and Cascading Style Sheets (CSS). Flex Builder is designed to optimize the resources needed to write Flex code more quickly and efficiently and offers features such as statement completion, debugging, and syntax coloring. Visually design the layout, appearance, and behavior of your Flex application. You also can work with the new datagrid to create interactive data analysis.
Workspace is a Flex-based application, rendered in a browser window, that can be completely customized using Flex builder. Customization allows companies to provide branding for their LiveCycle Workspace that is consistent with other corporate content. View a LiveCycle ES Workspace requires that the client machines have Flash Player 9.01 or higher loaded.
The LiveCycle Workspace ES is the central point for users involved in form-related processes in LiveCycle ES. It becomes the User Interface (UI) for LiveCycle ES deployed processes. A user can log in to start a new process, look at their to-do list, and track where in a process their form is currently located.
To see the interface you need to have a login provided by your LiveCycle Server administrator. The login page is the first page you see when opening the Workspace, as shown in Figure 34.23.

Once you have logged into the Workspace the welcome page gives you shortcuts to the three main areas, plus links to change preferences, read messages, get help, and log out as shown in Figure 34.24. The administrator can display a message of the day for users to read on the welcome page.
Selecting the Start Process icon opens the Category view of the process cards. The Favorites Category appears at the top of the list, followed by the remaining categories in alphabetical order. The LiveCycle administrator defines the categories that become the organizational containers seen in the Workspace as shown in Figure 34.25.

Within a category you'll find each of the related processes assigned to that category. If the company has an extensive list of categories and processes the employee is encouraged to add the ones they use most frequently to their favorites category for easier retrieval. A process card is added to the Favorites category by clicking the star icon in the upper-left corner of the process card.
Starting a new instance of a process only requires a single click on the process card or a double-click anywhere in the row of the List view.
Items in the To Do list may be notifications of pending processes you began. In that case, you can open the task to review the information. The item contains a Complete button. This button removes the task from your To Do list. You can go back and review this information later if necessary using the tracking feature.
Other To Do items are tasks you did not create but are routed to you by the LiveCycle process. In our example "Examining a Process" earlier in this chapter the manager must approve the purchase order before it can be sent on to accounting. The employee's manager becomes the approver for the purchase order.
If the manager is on vacation, the purchase order may have to be necessary routed to another manager. The alternate person may be a specific individual or the entire group of managers. In the case of a group assignment, the first manager who has the opportunity to take care of the task can claim it and continue the process. If you are a member of a group that is responsible for reviewing items, you may see the pool of tasks that have been assigned to the group in addition to your own tasks.
The tasks in the To Do show everything assigned to the logged-in user. This list can be filtered down into the categories they belong to. The drop-down list is next to username of the person logged in, as shown in Figure 34.28, or the group name the tasks were assigned to. Filtering allows you to prioritize the tasks without sorting through them manually.
Tracking allows the user to search for a process they have participated in. The process can be currently running or a completed process. The window is grouped by the process name and filtered by a start date and end date. Tracking provides many pieces of information from the tracking window, as shown in Figure 34.29.
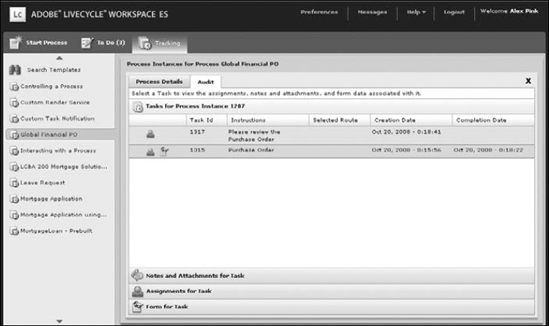
If you need additional information, double-click the task to open the process details, as shown in Figure 34.30, and audit information as shown in Figure 34.31. In the audit information you can see the tasks associated with the process, who was assigned each task, and if you are the initiator of the process, the completed form as well.
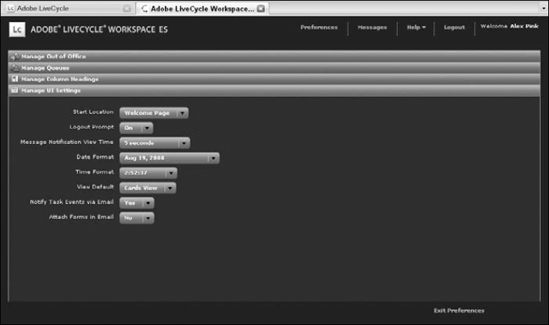
The Workspace preferences, as shown in Figure 34.32, allow you to set your Out of Office Status, assign tasks to another user while out of the office, share your task queue as well as request access to another queue. You also can change the columns that appear for the To Do List view and Tracking view.

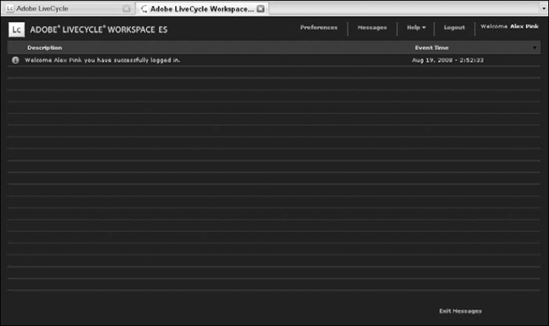
The Messages link, as shown in Figure 34.33, provides notices of events that occur during your current session. Session events including login and server errors are logged in this list. Process events notifying you of new tasks arriving are also logged here.
Most of this book talks about designing forms in one way or another. Now we shift the focus from the form design to optimizing the forms for use with LiveCycle Server. How you optimize a file varies between Acrobat and Designer. The following list pertains to Designer forms, although many of these points apply to Acrobat Forms as well. Although many things influence a form's performance, file size is one of the most important factors to watch. The following are general considerations to keep in mind when designing forms to reduce the overall file size:
Use compressed graphic types. JPEG or GIF formats provide good image quality while maintaining a reasonable file size.
Use embedded images rather than linked images. Having the image readily available reduces the time required to render the form. With linked images, you need time to gather the image information and render the image. The PDF format is very good at reducing the size of graphics even further.
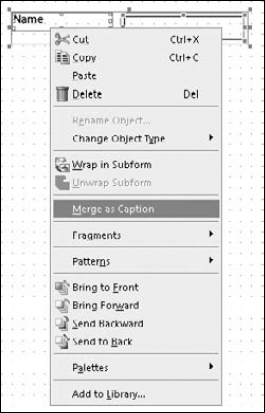
Minimize the number of objects on your form. Designer forms can have a reduced file size when fewer objects are used on the design page. Use the built-in caption properties of the objects rather than creating a field with second static text object as its caption. If the form was built his way, take the time to merge the field with the static text object.
To merge a static text object with a field as a caption, select both objects. Right-click and select Merge as Caption from the context menu as shown in Figure 34.34.
Reduce or avoid using embedded fonts. Do not embed fonts unless the font appearance is more important than the increase in file size.
One solution is to use a font available to all versions of Reader and Acrobat so embedding fonts, or font substitutions, are not necessary. The following fonts are included with Acrobat and Reader and display without substitutions:
To ensure that a form design looks the same when viewed on screen or printed using PCL print drivers, and PostScript print drivers, you should use one of these fonts:
Courier
Arial
Times New Roman
Examine the need for accessibility. While accessibility is necessary in many areas, accessible forms take longer to process.
Consider different templates for the interactive form version and the printed form version. Removing all the interactivity from a document intended for print can improve performance considerably.
The remaining recommendations relate to form processing when using LiveCycle ES Solution components and don't have as much impact in a standalone form:
When submitting form data, select XML as the file format to reduce the transfer time of the data file.
When rendering the form using LiveCycle Server, allow the form to be cached or use a SeedPDF. When a form is cached, the data is merged into a pre-generated version of the form and is always available to dynamic form designs. Some limitations exist when using static form designs. A SeedPDF is a customized PDF document (it contains only fonts) that is appended with a form design and data at runtime.
When running batches of the same form using LiveCycle Server, gather all of the data into a single file before merging to individual documents.
When running multiple batches using LiveCycle Server, group all of the instances of the same forms together, and then run the next group. Alternating between two or more forms slows the performance.
When fields or subforms are not needed for data binding, set the binding property to none. Failure to do so causes the program to search for a matching data node in the correlating XML file each time.
When you write script to handle calculations, validations, and other processing, by default all script runs on the client machine. The form recipient's viewer application (Acrobat, Reader, or the browser) is responsible for the script contained in the form. Knowing how that form is going to be rendered influences your scripting language choice because FormCalc is not supported in HTML. Using scripts increases the processing time required to render forms. Patterns (masks) offer better performance than scripts, with the same results, and you should explore them first.
FormCalc is the default scripting language in LiveCycle Designer. You can use it for any XDP or PDF form as long as it is not rendered as HTML. FormCalc script can be executed on the client or the server. FormCalc is similar to common spreadsheet formulas, which makes this an easy transition for many users. One of the benefits to using FormCalc is that the calculation engine is small and therefore quick to process the request.
JavaScript is the alternative scripting language in LiveCycle Designer and you can use it for any Designer form deployment. It also can be executed on the client or the server. JavaScript provides more robust scripting options, but can cause performance issues on long, complex scripts.
Choosing whether the script should execute on the client or server machine depends on the functionality desired and the complexity of the code. Changing where they execute influences their performance. For example, a calculation script designed to run on the client machine is executed in real time while the form recipient enters data. Furthermore, scripts that declare variables when run on the client retain values for the duration set by the scope of the variable declaration.
With script executed on the server, the calculation occurs on the server, the data is remerged with the form, and is presented back to the viewer application. This can add significant transfer time to a form, but it is necessary when the client application is incapable of running the script. Variables are available only while the script is executing. As soon as the form is presented to the viewer application, they no longer exist.
Setting a form to both client and server can cause both the client and the server to attempt to execute the script. If a form is using LiveCycle Forms and the client is incapable of executing the script, LiveCycle Forms attempts to process the script anyway.
Scripting a form rendered in HTML requires a few additional notes of consideration:
JavaScript must be used as the scripting language.
Client-side script for HTML forms must use the JavaScript resolveNode expression to locate objects in the hierarchy. Fully qualified notation that walks through the hierarchy fails in HTML rendered forms.
The browser application must be a supported version: Microsoft Internet Explorer 5.x, Netscape 6.0 or later, or Opera 5 or later.
The browser must have client side JavaScript enabled for any scripts to execute.
PDF or XDP formats are allowed most of the time with the LiveCycle ES Solution components. When choosing your file format, remember that file size is crucial to form performance. To improve performance, use PDF files whenever possible because they are usually smaller than their XDP counterparts.
Use PDF files in these situations:
When using static form design. If the form design will not change in layout, then PDF is the better choice.
If the form will be viewed only in Acrobat or Reader. If there is no need to alter the format, use the smallest format possible—PDF.
If digital signatures are required in the rendered form. Saving digital signatures requires the entire PDF to be saved.
Use XDP in these situations:
When you expect server-side processing.
When rendering the form as an HTML page or as a Flash based Form Guide. LiveCycle ES solution components are very powerful when given an XDP file with the proper instructions. The same file form design can be rendered as HTML or Flash.
When you place forms into the LiveCycle ES Process Management workflow, the server expects certain fields on the form. These fields are stored as a custom object for you to use at design time in LiveCycle Designer. In the Custom Library group is a custom object called Process Fields. The process fields contain nine objects, as shown in Figure 34.35, that provide the necessary connection to the Process Management workflow.
You don't need to customize these objects in the form design or provide them static values at design time. The fields are merged with the necessary information at runtime to allow the form to participate with the workflow.
If a form design does not contain these additional fields, you may be able to add them using a form bridge as part of the process design in LiveCycle Process Management.
LiveCycle ES runs as a J2EE service on a J2EE application.
The LiveCycle ES Foundation provides loosely coupled services that allow the components to work with one another and integrate with existing systems.
The Central Repository manages form versions, graphics, and other assets needed in a process.
Many solution components are available for LiveCycle ES. Components are not products; they are services deployed on a J2EE application.
LiveCycle ES is known for its ability to extract data from the presentation layer of a process and remerge them at any point later.
Components are available for: data capture, information assurance, document output, process management, and content services.
The LiveCycle Workbench is where process design takes place.
LiveCycle Designer is used to create XML base forms that are utilized by LiveCycle ES.
Workspace is the GUI for deployed processes.
Adobe Flex Builder can be used to customize the Workspace to allow corporate branding.
Forms should be optimized for performance before deploying them in a process.
File size is one of the most important considerations in optimizing a form.
Number of objects included in the form design and the complexity of the form design impact the performance at runtime.
Script may need to be altered when forms are rendered in different formats.
Special field objects are required for processing forms in LiveCycle ES.
LiveCycle ES is a powerful set of solution components for electronic business processes inside and outside the enterprise firewall.