
BONUS CHAPTER 3
Using Asset Tracking
How often do you go into your garage during the winter months? Unless you have a pair of warm overalls or a space heater, you probably just throw in any tools you use, the Christmas lights, spare quarts of oil, and the kids’ bikes wherever they fit as you make a mad dash back into the warm house; and then when spring comes, you have a real mess on your hands.
Max projects can be the same. During an aggressive project, Max files, textures, and render passes get saved all over the network. By the time the project is finished, you may have a hard time reusing things simply because you can't find anything. This dilemma is compounded when you work on a team with several individuals throwing stuff all over the place.
An asset tracking system can help with this problem by introducing a system that acts as a little secretary, logging every object thrown to the network. This little secretary also is smart enough to keep track of the latest updates of all files, making sure that each accessed file includes them. It also locks any file that is being used to keep unwanted fingers out of the pie.
Setting Up Asset Tracking
Max's asset tracking features provide support for several systems, including Autodesk's Vault, Microsoft's Visual SourceSafe, CVS, and Perforce. Each of these systems can be accessed using the Server ![]() Launch Provider menu command in the Asset Tracking interface. This interface is opened with the Application Button
Launch Provider menu command in the Asset Tracking interface. This interface is opened with the Application Button ![]() Manage
Manage ![]() Asset Tracking menu command (or by pressing Shift+T).
Asset Tracking menu command (or by pressing Shift+T).
Note
In order for an asset tracking system to work with Max, it must conform to the MSSCC standard.
For project teams that don't currently use an asset tracking system, you'll be happy to know that Autodesk has included a copy of its Vault system on the 3ds Max 2012 install disc. Both the Vault Server and a Vault Client can be installed from the install discs. Vault installation requires a separate setup from the standard 3ds Max 2012 setup. Just locate the Vault setup link on the first page of the install wizard under the Install Tools & Utilities section.
Note
Installation and configuration of the Vault Server should be left to your network administrator. The administrator is also responsible for setting up user profiles, issuing usernames and passwords for accessing the system, and creating project folders.
For an asset tracking system, assets are defined as any files that are used as part of a project. This could include Max scene files, XRefs, bitmap textures, MAXScript files, and so on. One of the key benefits to the Vault asset management system is that it stores data in a hierarchical structure including files such as textures as dependents of the Max scene file.
Checking in and checking out
To request an asset from the asset tracking system, you “check out” the file. This command locks the file so you can edit it without worrying about others making changes at the same time. If another user tries to check out a file that is already checked out, he receives a polite message stating that the requested file is available for read-only access and lists you as the person who has the file checked out. The requested file can be loaded and viewed, but it cannot be edited.
When you're finished editing the file, you can “check in” the file, making it available for other users. As a file is checked in, a comment dialog box appears where you can enter a message about the latest changes. Over time, these comments are compiled into a historical list that marks the changes over the life of the file. The asset tracking system also can be used to recall the file at any point in its history.
Note
Asset tracking systems such as Vault are very good at reminding you to check out and check in files so changes aren't lost. For example, if you make changes to a checked-out Vault file and try to open another file, a dialog box appears reminding you to check the file back in before opening another file.
Using the Asset Tracking interface
The Asset Tracking interface, shown in Figure 1, is opened using the Application Button ![]() Manage
Manage ![]() Asset Tracking menu command or by pressing Shift+T. This interface also allows you to access commands in the main Max interface while it is open.
Asset Tracking menu command or by pressing Shift+T. This interface also allows you to access commands in the main Max interface while it is open.
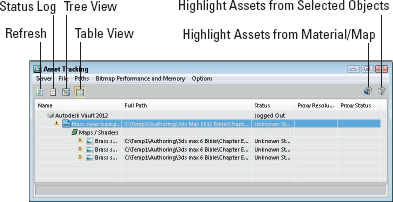
Vault files that are opened appear in this interface including all dependent files such as texture bitmaps, XRefs, photometric files, render files, and so on. Using the buttons at the top of the interface, you can Refresh the current list to see the latest updates, view the Status Log (which is a running list of all Vault commands), and change the view between a Tree view and a Table view.
To the left of each filename is a small icon that marks the status of the file. These icons are handy when the Tree view is enabled, or you can read the status as text in the Table view. The Table view includes separate columns for displaying the Name, Full Path, Status, Proxy Resolution, and Proxy Status of the various files.
On the right side of the interface are two buttons for filtering the assets. The first button highlights the material and map assets. The second button highlights the assets for the selected object.
FIGURE 1 The Asset Tracking interface shows all the checked-out files and the status of each.
Logging in
The first step in using an asset tracking system is to log in to the system. This lets the system know who you are, the access rights you have, and which name to place beside the assets you edit. You can log in to the designated asset tracking system using the Server ![]() Log in menu command in the Asset Tracking dialog box (refer to Figure 1).
Log in menu command in the Asset Tracking dialog box (refer to Figure 1).
Note
If Vault or another asset tracking software isn't installed, then the Log In command is unavailable.
Selecting a working folder
When files are checked out from the asset tracking system, they are copied to a local directory on your current machine where the changes are saved until the file is checked back in. The first time you try to check out a file from the asset tracking system, the system asks you to select a working folder. This folder is a temporary folder where the checked-out files are saved while being worked on. You can manually set the working folder by selecting the Server ![]() Options menu command in the Asset Tracking interface.
Options menu command in the Asset Tracking interface.
You can set which warning dialog boxes appear and which are handled automatically using the Options ![]() Prompts menu command in the Asset Tracking interface. This command presents a list of all the available prompt dialog boxes and lets you right-click each to have it appear or not appear.
Prompts menu command in the Asset Tracking interface. This command presents a list of all the available prompt dialog boxes and lets you right-click each to have it appear or not appear.
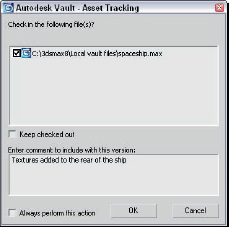
The Asset Tracking dialog box has commands for checking files in and out under the File menu. Each time a file is checked in, a confirmation dialog box appears, as shown in Figure 2. In this dialog box, you can enter a comment about the latest changes. The file is then saved to the Vault server with an incremented version number. The ability to save and keep track of different versions of a file is known as “version control” and is one of the key features of an asset management system.
FIGURE 2 The dialog box where comments on the latest changes are entered appears every time a Vault file is checked in.
An Undo Checkout command is available in the File menu that throws away the current changes and restores the current Vault file.
Getting and adding Vault files
After a database is created for a project and you've logged in, you can add open files to the Vault server using the File ![]() Add Files menu command. This command adds the current file to the Vault project folder, but the file must be saved to the local working folder before it can be added to the Vault folder. You can select multiple files such as bitmap textures by holding down the Ctrl key while clicking them; you also can add multiple files at the same time using this command.
Add Files menu command. This command adds the current file to the Vault project folder, but the file must be saved to the local working folder before it can be added to the Vault folder. You can select multiple files such as bitmap textures by holding down the Ctrl key while clicking them; you also can add multiple files at the same time using this command.
The File ![]() Get from Provider menu command does the opposite. It downloads any selected files from the Vault folder to your local working folder.
Get from Provider menu command does the opposite. It downloads any selected files from the Vault folder to your local working folder.
If you're missing files, such as a texture that has been moved to a different local folder, you can use the File ![]() Browse menu command to locate the missing file.
Browse menu command to locate the missing file.
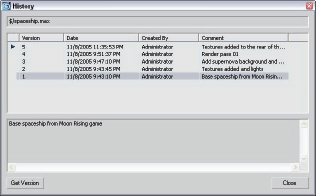
Loading older file versions
Each time a file is checked in, it is given a new version number. This makes it possible to load older versions of a file. For example, if you want to reuse a character made for a previous game, but you want to access the character before any textures were applied, you can locate and load the version saved just before textures were applied.
Older file versions can be found in the History dialog box, which is also found in the File menu. This dialog box, shown in Figure 3, lists all the different versions of a file along with their creation dates, their creator, and any comments entered when the file was checked in. To load an older version, simply select the file from the list and click the Get Version button.
FIGURE 3 The History dialog box lets you access older versions of a file.
Changing asset paths
The Path menu includes options for setting and changing the paths for the various assets. The Highlight Editable Assets command selects all assets in the Asset Tracking interface that have paths that can change. Typically, only the base Max file loaded from the Vault cannot be edited. The Set Path command opens a simple dialog box where you can browse to a new path for an asset. This is helpful if the asset has moved and is marked as missing. The Path menu also includes commands for retargeting the root path, which is the path that all assets have in common, stripping the path from an asset so that only the filenames are visible, making the path absolute or relative to the project folder, and converting paths to the Universal Naming Convention (UNC).
Working with proxies
The Proxy System lets you use proxy texture maps in place of high-resolution maps across all objects in the scene. Using the Bitmap Performance and Memory menu, you can enable the use of proxies, enable bitmap paging, set the global settings for the proxy system, and set the proxy resolution to use. The table view also displays the current proxy resolution for each asset and its status.
Cross-Reference
Bitmap Proxies can be used outside of Vault. For information on using them, see Chapter 23, “Rendering a Scene and Enabling Quicksilver.”
Summary
This chapter covered the features typically found in an asset tracking system and looked at the specific features involved in setting up and using Autodesk's Vault asset tracking system. This chapter covered the following topics:
- Understanding what an asset management system is
- Setting up an asset tracking system to work with Max by logging in and selecting a working folder
- Using the Asset Tracking interface to work with Vault assets