In the previous chapter, you learned how to create classes and use them to create objects. By using encapsulation to define a class with its own properties and methods, objects can isolate the details of their code from the rest of a program.
Although encapsulation helps improve program reliability, both inheritance and method overriding allow you to reuse existing objects to create more sophisticated programs faster and easier than before. When creating a Mac program, you'll be using the classes stored in the Cocoa framework to give your program the typical functionality of a Mac program without requiring you to write any code at all.
Inheritance lets you reuse an existing object and modify it. Method overriding lets you reuse the same method name but just alter the code that makes the method actually work. Together with encapsulation, inheritance and method overriding let you create more reliable software with less work.
The entire Cocoa framework is based on classes that inherit methods and properties from other classes. When you create your own classes, you can base your new class on an existing class to gain the functionality you want without writing the code to get it.
Over time, there's a good chance you'll create a particularly useful class that you'll want to reuse in another program. Rather than copying it and then modifying the copy of the class, it's better just to inherit the properties and methods from that class.
You've actually been using inheritance every time you create a new class. If you look carefully, the @interface portion of the class header (.h) file defines the class that you're inheriting from, such as NSObject like this:
@interface MyClass : NSObject
This line simply says that MyClass inherits from NSObject, which is the basic class that every class is based on. If you want a class to inherit from a class that you created, you need to do the following:
#import "OldClass.h"

@interface MyClass : OldClass
This first line tells the computer to import and make accessible all the code stored in the OldClass.h file. The second line tells the computer that MyClass inherits all the properties and methods stored in the OldClass files (OldClass.h and OldClass.m).
To see how inheritance can work, follow these steps:
Open the VariableTest project from the previous chapter.
Click the
MyClass.hfile inside the Classes folder, and modify the code as follows:#import <Cocoa/Cocoa.h> @interface MyClass : NSObject { @private int position; NSString *name; } @property (assign) int position; @property (retain) NSString *name; -(int)changePosition: (int)myPosition; @endChoose File

Click the
MyClass.mfile inside the Classes folder, and modify the code as follows:#import "MyClass.h" @implementation MyClass @synthesize position; @synthesize name; - (id)init { if ((self = [super init])) { // Initialization code here. } return self; } - (void)dealloc { // Clean-up code here. [name release];[super dealloc]; } -(int)changePosition: (int)myPosition { int newPosition; newPosition = self.position + myPosition; return newPosition; } @endThe
changePositionmethod takes its own property (position) and adds it to themyPositionvariable. Normally when you need to use an object's property, you must state the object's name, but since the object is manipulating its own property, you can just replace its name withselfinstead.Choose File
Click the
VariableTestAppDelegate.mfile stored inside the Classes folder, and modify the code in theVariableTestAppDelegate.mfile as follows:#import "VariableTestAppDelegate.h" #import "MyClass.h" @implementation VariableTestAppDelegate @synthesize window; - (void)applicationDidFinishLaunching:(NSNotification *)aNotification { MyClass *testObject = [[MyClass alloc] init]; testObject.position = 45; NSLog (@"The object's current position = %i", testObject.position); testObject.position = [testObject changePosition:10]; NSLog (@"The new object position = %i", testObject.position); [testObject release]; } @endThe
applicationDidFinishLoadingmethod creates an object calledtestObject, sets its property (position) to45, prints out thispositionproperty, calls thechangePositionmethod, and assigns thechangePositionmethod's result to thepositionproperty, which gets printed again so you can see the result.Choose File
Click the Build and Run button, or choose Build
Quit the program by clicking the Stop button or choosing Product
Choose Run
2010-09-11 21:30:26.157 VariableTest[4567:a0f] The object's current position = 45
2010-09-11 21:30:26.160 VariableTest[4567:a0f] The new object position = 55
The output to the Log window verifies that the testObject's property (position) and method (changePosition) is working. The changePosition method simply accepts a value, adds 10 to it, and returns this sum.
Once you've tested to make sure your object is working correctly, the next step is to create a new object, inherit properties and methods from MyClass, and use the new, inherited class to verify that it works, which you can do by following these steps:
Open the VariableTest project from the previous section.
Choose File
Click Cocoa under Mac OS X in the left pane of the template dialog box.
Click the Objective-C class icon, and click the Next button. A Save As dialog box appears.
Choose the Classes folder in the Group pop-up menu, and type NewClass for your class name. Then click the Save button. The
NewClass.handNewClass.mfiles appear in your Classes folder.Click the
NewClass.hfile, and modify the code as follows:#import <Cocoa/Cocoa.h>
#import "MyClass.h"@interface NewClass : MyClass {@private } @endThe two main changes you need to make in the
NewClass.hfile are to add the#import "MyClass.h"line and defineNewClassto inherit fromMyClassthrough the@interface NewClass :MyClassline.Choose File
Click the
VariableTestAppDelegate.mfile, and modify the code as follows:#import "VariableTestAppDelegate.h" #import "MyClass.h"
#import "NewClass.h"@implementation VariableTestAppDelegate @synthesize window; - (void)applicationDidFinishLaunching:(NSNotification *)aNotification { MyClass *testObject = [[MyClass alloc] init]; testObject.position = 45; NSLog (@"The object's current position = %i", testObject.position);testObject.position = [testObject changePosition:10]; NSLog (@"The new object position = %i", testObject.position); [testObject release];NewClass *newObject = [[NewClass alloc] init];newObject.position = 32;NSLog (@"The object's current position = %i", newObject.position);newObject.position = [newObject changePosition:10];NSLog (@"The new object position = %i", newObject.position);[newObject release];} @endTo make the
VariableTestAppDelegate.mfile capable of accessing the code stored in theNewClass.hfile, you must import it using the#import "NewClass.h"line. The last five lines in theapplicationDidFinishLaunchingmethod create anewObject, based onNewClass. At this point, theNewClassfile does not contain any code since it inherits all its code from theMyClassfile.To verify that
NewClassreally does inherit its code from theMyClassfile, this code then assigns the value32into the position property ofnewObject, which it then prints out. Next, it runs themoveMemethod using a value of10. The result of thismoveMemethod gets stored in the position property ofnewObject, which then gets printed again to show how it changed.Choose File
Click the Build and Run button, or choose Build
Quit the program by clicking the Stop button or choosing Product
Choose Run
2010-09-11 23:03:18.721 VariableTest[4776:a0f] The object's current position = 45
2010-09-11 23:03:18.724 VariableTest[4776:a0f] The new object position = 55
2010-09-11 23:03:18.721 VariableTest[4776:a0f] The object's current position = 32
2010-09-11 23:03:18.724 VariableTest[4776:a0f] The new object position = 42
Even though the NewsClass file does not contain the position property or the changePosition method, the property and method still work because they're defined in the MyClass file, which is where the NewClass file inherited it.
When you create a class with its own properties and methods, you took advantage of encapsulation, which is one of the main features of object-oriented programming. The second main feature is inheritance, where one object can inherit the properties and methods of another object without physically duplicating its code.
The third feature of object-oriented programming is method overriding, where two objects can have identically named methods that can work differently from one another.
To use method overriding, you simply create a new class that inherits from an existing class. In this new class, you create a method that's identically named as a method in the other class.
To see how method overriding works, follow these steps:
Open the VariableTest project from the previous section.
Click the
NewClass.hfile, and modify the code as follows:#import <Cocoa/Cocoa.h> #import "MyClass.h" @interface NewClass : MyClass { @private }-(int)changePosition: (int)myPosition;@endAll you're doing in this code is declaring a
moveMemethod that's identical to themoveMemethod stored in theMyClassfile.Choose File
Click the
NewClass.mfile, and modify the code as follows:#import "NewClass.h" @implementation NewClass - (id)init { if ((self = [super init])) { // Initialization code here. } return self; } - (void)dealloc { // Clean-up code here. [super dealloc]; }-(int)changePosition: (int)myPosition{int newPosition;newPosition = self.position * myPosition;return newPosition;}@endThis code redefines how the
changePositionmethod works. In theMyClassfile, thechangePositionmethod addsself.position + myPosition. In thismoveMemethod, it multiplesself.position * myPosition.Choose File
Click the Build and Run button, or choose Build
Quit the program by clicking the Stop button or choosing Product
Choose Run
2010-09-11 23:03:18.721 VariableTest[4776:a0f] The object's current position = 45
2010-09-11 23:03:18.724 VariableTest[4776:a0f] The new object position = 55
2010-09-11 23:03:18.726 VariableTest[4776:a0f] The object's current position = 32
2010-09-11 23:03:18.727 VariableTest[4776:a0f] The new object position = 320
Even though both the testObject (based on MyClass) and newObject (based on NewClass) use identical method names, method overriding lets you use the same method name in multiple objects.
Without writing a single line of code, you can create a Mac program that knows how to display pull-down menus and windows. If you move or resize the window, it behaves exactly like a typical Mac program. However, most parts of your user interface also have a list of predefined events that they can recognize.
In most cases, you can ignore all or most of these events and just let your program behave in its default mode. However, sometimes you may want to respond to certain types of events. To do this, you can create a method to respond to that specific event and store that method in another object. One common type of object that handles different events is called a delegate.
For example, the sample program you've been modifying throughout this book has a method called applicationDidFinishLaunching, which runs every time your program successfully starts. This applicationDidFinishLaunching method is automatically included in a file called AppDelegate. (The name of your project gets added to the front of this file name, so if you named your project MyTest, the complete name of the file would be MyTestAppDelegate.)
A delegate is simply a class (consisting of a header and an implementation file) that contains methods for handling a list of predefined events for a specific part of your program. Every time you create a basic Mac program, Xcode automatically creates an AppDelegate file, which is a delegate object for handling events related to your entire application, which is why it's called AppDelegate.
Every program is based on a class called NSApplication. This class contains all the code needed to make your program behave like a typical Mac program without you having to write a single line of code.
To respond to different events related to your application, your application relies on a file called AppDelegate. This AppDelegate file is where you'll create and store your methods for responding to different events related to the application.
To find the different types of events that an application can recognize, follow these steps:
Choose Help
Click in the Search field in the upper-right corner, type NSApplicationDelegate, and press Return. A list of help topics related to your search query appears in the left pane of the Organizer window.
Click the NSApplicationDelegate Protocol topic. A help screen for the NSApplicationDelegate Protocol Reference appears, as shown in Figure 13-1.
Scroll down this NSApplicationDelegate Protocol Reference screen until you find the list of events, under the Tasks category heading, that your application can respond to, as shown in Figure 13-2.
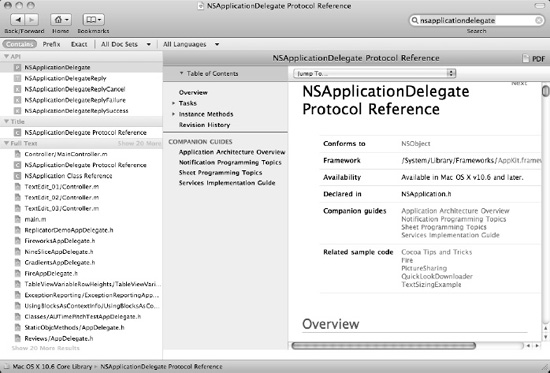
By identifying a particular class, you can find the list of events that the object can recognize. For the NSApplication class, which forms the basis for every Mac program you create, the following are the different events that the application can recognize:
Launching Applications
-applicationWillFinishLaunching:
             -applicationDidFinishLaunching:
Terminating Applications
-applicationShouldTerminate:
             -applicationShouldTerminateAfterLastWindowClosed:
             -applicationWillTerminate:
Managing Active Status
-applicationWillBecomeActive:
             -applicationDidBecomeActive:
             -applicationWillResignActive:
-applicationDidResignActive:-applicationWillHide:
-applicationDidHide:
-applicationWillUnhide:
-applicationDidUnhide:Managing Windows
-applicationWillUpdate:
             -applicationDidUpdate:
             -applicationShouldHandleReopen:hasVisibleWindows:
Managing the Dock Menu
-applicationDockMenu:
Displaying Errors
-application:willPresentError:
Managing the Screen
-applicationDidChangeScreenParameters:
Opening Files
-application:openFile:
             -application:openFileWithoutUI:
             -application:openTempFile:
             -application:openFiles:
             -applicationOpenUntitledFile:
             -applicationShouldOpenUntitledFile:
Printing
-application:printFile:
             -application:printFiles:withSettings:showPrintPanels:
You'll never need to recognize all of these possible events, but you may need to recognize some of them for your particular program. If you study these different types of events, you'll notice that they are in three categories: events that will happen, events that did happen, or events that are happening right now.
If you respond to an event that includes
willin its name, then your code will run before the event actually occurs.If you respond to an event that includes
didin its name, then your code will run after the event actually occurs.If you respond to an event that does not include the words
didorwill, then your code runs as the particular event occurs.
To see how some of these events can work, follow these steps:
Open the VariableTest project from the previous chapter.
Click the
VariableTestAppDelegate.mfile in the Classes folder. The middle pane of the Xcode window displays yourVariableTestAppDelegate.mcode.Modify the
VariableTestAppDelegate.mfile as follows:#import "VariableTestAppDelegate.h" #import "MyClass.h" @implementation VariableTestAppDelegate @synthesize window;
- (void)applicationDidFinishLaunching:(NSNotification *)aNotification {NSLog(@"applicationDidFinishLaunching");}-(void)applicationDidBecomeActive:(NSNotification *)aNotification {NSLog (@"applicationDidBecomeActive");}-(void)applicationWillTerminate:(NSNotification *)aNotification {NSLog (@"applicationWillTerminate");}@endChoose File
Click the Run button, or choose Product
Click another program that's running, or click the desktop to make your program inactive.
Quit the program by choosing the VariableTest
Choose Run
2010-09-11 18:04:18.424 VariableTest[3850:a0f] applicationDidFinishLaunching
2010-09-11 18:04:18.434 VariableTest[3850:a0f] applicationDidBecomeActive
2010-09-11 18:04:25.574 VariableTest[3850:a0f] applicationDidBecomeActive
2010-09-11 18:04:29.344 VariableTest[3850:a0f] applicationWillTerminate
When you ran your program, this what happened:
Your program ran and immediately launched the
applicationDidFinishLaunchingmethod inside theVariableTestAppDelegate.mfile.Your program's window appeared on the screen, which triggered the
applicationDidBecomeActivemethod.When you made another program active and then switched back to your program, the
applicationDidBecomeActivemethod ran a second time.When you quit your program, the
applicationWillTerminatemethod ran.
As you can see, your application can respond to a variety of different events, but it's up to you to create methods to respond to those events by writing Objective-C code in the AppDelegate file.
Object-oriented programming allows encapsulation, inheritance, and method overriding. Encapsulation isolates code from the rest of your program, making it easier to build a large program out of smaller parts. Inheritance lets you reuse code without physically copying it. Method overriding lets you write different code for identically named methods stored in different objects.
By using classes from the Cocoa framework, you're already using classes that inherit from other classes. If you create a class and want to inherit code from that class, you need to follow two steps. First, you need to use the #import command to import all the code from the class that you want to inherit from. Second, you need to define your new class as being based on another class like this:
#import "OldClass.h"

@interface NewClass : OldClass
To override a method, you just need to define an identically named method in a different class. When you call that message, you must also identify the object name so the computer knows which method to use and where that method is stored.
Finally, as you develop your programs, you'll find that parts of your user interface already know how to respond to different types of events that can occur. Normally you can ignore these events, but if you want to respond to them for a particular reason, you need to write a method with code that tells your program how to react when that specific event occurs.
By understanding how to use encapsulation, inheritance, and method overriding to create objects, you'll better understand how objects can make up your user interface, which you'll learn about in the next part of this book.
Every user interface object, such as a button or text field, can also respond to different types of events, which you may need to respond to through methods stored in a delegate file for that user interface object.
In this first part of the book, you've gone from learning the basics to using Xcode and Objective-C to learning how to write simple Objective-C programs that take advantage of object-oriented features. In the next part of this book, you'll learn how to tie your Objective-C code to your user interface to make your programs truly look and act like real Mac programs.