
C H A P T E R 24
Using the Other Interactions
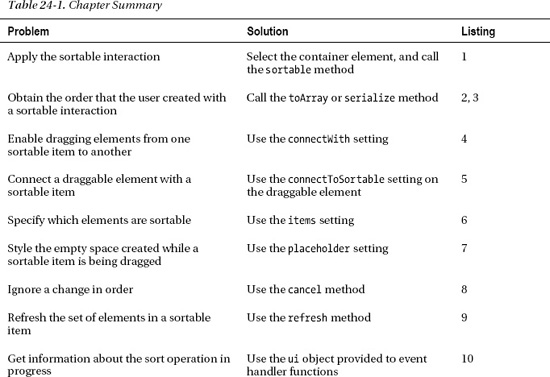
In this chapter, I describe the three remaining jQuery UI interactions: sortable, selectable, and resizable. These interactions are less used (and less useful) than draggable and droppable, which I described in Chapter 23. The interactions in this chapter can be useful, but they use models that are hard to highlight to the user. Because of that, they perform best as supplements to other, more conventional, approaches. Table 24-1 provides the summary for this chapter.
Using the Sortable Interaction
The sortable interaction lets the user change the order of a set of elements by dragging them around. You apply the sortable interaction by selecting the element that contains the individual items that you want to sort and then calling the sortable method. Listing 24-1 contains a simple example.
Listing 24-1. Using the sortable interaction
<!DOCTYPE html>

<html>

<head>

    <title>Example</title>

    <script src="jquery-1.7.js" type="text/javascript"></script>

    <script src="jquery-ui-1.8.16.custom.js" type="text/javascript"></script>

    <link rel="stylesheet" type="text/css" href="styles.css"/>

    <link rel="stylesheet" type="text/css" href="jquery-ui-1.8.16.custom.css"/>

    <style type="text/css">

       div.sortable { width: 100px; background-color: lightgrey; font-size: large;

           float: left; margin: 4px; text-align: center; border: medium solid black;

           padding: 4px;}

    </style>

    <script type="text/javascript">

        $(document).ready(function() {

            $('#sortContainer').sortable();

        });

    </script>

</head>

<body>

    <h1>Jacqui's Flower Shop</h1>

    <div id="sortContainer">

        <div id="item1" class="sortable">Item 1</div>

        <div id="item2" class="sortable">Item 2</div>
        <div id="item3" class="sortable">Item 3</div>

    </div>

</body>

</html>
In this example, I created a number of div elements and assigned them to the sortable class. This class has no effect on the interaction, and I use it only to style the elements. To create the interaction, I select the parent div element (the one whose id is sortContainer) and call the sortable method. The result is that I can change the order of my three div elements simply by dragging them into a new position. You can see the effect in Figure 24-1 (although, like all of the examples in this chapter, you will get a better sense of what is happening by running the example in the browser).

Figure 24-1. Sorting items by dragging them
To demonstrate the sortable interaction, I dragged the element labeled Item 2 to the right of the browser window. Once I drag the element past the one labeled Item 3, jQuery UI rearranges the items so that they are in a new order. I only dragged an element one position, but you can move them around several positions at a time.
Getting the Sortable Order
At some point, you need to know the order that the user created by moving the elements around. To get this information, you can call the toArray method, which returns a JavaScript array of the id attribute values for the sorted elements. Listing 24-2 shows the addition of a button to the example that writes the current order to the console.
Listing 24-2. Obtaining the sorted element order
...

<script type="text/javascript">

    $(document).ready(function() {

        $('#sortContainer').sortable();


        $('<div id=buttonDiv><button>Get Order</button></div>').appendTo('body'),

        $('button').button().click(function() {

            var order = $('#sortContainer').sortable("toArray");

            for (var i = 0; i < order.length; i++) {

                console.log("Position: " + i + " ID: " + order[i]);

            }

        })

    });

</script>

...
You can see the effect in Figure 24-2. When the button is pressed, I call the toArray method and enumerate the contents of the resulting array to the console.
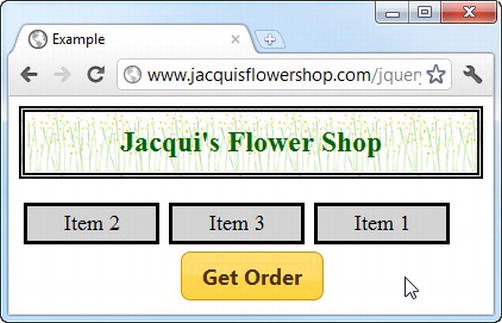
Figure 24-2. Adding a button to write out the sort order
For the order in the figure, pressing the button produces the following output:
Position: 0 ID: item2

Position: 1 ID: item3

Position: 2 ID: item1
You can also use the serialize method to generate a string that can easily be used with a form. Listing 24-3 provides an example.
Listing 24-3. Using the serialize method
<!DOCTYPE html>

<html>

<head>

    <title>Example</title>

    <script src="jquery-1.7.js" type="text/javascript"></script>

    <script src="jquery-ui-1.8.16.custom.js" type="text/javascript"></script>

    <link rel="stylesheet" type="text/css" href="styles.css"/>

    <link rel="stylesheet" type="text/css" href="jquery-ui-1.8.16.custom.css"/>

    <style type="text/css">

        div.sortable { width: 100px; background-color: lightgrey; font-size: large;

            float: left; margin: 4px; text-align: center; border: medium solid black;

            padding: 4px;}

            #buttonDiv {clear: both}

    </style>

    <script type="text/javascript">

        $(document).ready(function() {
$('#sortContainer').sortable();
$('<div id=buttonDiv><button>Get Order</button></div>').appendTo('body'),
$('button').button().click(function() {
var formstring = $('#sortContainer').sortable("serialize");
console.log(formstring);
})
});
</script>
</head>
<body>
<h1>Jacqui's Flower Shop</h1>
<div id="sortContainer">
<div id="item_1" class="sortable">Item 1</div>
<div id="item_2" class="sortable">Item 2</div>
<div id="item_3" class="sortable">Item 3</div>
</div>
</body>
</html>
Notice that I had to change the id values of the sortable elements. The serialize method looks for a pattern of <key>_<index> when generating its string. The output for the order shown in Figure 24-2 is as follows:
item[]=2&item[]=3&item[]=1
Configuring the Sortable Interaction
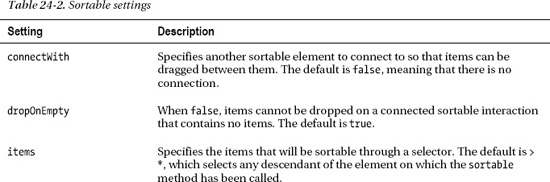
The sortable interaction relies heavily on the draggable interaction I described in Chapter 23. This means that the options I described for that interaction (such as axis and tolerance) can be applied with the same effect to configure sortable interactions. I won't describe those settings again. Instead, Table 24-2 shows the settings that are unique to the sortable interaction and the most useful. I describe these settings in the sections that follow.
![]()
Connecting Sortable Interactions
The sortable feature I like most is the ability to connect two sortable interactions together, allowing items to be dragged between them. You achieve this using the connectWith setting, specifying a selector that matches the element you want to connect with. You can create a bidirectional connection by using the connectWith setting on both sortable elements, as shown in Listing 24-4.
Listing 24-4. Connecting sortable interactions together
<!DOCTYPE html>

<html>

<head>

    <title>Example</title>

    <script src="jquery-1.7.js" type="text/javascript"></script>

    <script src="jquery-ui-1.8.16.custom.js" type="text/javascript"></script>

    <link rel="stylesheet" type="text/css" href="styles.css"/>

    <link rel="stylesheet" type="text/css" href="jquery-ui-1.8.16.custom.css"/>

    <style type="text/css">

        div.sortable { width: 100px; background-color: lightgrey; font-size: large;

            margin: 4px; text-align: center; border: medium solid black; padding: 4px;}

        #fruitContainer {position: absolute; right:50px}

        #flowerContainer {position: absolute; left:50px}

        div.flower {background-color: lightgreen}

    </style>

    <script type="text/javascript">

        $(document).ready(function() {

            $('#fruitContainer').sortable({

                connectWith: '#flowerContainer'

            });

            $('#flowerContainer').sortable({

                connectWith: '#fruitContainer'

            });

        });

    </script>

</head>

<body>

    <h1>Jacqui's Flower Shop</h1>

    <div id="fruitContainer" class="sortContainer">

        <div id="fruit_1" class="sortable fruit">Apple</div>

        <div id="fruit_2" class="sortable fruit">Orange</div>
<
div id="fruit_3" class="sortable fruit">Banana</div>

        <div id="fruit_4" class="sortable fruit">Pear</div>

    </div>

    <div id="flowerContainer" class="sortContainer">

        <div id="flower_1" class="sortable flower">Astor</div>

        <div id="flower_2" class="sortable flower">Peony</div>

        <div id="flower_3" class="sortable flower">Lily</div>

        <div id="flower_4" class="sortable flower">Orchid</div>

    </div>

</body>

</html>
In this example, I created two groups of items and called the sortable method on their container element. I used the connectwith setting to associate each sortable with the other, and the result is shown in Figure 24-3.
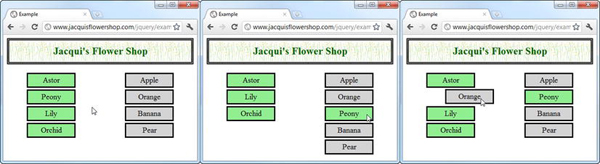
Figure 24-3. Dragging elements between connected sortable interactions
Connecting a Draggable Element with a Sortable Element
You can also connect a draggable element with a sortable one. You do this by applying the connectToSortable setting on the draggable element, specifying a selector that matches the draggable element you want to connect to. Listing 24-5 shows how this is done.
Listing 24-5. Connecting a draggable element and a sortable element
<!DOCTYPE html>

<html>

<head>

    <title>Example</title>

    <script src="jquery-1.7.js" type="text/javascript"></script>

    <script src="jquery-ui-1.8.16.custom.js" type="text/javascript"></script>

    <link rel="stylesheet" type="text/css" href="styles.css"/>

    <link rel="stylesheet" type="text/css" href="jquery-ui-1.8.16.custom.css"/>

    <style type="text/css">

        div.sortable { width: 100px; background-color: lightgrey; font-size: large;

            margin: 4px; text-align: center; border: medium solid black; padding: 4px;}

        #fruitContainer {position: absolute; right:50px}

        #flowerContainer {position: absolute; left:50px}

        div.flower {background-color: lightgreen}

    </style>

    <script type="text/javascript">

        $(document).ready(function() {

            $('#fruit_1').draggable({
                connectToSortable: '#flowerContainer',

                helper: "clone"

            });

            $('#flowerContainer').sortable();

        });

    </script>

</head>

<body>

    <h1>Jacqui's Flower Shop</h1>

    <div id="fruitContainer" class="sortContainer">

        <div id="fruit_1" class="sortable fruit">Apple</div>

    </div>

    <div id="flowerContainer" class="sortContainer">

        <div id="flower_1" class="sortable flower">Astor</div>

        <div id="flower_2" class="sortable flower">Peony</div>

        <div id="flower_3" class="sortable flower">Lily</div>

        <div id="flower_4" class="sortable flower">Orchid</div>

    </div>

</body>

</html>
In this example, I reduced the number of fruit items to one and made it draggable, connecting to the sortable list of flowers. The result is that the draggable item can be added to the sortable list, as shown in Figure 24-4. This setting works best when the helper setting for the draggable item is clone. It will work for other values, but an error will be reported.
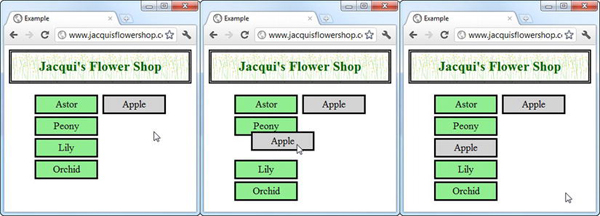
Figure 24-4. Connecting a sortable item and a draggable item
Selecting the Sortable Items
You can be selective about which items in the container are sortable. You do this through the items setting, the value of which is a selector that matches the elements you want to enable sorting for. Elements that do not match the selector cannot be rearranged. Listing 24-6 provides a demonstration.
Listing 24-6. Selecting specific elements to be sortable
<!DOCTYPE html>

<html>

<head>

    <title>Example</title>

    <script src="jquery-1.7.js" type="text/javascript"></script>

    <script src="jquery-ui-1.8.16.custom.js" type="text/javascript"></script>

    <link rel="stylesheet" type="text/css" href="styles.css"/>

    <link rel="stylesheet" type="text/css" href="jquery-ui-1.8.16.custom.css"/>

    <style type="text/css">

        div.sortable { width: 100px; background-color: lightgrey; font-size: large;

            margin: 4px; text-align: center; border: medium solid black; padding: 4px;}

        #fruitContainer {position: absolute; right:50px}

        #flowerContainer {position: absolute; left:50px}

    </style>

    <script type="text/javascript">

        $(document).ready(function() {


            $('div.flower:even').css("background-color", "lightgreen")


            $('#flowerContainer').sortable({

                items: '.flower:even'

            });

        });

    </script>

</head>

<body>

    <h1>Jacqui's Flower Shop</h1>

    <div id="flowerContainer" class="sortContainer">

        <div id="flower_1" class="sortable flower">Astor</div>

        <div id="flower_2" class="sortable flower">Peony</div>

        <div id="flower_3" class="sortable flower">Lily</div>

        <div id="flower_4" class="sortable flower">Orchid</div>

    </div>

</body>

</html>
In this example, I used the items setting to specify that only the even-numbered elements in the container should be sortable. In Figure 24-5, the Astor and Lily elements can be sorted, but the Peony and Orchid elements won't respond to being dragged and remain in position.

Figure 24-5. Selecting the items that can be sorted
There is an oddity you should be aware of when using the items setting, and I have shown it in the last frame of the figure. An element that doesn't match the selector cannot be dragged into a new position unless it has been dislodged by another element. So in the figure, I dragged the Astor element to a new position, which forces the Peony element to move. Once it is moved, the Peony element will respond to being dragged and sorted as though it matches the items selector.
Styling the Empty Space
While you are dragging an item into a new position, the space it leaves behind remains empty. You can apply a CSS class to this space through the placeholder setting. This can be a useful way to emphasize that the empty space is a drop target. Listing 24-7 shows the use of the placeholder setting.
Listing 24-7. Using the placeholder setting
<!DOCTYPE html>

<html>

<head>

    <title>Example</title>

    <script src="jquery-1.7.js" type="text/javascript"></script>

    <script src="jquery-ui-1.8.16.custom.js" type="text/javascript"></script>

    <link rel="stylesheet" type="text/css" href="styles.css"/>

    <link rel="stylesheet" type="text/css" href="jquery-ui-1.8.16.custom.css"/>

    <style type="text/css">

        div.sortable {width: 100px; background-color: lightgrey; font-size: large;

            margin: 4px; text-align: center; border: medium solid black; padding: 4px;}

        #flowerContainer {position: absolute; left:25%}

        .emptySpace {border: medium dotted red; height: 25px; margin: 4px}

    </style>

    <script type="text/javascript">

        $(document).ready(function() {

            $('#flowerContainer').sortable({
                placeholder: 'emptySpace'

            });

        });

    </script>

</head>

<body>

    <h1>Jacqui's Flower Shop</h1>

    <div id="flowerContainer" class="sortContainer">

        <div id="flower_1" class="sortable ">Astor</div>

        <div id="flower_2" class="sortable ">Peony</div>

        <div id="flower_3" class="sortable">Lily</div>

        <div id="flower_4" class="sortable">Orchid</div>

    </div>

</body>

</html>
In this example, I defined a CSS class called emptySpace, which defines sizes for the height and margin properties and defines a red dotted border. I specify this class using the placeholder setting and, as Figure 24-6 shows, when I drag an element to sort it, the space that it leaves behind is assigned to the emptySpace class.
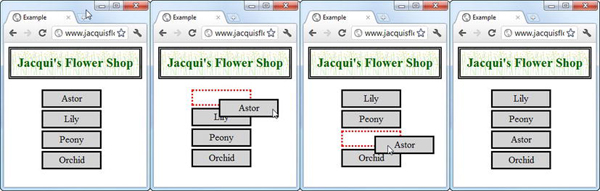
Figure 24-6. Using the placeholder setting
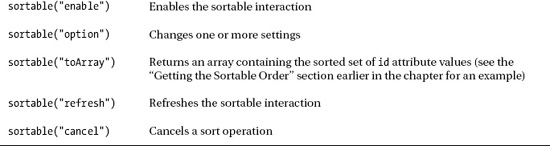
Using the Sortable Methods
The sortable interaction defines all of the standard jQuery UI methods, plus a few that are specific to working with sortable elements. Table 24-3 describes these methods.

Cancelling a Sort
You can use the cancel method to prevent elements from being sorted. This is something that should be done sparingly because it effectively ignores the actions that the user has taken. If you do cancel a sort, you should make sure the user knows why this happened. Listing 24-8 provides an example of using the cancel method in conjunction with the update event. The update event is triggered when the user releases the mouse button after having dragged an element to create a new sorted order. I describe the sortable events later in this chapter.
Listing 24-8. Using the cancel method
<!DOCTYPE html>

<html>

<head>

    <title>Example</title>

    <script src="jquery-1.7.js" type="text/javascript"></script>

    <script src="jquery-ui-1.8.16.custom.js" type="text/javascript"></script>

    <link rel="stylesheet" type="text/css" href="styles.css"/>

    <link rel="stylesheet" type="text/css" href="jquery-ui-1.8.16.custom.css"/>

    <style type="text/css">

        div.sortable {width: 100px; background-color: lightgrey; font-size: large;

            margin: 4px; text-align: center; border: medium solid black; padding: 4px;}

    </style>

    <script type="text/javascript">

        $(document).ready(function() {


            $('#error').dialog({autoOpen: false, modal: true})


            $('#flowerContainer').sortable({

                update: function() {

                    var sortedItems = $('#flowerContainer').sortable("toArray");

                    if (sortedItems[0] != "item_1") {

                        $('#error').dialog("open")

                        $('#flowerContainer').sortable("cancel")

                    }

                }

            });
        });

    </script>

</head>

<body>

    <div id="error">The King must be first</div>

    <h1>Jacqui's Flower Shop</h1>

    <div id="flowerContainer" class="sortContainer">

        <div id="item_1" class="sortable ">King</div>

        <div id="item_2" class="sortable ">Queen</div>

        <div id="item_3" class="sortable ">Jack</div>

        <div id="item_4" class="sortable">10</div>

    </div>

</body>

</html>
In this example, I call the cancel method if the new sorted order that the user has created means that the King element isn't in the first place in the list. I use the dialog widget, described in Chapter 22, to alert the user to the problem. Changes that affect the other sortable elements are allowed to continue.
Refreshing the Sortable Elements
The refresh method causes the sortable interaction to refresh its cache of the elements in the sortable container. Listing 24-9 shows how you can use this feature to add new sortable elements.
Listing 24-9. Adding new sortable elements
<!DOCTYPE html>

<html>

<head>

    <title>Example</title>

    <script src="jquery-1.7.js" type="text/javascript"></script>

    <script src="jquery-ui-1.8.16.custom.js" type="text/javascript"></script>

    <link rel="stylesheet" type="text/css" href="styles.css"/>

    <link rel="stylesheet" type="text/css" href="jquery-ui-1.8.16.custom.css"/>

    <style type="text/css">

        div.sortable {width: 100px; background-color: lightgrey; font-size: large;

            margin: 4px; text-align: center; border: medium solid black; padding: 4px;}

    </style>

    <script type="text/javascript">

        $(document).ready(function() {


            $('#flowerContainer').sortable();


            var itemCount = 2;


            $('button').click(function() {

                $('<div id=flower_' + (itemCount++) + ' class=sortable>Item ' +

                  itemCount + '</div>').appendTo('#flowerContainer'),

                $('#flowerContainer').sortable("refresh");

            })

        });
    </script>

</head>

<body>

    <h1>Jacqui's Flower Shop</h1>

    <button>Add Sortable Item</button>

    <div id="flowerContainer" class="sortContainer">

        <div id="flower_1" class="sortable">Astor</div>

        <div id="flower_2" class="sortable">Peony</div>

    </div>

</body>

</html>
In this example, I added a button to the document that adds new items to the sortable container and calls the refresh method to make sure that the items are properly sortable.
Using the Sortable Events
The sortable interaction supports all of the events defined by the draggable interaction, which I described in Chapter 23. Table 24-4 describes the events that are unique to the sortable interaction.
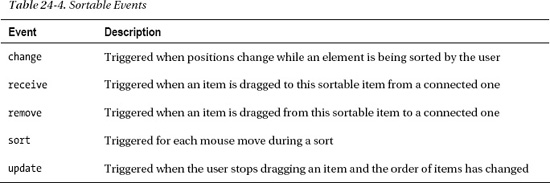
When triggering these events, jQuery UI provides additional information via a ui object argument, which has the properties shown in Table 24-5.
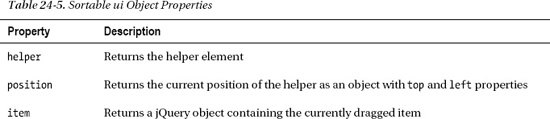

Listing 24-10 shows the use of the ui object with the sort and change events.
Listing 24-10. Using the change and sort events
<!DOCTYPE html>

<html>

<head>

    <title>Example</title>

    <script src="jquery-1.7.js" type="text/javascript"></script>

    <script src="jquery-ui-1.8.16.custom.js" type="text/javascript"></script>

    <link rel="stylesheet" type="text/css" href="styles.css"/>

    <link rel="stylesheet" type="text/css" href="jquery-ui-1.8.16.custom.css"/>

    <style type="text/css">

        div.sortable {width: 100px; background-color: lightgrey; font-size: large;

            margin: 4px; text-align: center; border: medium solid black; padding: 4px;}

        #flowerContainer {position: absolute; left:10px}

        #info {position: absolute; right: 10px; border: medium solid black; padding: 4px}

    </style>

    <script type="text/javascript">

        $(document).ready(function() {

            $('#flowerContainer').sortable({

                sort: function(event, ui) {

                    $('#itemId').text(ui.item.attr("id"))

                },

                change: function(event, ui) {

                    $('#pos').text($('#flowerContainer *').index(ui.placeholder))

                }

            });

        });

    </script>

</head>

<body>

    <h1>Jacqui's Flower Shop</h1>

    <div id="flowerContainer" class="sortContainer">

        <div id="flower_1" class="sortable ">Astor</div>

        <div id="flower_2" class="sortable ">Peony</div>

        <div id="flower_3" class="sortable">Lily</div>

        <div id="flower_4" class="sortable">Orchid</div>

    </div>

    <div id="info" class="ui-widget">

        <div>Item ID: <span id="itemId">None</span></div>

        <div>Pos: <span id="pos">None</span></div>

    </div>

</body>

</html>
I use the events to display information about the sorting operation. For the sort event, I read the ui.item property and get the id attribute of the element being dragged. For the change event, I use the ui.placeholder property, and I use the index method to figure out its position among the sortable elements.
Using the Selectable Interaction
The selectable interaction allows the user to select one or more elements, either by dragging the mouse or by clicking on individual elements. You apply the interaction through the selectable method as demonstrated in Listing 24-11.
Listing 24-11. Applying the selectable interaction
<!DOCTYPE html>

<html>

<head>

    <title>Example</title>

    <script src="jquery-1.7.js" type="text/javascript"></script>

    <script src="jquery-ui-1.8.16.custom.js" type="text/javascript"></script>

    <link rel="stylesheet" type="text/css" href="styles.css"/>

    <link rel="stylesheet" type="text/css" href="jquery-ui-1.8.16.custom.css"/>

    <style type="text/css">

        div.flower {width: 200px; background-color: lightgrey; font-size: large;

            margin: 4px; text-align: center; border: medium solid black; padding: 4px;}

        #flowerContainer {position: absolute; left:10px}

        div.ui-selected {border: medium solid green; background-color: lightgreen}

        div.ui-selecting {border: medium solid green}

    </style>

    <script type="text/javascript">

        $(document).ready(function() {

            $('#flowerContainer').selectable();

        });

    </script>

</head>

<body>

    <h1>Jacqui's Flower Shop</h1>

    <div id="flowerContainer">

        <div id="flower_1" class="flower">Astor</div>

        <div id="flower_2" class="flower">Peony</div>

        <div id="flower_3" class="flower">Lily</div>

        <div id="flower_4" class="flower">Orchid</div>

    </div>

</body>

</html>
You apply the selectable interaction to the element that contains the elements you want the user to be able to select. In this case, I use the same div elements I used for the sortable interaction earlier in the chapter. I select the container and call the selectable method like this:
$('#flowerContainer').selectable();
Although I have now applied the selectable interaction to my container, I need to define a pair of CSS styles for specific classes to give the user visual feedback. Here are the styles I associated with these classes:
div.ui-selected {border: medium solid green; background-color: lightgreen}

div.ui-selecting {border: medium solid green}
The selectable interaction applies these classes to my elements to reflect their selection status. The ui.selecting class is applied when the user is dragging the mouse to select the elements in a specific area, and the ui-selected class is applied when an element has been selected (either because the user has clicked on the element or because it was in the area covered by a mouse drag). I used simple styles that just apply green borders and backgrounds. You can see the effect of selecting elements by dragging the mouse in Figure 24-7.

Figure 24-7. Selecting elements with a mouse
The user must start dragging the mouse within the container element to start the selection process. You can see the outline of the area that has been selected (known as the marquee) in the middle frame of the figure—at that point, jQuery UI has applied the ui-selecting class. When the mouse is released, the elements that the marquee overlaps are selected and the ui-selected class is applied, as shown in the last frame of the figure.
The user can also select elements by clicking on them. Multiple elements can be selected, and holding the Control/Meta key allows for noncontiguous selections. If you find that clicking causes a single selected element to toggle, you need the addition shown in Listing 24-12.
Listing 24-12. Enabling multiple element selection for the selectable interaction
<script type="text/javascript">

    $(document).ready(function() {

        $('#flowerContainer')

            .bind("mousedown", function(e) {e.metaKey = true;})

            .selectable();

    });

</script>
When the user presses down the mouse button, the ui-selecting class is applied. The ui-selected class is applied when the mouse button is released.
Configuring the Selectable Interaction
You can configure the selectable interaction using the settings described in Table 24-6.
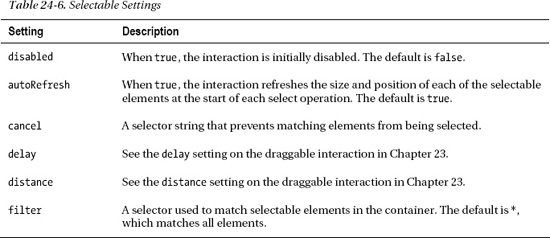
Most of these settings are self-evident or are the same as for other interactions. Of particular interest, though, is the cancel setting, which you can use to make elements unselectable by the user. Listing 24-13 provides a demonstration.
Listing 24-13. Using the cancel setting
...

<script type="text/javascript">

    $(document).ready(function() {

        $('#flowerContainer')

            .bind("mousedown", function(e) {e.metaKey = true;})

            .selectable({

                cancel: '#flower_3'

            });

    });

</script>

...
In this script, I use a selector that prevents the element with the ID of flower_3 from being selected. This works well when the user is selecting elements by clicking on them, but it doesn't prevent selection by dragging. For this reason, use the cancel setting with care.
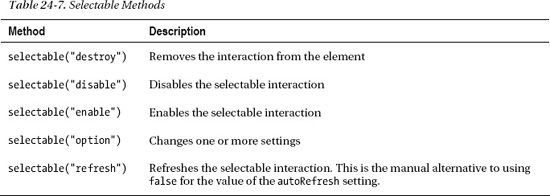
Using the Selectable Interaction Methods
The selectable interaction defines only one unique method, as described in Table 24-7. The other methods are those that are common to all widgets and interactions.
Using the Selectable Interaction Events
The selectable interaction defines the events shown in Table 24-8.

jQuery UI provides additional information for most of these events through a ui object. For the selected and selecting events, the ui object has a property called selected, which contains the HTMLElement corresponding to the element that has been (or is about to be) selected. For the unselected and unselecting events, the ui object has an unselected property that performs the same purpose.
Using the Resizable Interaction
The resizable interaction adds drag handles to elements that allow them to be resized by the user. Some browsers do this automatically with text areas, but the resizable interaction lets us apply this feature to any element in a document. Listing 24-14 shows the application of the resizable interaction that you perform using the resizable method.
Listing 24-14. Applying the resizable interaction
<!DOCTYPE html>

<html>

<head>

    <title>Example</title>

    <script src="jquery-1.7.js" type="text/javascript"></script>

    <script src="jquery-ui-1.8.16.custom.js" type="text/javascript"></script>

    <link rel="stylesheet" type="text/css" href="styles.css"/>

    <link rel="stylesheet" type="text/css" href="jquery-ui-1.8.16.custom.css"/>

    <style type="text/css">

        #astor, #lily {text-align: center; width: 150px; border: thin solid black;

            padding: 5px; float: left; margin: 20px}

        #astor img, #lily img {display: block; margin: auto}

    </style>

    <script type="text/javascript">

        $(document).ready(function() {

            $('#astor').resizable({

                alsoResize: "#astor img"

            });

        });

    </script>

</head>

<body>

    <h1>Jacqui's Flower Shop</h1>

    <div id="astor" class="ui-widget">

        <img src="astor.png" />

        Astor

    </div>

     <div id="lily" class="ui-widget">

        <img src="lily.png" />

        Lilly

    </div>

</body>

</html>
In this example, I created two div elements whose contents are an img and some text. I select one of these in the script and apply the resizable method (using the alsoResize setting, which I'll describe later in this chapter). jQuery UI adds a drag handle to the selected element, allowing me to resize it vertically and horizontally, as shown in Figure 24-8. In the figure, I increased the height of the element and reduced the width.
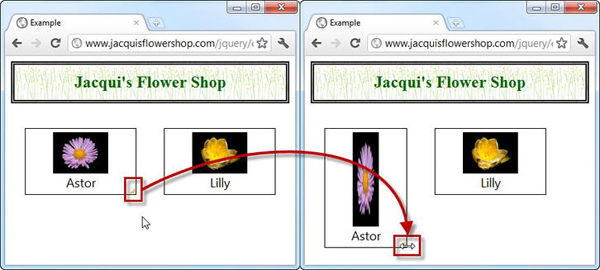
Figure 24-8. Using the drag handle to change the dimensions of a resizable element
Configuring the Resizable Interaction
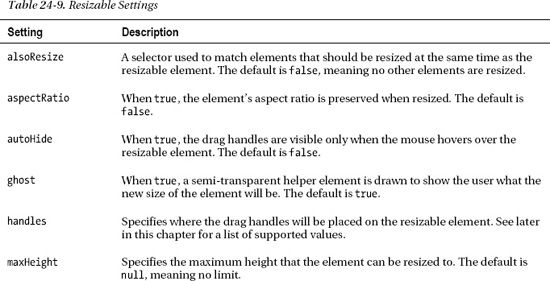
You can configure the resizable interaction using the settings described in Table 24-9. The resizable interaction relies on the draggable interaction I described in Chapter 23. This means that, in addition to the settings described in the table, you can configure the resizable interaction using the draggable settings as well, including delay, distance, grid, and containment.
Resizing Related Elements
To my mind, alsoResize is the most useful setting for configuring the resizable interaction. It allows you to specify additional elements that will be resized along with the element to which you applied the resizable method. I use this mainly to ensure that content elements are resized in sync with their parent, as I demonstrated earlier in the chapter when I selected the img element to be resized with the div. First of all, it helps to understand what happens when you have content elements and don't use the alsoResize setting. Listing 24-15 sets the scene.
Listing 24-15. Resizing an element with content without the alsoResize setting
...

<script type="text/javascript">

    $(document).ready(function() {

        $('#astor').resizable();

    });

</script>

...
Without the alsoResize setting, only the div element will change size. The content elements will be left as they are. You can see what happens in Figure 24-9.
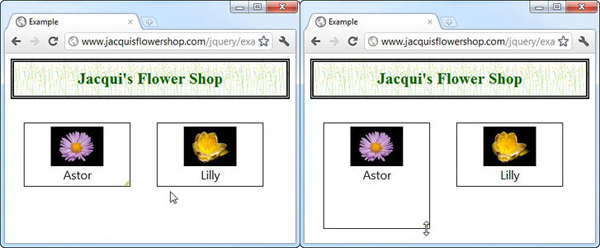
Figure 24-9. Resizing an element, but not its content
There are times when this is useful, but I find myself using the alsoResize setting almost every time I use the resizable interaction. For me, the neat thing about the alsoResize setting is that the matched elements are not limited to the contents of the element you are resizing. You can specify any element, as Listing 24-16 shows.
Listing 24-16. Resizing additional elements with the alsoResize setting
...

<script type="text/javascript">

    $(document).ready(function() {

        $('#astor').resizable({

            alsoResize: "#astor img, #lily, #lily img"

        });

    });

</script>

...
In this script, I broadened the selection to include the other div and img elements in the document. This means that when I resize the resizable div element, jQuery UI resizes four elements simultaneously. You can see the effect in Figure 24-10.
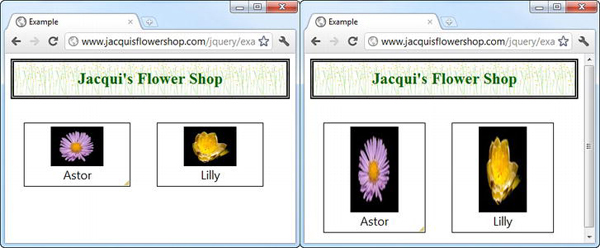
Figure 24-10. Resizing multiple elements
Constraining the Resizable Element Size
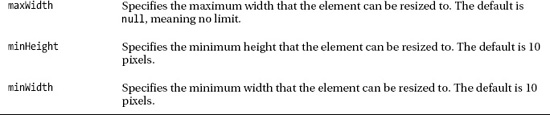
You can limit the size of resizable elements by applying the maxHeight, maxWidth, minHeight, and minWidth settings. The value for all four settings is a number of pixels or null, meaning that there is no limit. Listing 24-17 shows how you can use these settings.
![]() Tip The default values for the
Tip The default values for the minWidth and minHeight settings are 10 pixels. If the value is any smaller, jQuery UI cannot display the drag handles, which means the user would be unable to increase the size again. Use smaller values with caution.
Listing 24-17. Limiting the size of a resizable element
<script type="text/javascript">

    $(document).ready(function() {

        $('#astor').resizable({

            alsoResize: "#astor img",

            maxWidth: 200,

            maxHeight: 150

        });

    });

</script>
![]() Tip You can also use the containment setting that is defined by the draggable interaction, which I described in Chapter 23. This allows you to limit the maximum size of a resizable element to the size of another element.
Tip You can also use the containment setting that is defined by the draggable interaction, which I described in Chapter 23. This allows you to limit the maximum size of a resizable element to the size of another element.
Positioning the Drag Handles
You can specify which edges and corners can be dragged through the handles setting. The value for this setting is either all (meaning that all edges and corners are draggable) or a combination of compass points (n, e, s, w, ne, se, nw, sw) to specify individual corners and edges.
You can specify multiple values, separated by commas. The default value for this setting is e, s, se, which means that the lower-right corner (se) and the right (e) and bottom (s) edges will be draggable. jQuery UI draws a diagonal drag handle only in the lower-right corner and only if you have specified se as part of the handles value. For all other edges and corners, the cursor will change to indicate that dragging is possible when the mouse hovers above the edge or corner. Listing 24-18 shows the use of the handles setting.
Listing 24-18. Using the handles setting
...

<script type="text/javascript">

    $(document).ready(function() {

        $('#astor').resizable({

            alsoResize: "#astor img"

        });


        $('#lily').resizable({

            alsoResize: "#lilyimg",
            handles: "n, s, e, w"


        });

    });

</script>

...
In this script, I made both div elements resizable and applied a custom set of drag handles to one of them. You can see how jQuery UI handles the visible drag handles and the cursor change in Figure 24-11.
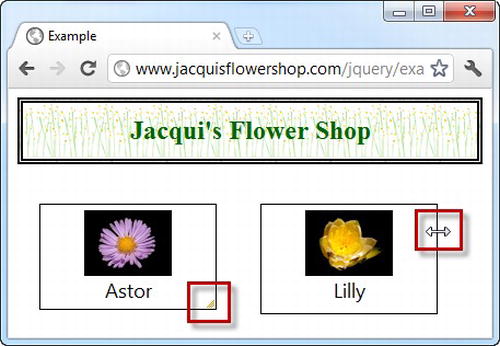
Figure 24-11. Using the handles setting
Summary
In this chapter, I explained and demonstrated three of the jQuery UI interactions: sortable, selectable, and resizable. These are less commonly used than the draggable and droppable interactions I described in Chapter 23, but they can still be useful if applied carefully. As with all of the interactions, the main challenge is in making the user aware that he or she can drag, select, sort, or resize an element when there are no standardized visual cues in web applications. For that reason, the interactions should be used as supplements to other mechanisms for interacting with your application or document. This allows advanced users to discover the advantages of the interactions, while other users rely on more obvious and conventional techniques.