
C H A P T E R 25
Refactoring the Example: Part III
In this part of the book, I have introduced you to the jQuery UI widgets and interactions. These allow you to create rich web applications that are consistently themed and that can be endlessly configured and tweaked to meet your needs. In this chapter, I'll add some of these features to the example to demonstrate how they can fit together.
Reviewing the Refactored Example
When you last refactored the example, you were at the verge of re-creating some of the jQuery UI functionality that uses the core jQuery library. You can see where you got to in Figure 25-1.
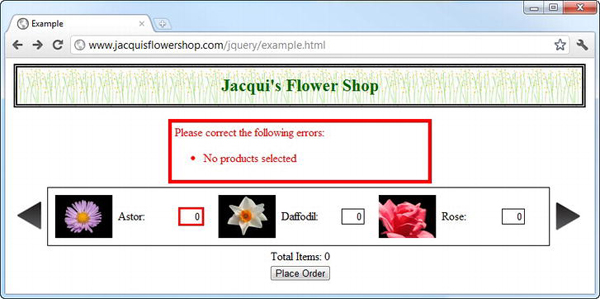
Figure 25-1. The previously refactored example document
The big additions in the previous part of the book included data templates, form validation, and Ajax, but you also added a simple product carousel that displayed the available products in a single row. I am going to use some of these features in this chapter, but my emphasis will be on applying jQuery UI. Listing 25-1 shows the starting point for this chapter.
Listing 25-1. The Starting Document for This Chapter
<!DOCTYPE html>

<html>

<head>

    <title>Example</title>

    <script src="jquery-1.7.js" type="text/javascript"></script>

    <script src="jquery-ui-1.8.16.custom.js" type="text/javascript"></script>

    <link rel="stylesheet" type="text/css" href="styles.css"/>

    <link rel="stylesheet" type="text/css" href="jquery-ui-1.8.16.custom.css"/>

    <script src="jquery.tmpl.js" type="text/javascript"></script>

    <script type="text/javascript">

        $(document).ready(function() {

            $.getJSON("mydata.json", function(data) {

                $('#flowerTmpl').tmpl(data).appendTo("#products");

            });

        });

    </script>

    <script id="flowerTmpl" type="text/x-jquery-tmpl">

        <div class="dcell">

            <img src="${product}.png"/>

            <label for="${product}">${name}:</label>

            <input name="${product}" value="0" />

        </div>

    </script>

</head>

<body>

    <h1>Jacqui's Flower Shop</h1>

    <form method="post" action="http://node.jacquisflowershop.com/order">

        <div id="products"></div>

        <div id="buttonDiv"><button type="submit">Place Order</button></div>

    </form>

</body>

</html>
In this document, I use the getJSON method to get the details of the products from a JSON file and generate elements using a date template. I add the product elements to a single div element, which has an id of products. You can see the starting point in Figure 25-2.
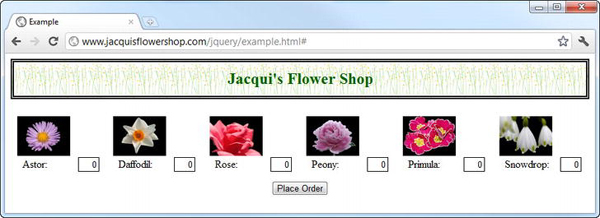
Figure 25-2. The starting document for this chapter
Displaying the Products
I am going to use an accordion to display the products to the user. I have only six products to deal with, but I am going to break them into groups of two and use jQuery to create the structure of elements that the accordion requires. Listing 25-2 shows the changes to the document.
Listing 25-2. Sorting and Structuring the Flower Elements
<!DOCTYPE html>

<html>

<head>

    <title>Example</title>

    <script src="jquery-1.7.js" type="text/javascript"></script>

    <script src="jquery-ui-1.8.16.custom.js" type="text/javascript"></script>

    <link rel="stylesheet" type="text/css" href="styles.css"/>

    <link rel="stylesheet" type="text/css" href="jquery-ui-1.8.16.custom.css"/>

    <script src="jquery.tmpl.js" type="text/javascript"></script>

    <style type="text/css">

        .dcell img {height: 60px}

    </style>

    <script type="text/javascript">

        $(document).ready(function() {

            $.getJSON("mydata.json", function(data) {

                var flowers = $('#flowerTmpl').tmpl(data);

                var rowCount = 1;

                for (var i = 0; i < flowers.length; i += 2) {

                    $("<h2><a href=#>" + data[i].name + " & " + data[i + 1].name

                      + "</a></h2>").appendTo("#products");

                    $("<div id='row" + (rowCount++) + "'></div>")

                        .appendTo("#products")

                        .append(flowers.slice(i, i + 2))

                }

                $('#products').accordion();
            });

        });

    </script>

    <script id="flowerTmpl" type="text/x-jquery-tmpl">

        <div class="dcell">

            <img src="${product}.png"/>

            <label for="${product}">${name}:</label>

            <input name="${product}" value="0" />

        </div>

    </script>

</head>

<body>

    <h1>Jacqui's Flower Shop</h1>

    <form method="post" action="http://node.jacquisflowershop.com/order">

        <div id="products"></div>

        <div id="buttonDiv"><button type="submit">Place Order</button></div>

    </form>

</body>

</html>
I have rewritten the function passed to the getJSON method to create the accordion, including constructing the element structure and calling the accordion method. The new implementation uses the JSON data object to extract the names of the flowers for the section titles but still uses the data template plugin to generate the HTML elements (that are then sliced and placed into wrapper div elements to suit the accordion). You can see how the document appears before and after the addition of the call to the accordion method in Figure 25-3.
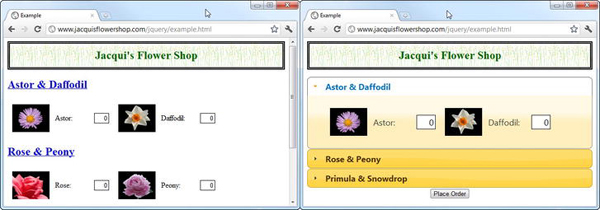
Figure 25-3. Creating the element structure and calling the accordion method
Adding the Shopping Basket
The next step is to add a simple shopping basket to show the user the selections they have made. Listing 25-3 shows the additions to the example document.
Listing 25-3. Adding the Shopping Basket
<!DOCTYPE html>

<html>

<head>

    <title>Example</title>

    <script src="jquery-1.7.js" type="text/javascript"></script>

    <script src="jquery-ui-1.8.16.custom.js" type="text/javascript"></script>

    <link rel="stylesheet" type="text/css" href="styles.css"/>

    <link rel="stylesheet" type="text/css" href="jquery-ui-1.8.16.custom.css"/>

    <script src="jquery.tmpl.js" type="text/javascript"></script>

    <style type="text/css">

        .dcell img {height: 60px}

        #basketTable {border: thin solid black; border-collapse: collapse}

        th, td {padding: 4px; width: 50px}

        td:first-child, th:first-child {width: 150px}

        #placeholder {text-align: center}

        #productWrapper {float: left; width: 65%}

        #basket {width: 30%; text-align: left; float: left; margin-left: 10px}

        #buttonDiv {clear: both}

    </style>

    <script type="text/javascript">

        $(document).ready(function() {

            $.getJSON("mydata.json", function(data) {

                var flowers = $('#flowerTmpl').tmpl(data);

                var rowCount = 1;

                for (var i = 0; i < flowers.length; i += 2) {

                    $("<h2><a href=#>" + data[i].name + " & " + data[i + 1].name

                      + "</a></h2>").appendTo("#products");

                    $("<div id='row" + (rowCount++) + "'></div>")

                        .appendTo("#products")

                        .append(flowers.slice(i, i + 2))

                }

                $('#products').accordion();


                $('input').change(function(event) {

                    $('#placeholder').hide();

                    var fname = $(this).attr("name");

                    var row = $('tr[id=' + fname + ']'),

                    if (row.length == 0) {

                        $('#rowTmpl').tmpl({

                            name: fname,

                            val:  $(this).val(),

                            product: $(this).siblings("label").text()

                        }).appendTo("#basketTable").find("a").click(function() {

                            removeTableRow($(this).closest("tr"));

                            var iElem = $('#products').find("input[name=" + fname + "]")

                            $('#products').accordion("activate",

                                iElem.closest("div[id^=row]").prev())

                            iElem.val(0).select();
                        })

                    } else if ($(this).val() != "0") {

                        row.children().eq(1).text($(this).val())

                    } else {

                        removeTableRow(row)

                    }

                })

            });


            function removeTableRow(row) {

                row.remove();

                if ($('#basketTable tbody').children(':visible').length == 1) {

                    $('#placeholder').show();

                }

            }


        });

    </script>

    <script id="rowTmpl" type="text/x-jquery-tmpl">

        <tr id=${name}><td>${product}</td><td>${val}</td>

            <td><a href=#>Remove</a></td></tr>

    </script>

    <script id="flowerTmpl" type="text/x-jquery-tmpl">

        <div class="dcell">

            <img src="${product}.png"/>

            <label for="${product}">${name}:</label>

            <input name="${product}" value="0" />

        </div>

    </script>

</head>

<body>

    <h1>Jacqui's Flower Shop</h1>

    <form method="post" action="http://node.jacquisflowershop.com/order">

        <div id="productWrapper">

            <div id="products"></div>

        </div>

        <div id="basket" class="ui-widget">

            <table border=1 id="basketTable">

                <tr><th>Product</th><th>Quantity</th><th>Remove</th></tr>

                <tr id="placeholder"><td colspan=3>No Products</td></tr>

            </table>

        </div>

        <div id="buttonDiv"><button type="submit">Place Order</button></div>

    </form>

</body>

</html>
Wrapping the Accordion
I want to display the basket alongside the accordion. To do this, I have wrapped the element that I select for the accordion method in another div element, like this:
The accordion widget gets confused if it isn't set to occupy 100 percent of the parent element's width, so I add the wrapper element and then use the CSS width property to fix its size, as follows:
#productWrapper {float: left; width: 65%}
The accordion widget happily occupies 100 percent of the wrapper div element, which occupies only 65 percent of its parent element.
Adding the Table
I decided to display the basket using a table element, which I have added to the static elements in the document, as follows:
<div id="basket" class="ui-widget">
<table border=1 id="basketTable">
<tr><th>Product</th><th>Quantity</th><th>Remove</th></tr>
<tr id="placeholder"><td colspan=3>No Products</td></tr>
</table>
</div>
Just as for the accordion, I have put the table element inside a wrapper whose width I then set using CSS:
#basket {width: 30%; text-align: left; float: left; margin-left: 10px}
The table element contains a header row and a placeholder that spans the entire table. You can see the effect that is created in Figure 25-4.
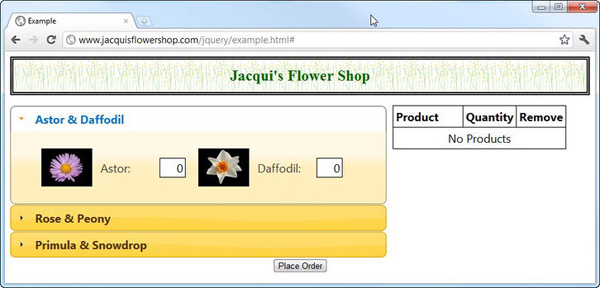
Figure 25-4. Adding the table to the document
Handling Input Value Changes
To link the table to the accordion, I listen to the change event on the input elements that I create in the getJSON function, like this:
$('input').change(function(event) {
$('#placeholder').hide();
var fname = $(this).attr("name");
var row = $('tr[id=' + fname + ']'),
if (row.length == 0) {
$('#rowTmpl').tmpl({
name: fname,
val: $(this).val(),
product: $(this).siblings("label").text()
}).appendTo("#basketTable").find("a").click(function() {
removeTableRow($(this).closest("tr"));
var iElem = $('#products').find("input[name=" + fname + "]")
$('#products').accordion("activate",
iElem.closest("div[id^=row]").prev())
iElem.val(0).select();
})
} else if ($(this).val() != "0") {
row.children().eq(1).text($(this).val())
} else {
removeTableRow(row)
}
})
A lot is going on in this function. When the user changes a value, I check to see whether there is already a row in the table for the corresponding product. If there is not, then I use the following template to create a new row:
<script id="rowTmpl" type="text/x-jquery-tmpl">
<tr id=${name}><td>${product}</td><td>${val}</td>
<td><a href=#>Remove</a></td></tr>
</script>
To get the values for this template, I use core jQuery methods to get information from the input element that triggered the event. I also want the display name for the product, which I obtain by navigating the DOM to find the nearby label element and reading its content, like this:
$(this).siblings("label").text()
I append the new row to the table. The placeholder row has already been hidden, back at the start of the function:
$('#placeholder').hide();
You can see how newly added rows appear in Figure 25-5. The user enters a value in an input element, and a new row appears in the basket table when the focus changes.
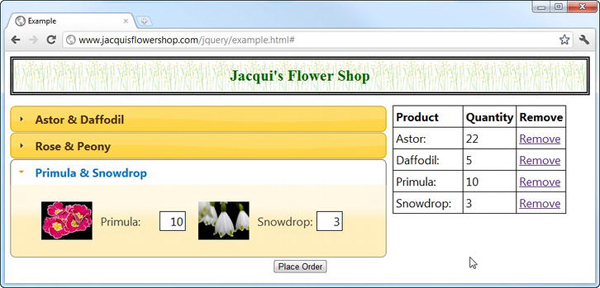
Figure 25-5. Adding rows to the basket table
Deleting Rows
You can see that I have added an a element to the table row as part of the data template. I register a handler for this element when I create the row from the data template, as follows:
...
}).appendTo("#basketTable").find("a").click(function() {
removeTableRow($(this).closest("tr"));
var iElem = $('#products').find("input[name=" + fname + "]")
$('#products').accordion("activate",
iElem.closest("div[id^=row]").prev())
iElem.val(0).select();
})
...
The first thing I do is call the removeTableRow function, passing in the closest ancestor tr element to the a element. The removeTableRow function uses the remove method to remove the specified element from the document. It also restores the placeholder row in the table if there are no product-related rows, like this:
function removeTableRow(row) {
row.remove();
if ($('#basketTable tbody').children(':visible').length == 1) {
$('#placeholder').show();
}
}
Once the row has been deleted, I find the input element that is associated with the row in the product. I then navigate through the DOM to find the h2 element that is the immediate previous sibling to the div that contains the input element and pass this to the activate method of the accordion widget. This has the effect of opening the part of the accordion that contains the product that the user has just deleted from the basket. Finally, I set the value of the input element to zero and call the select method so that it is focused and the value is selected. You can see the effect in Figure 25-6 (although this is something that you really need to see in the browser to appreciate).
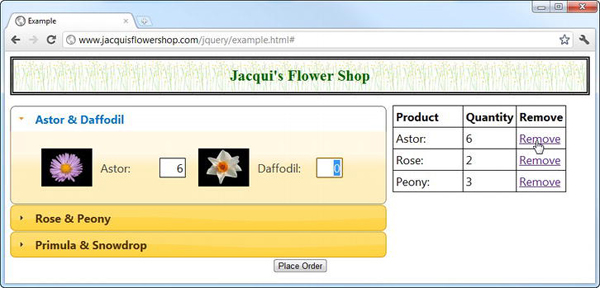
Figure 25-6. Focusing on an input element in the accordion when a table row is deleted
![]() Tip I also delete rows when the user enters a value of zero in an
Tip I also delete rows when the user enters a value of zero in an input element for which there is a row in the table. I do this using the removeTableRow function so that the placeholder is shown if needed.
Updating Existing Rows
If there is already a row for the product, then the user is effectively changing the quantity that they want to order. Rather than remove and replace the row, I find it in the table and update the contents of the cell:
row.children().eq(1).text($(this).val())
The row variable is a jQuery object containing the tr element for the product in the table. I access the td element by position (using the index method) and then set its content using the text method.
Applying the Theme Style
The functionality of the basket is fine, but the appearance is terrible. Fortunately, jQuery UI provides a framework of CSS styles that you can apply to elements to give them the same visual appearance as applied to the widgets by your theme. Listing 25-4 shows some simple additions to the HTML elements in the document.
Listing 25-4. Applying the jQuery UI CSS Framework Styles to the table Element
...
<body>
<h1>Jacqui's Flower Shop</h1>
<form method="post" action="http://node.jacquisflowershop.com/order">
<div id="productWrapper">

    <div id="products"></div>

</div>
<div id="basket" class="ui-widget ui-widget-content">
<table border=0 id="basketTable">
<tr class="ui-widget-header">
<th>Product</th><th>Quantity</th><th>Remove</th></tr>
<tr id="placeholder"><td colspan=3>No Products</td></tr>
</table>
</div>
<div id="buttonDiv"><button type="submit">Place Order</button></div>
</form>
</body>
...
You may have noticed that I have used the ui-widget class in some of the examples in preceding chapters. This is the basic jQuery UI style, and it is applied to the outer container of sets of elements that require an appearance that is consistent with the jQuery UI widgets. The ui-widget-content class is used for elements that contain content, and the ui-widget-header is, as its name suggests, used for header elements.
![]() Tip I describe the jQuery UI CSS framework classes in Chapter 34.
Tip I describe the jQuery UI CSS framework classes in Chapter 34.
In addition to applying these classes, I disabled the border for the table element as follows:
#basketTable {border: none; border-collapse: collapse}
You can see the effect in Figure 25-7.
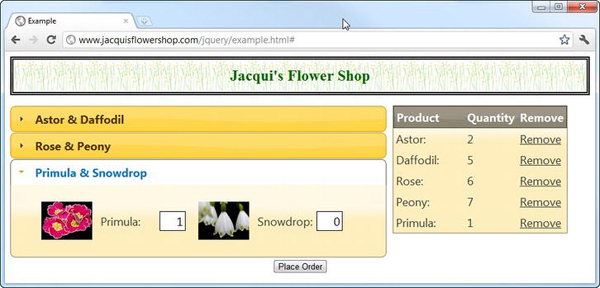
Figure 25-7. Applying the jQuery UI CSS framework classes to the table
Applying the CSS Framework More Widely
You can go further and apply the framework styles more widely. Listing 25-5 shows some useful additions to the document.
Listing 25-5. Applying the Framework Styles More Widely
...
<body>
<div id="logoWrapper" class="ui-widget ui-widget-content ui-corner-all">
<h1 id="logo">Jacqui's Flower Shop</h1>
</div>
<form method="post" action="http://node.jacquisflowershop.com/order">
<div id="productWrapper">
<div id="products"></div>
</div>
<div id="basket" class="ui-widget ui-widget-content">
<table border=0 id="basketTable">
<tr class="ui-widget-header">
<th>Product</th><th>Quantity</th><th>Remove</th></tr>
<tr id="placeholder"><td colspan=3>No Products</td></tr>
</table>
</div>
<div id="buttonDiv"><button type="submit">Place Order</button></div>
</form>
</body>
...
I have placed the h1 element inside a div and applied several of the framework styles, including ui-corner-all, which creates the rounded corners that you can see in Figure 25-8. I also applied some new styles to this document to create the effect I wanted, overriding the styles in the styles.css file you have been using since Chapter 3:
<style type="text/css">
.dcell img {height: 60px}
#basketTable {border: none; border-collapse: collapse}
th, td {padding: 4px; width: 50px}
td:first-child, th:first-child {width: 150px}
#placeholder {text-align: center}
#productWrapper {float: left; width: 65%}
#basket {width: 33%; text-align: left; float: left; margin-left: 10px;
position: absolute; right: 10px}
#buttonDiv {clear: both}
#logo {font-size: 1.5em; background-size: contain; margin: 1px;
border: none; color: inherit}
#logoWrapper {margin-bottom: 5px}
</style>
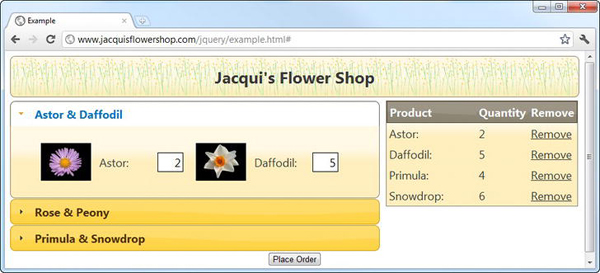
Figure 25-8. Applying the CSS framework styles to the document header
Applying Rounded Corners to the Table
Applying the ui-corner-all class to table elements causes some problems, as shown in Figure 25-9. You will notice that the table element doesn't have rounded corners. This is caused by an interaction between the jQuery UI CSS framework classes and the way that tables are handled in most browsers.
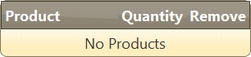
Figure 25-9. The effect of rounded corners on a table
To get around this problem, you need to change the table element, apply the jQuery UI CSS framework classes slightly differently, and define a new custom style. First, you need to modify the table, as shown in Listing 25-6.
Listing 25-6. Modifying the table Element to Support Rounded Corners
...
<form method="post" action="http://node.jacquisflowershop.com/order">
<div id="productWrapper">
<div id="products"></div>
</div>
<div id="basket" class="ui-widget ui-widget-content ui-corner-all">
<table border=0 id="basketTable">
<thead id="theader" class="ui-widget-header">
<tr>
<th class="ui-corner-tl">Product</th>
<th>Quantity</th>
<th class="ui-corner-tr">Remove</th></tr>
</thead>
<tr id="placeholder"><td colspan=3>No Products</td></tr>
</table>
</div>
<div id="buttonDiv"><button type="submit">Place Order</button></div>
</form>
...
I have added a thead element to the table, separating the header from the body rows. It is important to assign the thead element an id and to apply the ui-widget-header class. Since the header is part of the ui-widget-header class, you can remove it from the tr element.
Next, you apply the ui-corner-tl and ui-corner-tr classes to the outer cells in the header row. These classes create rounded corners for the top-left and top-right corners of the elements to which they are assigned. (I describe all of the jQuery UI CSS framework classes in Chapter 34.)
Next, you need to use the id you gave to the thead element to disable the CSS border property in the style element and do the same for the table element, like this:
...
<style type="text/css">
.dcell img {height: 60px}
#basketTable {border: none; border-collapse: collapse}
th, td {padding: 4px; width: 50px}
td:first-child, th:first-child {width: 150px}
#placeholder {text-align: center}
#productWrapper {float: left; width: 65%}
#basket {width: 33%; text-align: left; float: left; margin-left: 10px;
position: absolute; right: 10px}
#buttonDiv {clear: both}
#logo {font-size: 1.5em; background-size: contain; margin: 1px;
border: none; color: inherit}
#logoWrapper {margin-bottom: 5px}
#theader {border: none}
</style>
...
Finally, you need to make a small tweak to the removeTableRow function. Now that you have separated the header row and placed it in a thead element, you have one fewer row in the tbody. Here is the change:
function removeTableRow(row) {
row.remove();
if ($('#basketTable tbody').children(':visible').length == 0) {
$('#placeholder').show();
}
}
![]() Tip The
Tip The tbody element is created automatically by the browser when the table element is parsed. It is an oddity of HTML that you don't have to specify this element (although you can if preferred)
With these changes, you have a table with rounded corners that matches the other elements in the document, as Figure 25-10 shows.
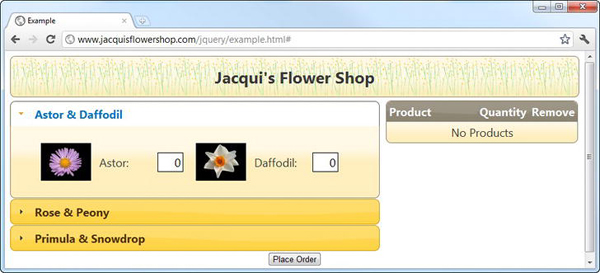
Figure 25-10. A table with rounded corners
Creating the jQuery UI Button
The next step is to relocate the button and transform it into a jQuery UI widget. Listing 25-7 shows the changes to the document.
Listing 25-7. Relocating and Transforming the Button
<!DOCTYPE html>
<html>
<head>
<title>Example</title>
<script src="jquery-1.7.js" type="text/javascript"></script>
<script src="jquery-ui-1.8.16.custom.js" type="text/javascript"></script>
<link rel="stylesheet" type="text/css" href="styles.css"/>
<link rel="stylesheet" type="text/css" href="jquery-ui-1.8.16.custom.css"/>
<script src="jquery.tmpl.js" type="text/javascript"></script>
<style type="text/css">
.dcell img {height: 60px}
#basketTable {border: none; border-collapse: collapse}
th, td {padding: 4px; width: 50px}
td:first-child, th:first-child {width: 150px}
#placeholder {text-align: center}
#productWrapper {float: left; width: 65%}
#basket {text-align: left;}
#buttonDiv {clear: both; margin: 5px}
#logo {font-size: 1.5em; background-size: contain; margin: 1px;
border: none; color: inherit}
#logoWrapper {margin-bottom: 5px}
#theader {border: none}
</style>
<script type="text/javascript">
$(document).ready(function() {
$.getJSON("mydata.json", function(data) {
var flowers = $('#flowerTmpl').tmpl(data);
var rowCount = 1;
for (var i = 0; i < flowers.length; i += 2) {
$("<h2><a href=#>" + data[i].name + " & " + data[i + 1].name
+ "</a></h2>").appendTo("#products");
$("<div id='row" + (rowCount++) + "'></div>")
.appendTo("#products")
.append(flowers.slice(i, i + 2))
}
$('#products').accordion();
$('input').change(function(event) {

    $('#placeholder').hide();

    var fname = $(this).attr("name");

    var row = $('tr[id=' + fname + ']'),

    if (row.length == 0) {

        $('#rowTmpl').tmpl({

            name: fname,

            val:  $(this).val(),

            product: $(this).siblings("label").text()

        }).appendTo("#basketTable").find("a").click(function() {

            removeTableRow($(this).closest("tr"));

            var iElem = $('#products').find("input[name=" + fname + "]")

            $('#products').accordion("activate",

                iElem.closest("div[id^=row]").prev())

            iElem.val(0).select();

        })

    } else if ($(this).val() != "0") {

        row.children().eq(1).text($(this).val())

    } else {

        removeTableRow(row)

    }

})
});
$('#buttonDiv, #basket').wrapAll("<div />").parent().css({
float: "left",
marginLeft: "2px"
})
$('button').button()
function removeTableRow(row) {
row.remove();
if ($('#basketTable tbody').children(':visible').length == 0) {
$('#placeholder').show();
}
}
});
</script>
<script id="rowTmpl" type="text/x-jquery-tmpl">

    <tr id=${name}><td>${product}</td><td>${val}</td>

    <td><a href=#>Remove</a></td></tr>

</script>
<script id="flowerTmpl" type="text/x-jquery-tmpl">
<div class="dcell">
<img src="${product}.png"/>
<label for="${product}">${name}:</label>
<input name="${product}" value="0" />
</div>
</script>
</head>
<body>
<div id="logoWrapper" class="ui-widget ui-widget-content ui-corner-all">
<h1 id="logo">Jacqui's Flower Shop</h1>
</div>
<form method="post" action="http://node.jacquisflowershop.com/order">
<div id="productWrapper">
<div id="products"></div>
</div>
<div id="basket" class="ui-widget ui-widget-content ui-corner-all">
<table border=0 id="basketTable">
<thead id="theader" class="ui-widget-header">
<tr>
<th class="ui-corner-tl">Product</th><th>Quantity</th>
<th class="ui-corner-tr">Remove</th></tr>
</thead>
<tr id="placeholder"><td colspan=3>No Products</td></tr>
</table>
</div>
<div id="buttonDiv"><button type="submit">Place Order</button></div>
</form>
</body>
</html>
I have wrapped the buttonDiv and basket elements in a new div element and adjusted some of the CSS styles to adjust the positioning of these elements. And, as Figure 25-11 shows, I call the button method to create a jQuery UI button.
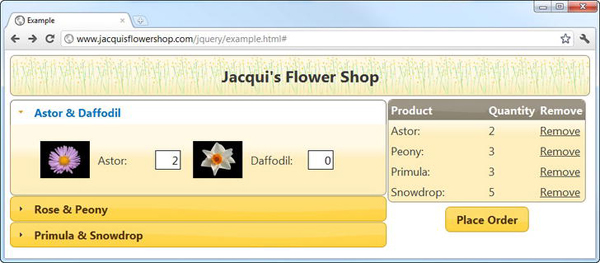
Figure 25-11. Repositioning and transforming the button element
Adding the Completion Dialog
When the user clicks the Place Order button, I want to collect some additional information from them. I showed you how to display a multipart form using tabs in Chapter 20, so for some variety, I'll use a dialog widget this time. Listing 25-8 shows the changes to the document for the dialog.
Listing 25-8. Adding the Dialog
<!DOCTYPE html>
<html>
<head>
<title>Example</title>
<script src="jquery-1.7.js" type="text/javascript"></script>
<script src="jquery-ui-1.8.16.custom.js" type="text/javascript"></script>
<link rel="stylesheet" type="text/css" href="styles.css"/>
<link rel="stylesheet" type="text/css" href="jquery-ui-1.8.16.custom.css"/>
<script src="jquery.tmpl.js" type="text/javascript"></script>
<style type="text/css">
.dcell img {height: 60px}
#basketTable {border: none; border-collapse: collapse}
th, td {padding: 4px; width: 50px}
td:first-child, th:first-child {width: 150px}
#placeholder {text-align: center}
#productWrapper {float: left; width: 65%}
#basket {text-align: left;}
#buttonDiv {clear: both; margin: 5px}
#logo {font-size: 1.5em; background-size: contain; margin: 1px;
border: none; color: inherit}
#logoWrapper {margin-bottom: 5px}
#theader {border: none}
#completeDialog input {width: 150px; margin-left: 5px; text-align: left}
#completeDialog label {width: 60px; text-align: right}
</style>
<script type="text/javascript">
$(document).ready(function() {
$.getJSON("mydata.json", function(data) {
var flowers = $('#flowerTmpl').tmpl(data);
var rowCount = 1;
for (var i = 0; i < flowers.length; i += 2) {
$("<h2><a href=#>" + data[i].name + " & " + data[i + 1].name
+ "</a></h2>").appendTo("#products");
$("<div id='row" + (rowCount++) + "'></div>")
.appendTo("#products")
.append(flowers.slice(i, i + 2))
}
$('#products').accordion();
$('#products input').change(function(event) {
$('#placeholder').hide();
var fname = $(this).attr("name");
var row = $('tr[id=' + fname + ']'),
if (row.length == 0) {
$('#rowTmpl').tmpl({
name: fname,
val: $(this).val(),
product: $(this).siblings("label").text()
}).appendTo("#basketTable").find("a").click(function() {
removeTableRow($(this).closest("tr"));
var iElem = $('#products').find("input[name=" + fname + "]")
$('#products').accordion("activate",
iElem.closest("div[id^=row]").prev())
iElem.val(0).select();
})
} else if ($(this).val() != "0") {
row.children().eq(1).text($(this).val())
} else {
removeTableRow(row)
}
})
});
$('#buttonDiv, #basket').wrapAll("<div />").parent().css({
float: "left",
marginLeft: "2px"
})
$('button').button()
$('#completeDialog').dialog({
modal: true,
buttons: [{text: "OK", click: sendOrder},
{text: "Cancel", click: function() {
$("#completeDialog").dialog("close");
}}]
});
function sendOrder() {
}
function removeTableRow(row) {

    row.remove();

    if ($('#basketTable tbody').children(':visible').length == 0) {

        $('#placeholder').show();

    }

}
});
</script>
<script id="rowTmpl" type="text/x-jquery-tmpl">
<tr id=${name}><td>${product}</td><td>${val}</td>
<td><a href=#>Remove</a></td></tr>
</script>
<script id="flowerTmpl" type="text/x-jquery-tmpl">
<div class="dcell">
<img src="${product}.png"/>
<label for="${product}">${name}:</label>
<input name="${product}" value="0" />
</div>
</script>
</head>
<body>
<div id="logoWrapper" class="ui-widget ui-widget-content ui-corner-all">
<h1 id="logo">Jacqui's Flower Shop</h1>
</div>
<form method="post" action="http://node.jacquisflowershop.com/order">
        <div id="productWrapper">

            <div id="products"></div>

        </div>

        <div id="basket" class="ui-widget ui-widget-content ui-corner-all">

            <table border=0 id="basketTable">

                <thead id="theader" class="ui-widget-header">

                    <tr>

                        <th class="ui-corner-tl">Product</th><th>Quantity</th>

                        <th class="ui-corner-tr">Remove</th></tr>

                </thead>

                <tr id="placeholder"><td colspan=3>No Products</td></tr>

            </table>

        </div>

        <div id="buttonDiv"><button type="submit">Place Order</button></div>

    </form>

    <div id="completeDialog" title="Complete Purchase">

            <div><label for="name">Name: </label><input name="first" /></div>

            <div><label for="email">Email: </label><input name="email" /></div>

            <div><label for="city">City: </label><input name="city" /></div>

    </div>

</body>

</html>
I have added a div element with the content that will be displayed to the user in the body element, along with some CSS styles to override those that are in the styles.css file that is imported into the document using a link element. Here is the call to the dialog method that creates the dialog widget:
$('#completeDialog').dialog({

    modal: true,

    buttons: [{text: "OK", click: sendOrder},

        {text: "Cancel", click: function() {

        $("#completeDialog").dialog("close");

    }}]

});
I have created a modal dialog that has two buttons. Clicking the Cancel button will close the dialog. Clicking the OK button will call the sendOrder function. This function doesn't do anything at the moment.
As you will remember from Chapter 22, the dialog widget is open by default, which means that it is shown to the user as soon as it is created. You can see how it appears in Figure 25-12.

Figure 25-12. The dialog used to complete the purchase
![]() Tip Notice that I have narrowed the selection when I set up the change event on the input elements. I limit the selection to exclude those input elements in the dialog. If I had not done this, entering a value in the Complete Purchase dialog would have added a new item in the basket.
Tip Notice that I have narrowed the selection when I set up the change event on the input elements. I limit the selection to exclude those input elements in the dialog. If I had not done this, entering a value in the Complete Purchase dialog would have added a new item in the basket.
Handling the Place Order Button Click
I don't want the user to see the dialog box until they click the Place Order button. I use the autoOpen setting to hide the dialog until it is needed and use the click method to handle the button click, as Listing 25-9 shows.
Listing 25-9. Hiding the Dialog and Handling the Button Click
...

<script type="text/javascript">

    $(document).ready(function() {

        $.getJSON("mydata.json", function(data) {

            var flowers = $('#flowerTmpl').tmpl(data);

            var rowCount = 1;

            for (var i = 0; i < flowers.length; i += 2) {

                $("<h2><a href=#>" + data[i].name + " & " + data[i + 1].name

                  + "</a></h2>").appendTo("#products");

                $("<div id='row" + (rowCount++) + "'></div>")

                    .appendTo("#products")

                    .append(flowers.slice(i, i + 2))

            }

            $('#products').accordion();
            $('input').change(function(event) {

                $('#placeholder').hide();

                var fname = $(this).attr("name");

                var row = $('tr[id=' + fname + ']'),

                if (row.length == 0) {

                    $('#rowTmpl').tmpl({

                        name: fname,

                        val:  $(this).val(),

                        product: $(this).siblings("label").text()

                    }).appendTo("#basketTable").find("a").click(function() {

                        removeTableRow($(this).closest("tr"));

                        var iElem = $('#products').find("input[name=" + fname + "]")

                        $('#products').accordion("activate",

                            iElem.closest("div[id^=row]").prev())

                        iElem.val(0).select();

                    })

                } else if ($(this).val() != "0") {

                    row.children().eq(1).text($(this).val())

                } else {

                    removeTableRow(row)

                }

            })

        });


        $('#buttonDiv, #basket').wrapAll("<div />").parent().css({

             float: "left",

             marginLeft: "2px"

         })


         $('button').button().click(function(e) {

            e.preventDefault();

            if ($('#placeholder:visible').length) {


                $('<div>Please select some products</div>').dialog({

                    modal: true,

                    buttons: [{text: "OK",

                        click: function() {$(this).dialog("close")}}]

                })

            } else {

                $('#completeDialog').dialog("open");

            }

         })


         $('#completeDialog').dialog({

            modal: true,

            autoOpen: false,

            buttons: [{text: "OK", click: sendOrder},

                      {text: "Cancel", click: function() {

                        $("#completeDialog").dialog("close");

                      }}]
        });


        function sendOrder() {


        }


        function removeTableRow(row) {

            row.remove();

            if ($('#basketTable tbody').children(':visible').length == 0) {

                $('#placeholder').show();

            }

        }

    });

</script>

...
When the user clicks the button, I check to see whether the placeholder element is visible. I do this using jQuery, using a selector that produces a jQuery object that will contain elements only if the placeholder is visible.
I am using the visibility of the placeholder as a proxy for the user having selected some products. The placeholder is hidden if there are any selections in the basket, and so a visible placeholder tells me that there are no selections.
![]() Tip This is a nice example of the way you can layer functionality in a document, but it does mean that my simple test for product selection depends on the implementation of the basket and will need to change if I ever modify the way that the basket works.
Tip This is a nice example of the way you can layer functionality in a document, but it does mean that my simple test for product selection depends on the implementation of the basket and will need to change if I ever modify the way that the basket works.
I create and display a dialog widget dynamically if the user clicks the button without having selected any products. You can see how this appears in Figure 25-13. If selections have been made, then the completion dialog is shown to capture the final information I want from the user.
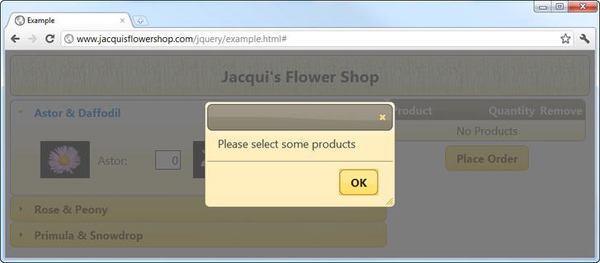
Figure 25-13. Displaying a dialog if there is no product selection
Completing the Order
All that remains is to implement the sendOrder function. I have already shown you the different ways that you can send data to the server via Ajax, so to keep this chapter simple, I will simply collect the values from the various input elements and create a JSON object that can be sent to a server for processing. Listing 25-10 shows the additions to the document.
Listing 25-10. Completing the Order Process
...

function sendOrder() {

    var data = new Object();

    $('input').each(function(index, elem) {

        var jqElem = $(elem);

        data[jqElem.attr("name")] = jqElem.val();

    })

    console.log(JSON.stringify(data));

    $('#completeDialog').dialog("close");

    $('#products input').val("0");

    $('#products').accordion("activate", 0)

    $('#basketTable tbody').children(':visible').remove();

    $('#placeholder').show();

}

...
In this function I get the value from each of the input elements and add them as properties to an object that I then convert to JSON and write to the console.
More usefully, I then reset the document, closing the dialog, resetting the values of the input elements, switching to the first panel of the accordion, and resetting the basket. Figure 25-14 shows the document with some product selection. I'll use these to generate the JSON string.

Figure 25-14. Selecting products using the example document
When I click the Place Order button, I am presented with the dialog requesting additional information, as shown in Figure 25-15.
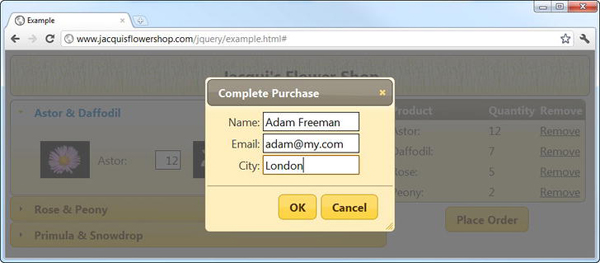
Figure 25-15. Providing additional information to complete the order
Finally, clicking the OK button generates the JSON and resets the document. The JSON for this example is as follows:
{"astor":"12","daffodil":"7","rose":"5","peony":"2","primula":"0","snowdrop":"0",

    "first":"Adam Freeman","email":"[email protected]","city":"London"}
And, as Figure 25-16 shows, you are back where you started, ready to go through the process again.
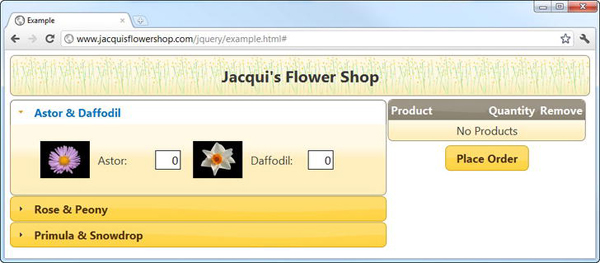
Figure 25-16. Resetting the document
Summary
In this chapter, I refactored the example document to incorporate features from jQuery UI. I added some of the widgets, such as accordion, dialog, and button, as well as gave an initial look at how you can apply the jQuery UI CSS framework classes to manage the appearance of other elements. I give more detail about these CSS classes in Chapter 34.