
Note
The full code for this sample is available at https://github.com/jcleblanc/programming-social-applications/blob/master/chapter_6/chapter_final.xml.
Now that you have the knowledge you need to leverage a gadget’s social features, we’ll put it to use in a sample gadget. This gadget will display the activity stream of the viewer’s friends, display their profile images, and then provide a method for the viewer to add a new activity to his stream.
First, we need to build the gadget markup. In this example, we’ll
just need the lightweight osapi
JavaScript library, so we’ll include that feature in the gadget. We then
define the view in which the Content
node will be loaded:
<?xml version="1.0" encoding="UTF-8"?>
<Module>
   <ModulePrefs title="Chapter 4 Example"
                description="Display social information fetch and push abilities">
      <Require feature="opensocial-0.9"/>
      <Require feature="osapi" />
   </ModulePrefs>
   <Content type="html" view="canvas">
      <![CDATA[
      <!-- view content -->
      ]]>
   </Content>
</Module>
We now need to include our styles and markup in the Content node. For this example, we use styles to
position the page elements and set their font, colors, and spacing. This
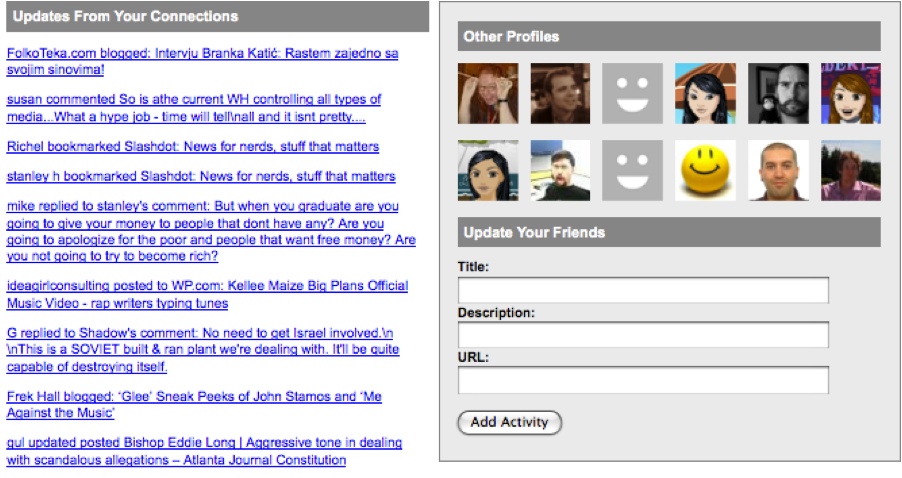
markup will build a container with two columns. The left column will
display the recent updates of the viewer’s friends, and the right column
will display profile images for 12 of those friends. Below the photos is a
form to allow the user to input a title, description, and URL to push out
a new activity to his stream:
<style type="text/css">
div#gadget{ font:11px arial,helvetica,sans-serif; }
div#gadget div.header{ background-color:#858585;
                       color:#fff; font-weight:bold;
                       font-size:12px;
                       padding:5px;
                       margin:5px; }
div#gadget div#railRight{ width:360px;
                          float:right;
                          border:1px solid #858585;
                          margin:0 0 15px 15px;
                          padding:10px;
                          background-color:#eaeaea; }
div#gadget div#railRight div#friendLinks img{ border:0;
                                              margin:5px;
                                              width:50px;
                                              height:50px; }
div#gadget div#railRight form{ margin:10px 5px; }
div#gadget div#railRight form label{ font-weight:bold; }
div#gadget div#railRight form input{ width:300px; }
div#gadget div#updates{ margin-left:5px;
                        margin-right:390px; }
div#gadget div#updates div.header{ margin:0; }
</style>

<div id="gadget">
   <div id="railRight">
      <div class="header">Other Profiles</div>
      <div id="friendLinks"></div>
      <div class="header">Update Your Friends</div>
      <form name="addActivity" onSubmit="return false;">
         <label for="title">Title:</label><br />
         <input type="text" name="title" id="title" /><br />

         <label for="description">Description:</label><br />
         <input type="text" name="description" id="description" /><br />

         <label for="url">URL:</label><br />
         <input type="text" name="url" id="url" /><br /><br />
         <button onclick="socialController.addActivity();">Add Activity</button>
      </form>
   </div>
   <div id="updates">
      <div class="header">Updates From Your Connections</div>
      <div id="updateContent"></div>
   </div>
</div>
The last piece of the gadget is the JavaScript layer. This section contains three functions to handle the getting and setting of the gadget’s social data. These functions act as constructors for the social data sources and promote application data to the user’s friends:
<script type="text/javascript">
var socialController = {
   //fetch profile photos for friends
   fetchProfile: function(insertID){
      //make GET request for 12 viewer friend profiles
      osapi.people.get({userId: "@viewer",
                        groupId: "@friends",
                        count: 12}).execute(function(result){
         var friends = result.list;
         var html = '';

         //for each friend found, create a profile image linked to their profile
         for (var i = 0; i < friends.length; i++){
            html += "<a href='" + friends[i].profileUrl + "'><img src='"
                     + friends[i].thumbnailUrl + "' /></a>";
         }
         document.getElementById(insertID).innerHTML = html;
      });
   },

   //fetch update stream for friends
   fetchUpdates: function(insertID){
      //make GET request for 30 viewer friend activities
      osapi.activities.get({userId: "@viewer",
                            groupId: "@friends",
                            count: 30}).execute(function(result){
         var activities = result.list; var html = '';

         //for each activity, create a title linked to their source
         for (var i = 0; i < activities.length; i++){
            html += "<p><a href='" + activities[i].url + "'>"
                  + activities[i].title + "</a><br /></p>";
         }
         document.getElementById(insertID).innerHTML = html;
      });
   },

   //insert a new activity for the current viewer
   addActivity: function(){
      osapi.activities.create({userId: "@viewer", groupId: "@self",
         activity: {
            title: document.getElementById("title").value,
            body: document.getElementById("description").value,
            url: document.getElementById("url").value
         }
      }).execute();
   }
};

//initialize data requests
socialController.fetchProfile("friendLinks");
socialController.fetchUpdates("updateContent");
</script>
The fetchProfile() function
captures profile photos and profile URLs for the viewer’s friends. This
information is then used to create a series of image tags and insert that
HTML into the gadget markup.
The fetchUpdates() function
captures updates from the viewer’s friends, creates markup for the linked
titles, and inserts that markup into the application’s left column.
The last function, addActivity(),
inserts a new activity into the viewer’s stream when he enters a title,
description, and URL for that activity in the right column.
The last two lines of the JavaScript call the social data fetch
functions to populate the application once it loads. When the gadget is
loaded, it will render with the social features we’ve defined in our
div nodes, appearing like Figure 6-6.
This application contains some of the core social features that you can use to promote application growth and user customization. Using even a subset of these features will help you target user preferences, get the users to promote your application for you, and draw users’ social friendships into the application context.