
In the last recipe, we preconfigured virtual machines using Vagrant; they are to be used with VSM. In this recipe, we will learn about the pre-flight configuration that is needed on these VMs so that it can be used with VSM.
Please note that by using Vagrant, we have done most of this pre-flight configuration using the shell script file, ceph-cookbook/vsm/post-deploy.sh, present in the GIT repository that we cloned in the last recipe. You might not want to repeat these first four steps as Vagrant already performed them. We are explaining these steps here so that you can know what Vagrant did in the background.
- Create the user,
cephuser, on all the nodes that will be used for VSM deployment. For simplicity, we will set the password of this user ascephuser. You can always use a username of your choice. Also, providesudorights to this user:# useradd cephuser # echo 'cephuser:cephuser' | chpasswd # echo "cephuser ALL=(ALL) NOPASSWD: ALL" >> /etc/sudoers
- Ensure that the NTP is configured:
# systemctl stop ntpd
# systemctl stop ntpdate
# ntpdate 0.centos.pool.ntp.org > /dev/null 2> /dev/null
# systemctl start ntpdate
# systemctl start ntpd
- Install
tree(Optional),git, and theepelpackages:# yum install -y tree git epel-release - Add host information to the
/etc/hostsfile:192.168.123.100 vsm-controller 192.168.123.101 vsm-node1 192.168.123.102 vsm-node2 192.168.123.103 vsm-node3
The following steps must be performed on the nodes as specified:
- Log in to the
vsm-controllernode, and generate and share the SSH keys with other vsm nodes. During this step, you will need to input thecephuserpassword, which iscephuser:# ssh [email protected] $ mkdir .ssh;ssh-keygen -f .ssh/id_rsa -t rsa -N '' $ ssh-copy-id vsm-node1 $ ssh-copy-id vsm-node2 $ ssh-copy-id vsm-node3
- Using Vagrant, we have attached three VirtualBox virtual disks on each
vsm-node {1,2,3}, which will be used as Ceph OSD disks. We need to partition these disks manually for the Ceph OSD and Journal so that VSM can use them with Ceph. Execute the following commands on allvsm-nodes {1,2,3}:$ sudo parted /dev/sdb -- mklabel gpt $ sudo parted -a optimal /dev/sdb -- mkpart primary 10% 100% $ sudo parted -a optimal /dev/sdb -- mkpart primary 0 10% $ sudo parted /dev/sdc -- mklabel gpt $ sudo parted -a optimal /dev/sdc -- mkpart primary 10% 100% $ sudo parted -a optimal /dev/sdc -- mkpart primary 0 10% $ sudo parted /dev/sdd -- mklabel gpt $ sudo parted -a optimal /dev/sdd -- mkpart primary 0 10% $ sudo parted -a optimal /dev/sdd -- mkpart primary 10% 100%

- Once you have created partitions on all disks, list block devices on these nodes to verify that the partitions look as shown next:
$ lsblk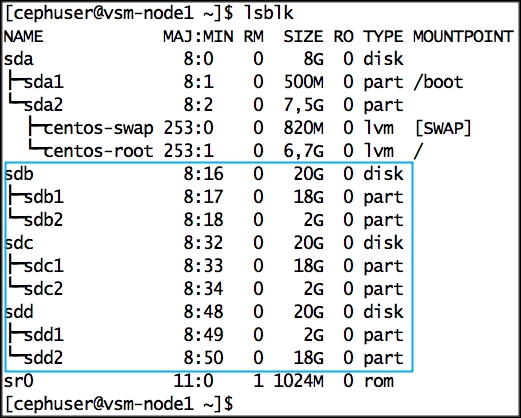
- At this stage, we have completed the prerequisites required for VSM. As an optional step, it's a good idea to take a snapshot of the virtual machine, so that it can be restored if anything goes wrong.

..................Content has been hidden....................
You can't read the all page of ebook, please click here login for view all page.