
JIRA initially started off as a bug tracking system, helping software development teams to better track and manage the problems/issues in their projects. Over the years, JIRA has improved its features to add support for Scrum and Kanban through the JIRA Agile add-on. This enables projects to be managed through both the traditional waterfall model and newer agile methodologies.
In this chapter, we will start with a high-level view of the overall hierarchy on how data is structured in JIRA. We will then take a look at the various user interfaces that JIRA has for working with projects, both as an administrator and an everyday user. We will also introduce permissions for the first time in the context of projects and will expand on this in later chapters.
By the end of this chapter, you will learn the following:
- How JIRA structures content
- Different user interfaces for project management in JIRA
- How to create new projects in JIRA
- How to import data from other systems into JIRA
- How to manage and configure a project
- How to manage components and versions
Like most other information systems, JIRA organizes its data in a hierarchical structure. At the lowest level, we have field, which are used to hold raw information. Then the next level up, we have issue, which are like a unit of work to be performed.
An issue will belong to a project, which defines the context of the issue. Finally, we have project category, which logically group similar projects together. We will discuss each of these levels in the forthcoming sections. The figure in the following illustrates the hierarchy we just talked about:
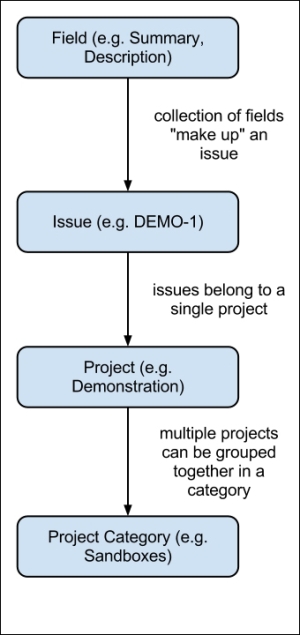
Project category is a logical grouping for projects, usually of similar nature. Project category is optional. Projects do not have to belong to any category in JIRA. When a project does not belong to any category, it is considered uncategorized. The categories themselves do not contain any information; they serve as a way to organize all your projects in JIRA, especially when you have many of them.
In JIRA, a project is a collection of issues. Projects provide the background context for issues by letting users know where issues should be created. Users will be members of a project, working on issues in the project. Most configurations in JIRA, such as permissions and screen layouts, are all applied on the project level.
It is important to remember that projects are not limited to software development projects that need to deliver a product. They can be anything logical, such as the following:
- Company department or team
- Software development projects
- Products or systems
- A risk register
Issues represent work to be performed. From a functional perspective, an issue is the base unit for JIRA. Users create issues and assign them to other people to be worked on. Project leaders can generate reports on issues to see how everything is tracking. In a sense, you can say JIRA is issue-centric.
We will be looking at issues in more detail in Chapter 3, Issue Management. For now, you just need to remember three things:
- An issue can belong to only one project
- There can be many different types of issues
- An issue contains many fields that hold values for the issue
Fields are the most basic unit of data in JIRA. They hold data for issues and give meaning to them. Fields in JIRA can be broadly categorized into two distinctive categories, namely, system fields and custom fields. They come in many different forms, such as text fields, drop-down lists, and user pickers. Fields and the topics related to them are discussed in more depth in Chapter 4, Field Management. For now, you just need to remember three things:
- Fields hold values for issues
- Fields can have behaviors (hidden or mandatory)
- Fields can have a view and structure (text field or drop-down list)