
As you have already seen, fields are used to capture and display data in JIRA. Fields can also have behaviors, which are defined by field configuration. For each field in JIRA, you can configure its behaviors listed as follows:
- Field description: This is the description text that appears under the field when an issue is edited. With field configuration, you can have different description texts for different projects and issue types.
- Visibility: This determines if a field should be visible or hidden.
- Required: This specifies if a field will be optional or required to have a value when an issue is being created/updated. When applied to a select, checkbox, and radio button custom fields, this will remove the None option from the list.
- Rendering: This specifies how the content is to be rendered for text-based fields (for example, wiki renderer or simple text renderer for text fields).
A field configuration provides you with control over each individual field in your JIRA, including both built-in and custom fields. Since it is usually a good practice to reuse the same set of fields instead of creating new ones for every project, JIRA allows you to create multiple field configurations, with which we can specify different behaviors on the same set of fields and apply them to different projects.
We will be looking at how to manage and apply multiple field configurations in the later sections of this chapter. But first, let's take a close look at how to create new field configurations and what we can do with them.
You can access the field configuration management page through the JIRA administration console:
- Browse to the JIRA administration console.
- Select the Issues tab and then the Field Configurations option. This will bring you to the View Field Configurations page:
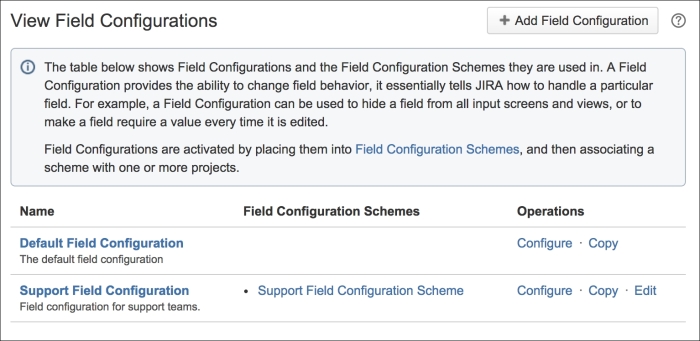
Creating new field configurations is simple. All you need to do is specify the name and the short description for the new configuration:
- Browse to the View Field Configurations page.
- Specify the name for the new field configuration in the Add Field Configuration section.
- Provide a short description for the field configuration.
- Click on the Add button to create a field configuration.
As we will see later in the Field Configuration Scheme section, field configurations are linked to issue types, so it is recommended to name them based on the issue type they will be applied to and with a version number at the end, for example, Bugs Field Configuration 1.0. This way, when you need to make changes to the field configuration, you can increment the version number, leaving a history of changes you can revert back to.
After a field configuration is created, it is put into what we call the inactive state. This means the configuration is not being used anywhere in JIRA and you are free to edit and delete it. In order to activate the field configuration, we need to associate it with a field configuration scheme. We will look at how to do this in later sections.
You can update existing field configuration details and delete them all together. The details you can edit are the configuration's name and description:
- Browse to the View Field Configurations page.
- Click on the Edit link for the field configuration you wish to edit. This will take you to the Edit Field Configuration page.
- Update the Name and Description fields with new values.
- Click on the Update button to apply the changes.
You will be able to edit field configuration details at anytime. However, for deletion, you can only delete the configuration when it is inactive. Once you associate the configuration with a scheme, which will put the configuration into an active state, you cannot delete it until it is back to the inactive state. For you to put the field configuration back into the inactive state, you need to unassociate it from the field configuration scheme:
- Browse to the View Field Configurations page.
- Click on the Delete link for the field configuration you wish to delete. This will take you to the Delete Field Configuration page for confirmation.
- Click on the Delete button to delete the field configuration.
A field configuration contains configuration details for all fields in JIRA. For a moderately complicated instance, you are likely to have over 20 fields. It will be very unproductive if you have to reconfigure every single field again, whenever you need to create a new set of field configurations, usually with only minor differences for a few fields.
To simplify your task, JIRA allows you to copy an existing field configuration and use that as a base for you to make only the necessary changes. This greatly reduces the amount of effort required as you will not have to reconfigure all the fields that are common across all the use cases:
- Browse to the View Field Configurations page.
- Click on the Copy link for the field configuration you wish to copy. This will take you to the Copy Field Configuration page.
- Enter a new name and description for the field configuration.
- Click on the Copy button to copy the field configuration.
Now that we have seen how to create, edit, delete, and copy field configurations, it is time for us to take a closer look at the different configuration options. Just a quick recap—each field configuration includes all fields available in JIRA, and its behavior is defined specifically to each field configuration. We will then set a context for the field configurations through the use of the field configuration scheme, which will determine when a field configuration will become active for a given issue.
Perform the following steps to access the field configuration options:
- Browse to the View Field Configurations page.
- Click on the Configure link for the field configuration you wish to configure. This will take you to the View Field Configuration page.
On this page, all the fields and their current configuration options that are currently set for the selected field configuration are listed:
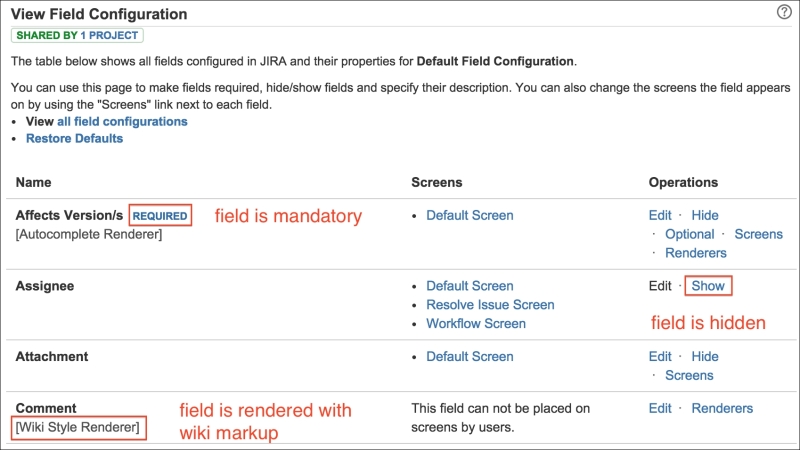
As you can see, there are several options you can configure for each field, and depending on the field type, the options may vary. While we will be looking at each of the options, it is important to note that some of the options will override each other. This is JIRA trying to protect you from accidentally creating a configuration combination that will break your production system. For example, if a field is set to both hidden and required, your users will not be able to create or edit issues, so JIRA will not allow you to set a field to required if you have already set it to hidden.
While having a meaningful name for your fields will help your users understand what the fields are for, providing a short description will provide more context and meaning. Field descriptions are displayed under the fields when you create or edit an issue. To add a description for a field, do the following:
- Browse to the View Field Configuration page for the field configuration you wish to use.
- Click on the Edit link for the field you wish to set a description for.
- Add a description for the field, and click on Update.
You can set certain fields as required or mandatory for issues. This is a very useful feature as it ensures that critical information can be captured when users create issues. For example, for our support system, it makes sense to have our users enter in the system that is misbehaving in a field and make that field compulsory to help our support engineers.
You have already seen required fields in action. System fields, such as Summary and Issue Type, are compulsory in JIRA (and you cannot change that). When you do not specify a value for a required field, JIRA will display an error message underneath the field, telling you that the value is required.
When you add a new field into JIRA, such as custom fields, it is optional by default, meaning users do not need to specify a value. You can then change the setting to make those fields required:
- Browse to the View Field Configuration page for the field configuration you wish to use.
- Click on the Required/Optional link for the field you wish to set as the mandatory requirement.
You will notice that once a field is set to required, there will be a small required text label in red next to the field name. When you create or edit an issue, the field will have a red * character next to its name. This is JIRA's way of indicating that a field is mandatory.
Most fields in JIRA can be hidden from user's view. When a field is set to hidden, users will not see the fields on any screens including issues such as create, update, and view. Perform the following steps to show or hide a field:
- Browse to the View Field Configuration page for the field configuration you wish to use.
- Click on the Show/Hide link for the field you wish to show or hide, respectively.
Once a field has been set to hidden, it will not appear on screen and you will not be able to search in it. However, you can still use tools such as scripts to set values for hidden fields. For this reason, hidden fields are used to store data that is used by automated processes.
Not all fields can be hidden. Built-in fields, such as Summary and Issue Type, cannot be hidden. When you set a field to hidden, you will notice that you can no longer set the field as required. As stated earlier, setting a field to required will make JIRA enforce a value to be entered into the field when you create or edit an issue. If the field is hidden, there will be no way for you to set a value and you will be stuck. This is why JIRA will automatically disable the required option, especially if you have already hidden a field. On the other hand, if you marked a field as required, when you hide the same field, you will notice that the field is no longer required. The rule of thumb is that field visibility will override field requirement.
Renderers control how a field will be displayed when it is being viewed or edited. Some built-in and custom fields have more than one renderer, and for these fields, you can choose which one to use. For example, for text-based fields, such as Description, you can choose to use the default simple text renderer or the more sophisticated wiki style renderer that will allow you to use wiki markup to add more styling.
JIRA ships with four different renderers:
- Default text renderer: This is the default renderer for text-based fields. Contents are rendered as plain text. If the text resolves a JIRA issue key, the renderer will automatically turn that into an HTML link.
- Wiki style renderer: This is an enhanced renderer for text-based fields. It allows you to use wiki markup to decorate your text content.
- Select list renderer: This is the default renderer for selection-based fields. It is rendered as a standard HTML select list.
- Autocomplete renderer: This is an enhanced renderer for selection-based fields, and it provides an autocomplete feature to assist users as they start typing into the fields.
The following table lists all the fields that can have special renders configured and their available options:
|
Field |
Available renderers |
|---|---|
|
Description |
Wiki style renderer and default text renderer. |
|
Comment |
Wiki style renderer and default text renderer. |
|
Environment |
Wiki style renderer and default text renderer. |
|
Component |
Autocomplete renderer and select list renderer. |
|
Affects version |
Autocomplete renderer and select list renderer. |
|
Fix versions |
Autocomplete renderer and select list renderer. |
|
Custom field of type "Free Text Field (unlimited text)" |
Wiki style renderer and default text renderer. |
|
Custom field of type "Text Field" |
Wiki style renderer and default text renderer. |
|
Custom field of type "Multi Select" |
Autocomplete renderer and select list renderer. |
|
Custom field of type "Version Picker" |
Autocomplete renderer and select list renderer. |
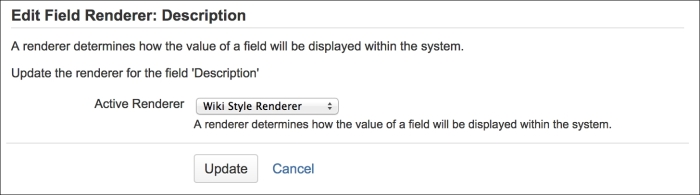
Perform the following steps to set the renderer for a field:
- Browse the View Field Configuration page for the field configuration you wish to use.
- Click on the Renderer link for the field you wish to set a renderer for (if it is available). You will be taken to the Edit Field Renderer page.
- Select the renderer from the available drop-down list.
- Click on the Update button to set the renderer:
There are other custom renderers developed by third-party vendors. Just like custom fields, these are packaged as add-ons that you can install in JIRA. Once installed, these custom renderers will be available for the selection of the appropriate field types.
A good example is the JEditor plugin, which provides a rich-text editor for all text-based fields such as Description.
In order for a field to appear, it needs to be placed onto a screen. You have already seen this when creating new custom fields. One of the steps in the creation process is to select what screens to add the custom field to. Screens will be discussed further in Chapter 5, Screen Management, so we will not spend too much time understanding them right now.
What you need to know for now is that after a field has been added to a screen, you can add it to additional screens or take it off completely. If you are working with just one field, you can configure it here from the field configurations. If you have multiple fields to update, a better approach will be to work directly with screens, as we will see in Chapter 5, Screen Management.