
Armed with the new knowledge that you gathered in this chapter, together with fields from the previous chapter, it is time for you to further customize your JIRA to provide a better user experience through presentation.
What we will do this time is create new screens and apply them to our Help Desk project. We want to separate the generic fields from our specialized custom fields designed for escalation. We also want to, at this time, apply the changes to the issues of the Incident type only and not affect the other issue types. As with any changes to be done on a production system, it is critical that you have a backup of your current data before applying changes.
In Chapter 4, Field Management, you created a few custom fields specifically designed for our support teams. As you learned, those fields are added to the default screen. The first thing you need to do is to create a couple of screens for your Help Desk project only, to avoid affecting any other screens used by other projects and teams.
We will be creating three screens—one for creating and viewing issues, one for updating issues, and one to transition issues through the workflow. Since workflow is covered in the next chapter, we will just create the screen and come back to it when we discuss workflows. To create a screen perform the following steps:
- Browse to the View Screens page and click on Add Screen.
- Name the new screen such as
Help Desk Create/View Screen. - Provide a helpful description such as
Screen for create/view help desk issues. - Click on the Add button to create the screen.
The next step is to set up the tabs for our new screen. We would like to have the default fields on the first screen to capture generic issue data, and then we will place the new custom fields that were created in Chapter 4, Field Management, onto a new tab called Escalation, as follows:
- Rename the default tab (named Field Tab) to
General. - Create a new tab called
Escalation.
Now that you have your screen and tabs, it is time to place your fields onto them using the following steps:
- Move back to the General tab.
- Add the fields from the Default screen onto the tab (see the following table for the complete list of fields to add).
- Move to the Escalation tab.
- Add the new escalation custom fields onto the tab.
Field
Tab
Summary
General
Issue Type
General
Security Level
General
Priority
General
Due Date
General
Component/s
General
Affects Version/s
General
Fix Version/s
General
Assignee
General
Reporter
General
Environment
General
Description
General
Time Tracking
General
Attachment
General
Escalation List
Escalation
Escalation Level
Escalation
Is Escalation Required
Escalation
Of course, you might be thinking that this can be done much faster if we just clone the default screen and move the escalation fields to the new tab, and you are absolutely correct. However, we are just doing it manually this time to learn the process.
We created and configured our first create/view screen. Our new edit screen is going to look very similar to this with just a few modifications. We want to take the Issue Type field off since we do not want users to change the issue type all the time, and we are going to take the Escalation Level field off as it makes little sense to have a noneditable field on the edit screen. Since we are only taking off some fields from an existing screen, instead of going through the entire create and configure process, let's spare ourselves the tedious clicking, and copy the screen we just created, since we have already done it once:
- Browse to the View Screens page.
- Click on the Copy link for Help Desk Create/View Screen.
- Name the new screen
Help Desk Edit Screen. - Provide a helpful description such as
Screen for edit help desk issues. - Click on the Copy button to create the new screen.
Since we copied the screen, we inherit all of the fields and tabs so there is no need to reconfigure them. All we need to do is to remove the fields we do not need:
- Click on the Configure link for Help Desk Edit Screen.
- Delete the Issue Type field in the General tab.
- Delete the Escalation Level field in the Escalation tab.
The last step is to create your third screen, which we will use in the next chapter. This screen will be used during workflow transitions, and we would like to allow users to reassign the issue and also update the Escalation List field. Since this is going to be a fairly simple screen, we will create it from scratch:
- Browse to the View Screens page and click on Add Screen.
- Name the new screen as
Help Desk Workflow Screen. - Provide a helpful description such as
Screen for transition help desk issues. - Click on the Add button to create the screen.
- Click on the Configure link for Help Desk Workflow Screen.
- Add the Assignee and Escalation List fields to the screen.
You now have your fully configured screens set up, but they are not in use right now. The next step is to establish the associations with their respective issue operations.
With the screens created and configured, we now need to link them up with issue operations so that JIRA will know on which action the new screens will be displayed using the following steps:
- Browse to the View Screen Schemes page and click on Add Screen Scheme.
- Name the new screen scheme as
Help Desk Incident Screen Scheme. - Provide a helpful description such as
Screen scheme for Help Desk incidents. - Select Help Desk Create/View Screen as the default screen.
- Click on the Add button to create the screen scheme.
With our screen scheme in place, it is time to link up our screens with their respective issue operations:
- Click on the Associate an Issue Operation with a Screen button.
- Select Help Desk Edit Screen for the Edit Issue operation.
Since we assigned Help Desk Create/View Screen to Default, this screen will be applied to the unmapped operations, Create Issue and View Issue. There are no differences if you choose to explicitly set the mappings for the preceding two operations.
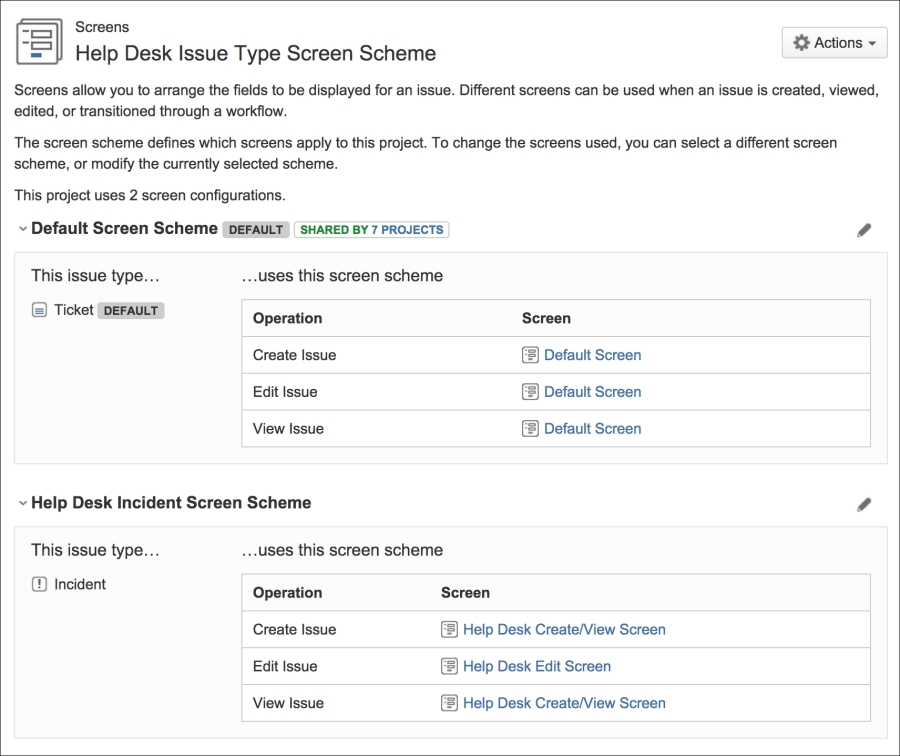
Now, you need to tell JIRA which issue type to apply the screen scheme to that you just created. We will be applying our new screens to issues of type Incident initially, since these are usually the type of issues that require immediate attention and appropriate escalation. For future enhancements, you can further customize your design so that each issue type will have its own screen design.
The first step is to create a new issue type screen scheme to be used specifically for our project:
- Browse to the Issue Type Screen Schemes page and click on the Add Issue Type Screen Scheme button.
- Name the new screen scheme
Help Desk Issue Type Screen Scheme. - Provide a helpful description such as
Issue type screen scheme for Help Desk team. - Select Default Screen Scheme as the default screen scheme.
- Click on the Add button to create the issue type screen scheme.
With the scheme created, you can establish the associations between issue types and screen schemes:
- Click on the Associate an Issue Type with a Screen Scheme button.
- Select Incident for Issue Type.
- Select Help Desk Incident Screen Scheme for the screen scheme to be associated.
- Click on the Add button to create the association.
This will ensure that issues of type Incident will have your new screens applied while issues of other types will not be affected.
The last step is to activate all the screens and schemes you created so far in this chapter and see them in action. Remember that there is only one thing you need to do—choose your project and configure it to use your issue type screen scheme:
- Browse to the Project Administration page for your Help Desk project.
- Select the Screens tab on the left-hand side.
- Click on the Actions drop-down menu and select Use a different scheme.
- Select Help Desk Issue Type Screen Scheme and click on the Associate button.
If you are performing this on a live production system, it is recommended that you alert the users of the change and perform this when there are not many users on the system.
This is it. All done! Our final screen mapping will look something like the following screenshot:
You can now take a look at your hard work and see your custom screens, fields, and tabs, all working nicely together to present you with a custom form for collecting user data. Let's go ahead and create a new incident and see what your newly customized Create Issue screen will look like, as shown in the following screenshot:
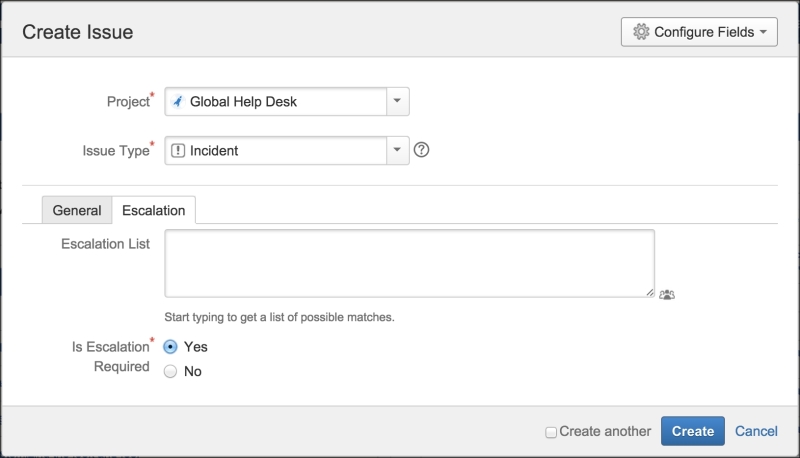
As you can see, your new screen is nicely divided into two tabs with your new custom fields on the Escalation tab. If you create an issue of type Ticket, you will see that it will not have the tabbed screen design.