
While many other software systems provide users with limited control over the presentation of screens, JIRA is very flexible when it comes to screen customizations. You can create your own screens and decide what fields are to be placed on them and their orders. You can also decide which screens are to be displayed for major issue operations. In JIRA, you can create and design customized screens for the following operations:
- Create an issue in the create issue dialog box
- Edit an issue when an issue is being updated
- View an issue after an issue is created and is being viewed by users
- Manage workflows during workflow transitions (workflows will be covered in Chapter 6, Workflows and Business Processes)
Screens are maintained centrally from the administration console, which means you need to be a JIRA administrator to create and configure screens. Perform the following steps to access the screens page:
- Log in as a JIRA administrator user.
- Browse to the JIRA administration console.
- Select the Issues tab and then the Screens option, this will bring up the View Screens page.
The View Screens page lists all the screens that are currently available in your JIRA instance. You can select a screen and configure what fields will be on this screen, and decide how you can divide a screen into various tabs.
For each of the screens listed here, JIRA will also tell you what screen scheme each of the screens are a part of and the workflows that are being used. You have probably noticed that for screens that are either part of a screen scheme or workflow, there is no Delete option available as you cannot delete screens that are in use. You need to unassociate the screen from screen schemes and/or workflows to delete them, as shown in the following screenshot:

As shown in the preceding screenshot, for each screen, you can perform the following operations:
- Configure: This configures what fields are to be placed on the screen. Not to be confused with the Edit operation.
- Edit: This updates the screen's name and description.
- Copy: This makes a copy of the selected screen, including its tabs and field configurations.
- Delete: This deletes the screen from JIRA. Only available if it is not being used by a screen scheme or workflow.
JIRA comes with three screens by default. You have already seen them while creating a new issue, resolving an issue, and transitioning an issue through a workflow. As a matter of fact, if you have not made any customizations to screens, every issue screen you see will be one of the following:
- Default Screen: This screen is used for creating, editing, and viewing issues
- Resolve Issue Screen: This screen is used when resolving and closing issues
- Workflow Screen: This screen is used when transitioning issues through workflows (if configured to have a screen, such as Reopen Issue)
While these screens are able to cover the most basic requirements, you will soon find yourself outgrowing them, and adjustments will need to be made. For example, if you want to keep certain fields, such as priority or read-only, so that they shouldn't be changed after issue creation, you can achieve this by setting up different screens for creating and editing issues. Another example will be to have different create and edit screens for different issue types, such as bug and task. In these cases, you will need to create your own screen in JIRA using the following steps:
- Browse to the View Screens page.
- Click on the Add Screen button. This will bring up the Add Screen dialog box.
- Enter a meaningful name for the new screen. It is a good idea to name your screen after its purpose, for example,
Bug Create Screento indicate that it is the screen to create new bug issues. - Enter an optional short description for the screen.
- Click on the Add button to create the screen.
At this point, your new screen is blank with no fields in it. You will see in later sections how to add fields onto screens and put them to use.
You can edit existing screens to update their details to help keep your configurations up to date and consistent. Perform the following steps to edit a screen:
- Browse to the View Screens page.
- Click on the Edit link for the screen you wish to update. This will take you to the Edit Screen page.
- Update the name and description of the screen.
- Click on the Update button to apply your changes.
To delete an existing screen, it must not be used by any screen schemes or workflows. If it is associated with a screen scheme or workflow, you will not be able to delete it. You will need to undo the association first. Perform the following steps to delete a screen:
- Browse to the View Screens page.
- Click on the Delete link for the screen you wish to remove. This will take you to the Delete Screen page for confirmation.
- Click on the Delete button to remove the screen.
By deleting a screen, you do not delete the fields that are on the screen from the system.
Screens can be complicated with many of fields ordered logically, so creating a new screen from scratch may not be the most efficient method if there is already a similar one available. Just like with many other entities in JIRA, you can make a copy of an existing screen, thus cutting down the time that would otherwise take you to re-add all the fields:
- Browse to the View Screens page.
- Click on the Copy link for the screen you wish to copy. This will take you to the Copy Screen page.
- Enter a new name and description for the screen.
- Click on the Copy button to copy the screen.
Creating a new screen is like getting a blank piece of paper; the fun part is to add and arrange the fields on the screen. Fields in JIRA are arranged and displayed from top to bottom in a single column. You have full control of what fields can be added and in what order they can be arranged.
The only exception to this is for the View screen. When you are viewing an issue, fields are grouped together by type. For example, user fields such as reporter and assignee are displayed together on the top right-hand side of the page. Also note that for built-in fields such as Summary and Issue type, even if you take them off the screen, they will still be displayed when viewing an issue. For these fields, you cannot change their position on the screen.
JIRA also allows you to break your screens into tabs or pages within a form, and you can do all of this within a single configuration page. It is this level of flexibility combined with simplicity that makes JIRA a very powerful tool.
Perform the following steps to configure an existing screen:
- Browse to the View Screens page.
- Click on the Configure link for the screen you wish to configure.
On this page, you can do the following:
- Add/remove fields onto the screen
- Arrange the order of the fields
- Create/delete tabs on the screen
- Move fields from one tab to another
When you first create a screen, it is of little use. In order for screens to have items to present to the users, you must first add fields onto the screens:
- Browse to the Configure Screen page for the screen you wish to configure.
- Select the fields you would like to add by typing in the field's name in the Select Field ... drop-down list. JIRA will auto match the field as you type, as shown in the following screenshot.
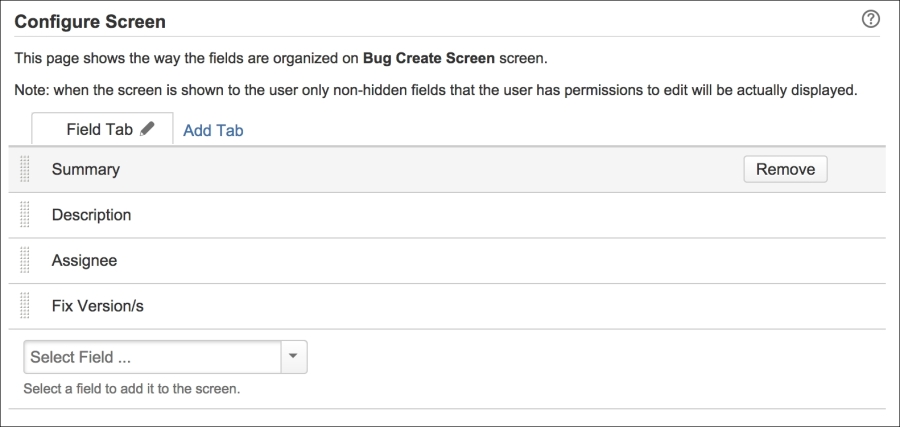
Fields are added to the bottom of the list. You can reorder the list of fields by simply dragging them up and down.
Fields can be taken off from a screen completely. When a field is taken off, the field will not appear when the screen is presented to the users. There is a subtle difference between deleting a field from a screen and hiding it (discussed in the previous chapter). Although both the actions will prevent the field from showing up, by removing the field, issues will not receive a value for that field when they are created. This becomes important when a field is configured to have a default value. When the field is removed, the issue will not have the default value for the field, while if the field is simply hidden, the default value will be applied.
You will also need to pay close attention when deleting fields off a screen as there is no confirmation dialog. Make sure you do not delete required fields, such as summary, from a screen used to create new issues. As seen in Chapter 4, Field Management, JIRA will prevent you from hiding fields that are marked as required, but JIRA does not prevent you from taking the required fields off the screen. Therefore, it is possible for you to end up in a situation where JIRA requires a value for a field that does not exist on the screen. This can lead to very confusing error messages to the end users:
- Browse to the Configure Screen page for the screen you wish to configure.
- Hover your mouse over the field you want to delete and click on the Remove button.
For most cases, you will be sequentially adding fields to a screen, and users will fill them from top to bottom. However, there will be cases where your screen becomes over complicated and cluttered due to the sheer number of fields you need or you simply want to have a way to logically group several fields together and separate them from the rest. This is where tabs come in.
If you think of screens as the entire form a user must fill in, then tabs will be individual pages or sections that make up the whole document. Tabs go from left to right, so it is a good practice to design your tabs to flow logically from left to right. For example, the first tab can gather general information, such as summary and description. Subsequent tabs will gather more domain-specific information.
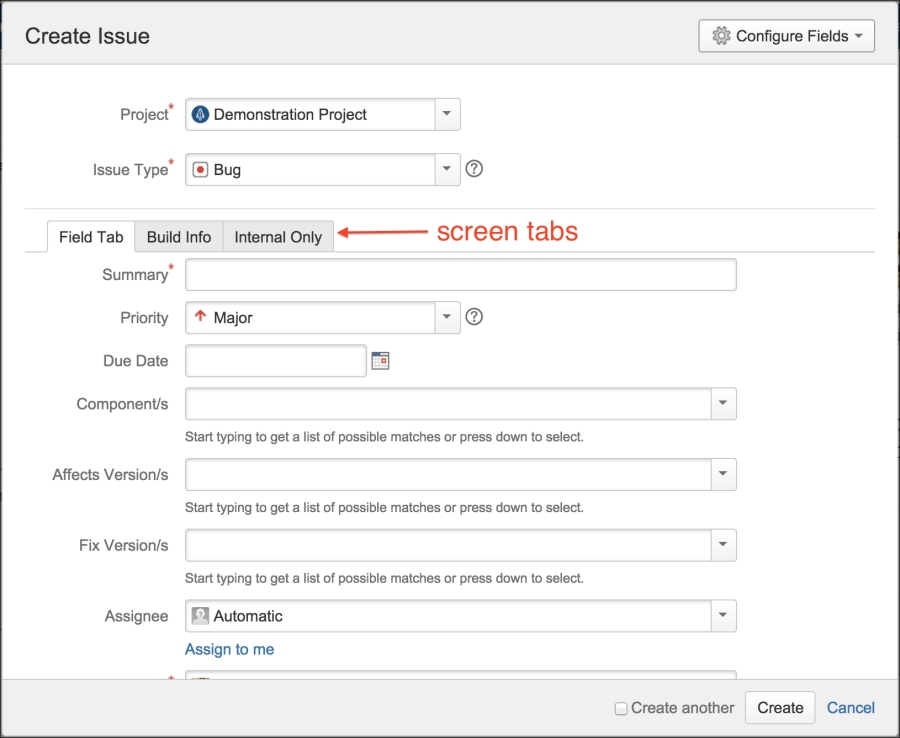
You can add tabs to any screen in JIRA. In fact, by default, all screens have a default tab called Field Tab that is used to host all the fields. You can add new tabs to a screen to break down and better manage your screen presentation:
- Browse to the View Screens page.
- Click on the Configure link for the screen you wish to add a new tab for.
- Click on the Add Tab link and enter a name for the tab.
- Click on the Add button to create the tab.
Tabs are organized horizontally from left to right. When you add a new tab to the screen, they are appended to the end of the list. You can change the order of tabs by dragging them left and right in the list, as shown in the following screenshot:
You can also move fields from one tab to another by dragging the field and hovering it over to the target tab. This will save you some time from having to manually remove a field from a tab and then add it to the new tab.
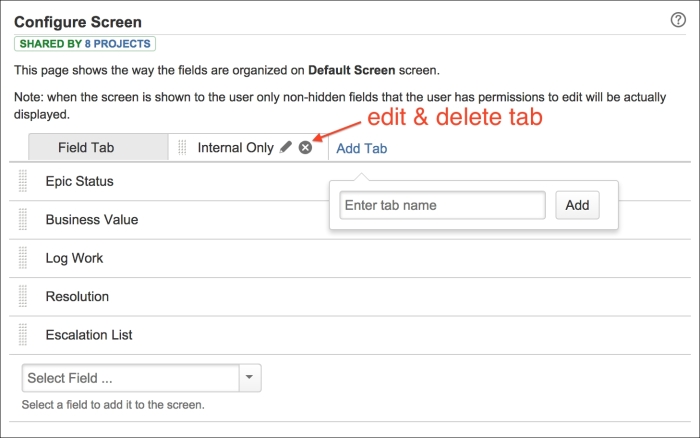
Just like screens, you can maintain existing tabs by editing their names and/or removing them from the screen. Perform the following steps to edit a tab's name:
- Browse to the View Screens page.
- Click on the Configure link for the screen that has the tab you wish to edit.
- Select the tab by clicking on it.
- Click on the Edit icon and enter a new name for the tab.
- Click on the OK button to apply the change.
When you delete a tab, the fields that are on the tab will be taken off the screen. You will need to re-add or move them to a different tab if you still want those fields to appear on the screen. You cannot delete the last tab on the screen. To delete a tab perform the following steps:
- Browse to the View Screens page.
- Click on the Configure link for the screen that has the tab you wish to edit.
- Select the tab by clicking on it.
- Click on the Delete icon. JIRA will ask you to confirm whether you want to delete the tab and list all the fields present.
- Click on the Delete button to remove the tab from the screen.