
JIRA is an event-driven system. This means that usually when an action occurs (for example, when an issue is created), JIRA fires off a corresponding event. This event is then picked up by components that are designed to listen to the event. Not surprisingly, they are called listeners. When a listener picks up an event, it will perform its duty such as keeping issues up-to-date with changes or sending an e-mail to users watching the issue.
This mechanism allows JIRA to process operations asynchronously. The advantage of this model is operations, such as sending e-mails, and it's separated from JIRA's core functions like issue creation. If there is a problem with the mail server, for example, you will not want this problem to prevent your users from creating issues.
There are two types of events in JIRA:
The following table lists all the system events in JIRA and what they are used for:
As an administrator, you will be able to get a one-page view of all the events in JIRA. You just need to do the following:
- Browse to the JIRA administration console.
- Select the System tab and then the Events option. This will bring up the View Events page.
Like most other entities in JIRA, such as screens, events can be either active or inactive. New events are inactive by default, and they need to be associated with a notification scheme or workflow post function to become active. While you cannot edit or delete system events, you can deactivate them by removing their association with notification schemes and workflow post functions.
Each event is associated with a template, often referred to as a mail template. These templates contain the base e-mail contents when notifications are sent. For system events, you cannot change their templates (you can change the template files, however). For custom events, you can choose to use one of the existing templates or create your own mail template.
Mail templates are physical files that you create and edit directly via a text editor; you can not edit mail templates in the browser. Each mail template is made up of three files:
Mail templates are stored in the <JIRA_INSTALL>/atlassian-jira/WEB-INF/classes/templates/email directory. Each of the three files listed are placed in their respective directories called subject, text, and html.
While creating new mail templates, it is a good practice to name your template files after the issue event. This will help future users understand the purpose of the templates.
Mail templates use Apache's Velocity template language (http://velocity.apache.org). For this reason, creating new mail templates will require some understanding of HTML and template programming.
If your templates only contain static text, you can simply use standard HTML tags for your template. However, if you need to have dynamic data rendered as part of your templates, such as the issue key or summary, you will need to use the Velocity syntax. A full explanation of Velocity is beyond the scope of this book. The following section provides a quick introduction to creating simple mail templates for JIRA. You can find more information on Velocity and its usage in JIRA mail templates at https://confluence.atlassian.com/x/dQISCw.
In a Velocity template, all the text will be treated as normal. Anything that starts with a dollar sign ($), such as $issue, is a Velocity statement. The $ sign tells Velocity to reference the item after the sign, and when combined with the period (.), you are able to retrieve the value specified. For example, the following command will get the issue key and summary from the current issue, separated by a "–" character:
$issue.key - $issue.summary
JIRA provides a range of Velocity references that you can use for creating mail templates. You can find a comprehensive list at https://developer.atlassian.com/display/JIRADEV/Velocity+Context+for+Email+Templates.
Now that you have a brief understanding of how Velocity works, you first need to create a template for the mail subject. The following command shows a typical subject template:
$eventTypeName: ($issue.key) $issue.summary
When the template is processed, JIRA will substitute in the actual values for the event type (for example, Issue Created), issue key, and issue summary (for example, Issue Escalated: HD-11–Database server is running very slow).
You then need to create a template for the actual e-mail content. You need to create a text and HTML version. The following code shows a simple example of a text-based template, which displays the key for the escalated issue:
Hello,

The ticket $issue.key has been escalated and is currently being worked on.  We will contact you if we require more information.

Regards
Support team.
Before JIRA sends out the e-mail, the preceding text will be processed, where all Velocity references, such as $issue.key
, will be converted into proper values, for example, DEMO-1.
After creating your mail
templates, register them with JIRA. To register your new templates, locate and open the email-templates-id-mappings.xml file in the <JIRA_INSTALL>/atlassian-jira/WEB-INF/classes directory in a text editor. Add a new entry to the end of the file before closing the </templatemappings> tag, as follows:
<templatemapping id="10001">
  <name>Example Custom Event</name>
  <template>examplecustomevent.vm</template>
  <templatetype>issueevent</templatetype>
</templatemapping>
Here, we register a new custom mail template entry and the details are given in the following table:
|
Parameter |
Description |
|---|---|
|
|
The unique ID for the template. |
|
|
A human-readable name for JIRA to display. |
|
|
The mail template file names for |
|
|
Template type. For events generated from an issue, the value will be |
After creating your templates and registering them in the mapping file, you will have to restart JIRA for the changes to be picked up. The new templates will be available when we create new events, as covered in the following section.
JIRA comes with a comprehensive list of system events focused around issue-related operations. However, there will be times when you will need to create custom-designed events representing specialized business operations, or when you simply need to use a custom e-mail template.
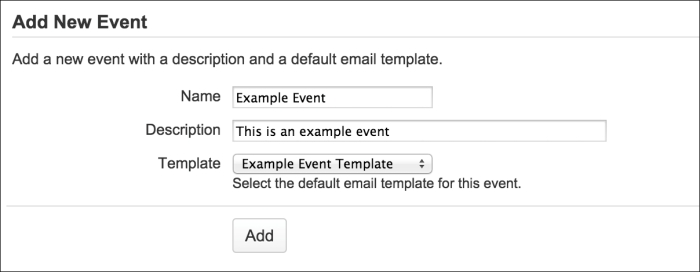
Perform the following steps to add a new custom event:
- Browse to the View Events page.
- Enter a meaningful name and description for the new event in the Add New Event section.
- Select the mail template for the new event.
- Click on the Add button to create a new event:
New events are inactive by default. Associating them with a notification scheme or workflow post function will activate them.
Unlike system events, with custom events, you need to tell JIRA when it can fire a custom event.
Custom events are mostly fired by workflow transitions. If you recall from Chapter 6, Workflows and Business Processes, you can add post functions to workflow transitions. Almost all JIRA's transitions will have a post function that fires an appropriate event. It is important to understand that just because an event is fired does not mean that there needs to be something to listen to it.
If you skipped Chapter 6, Workflows and Business Processes, or still do not have a good understanding on workflows, now would be a good time to go back and revisit the chapter.
Perform the following steps to fire a custom event from a workflow post function:
- Browse to the View Workflows page.
- Click on the Edit link for the workflow that will be used to fire the event.
- Click on the transition that will fire the event when executed.
- Click on the Post Functions tab.
- Click on the Edit link for the post function that reads Fire a <event name> event that can be processed by the listeners:

- Select the custom event from the drop-down list.
- Click on the Update button to apply the changes to the post function.
- Publish the workflow.
Now, whenever the workflow transition is executed, the post function will run and fire the selected event. Each transition can fire only one event, so you cannot have both Issue Created and Issue Updated events being fired from the same transition.