
You have seen how we can create and manage screens and how to configure what fields to add to the screens. The next piece of the puzzle is letting JIRA know how to choose the screen that has to be displayed for each issue operation.
Screens are displayed during issue operations, and a screen scheme defines the mapping between screens and the operations. With a screen scheme, you can control the screen for displaying each of the issue operations, as follows:
- Create Issue: This screen is shown when you create a new issue
- Edit Issue: This screen is shown when you edit an existing issue
- View Issue: This screen is shown when you view an issue
By default, all the three operations use the same screen, Default Screen. This is a sensible default as it displays the information to users consistently across all the three operations. However, there will be times when you would wish that certain fields should not be available for editing once the issue is created, such as Issue Type. You may want to have finer control over the type of issues raised for reporting and statistical measurement reasons, so it is not a good idea to let users freely change the issue type. Another example would be that certain fields are not required during the creation time, because the required information may not be available at the time. Therefore, instead of confusing and/or overwhelming your users, leave those fields out during issue creation and only ask for them to be filled in at a later time when the information becomes available.
As you can see, by dividing the screen into multiple issue operations rather than having the one-screen-fits-all approach, JIRA provides you with a new level of flexibility to control and design your screens. As always, if there are no significant differences between the screens, for example create and edit, it is recommended that you create a base screen and use the Copy Screen feature to reduce your workload.
Just like screens, you need to be a JIRA administrator to manage screen schemes. Perform the following steps to manage screen schemes:
- Browse to the JIRA administration console.
- Select the Issues tab and then the Screen Schemes option to bring up the View Screen Schemes page.
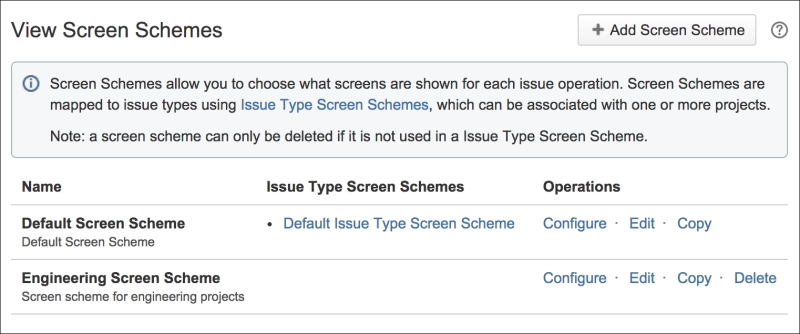
From the View Screen Schemes page, you will be able to see a list of all the existing screen schemes, create and manage their configurations, and view their associations with issue type screen schemes (explained in the later section).
JIRA ships with Default Screen Scheme, which uses Default Screen for viewing, creating, and editing issues. When you create a new project, by default, this is the screen scheme that will be used.
As your JIRA grows, different projects are created. It is a good practice to create separate, specialized screen schemes to better manage screen presentations. In this way, you will have finer control over the screens used by the different issue operations and issue types. Perform the following steps to create a new screen scheme:
- Browse to the View Screen Schemes page.
- Click on the Add Screen Scheme button.
- Enter a meaningful name and description for the new screen scheme.
- Select a default screen from the list of screens. This screen will be displayed when no specific issue operation is mapped.
- Click on the Add button to create the screen scheme.
At this stage, the new screen scheme is not in use. This means that it is not associated with any issue type screen schemes yet (issue type screen schemes are covered in the later sections).
After a screen scheme is created, it will apply the selected default screen to all the issue operations. We will look at how to associate screens to issue operations in later sections.
You can update the details of the existing screen schemes, such as its name and description. In order for you to make changes to the default screen selection, you need to configure the screen scheme, which will be covered in later sections. Perform the following steps to edit an existing screen scheme:
- Browse to the View Screen Schemes page.
- Click on the Edit link for the screen scheme you wish to edit. This will take you to the Edit Screen Scheme page.
- Update the name and description with new values.
- Click on the Update button to apply the changes.
Inactive screen schemes can also be deleted. If the screen scheme is active (that is, associated with an issue type screen scheme), then the delete option will not be present. Perform the following steps to delete a screen scheme:
- Browse to the View Screen Schemes page.
- Click on the Delete link for the screen scheme you wish to edit. This will take you to the Delete Screen Scheme page.
- Click on the Delete button to confirm that you wish to delete the screen scheme.
While screen schemes are not as complicated as screens, there will still be times when you would like to copy an existing screen scheme rather than creating one from scratch. You might wish to copy the scheme's screens/issue operations associations, which we will cover in the following section, or make a quick backup copy before making any changes to the scheme.
Perform the following steps to copy an existing screen scheme:
- Browse to the View Screen Schemes page.
- Click on the Copy link for the screen scheme you wish to copy. This will take you to the Copy Screen Scheme page.
- Enter a new name and description for the screen scheme.
- Click on the Copy button to copy the selected screen scheme.
Just like creating a new screen scheme, copied screen schemes are inactive by default.
As mentioned earlier, when you create a new screen scheme, it will use the same screen selected as your default screen for all issue operations. Now, if you want to use the same screen to create, edit, and view, then you are all set; there is no need to perform any further configuration to your screen scheme. However, if you need to have different screens displayed for different issue operations, then you will need to establish this association.
When an issue operation does not have an association with a screen, the selected default screen will be applied. If the issue operation is later given in a screen association, then the specific association will take precedence over the general fallback default screen.
The associations between screens and issue operations are managed on a per screen scheme level. Perform the following steps to configure a screen scheme:
- Browse to the View Screen Schemes page.
- Click on the Configure link for the screen scheme you wish to configure. This will take you to the Configure Screen Scheme page.
Each issue operation can be associated with one or more issue operations. Perform the following steps to associate an issue operation with a screen:
- Browse to the Configure Screen Scheme page for the screen scheme to be configured.
- Click on the Add an Issue Operation with a Screen button.
- Select an issue operation to be assigned to a screen.
- Select the screen to be associated to the issue operation.
- Click on the Add button to create the association.
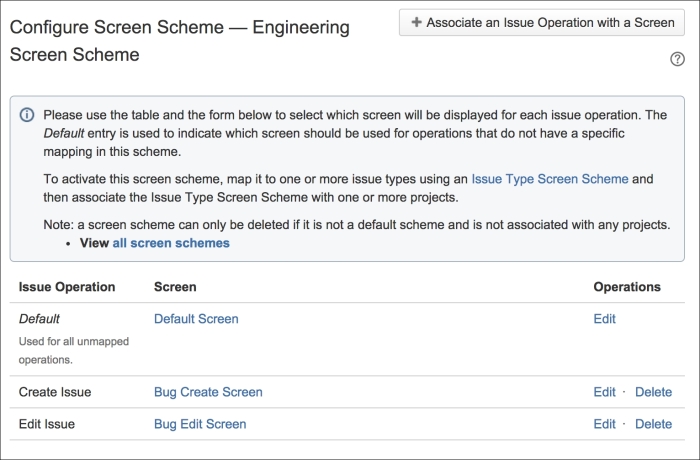
As shown in the preceding screenshot, the Create Issue and Edit Issue operations are associated with Bug Create Screen and Bug Edit Screen, respectively. Since we do not have a screen associated with the View Issue operation, the default association of Default Screen will be used.
After you create an association for an issue operation, JIRA prevents you from creating another association for the same issue operation by removing it from the list of available options. In order to change the association to a different screen, you need to edit the existing association, as follows:
- Browse to the Configure Screen Scheme page for the screen scheme to be configured.
- Click on the Edit link for the association you wish to edit. This will take you to the Edit Screen Scheme Item page.
- Select a new screen to associate with the issue operation.
- Click on the Update button to apply the change.
If you decide that one or more existing associations are no longer needed, then you can delete them from the screen scheme by performing the following steps:
- Browse to the Configure Screen Scheme page for the screen scheme to be configured.
- Click on the Delete link for the association you wish to delete.
Please note that unlike other similar operations, deleting an issue operation association does not prompt you with a confirmation page. As soon as you click on the Delete link, your association will be deleted immediately.