
The Project Administration interface is where project administrators can manage the settings and configurations of their projects. For example, you can change the project's name, select what issue types will be available for the project, and manage a list of components within the project. Only users with the Administer Projects permission for a given project will be able to access this interface.
To access the Project Administration interface use the following steps:
- Go to the project browser for the project you want to administer.
- Select the Administration tab. If you do not see the tab, then you do not have the necessary permission.
From the Project Administration interface, if you are a JIRA Administrator (such as the user created during installation) you will be able to perform the following key operations:
- Update project details, such as project name, description, and avatar
- Manage what users see when working on the project, such as issue types, fields, and screens
- Control permission settings and notifications
- Manage the list of available components and versions
Note
If you are not a JIRA Administrator (that is, you do not have the JIRA Administrator global permission), you can only view the current project's configuration. We will cover permissions in Chapter 8, Securing JIRA.
The preceding key operations are shown in the following screenshot:

JIRA 6 has made many improvements to this interface. As we will see in later chapters when talking about configurations such as issue types and screens, not only does JIRA tell us what configuration schemes are being used by the project, but also their details. It also lets us make changes on the spot.
The first group consists of a single tab, the Summary tab. On this tab, JIRA displays a single-page view on all the current configuration settings for the project. Not all the settings will have their own tabs. Those that do not have a tab will also be shown here, on the Summary tab.
On this tab, you can do the following:
- Update the project's general information, including the project key (only available after JIRA 6.1)
- Set the project's category
- Re-index the project
- Delete the project
The Components tab is where project administrators can manage the components for their projects. Components can be thought of as subsections that make up the full project. In a software development project, components can be various modules that the final product comprises. As shown in the following screenshot, there are three components configured in the current project:
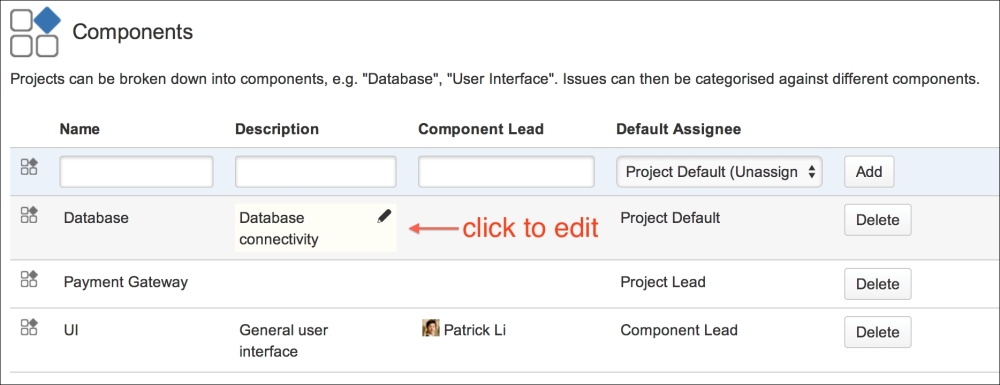
In JIRA, components are project-specific. This means that components from one project cannot be used in a different project. This also allows each project to maintain its own sets of components. A component has four pieces of information, as shown in the following table:
|
Field |
Description |
|---|---|
|
Name |
This is a unique name for the component. |
|
Description |
This is an optional description to offer more explanation on what the component is for. |
|
Component Lead |
This is an optional field where you can select a single user as the lead for the component. For example, in a software project, this can be the main developer for the component. |
|
Default Assignee |
This tells JIRA when an issue is created without the assignee being selected. If the issue has a component, then JIRA will auto-assign the issue to the selected default assignee. |
Unlike some older versions of JIRA, you can create new components directly from the Components tab:
- Browse to the Components tab for the project.
- Provide a unique name for the component. JIRA will let you know whether the name is already taken.
- Provide a short description for the new component.
- Select a user to be the lead of the component. Just start typing and JIRA will prompt you with options that meet the criteria.
- Select the default assignee option for the component.
- Click on Add to create the new component.
Once you have created the new component, it will be added to the list of existing components. When a component is first created, it will be placed at the top of the list. If you refresh the page, the list will then be ordered alphabetically.
If you want to edit a component's name or any other details, all you need to do is hover your mouse over the component's name, and you will see that the name field is highlighted. Click on the name to make the field editable, make your changes, and click on Update. If you want to delete a component, all you have to do is to click on the Delete button next to the target component.
As explained in the preceding section, one of the useful features of components is the ability to assign a default assignee to each individual component. This means, when a user creates an issue and sets the assignee as Automatic, JIRA will be able to automatically assign the issue based on the component selected. This is a very powerful feature for organizations where members of various teams often do not know each other. Therefore, when it comes to assigning issues at creation time, it is difficult to decide who to assign it to. With this feature, it can be set up so that the lead of the component becomes the default assignee and the issues raised can then be delegated to other members of the team.
For our demo project, each of the supported systems has a system expert, which is represented as the lead of the respective component. When the business user logs a ticket and selects a component, the ticket will go directly to the lead. This setup is also flexible enough. If the user knows who to best assign the ticket to, he or she can directly assign the ticket to a member of the team and the automatic assignment will not take place.
Like the Components tab, the Versions tab allows project administrators to manage versions for their projects. Versions serve as milestones for a project. In project management, versions represent points in time. While for projects that are not product-oriented, versions may seem to be something that is less relevant; versions can still be valuable at managing and tracking the progress of issues and work.
As with components, versions also have a number of attributes, as shown in the following table:
|
Field |
Description |
|---|---|
|
Name |
This is a unique name for the version. |
|
Description |
This is an optional description to offer more explanation on what the version is for. |
|
Release Date |
This is an optional date that will be marked as the scheduled date to release the version. Versions that are not released according to the release date will have the date highlighted in red. |
Creating new versions is as simple as providing the necessary details for the new version and clicking on the Add button:
- Browse to the Versions tab for the target project.
- Provide a unique name for the version (for example,
1.1.0,v2.3). JIRA will let you know whether the name is already taken. - Provide a short description for the new version.
- Select the date for when the version starts and will be released by using the date picker.
- Click on Add to create the new version.
Unlike components, versions will not be ordered automatically by JIRA, so you will have to manually maintain the order. To change the order of versions, all you have to do is hover your mouse pointer over to the left of the version, and you will be able to drag the version up and down the list.
Just like managing components, the Versions tab uses the in-place editing feature. You just need to click on the field of the version you want to change, and click on Update to apply.
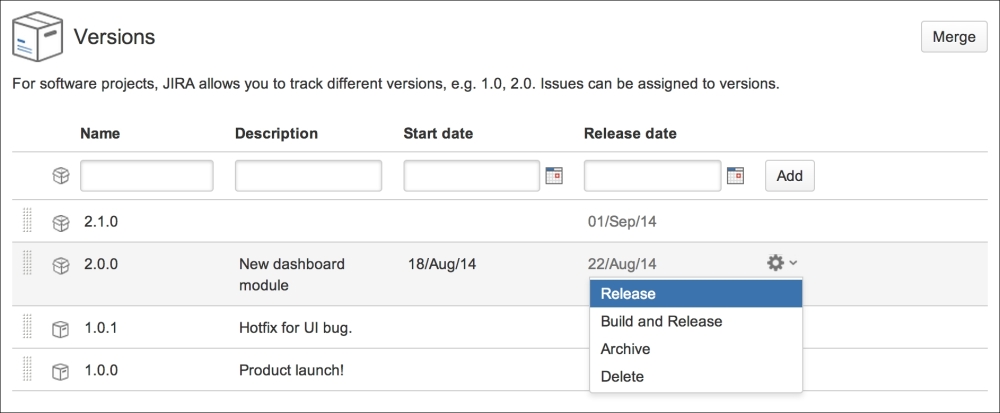
When you hover over a version, you will notice that there is a little cog icon to the right. If you click on that, you will have the options to do the following:
|
Option |
Description |
|---|---|
|
Release |
This will mark the version as released; meaning it is completed or shipped. When you release a version, JIRA will automatically check to make sure that all the issues are completed for the selected version. If these are incomplete, you will be prompted to either ignore those issues or push them to a different version. If the version has already been released, it will change to Unrelease. |
|
Build and Release |
This is similar to the Release option, but it also performs a build through Atlassian Bamboo, if there are any software codes. The version will only be released if the build is successful. This option is not available if the version is already released. |
|
Archive |
This will mark the version as archived; meaning that the version is stored away until further notice. When a version is archived, you cannot release or delete it until it is unarchived. |
|
Delete |
This will delete the version from JIRA. Again, JIRA will search for issues that are related to this version and prompt you as to whether you would like to move these issues to a different version. |
The options discussed in the preceding table can be seen in the following screenshot:
There are a number of other tabs on the Project Administration interface. We will not get into the details for these tabs as they will each be covered in their own chapters later. We will, however, take a quick tour to look at what each tab does, as shown in the following table:
|
Tab |
Description |
|---|---|
|
Issue Types |
This controls the types of issues that users can create for the project. For example, this may include Bugs, Improvements, and Tasks. Issue Types will be covered in Chapter 3, Issue Management. |
|
Workflows |
This controls the workflow issues that we will go through. Workflows consist of a series of steps that usually mimic the existing processes that are in place for the organization. Workflows will be covered in Chapter 6, Workflows and Business Processes. |
|
Screens |
Screens are what users see when they create and edit issues in JIRA. Screens will be covered in Chapter 5, Screen Management. |
|
Fields |
Fields are what JIRA uses to capture data from users when they create issues. JIRA comes with a set of default fields, and the JIRA administrator is able to add additional fields as needed. Fields will be covered in Chapter 4, Field Management. |
|
Roles |
The project administrators can define roles in the project and assign users to them. These roles can then be used to control permissions and notifications. Roles will be covered in Chapter 8, Securing JIRA. |
|
Permissions |
As we have already seen, permissions define who can perform certain tasks or have access in JIRA. Permissions will be covered in Chapter 8, Securing JIRA. |
|
Issue Security |
JIRA allows users to control who can view the issues they created, by selecting the issue security level. Issue security will be covered in Chapter 8, Securing JIRA. |
|
Notifications |
JIRA has the ability to send out e-mail notifications when certain events occur. For example, when an issue is updated, JIRA can send out an e-mail to alert all users who participate on the issue of the change. Notifications will be covered in Chapter 7, E-mails and Notifications. |