
Sure enough, if you are going to work with 3D graphics, it is necessary to have a 3D artist in your team. A good specialist may help you prevent many pitfalls. But in some cases, especially if the models are not complicated, you may be the chief cook and bottle washer and create all geometry yourself. It is preferable to prepare for such a task with the help of special literature because I only cover some basic aspects of 3D modeling for games without any specific details.
There is a wide range of different 3D editors in the market including some free ones, but a pretty popular tool is Blender (http://www.blender.org/) from Blender Foundation. It is cross-platformed; so, it can be used both on PC and Mac and has a huge community featuring a lot of tutorials, models, and so on. This is a very good editor to begin with.
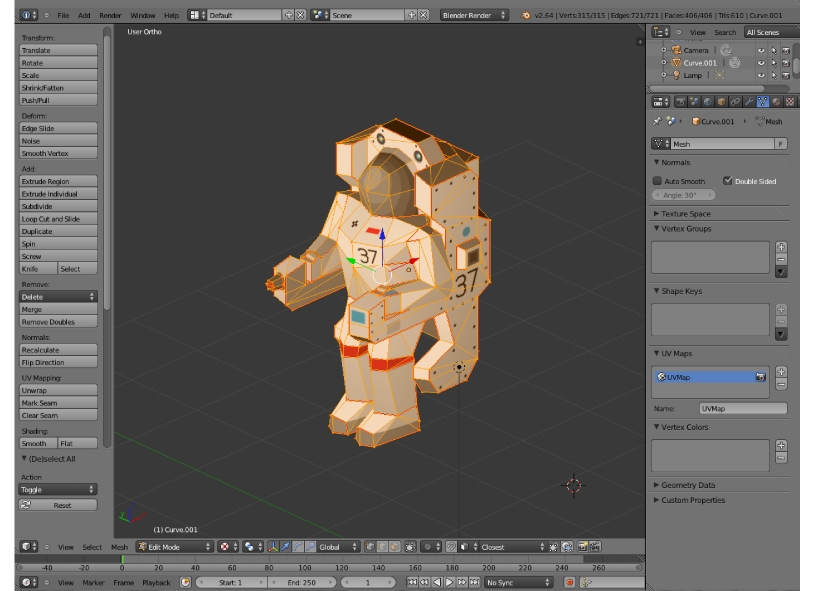
A screenshot of Blender
First of all, you need some sketches and concept of objects that you are going to create. It is good to start on paper. It helps to determine the basic details and principles of the visual look. The process requires some inspiration; so, a little research should be done. For example, for working on the astronaut, you need to find a lot of images of a real astronaut, stills from science-fiction movies of various decades, and even examples of corresponded toys, especially the vintage ones. It is a good practice to create a draft model from clay. It may help figure out many unclear moments in the geometry of the character. Many things cannot be understood only by a drawing on paper and speculative thinking. Therefore, clay might be very useful.
Then, a blueprint must be created—an accurate image of frontal, side, back, and sometimes top projection of the character or object. There is a standard pose for charters; the arms are raised. So, the figure has a shape of the letter T; such a look is known as the T-pose. But now, many modelers choose another version; when arms are raised less, forming a 45-degree angle with the body (the pose can be called an arrow pose), it helps prevent some potential problems with the shoulders after the arms are down. The blueprint must be loaded into a 3D editor, thus becoming a template to begin work with.
One of the ways to create a low poly model is to prepare a collection of cross sections of the object. Place them in the correct position and connect the appropriate vertexes, creating edges and filling surfaces with faces at the end. Such an approach can help to control the edges manually, avoiding the situation where the editors turn polygonal faces into tris automatically, thus creating ugly triangles. Alternatively, a model can be sculptured in a high-poly mode, but then it should be optimized either by using a special modifier controlling the number of faces inside objects (in Blender it is called Decimate) or by doing it manually.
Note
If you prefer to work with shapes in vector editors such as Adobe Illustrator rather than 3D editors, that is not a problem. Blender may import SVG-documents. Thus, some shapes can be created in Illustrator, saved as an SVG-file, and imported into a 3D scene. To resolve an issue with the anchor point, always place shapes at the very center of the artboard in Illustrator. If you need only paths, remove attributes from them before saving in SVG, for example, fill color so path color and width. Don't forget to turn imported shapes into meshes if you need to.
After the geometry has been completed and is solid, the mesh should be textured. For this operation, you need to learn such non-trivial procedures as UV mapping. It is good to comprehend it with a low poly model. The process becomes very visual and obvious because of the direct analogy with the paper craft. To add an element of texture on a specific surface, you need to tell the 3D engine where to find that graphic fragment in a texture document. For this job, the surface should be figuratively cut out from the 3D object, such as a slice of paper cut by a knife, and then put on a texture as a template. That is the basic idea of 2D-mapping. A principle of projection of 3D geometry on a flat image, three coordinates, X, Y, and Z, are transferred on a flat map which has only two coordinates. For the sake of clarity, these two coordinates are marked as U and V (U = Xtexture, V = Ytexture), rather than simply X and Y.
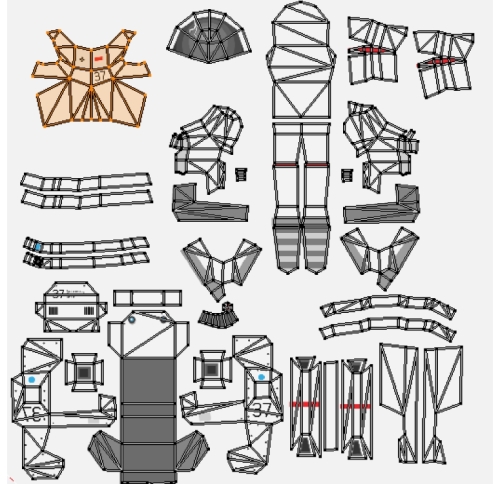
UV mapping of the Astronaut 3D model
Paper toys are not made of individual slices, but of elements connected together. There are lines of seams and lines to fold. The unwrapping has the same principles; some edges of a model must be marked as seams, other ones will be calculated as fold lines. The tricky part is that for the best result, you should define all the seams manually by selecting the appropriate edges one by one. Before that, you should imagine in your head how a 3D element (for example, an arm) can be unwrapped into a series of connected flat images. If the element is complex, it can be split into several separate fragments. Remember that a good UV map is not a conglomeration of abstract geometric shapes, but an image where the elements of the model can be easily perceived and read; this is the head, here are the fragments of the boots, and so on. Such a rule helps to create the texture right. In some cases, several takes are needed to unwrap the 3D model correctly. After each take, you look at the result, notice some error, fix it, and try to wrap the texture again. An unobvious feature of UV-mapping is the visual testing of the mesh geometry. If there are some problems such as double vertexes and sharp edges, the UV-map can demonstrate that; some parts of it will be lacerated.
To create a texture based on a UV-map, the map's layout should be exported as a raster or vector template. Blender has a special menu option for such an operation: UVs | Export UV Layout. After that, the layout can be filled with graphics.
3D engines in games required models in specific formats such as OBJ-documents. There should not be any lights, cameras, or incidental geometry in such files; otherwise, an error or visual glitches may occur. Besides the main geometry, there can be several other items in a data folder, such as textures, material files, and normal maps.