
An animation in case of games, which uses characters to drive the story is not a simple tool to decorate a game scene and to make it attractive, but it is a way to express the game mechanics. A character moves his legs not because it looks realistic and nice but because this demonstrates the idea that the character can walk as do ordinary creatures on the surface of the Earth. In other words, he obeys certain rules familiar to the player. Otherwise, the player has to invent new interpretations of what he is looking at. For instance, there is a character whose graphic representation has legs, but there is no walking animation sequence in the game, causing the legs to appear still. So, the character's movement on the game board can be read as sliding or floating rather than as walking. This is a problem because such a process has its own physical features in the real world, which differs from normal pedestrianism.
For example, the sliding implies longer and more uncontrolled deceleration, and the floating can be interpreted as the behavior of ghosts. So, the player expects the character to penetrate walls and other types of obstacles and other properties from the game. As you can see, the animation can give the player the right description of what the character can or cannot to do.
The animation for 2D is not a very complicated task when it comes to illustrating the basic phases of motion, not creating artistic dramatic scenes, which need some stage feeling and well-balanced directing. Partially, the phases are pretty mechanical and can be easily descried by geometric trajectories. I said partially because to create real magic, you need to enrich the mechanical skeleton with some personal touches and original details, which make the animated characters look truly alive. To find such elements, you need to become very observant and sensitive, look at the world around you, try to notice how people and animals move, and perceive how they walk in different situations and when affected by various conditions. For instance, have you ever noticed that a person carrying a heavy bag always tilts his head in the direction opposing the arm holding the bag? Another good example is when humans step forward with their foot, they usually lift up their toes. Some birds move differently on the ground: pigeons walk by taking tiny steps, almost like humans do, but sparrows jump, they move their short legs in parallel. Cats have many types of gaits and so do horses. So, all of them have some unique detail. It is good to have a notebook (or a text file) to note all your interesting observations. Before planning an animation sequence, try to imitate the specified action by yourself, for example, take a few steps and note all the peculiarities.
Of course, some additional reading can help you dramatically. There are many useful books about animation. One of my favorite ones is The Animator's Survival Kit written by Richard Williams, who directed the animation process on the famous masterpiece Who Framed Roger Rabbit by Robert Zemeckis. The book includes a lot of helpful information and many wonderful illustrations.
Before starting the animation process, you should create a list of all actions your character will do. This can help you plan your efforts in advance. In this particular case, the game will use the following types of basic animated sequences:
- Standby
- Walking/running cycle
- Jumping
- Shooting
- Concussion
Recall from Chapter 1, Starting the Game, games store animations in special sprite sheets files, which consist of frames collected together in one big image. This is a little tricky because it requires an additional phase in the production of the animation: you first create a motion sequence, then export all frames as individual images, and finally arrange them in one file. Remember that there are special tools for working with sprite sheets such as TexturePacker that help collect files and have some useful extra abilities. Nevertheless, you can manage everything by using Adobe Flash and Adobe Illustrator. The following figure demonstrates graphic elements that the protagonist consists of:
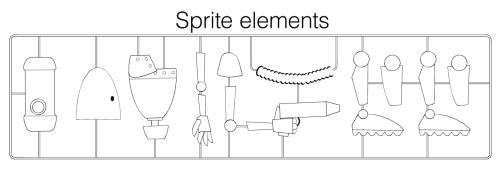
The workflow begins in Adobe Illustrator using which a game character is developed. In an ideal case, the artwork is totally vector based and does not include any complicated elements such as special opacity modes for shapes (Screen, Multiply, Overlay, and so on), meshes, and raster-based effects; therefore, it can be easily transferred to Adobe Flash via a clipboard. It is better to group relative elements together, for instance, all elements of a head should be grouped together. If the artwork is made of raster effects, textures, and so on, it is better to divide the character into individual moving parts, such as legs, arms, and palms, and export each of them as separate PNG files (slices can help to make this).
In Adobe Flash, the character should be placed in the main scene. Avoid converting it inside symbols, especially Movieclips, because they utilize their own timeline, which cannot be seen for the Export function. The graphic symbols are safe, but the length of the main timeline must be equal to that of the symbol's timeline. The dimensions of the movie scene have to be identical to those of the animation frame you've chosen before. By default, all graphic elements of the character are situated on a single graphic layer, they should be separated. The rule is quite simple: each moving part has to be turned into a graphic symbol and should have its own layer. The process can be easily automated: simply convert the parts into symbols and click on Separate image to layers in the context menu. The application will lay out the elements on the layers, not changing their positions on the screen.
Once the animation is ready, carefully tested, and has an attractive look, the frames can be exported as separate PNG files via File | Export Movie.... After that, they can be used to form a sprite sheet. In Adobe Illustrator, you create a document using a canvas of specified dimensions; the frames are imported inside it (by drag & drop). It is important to note that the images should be linked, not embedded. Generally, Adobe Illustrator collects imported files in a stack because it does not know where each of them must be set, so you need to arrange them in the correct order. The final document is now ready for export and the sprite sheet can be easily generated by navigating to File | Save for Web & Devices.
In an exceptional case, either Adobe Flash or Adobe Illustrator alone can be used to work on sprite sheets. Adobe Illustrator has no helpful tool to create animations, but each frame can be created manually and placed on individual layers. By rule of thumb, all you need to do is move each detail in an animated image. The process can be controlled using test SWF files, which can be generated via the Save for Web & Devices window (don't forget about the Layers to SWF frames option). As far as the animation is successfully tested and works well, images inside the AI document can be rearranged into a sprite sheet. Adobe Flash can be used for the purposes of illustrations, animation development, and sprite sheet export. Its drawing vector tools are powerful enough to create pretty complicated images, but they have their own individualities. So, it takes some time to get accustomed to.