
There is an interesting opportunity to add some extra details to your 3D model without adding any excess tris to its geometry. A regular object is wrapped by a special texture that stores some relief information. It is like putting on a dress made of cloth with bulging patterns. That is a very smart technical solution. A bitmap document keeps information about the heights of a specific region of an object. The data can be transferred and compressed as regular raster graphics. There is no need of special file formats. Such a method is known as bump mapping because various elements of 3D relief, called bumps for the sake of simplicity, are projected onto a flat image turning into a map.
Classical bump maps are grayscale maps where heights are coded by a pixel's brightness. A 3D engine wraps such a texture on an object but does not display it in a straight form. It only uses it for simulation of extra geometry (generating both concave and convex elements). All graphic details creating by a bump map are some sort of a fake or technological trick, but the final results are pretty convincing and spectacular, especially if the mapping is done perfectly.
Standard grayscale height mapping is pretty handy, but it has a drawback. Such maps are not carefully optimized, and need some additional post-processing procedures such as calculations of normals. That is why, now, a more popular form of mapping is normal mapping. It uses the same paradigm. The height information is saved as a raster document, but the data is stored in some pre-processing form that is more natural for 3D calculations. Such a result is attained by converting X, Y, and Z coordinates of the surface normals to RGB. Files with normal maps can be easily recognized by a distinctive domination of blue color in their palette. This is because a projected flat surface without any bumps is written as a single RGB color (128, 128, 255), which is a shade of blue.
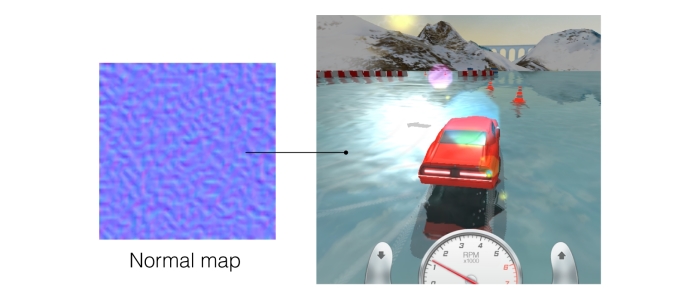
A racing game, Ice Driver, developed by Spooky House Studios UG (haftungsbeschränkt) uses normal mapping to create a shader effect of the bumped ice surface
Bump maps are usually generated via 3D editors using a function that allows you to bake 3D geometry onto a flat texture file. For example, Blender has such an option at the bottom part of the Render panel. But sometimes it is more handy to use some raster editors such as Adobe Photoshop (for example, to create a bump texture from a photo). The simplest case is the regular grayscale height map. It can be created even from scratch using basic drawing tools such as brushes or by converting a photo into a map by some proper color manipulations. A good flair, some tests on 3D models, and proper adjusting of a raster image can help draw the map manually.
A common example is a texture with some text that would be carved onto a 3D surface. But it is practically impossible to apply a similar approach on normal maps because geometry is coded in a less-analogous form, mostly being a source of digital information. Also, it is hard to reproduce it manually. The only exceptions are some minor manipulations with images, such as using a clone stamp tool for cloning some fragments and painting over some elements that are among other things that give an opportunity to create normal mapping textures that are seamless. For more complex operations, third-party tools must be used. For instance, NVIDIA Texture Tools for Adobe Photoshop (https://developer.nvidia.com/nvidia-texture-tools-adobe-photoshop), a special plugin for Photoshop that allows converting a grayscale height map into a normal map.