
Game engines, especially 3D-capable ones, can be a bit intimidating the first time you open them. Although Unity is particularly intuitive, user-friendly, and well documented, we have provided this recipe to show you how to operate inside its User Interface (UI).
Let's take a look at Unity's user interface:
- Run Unity. Unless you have previously changed it, its layout should initiate in Wide mode. Access Window | Layouts and choose another option, such as 4 Split or 2 by 3, and notice how the interface is organized into Views:
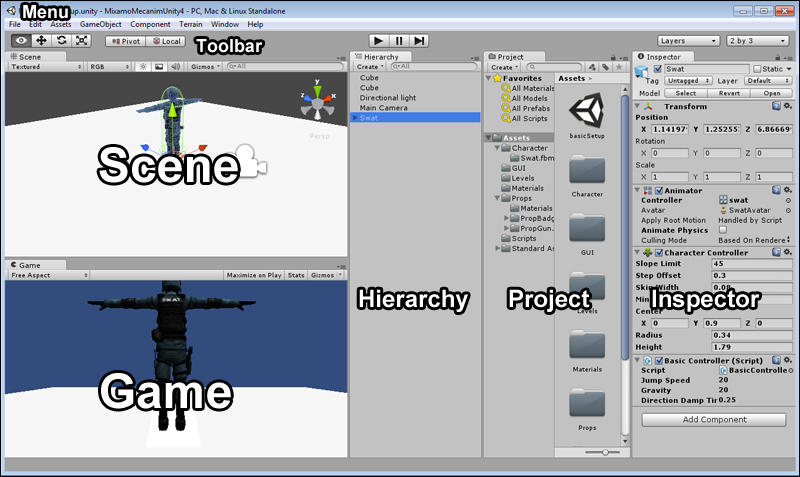
Let's take a look at those views:
- Scene: This view is used to position, rotate, scale, and select game objects, and also navigate your level.
- Game: This is the place to play and test your game. It will reproduce the player's experience as accurately as possible.
- Hierarchy: Game objects (as diverse as characters, cameras, level geometry, lights, and even GUI textures) placed in our scene will be listed here.
- Project: This is where you create, organize, and access your game assets. From 3D models and 2D textures to C# scripts and Prefabs, every re-usable element will be listed here.
- Inspector: From the Inspector, you can configure any game objects (selected from the Hierarchy view) or assets (selected from the Project view). That includes changing its Transform settings, configuring existing components and attaching new ones. Also, you can adjust other preferences for your game, once you have accessed them from the menu, in the Inspector view.
- Toolbar: Includes transform tools (used for manipulating game objects and navigating the scene), control tools (used for playing / pausing and stopping the level), and drop-down tools (used for managing layers and layouts).
- Menu: Gives access to a diverse list of commands covering asset import/export, preferences setting, game object creation, components, terrain, layout, and documentation.
- If you want to customize the layout any further, drag and drop the views to relocate and/or dock them.
- If you like your custom layout, save it through the Window | Layouts | Save Layout... menu.
- When testing your game, it might be a good idea to check the Maximize on Play button, in the Game view. Also, if you work with more than one display monitor, you could drag the Game view into the second display, leaving a display exclusively for the Editor.
- You can also adjust the Game view resolution. It's a good idea to test your game running on its standard standalone resolution and every supported aspect ratio.
- In case you want to check the graphics performance of your game during testing, you should turn on the Stats button (you can also turn it off during testing, if so you wish).
- Finally, activate Gizmos if you want them to be drawn at runtime, making it easier to spot rays, colliders, lights, cameras, and so on in your scene, as shown here:

- There is another view you should pay attention to: the Console view. Access it by navigating to Window | Console. This is a very important view when it comes to debugging your game, as it displays errors, warnings, and other debug output during testing.
- Another interesting view (for those with Unity Pro) is the Profiler (Window | Profiler), where you can check out detailed statistics of your game performance in real time.
To get an extensive explanation on each UI feature, please check out Unity's documentation at http://docs.unity3d.com/Documentation/Manual/LearningtheInterface.html.
..................Content has been hidden....................
You can't read the all page of ebook, please click here login for view all page.