
One of the features that make Unity's new animation system, Mecanim, so flexible and powerful is the ability to quickly reassign animation clips from one character to another. This is made possible through the use of Avatars; an Avatar is basically a layer between your character's original rig and Unity's animation system.
In this recipe, we will learn how to configure an Avatar skeleton on a Mixamo character.
For this recipe, we have prepared a project named MixamoProject, containing several assets such as levels, animated characters, and props. You can find it inside the 0423_05_codes folder.
To configure an Avatar skeleton, perform the following steps:
- Open the project, and then open the level named 05_01 (inside the folder Levels).
- In the Project view, inside the Original_Character folder, select the Swat model.
- In the Inspector view, under Swat Import Settings, click on the Rig tab. Then, change Animation Type to Humanoid. Leave Avatar Definition as Create From this Model, and also make sure that the option Keep Additional Bones is selected. Finally, click on the Configure… button.
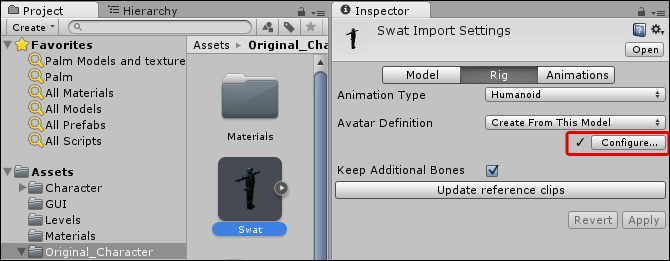
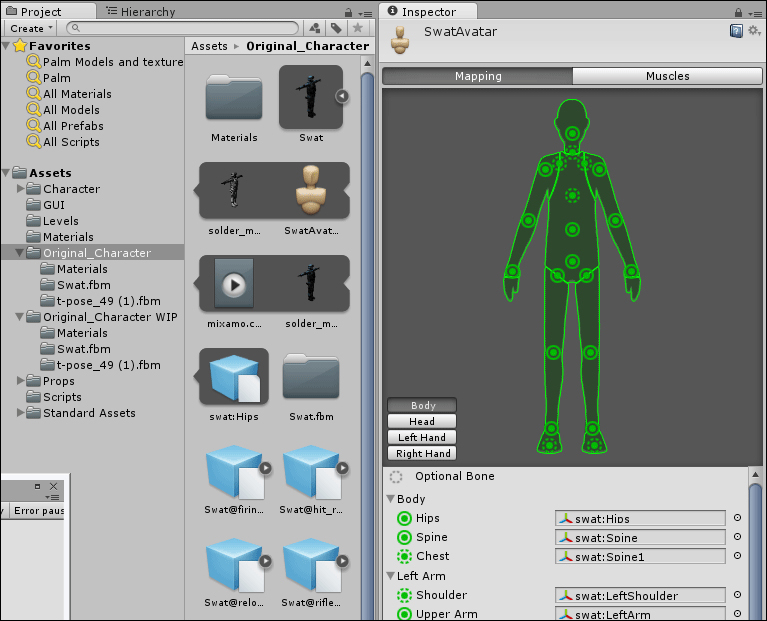
- The Inspector view will show the newly-created Avatar. Observe how Unity correctly maps the bones of our character onto its structure, assigning (for example) the swat:LeftForeArm bone as the Avatar's Lower Arm. We could, of course, reassign the bones if needed. For now, just click on the Done button to close the view.
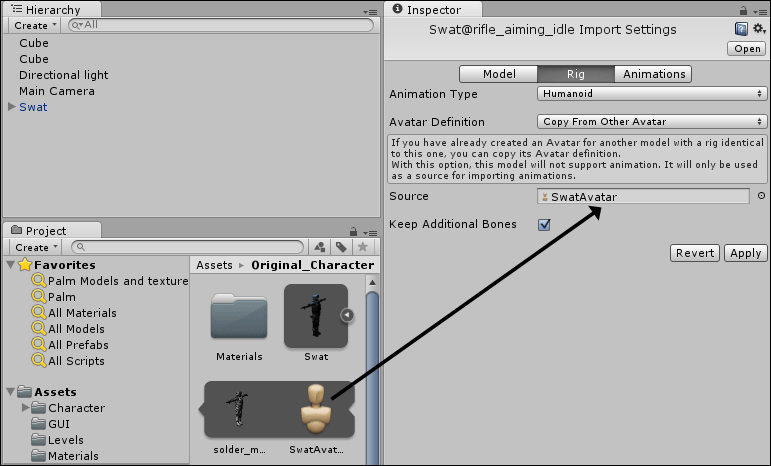
- Now that we have our Avatar ready, let's configure our animation for the Idle state. From the Original_Character folder, select the Swat@rifle_aiming_idle file.
- Activate the Rig section, change Animation Type to Humanoid and Avatar Definition to Copy From Other Avatar. Then, select swatAvatar for Source, by choosing it from the list or dragging it into the slot from the Project view. Confirm your changes by clicking on Apply.
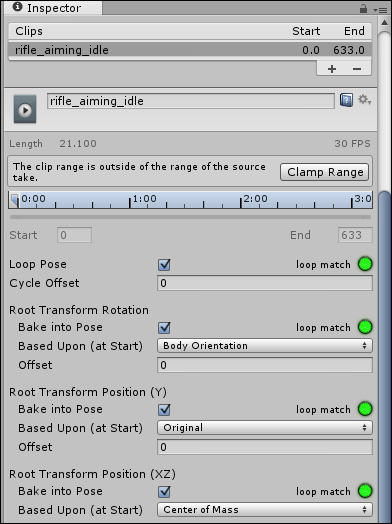
- Now click on the Animations tab. Select the rifle_aiming_idle clip from the Clips list and select the Loop Pose option. Under Root Transform Rotation, check Bake into Pose and set Body Orientation for Baked Upon (at Start); Under Root Transform Position (Y), check Bake into Pose and set Original for Baked Upon (at Start); Under Root Transform Position (XZ), check Bake into Pose and set Center of Mass for Baked Upon (at Start). Finally, click on the Clamp Range button (see the following screenshot) to adjust the timeline. Click on Apply to confirm changes.
- In order to access animation clips and play them, we need to create a controller. Do that by clicking on the Create button from the Project view and selecting the option Animator Controller. Name it
swatController01. - Double-click on Animator Controller to open the Animator view.
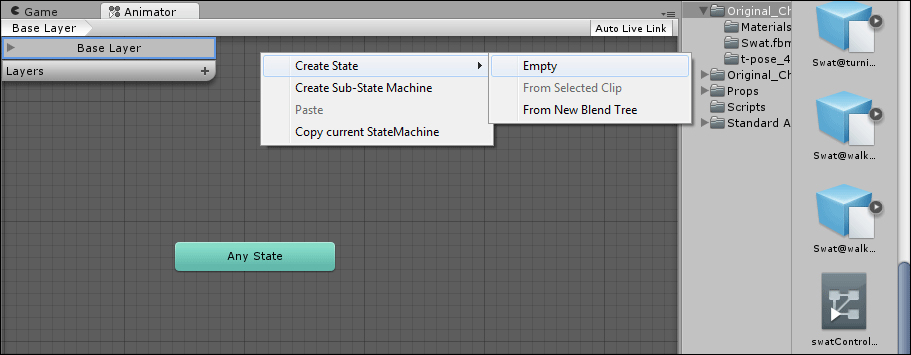
- In the Animator view, right-click on the grid to open a context menu. Then, select the Empty option under Create State (see the following screenshot). A new box named New State will appear, which is orange in color, indicating that this is the default state.
- Select this box and, in the Inspector view, change its name to
Idle. Also, for the Motion field, choose rifle_aiming_idle by either selecting it from the list or dragging it from the Project view.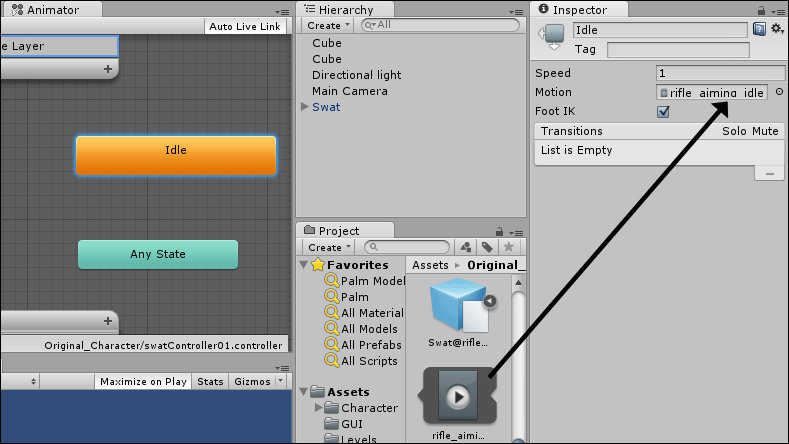
- Drag the Swat model from the Original_Character folder onto the Hierarchy view, placing it into the scene.
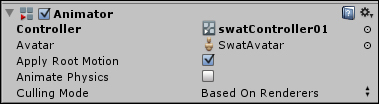
- Select the Swat model from the Hierarchy view and observe its Animator component in the Inspector view. Then, assign the newly created swatController01 to the Controller field.
- Play your scene to see the character correctly animated.
As you might have noticed, we performed a variety of operations in order to have our character configured and animated in the scene. First, we set up its Avatar skeleton based on its original bone structure. Then, we applied the character's Avatar in the animation clip (which, like the character itself, is a .fbx file). After that, we adjusted the animation clip to better suit our character, which included making it loop. Finally, an Animator Controller was created, and the edited animation clip was made into its default animation state.
The concept of the Avatar is what makes Mecanim so flexible. Once you have a Controller, you can apply it to other humanoid characters as long as they have an Avatar body mask. If you want to try it yourself, import the mascot.fbx file (located inside the 0423_05_01 folder), perform steps 3 and 4 of this recipe for that character, place it on the scene, and use swatController01 as its Controller in the Animator component. Then, play the scene to see the mascot playing the rifle_aiming_idle animation clip.
To get more information about the Animator Controller, check Unity's documentation at http://docs.unity3d.com/Documentation/Components/class-AnimatorController.html.