
Self-illuminated materials can be used to simulate a variety of objects, from LED mobile displays to futuristic Tron suits. In this recipe, we will learn how to configure this kind of material and its texture maps.
As we will create an LCD display in this example, please make sure you have a font in that style installed on your computer. If not, you can find several free LCD fonts on specialized websites, such as www.dafont.com.
To create a self-illuminated material, follow these steps:
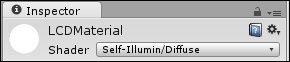
- Create a new material named
LCDMaterial. - Select your material. In the Inspector view, under the material's name, use the drop-down menu to change its Shader parameter to Self-Illumin/Diffuse:
- Open your image editor (we'll use Adobe Photoshop to illustrate the next steps).
- Create a new image. Let's make it 256 pixel both wide and tall, at 72 dpi (RGB mode).
- Create a new layer and fill it with a dark blue color (for instance, R:8, G:16, B:99). Name it
blueBg. - Create a type layer and write your LCD text in light blue (R:8, G:90, B:231). Name it
blueText. - Duplicate the
blueBgandblueTextlayers. Rename them toselfBgandselfTextrespectively. - Change the color of the
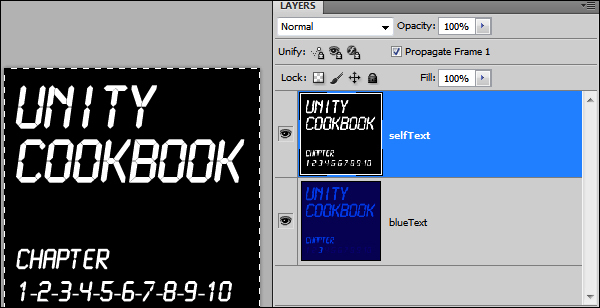
selfTexttype to white. Then, fill theselfBglayer in black. - Merge the
selfTextandselfBglayers. Then, merge theblueTextandblueBglayers: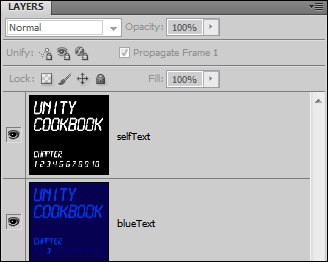
- Make a selection of the entire black and white layer (Ctrl + A on Windows, Command + A on Mac OS). Then, copy it (using Ctrl + C or Command + C):
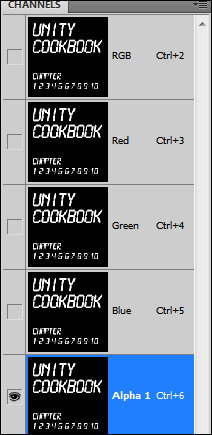
- Open the Channels window (in Photoshop this can be done by navigating to Window | Channels).
- There should be three channels: Red, Green, and Blue. Create a new channel. That will be the Alpha channel that controls the level of self-illumination and gloss.
- Paste (Ctrl + V or Command + V) your black and white layer into the Alpha channel:
- In the Layers window, hide or delete the merged black and white layer.
- Save your file (
.psdor.tgaformats are good options, as they keep the alpha channel). - Inside the Unity Editor, import your image file access through the Assets menu, clicking on Import New Asset....
- In the Project view, choose LCDMaterial. Then, select your image file as both Base and Illumin maps (by clicking on the Select button or dragging them from the Project view to the material slots). Your self-illuminated material is ready, as shown in the following screenshot:
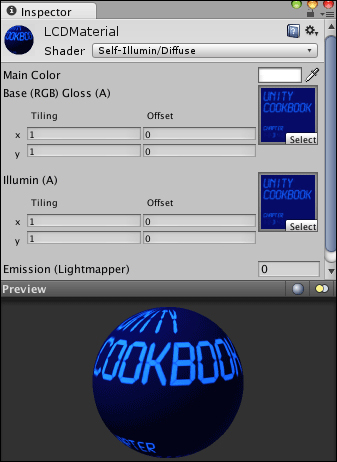
Unity is able to read four channels of a texture map: R (red), G (green), B (blue), and A (alpha). Self-illuminated shaders use RGB channels as the base texture (often referred to as the diffuse texture), while using the Alpha to illuminate the material according to each pixel's brightness level.