
Radars display the locations of other objects relative to the player, usually based on a circular display, where the center represents the player, and each graphical "blip' indicates, for each object, how far away and what relative direction it is to the player. Sophisticated radar displays will display different categories of object with different colored "blip" icons.
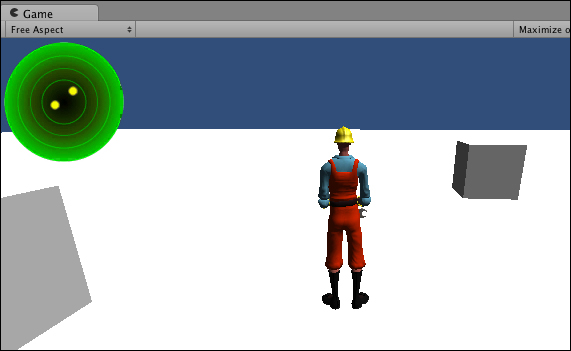
In the following screenshot, we can see two yellow circle "blips", indicating the relative position of the objects tagged cube near the player. The green circle radar background image gives the impression of an aircraft control tower radar.
If you need a set of images for this recipe, you'll find two image files in the 0423_04_04 folder. One is a background image of green radar circles, and the other is a yellow circle image to represent objects on the radar.
To display a radar showing relative object locations, please follow these steps:
- Create a new scene, and add a directional light.
- Create a new terrain, set Size to 2000 x 2000 and Position as (
-1000,0,-1000). - Import the built-in Character Controller Unity package.
- Add a 3rd Person Controller to your scene at position (0, 1, 0).
- Create a cube in front of the 3rd Person Controller at (0, 1, 5) and give this the
cubetag. - Create a second cube to the left of the 3rd Person Controller at (-5, 1, 0) and give this the
cubetag. - Attach the following C# script class to the Main Camera:
// file: Radar.cs using UnityEngine; using System.Collections; public class Radar : MonoBehaviour { const float MAX_DISTANCE = 20f; const int RADAR_SIZE = 128; public Transform playerController; public Texture radarBackground; public Texture targetBlip; private void OnGUI() { // background displaying top left in square of 128 pixels Rect radarBackgroundRect = new Rect(0,0, RADAR_SIZE, RADAR_SIZE); GUI.DrawTexture(radarBackgroundRect,radarBackground); // find all 'cube' tagged objects GameObject[] cubeGOArray = GameObject. FindGameObjectsWithTag("cube"); // draw blips for all within distance Vector3 playerPos = playerController.transform.position; foreach (GameObject cubeGO in cubeGOArray) { Vector3 targetPos = cubeGO.transform.position; float distanceToTarget = Vector3.Distance(targetPos,playerPos); if( (distanceToTarget <= MAX_DISTANCE) ) DrawBlip(playerPos, targetPos, distanceToTarget); } } private void DrawBlip(Vector3 playerPos, Vector3 targetPos, float distanceToTarget) { // distance from target to player float dx = targetPos.x - playerPos.x; float dz = targetPos.z - playerPos.z; // find angle from player to target float angleToTarget = Mathf.Atan2(dx,dz) * Mathf.Rad2Deg; // direction player facing float anglePlayer = playerController.eulerAngles.y; // subtract player angle, to get relative angle to object // subtract 90 // (so 0 degrees (same direction as player) is UP) float angleRadarDegrees = angleToTarget – anglePlayer - 90; // calculate (x,y) position given angle and distance float normalisedDistance = distanceToTarget / MAX_DISTANCE; float angleRadians = angleRadarDegrees * Mathf.Deg2Rad; float blipX = normalisedDistance * Mathf.Cos(angleRadians); float blipY = normalisedDistance * Mathf.Sin(angleRadians); // scale blip position according to radar size blipX *= RADAR_SIZE/2; blipY *= RADAR_SIZE/2; // offset blip position relative to radar center blipX += RADAR_SIZE/2; blipY += RADAR_SIZE/2; // draw target texture at calculated location Rect blipRect = new Rect(blipX - 5, blipY - 5, 10, 10); GUI.DrawTexture(blipRect, targetBlip); } } - With the Main Camera selected in the Hierarchy view, drag the 3rd Person Controller, the radar background image, and the image for the cube's yellow "blip" into the Inspector view for the three public variables.
The following two constants are defined in our script code:
MAX_DISTANCE: This specifies the maximum distance (in Unity "units") to which the objects are to be detectedRADAR_SIZE: This specifies the size (in pixels) of the top-left square the radar will occupy
The Radar class needs three public variables:
Since there is a lot happening in the code for this recipe, each method will be described in its own section.
The OnGUI() method first displays the radar's background image. An array of GameObjects with the desired tag is retrieved, and iterated through. For each target GameObject, if its distance to the character controller is within MAX_DISTANCE, then the DrawBlip() method is called, with arguments of the Vector3 positions of the player's character controller and the target game object.
The DrawBlip() method finds the x and z distances between the target and the player, and uses them to calculate the angle from the target to the player (using Unity's Atan2() inverse trigonometric function). The direction the player's character is facing is retrieved from its y-axis Euler angle (just as in the previous recipe). The player's direction angle is subtracted from the angle between the target and the player, since radar displays the relative angle from the direction the player is facing, to the target object. As usual, 90 degrees will need to be subtracted from the final angle, since we want zero degrees to be displayed as upwards in our GUI.
The noramlisedDistance value is calculated, which will always range between 0 and 1, by dividing the distance in pixels of the target from the player, by MAX_DISTANCE. The angle is converted into radians, since that is required for the Unity trigonometry methods. We then multiply these Sin() and Cos() results by the distance we want the blip to be displayed from the center of the radar circle, that is, noramlisedDistance. These coordinates are then converted to display in the top-left corner of the screen in a square of RADAR_SIZE pixels. Knowing the center of the blip image, and its width and height (both 10 pixels) allows the Rect object to be created for use by the DrawTexture() method called from the GUI class.
Here are some details you don't want to miss:
Adding more public Texture variables allows for different icons to represent different categories of object on the radar. A Texture parameter can be added to the DrawBlip() method declaration, and that texture can be used in the GUI.DrawTexture() statement. This allows DrawBlip() to be called from different loops, each for objects tagged with a different string.