
Cursor icons are often used to indicate the nature of the interaction that can be done with the mouse. Zooming, for instance, might be illustrated by a magnifying glass. Shooting, on the other hand, is usually represented by a stylized target. In this recipe, we will learn how to implement custom mouse cursor icons to better illustrate your gameplay—or just to escape the Windows and OS X default GUI.
If you need a set of textures to be used as cursor icons, please use the three image files available in the 0423_04_15 folder.
To implement custom mouse cursors, please follow these steps:
- Import the textures into your Unity project.
- In the Project window, select the cursorArrow texture.
- Create a new GUI texture by navigating to GameObject | Create Other | GUI Texture. Since you had the cursorArrow texture selected, the GUI Texture will use it.
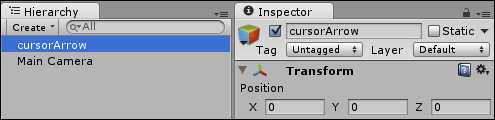
- In the Transform component of the Inspector view, set the GUI texture's Position to (0,0,0), as shown in the following screenshot:
- Create a new C# script class named
CursorScriptcontaining the following code:// file: CursorScript.cs using UnityEngine; using System.Collections; public class CursorScript : MonoBehaviour { public Texture2D iconArrow; public Vector2 arrowRegPoint; public Texture2D iconZoom; public Vector2 zoomRegPoint; public Texture2D iconTarget; public Vector2 targetRegPoint; private Vector2 mouseReg; void Start() { guiTexture.enabled = true; if (iconArrow) { guiTexture.texture = iconArrow; mouseReg = arrowRegPoint; Screen.showCursor = false; } } void Update() { Vector2 mouseCoord = Input.mousePosition; Texture mouseTex = guiTexture.texture; guiTexture.pixelInset = new Rect(mouseCoord.x - (mouseReg.x), mouseCoord.y - (mouseReg.y), mouseTex.width, mouseTex.height); if (Input.GetKey(KeyCode.RightShift) || Input.GetKey(KeyCode.LeftShift)) { if (iconTarget) { guiTexture.texture = iconTarget; mouseReg = targetRegPoint; } } else if (Input.GetMouseButton(1)) { if (iconZoom) { guiTexture.texture = iconZoom; mouseReg = zoomRegPoint; } } else { if (iconArrow) { guiTexture.texture = iconArrow; mouseReg = arrowRegPoint; } } } } - Save your script and apply it to the GUI texture you have created by dragging it from the Project window to the GUI Texture game object in the Hierarchy window.
- In the Hierarchy window, select the GUI texture and disable its GUITexture component.
- Drag the cursorArrow, cursorZoom, and cursorTarget texture files to the Icon Arrow, Icon Zoom, and Icon Target fields respectively.
- Change the Arrow Reg Point, Zoom Reg Point, and Target Reg Point fields to X:0 Y:32, X:15 Y:16, and X:14 Y:14 respectively (use the following screenshot for your reference):

- Play your scene. Your operating system's default cursor should be replaced by the cursorArrow texture; changed to
cursorZoomwhen the right mouse button is clicked and tocursorTargetwhen any Shift key is down.
The script updates the GUI texture's position based on the mouse cursor position and registration points for each cursor type. The texture map is chosen according to the user's action (pressing the Shift key or clicking the right mouse button will change the texture). The script also hides the original mouse cursor, so it won't be on top of your custom one.