
Metal, car paint, and glossy plastic surfaces are just some very recurrent examples of materials that need reflectiveness. Luckily for us, Unity includes reflective shaders that, when properly configured, can help us to achieve the look that we are after.
For this recipe, we will prepare two texture maps: the Base map and the Reflection Cubemap. The Base map will be a RGBA image, where the alpha channel will assign the reflection level from completely opaque (black) to completely reflective (white). The Reflection Cubemap can be made from either six or, as shown in this recipe, a single texture.
To help us focus on this recipe's main subject, which is setting up a reflective material, a Unity package containing a previously made scene, and also a .jpg file to be used as reflection map, are available inside the 0423_03_01 folder.
To create a reflective material, follow these steps:
- Import the
reflectiveMaterialUnity package. - Open the
reflectiveMaterialLevellevel. There will be a single 3D object (a battery) that rotates around its own axis when the level is played. We can also orbit the camera around it. - Stop the level from running and, in the Hierarchy view, select the battery. The Inspector view will display its material. Use the drop-down menu to set Shader from Diffuse to Reflective/Specular:

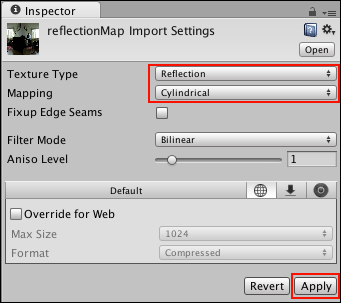
- Now we must build our Reflection Cubemap. In the Project view, select the reflectionMap texture. The Texture Importer settings will be displayed in the Inspector view. Using the Texture Type drop-down menu, choose Reflection. Then, change the Mapping option to Cylindrical. Finally, click Apply to apply the changes we've made, as shown in the following screenshot:
- Select the
reflectionMapasset in your Project view. It has changed from a 2D texture to a Cubemap (as you can see from its icon). - Select the battery material and apply the
reflectionMapasset into the Reflection Cubemap slot: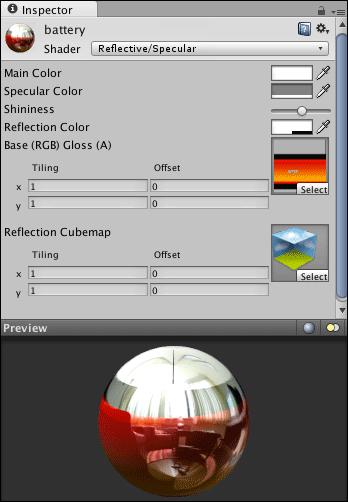
- Play the level. The reflection effect is visible, but it could be smoother in some areas of the texture.
- Open the base texture (named
batteryBase) in your image editor. - In your image editor, make all the channels visible and select the Alpha channel window (in Photoshop this can be done by navigating to Window | Channels).
- The Alpha channel is completely white. Paint a grey rectangle in the region correspondent to the battery's label. In this example, we have used a grey color of Red, and also used Green and Blue values of
152: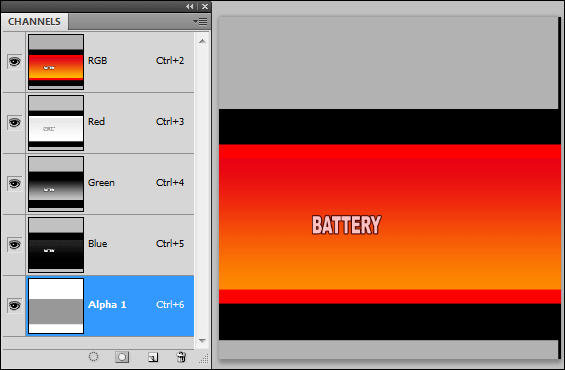
- Save the file to make the changes and wait for Unity to reload the image. Reflection should now be more discreet inside the label area.
The base texture map's alpha channel sets the reflectiveness and, in this example, the specular level of the material according to each pixel's brightness. That means the Reflection Cubemap texture will be more visible where the alpha channel is white.
The Reflection Cubemap is actually made from six different images, which were generated from our original image file by the Texture Importer settings when we set Texture Type to Reflection. These six images are mapped as top, bottom, front, back, left, and right.
Reflection Cubemaps can be done in many ways and have different mapping properties.
Instead of using a single texture map, you could also create an empty Reflection Cubemap in the Project view and assign six different image files illustrating the top, bottom, front, back, left, and right of your environment.
The cylindrical mapping we used was the best choice for the battery model. Experiment with other settings for different shapes. Besides the Base and Reflection texture maps, you can also experiment with the other shader settings such as Main, Specular and Reflection Colors (that can be used to tint the material), and also Shininess (which controls the specular dispersion).
If you're using Unity Pro, you could make a reflection map from the actual level geometry. In fact, it could either reflect your level in real time or bake a single frame into the Reflection Cubemap. Unity's documentation has all the instructions you need, including the complete script code, at http://unity3d.com/support/documentation/ScriptReference/Camera.RenderToCubemap.html.