
3D stereo is everywhere: from movie theaters to TV sets and portable gaming. While Unity doesn't natively support Quad Buffer technology in order to make active stereo implementation easy, you might achieve interesting results using passive stereoscopy through a polarized system. While this recipe might be of limited application, it might be very useful for those working with public presentations.
For this recipe, we have prepared a package named StereoScene containing a playable scene including a First Person Controller, a terrain, and some basic geometry. The package is in the 0423_10_03 folder.
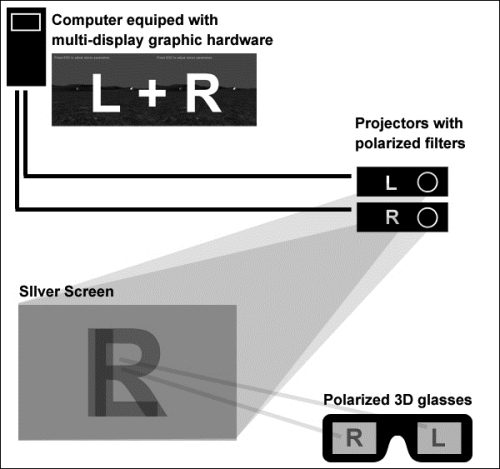
Although you don't need any extra hardware to try this recipe, you will of course need an adequate projection setup to test it properly. That would include a multi-display hardware such as Matrox DualHead2Go, a silver screen, two projectors with polarizing filters, and polarized 3D glasses.
To create side-by-side 3D stereo viewports, perform the following steps:
- Import the
StereoScenepackage into your project and open the level namedStereoCam. - Add the following C# Script
StereoCamto the Main Camera that is a child of the First Person Controller game object:// file: StereoCam.cs using UnityEngine; using System.Collections; public class StereoCam : MonoBehaviour{ public float parallaxDistance = 10.0f; public float eyeDistance = 0.05f; private bool showGUI = false; private GameObject lCamera; private GameObject rCamera; private GameObject parallax; void Start(){ lCamera = new GameObject( "lCamera" ); lCamera.AddComponent<Camera>(); lCamera.AddComponent<GUILayer>(); lCamera.AddComponent("FlareLayer"); lCamera.camera.CopyFrom(Camera.main); rCamera = (GameObject) Instantiate(lCamera, transform.position, transform.rotation); rCamera.name = "rCamera"; lCamera.transform.parent = Camera.main.transform; rCamera.transform.parent = Camera.main.transform; parallax = new GameObject( "parallax" ); parallax.transform.parent = Camera.main.transform; parallax.transform.localPosition = Vector3.zero; Vector3 parallaxPosition = parallax.transform.localPosition; parallaxPosition.z = parallaxDistance; parallax.transform.localPosition = parallaxPosition; camera.enabled = false; lCamera.camera.rect = new Rect(0, 0, 0.5f, 1); rCamera.camera.rect = new Rect(0.5f, 0, 0.5f, 1); lCamera.transform.localPosition = Vector3.zero; rCamera.transform.localPosition = Vector3.zero; Vector3 cameraPosition = lCamera.transform.localPosition; cameraPosition.x = -eyeDistance; lCamera.transform.localPosition = cameraPosition; cameraPosition.x = eyeDistance; rCamera.transform.localPosition = cameraPosition; } void Update(){ lCamera.transform.LookAt(parallax.transform); rCamera.transform.LookAt(parallax.transform); if (Input.GetKeyUp(KeyCode.Escape)){ if (showGUI){ showGUI = false; } else{ showGUI = true; } } if (showGUI){ if (Input.GetKey(KeyCode.Alpha1)) eyeDistance -= 0.001f; if (Input.GetKey(KeyCode.Alpha2)) eyeDistance += 0.001f; if (Input.GetKey(KeyCode.Alpha3)) parallaxDistance -= 0.01f; if (Input.GetKey(KeyCode.Alpha4)) parallaxDistance += 0.01f; Vector3 cameraPosition = lCamera.transform.localPosition; cameraPosition.x = -eyeDistance; lCamera.transform.localPosition = cameraPosition; cameraPosition.x = eyeDistance; rCamera.transform.localPosition = cameraPosition; Vector3 parallaxPosition = parallax.transform.localPosition; parallaxPosition.z = parallaxDistance; parallax.transform.localPosition = parallaxPosition; } } void OnGUI(){ for (int n = 0; n < 2; n++){ if (showGUI){ GUI.Label(new Rect((Screen.width * 0.5f * n) + 10, 30, 500, 20), "Eye distance: " + eyeDistance.ToString("F") + ". Press 1 to decrease and 2 to increase."); GUI.Label(new Rect((Screen.width * 0.5f * n) + 10, 70, 500, 20), "parallax distance: " + parallaxDistance.ToString("F") + ". Press 3 to decrease and 4 to increase."); }else{ GUI.Label(new Rect((Screen.width * 0.5f * n) + 10, 10, 500, 20), "Press ESC to adjust stereo parameters"); } } } } - Play your scene. It should now be playing in two viewports: one for left eye and the other for the right.
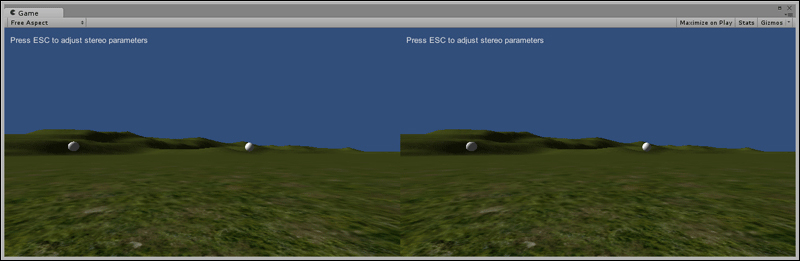
- Build the executable file and run it in full-screen mode on your dual projector system, making sure it behaves as a very wide single display, not two different displays side-by-side. Left and right viewports should superimposed, and not side-by-side.
Once attached to the Main Camera, our script creates three objects: two cameras (left and right) and an empty object named parallax. These objects are made children of the Main Camera, so they move and rotate accordingly. The stereographic effect is given by the distance between the left and right cameras, and also by how their focal points converge at the parallax. Also, we have used a for loop to make sure GUI elements are displayed on both viewports.
Since you might want to adjust the distance and parallax of your cameras, depending on your preferences and final result on your projection environment, we've made those variables adjustable (press the Esc key to read the instructions).
The following are some important suggestions:
As an alternative to having two viewports, you could get a similar result using Render to Texture, as proposed by Paul Bourke at http://paulbourke.net/stereographics/Unitystereo/.
In case you prefer to develop an anaglyph stereoscopic effect, there are some products you should take a look at, such as the following:
- 3D Anaglyph System, by Azer2K available at http://u3d.as/content/azert2k/3d-anaglyph-system/1AE
- Stereoskopix' FOV2GO at Unity's Asset Store, available at http://u3d.as/content/stereoskopix/fov2go/2HA
Alternatively, you could develop your game targeting NVidia's solution 3D Vision. You can find, at the Unity Asset Store, a dedicated resource developed by Dembeta SL named Active Stereoscopic 3D for Unity at http://u3d.as/content/dembeta-sl/active-stereoscopic-3d-for-unity/2Vt.
In case you need a more robust solution for active stereo and VR, you could check out the following third-party software:
- Mechdyne sells a solution named getReal3D for Unity, available at http://www.mechdyne.com
- I'm in VR has developed MiddleVR For Unity, available at http://www.imin-vr.com/middlevr-for-unity/