
In many games, a broader view of the scene can be invaluable for navigation and information. Mini-maps are great for giving players that extra perspective they might need when in first- or third-person mode.
In order to follow this recipe, please import the miniMap package, available in the 0423_02_08 folder, into your project. The package includes a scene containing a third-person controller inside a simple maze, and also a texture named marker.
To create a mini-map, follow these steps:
- Import the
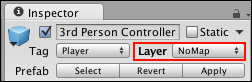
miniMapUnity package and open the scene namedthirdPerson, available in the02_08folder. - Select the 3rd Person Controller option and, in the Inspector view, add it to a new layer named NoMap:
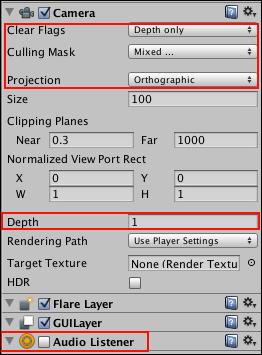
- Create a new camera. Rename it Map Camera and, in the Inspector view, change its parameters as follows:
- Clear Flags: Depth Only
- Culling Mask: Mixed… (unselect NoMap)
- Projection: Orthographic
- Depth: 1 (also, uncheck the camera's Audio Listener component)
- In the Project window, create a new C# Script and name it
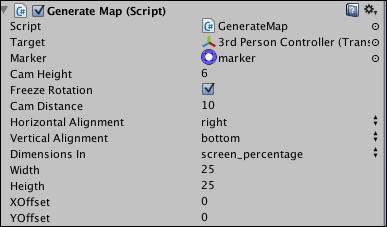
GenerateMap. Open it and replace everything with the following code:using UnityEngine; using System.Collections; public class GenerateMap : MonoBehaviour { public Transform target; public Texture2D marker; public float camHeight = 1.0f; public bool freezeRotation = true; public float camDistance = 2.0f; public enum ha {left, center, right}; public enum va {top, middle, bottom}; public ha horizontalAlignment = ha.left; public va verticalAlignment = va.top; public enum sd {pixels, screen_percentage}; public sd dimensionsIn = sd.pixels; public int width = 50; public int heigth = 50; public float xOffset = 0f; public float yOffset = 0f; void Start(){ Vector3 angles = transform.eulerAngles; angles.x = 90; angles.y = target.transform.eulerAngles.y; transform.eulerAngles = angles; Draw(); } void Update(){ transform.position = new Vector3(target.transform.position.x, target.transform.position.y + camHeight, target.transform.position.z); camera.orthographicSize = camDistance; if (freezeRotation){ Vector3 angles = transform.eulerAngles; angles.y = target.transform.eulerAngles.y; transform.eulerAngles = angles; } } void Draw() { int hsize = Mathf.RoundToInt(width * 0.01f * Screen.width); int vsize = Mathf.RoundToInt(heigth * 0.01f * Screen.height); int hloc = Mathf.RoundToInt(xOffset * 0.01f * Screen.width);; int vloc = Mathf.RoundToInt((Screen.height - vsize) - (yOffset * 0.01f * Screen.height)); if(dimensionsIn == sd.screen_percentage){ hsize = Mathf.RoundToInt(width * 0.01f * Screen.width); vsize = Mathf.RoundToInt(heigth * 0.01f * Screen.height); } else { hsize = width; vsize = heigth; } switch(horizontalAlignment){ case ha.left: hloc = Mathf.RoundToInt(xOffset * 0.01f * Screen.width); break; case ha.right: hloc = Mathf.RoundToInt((Screen.width - hsize) - (xOffset * 0.01f * Screen.width)); break; case ha.center: hloc = Mathf.RoundToInt(((Screen.width * 0.5f) - (hsize * 0.5f)) - (xOffset * 0.01f * Screen.height)); break; } switch(verticalAlignment){ case va.top: vloc = Mathf.RoundToInt((Screen.height - vsize) - (yOffset * 0.01f * Screen.height)); break; case va.bottom: vloc = Mathf.RoundToInt(yOffset * 0.01f * Screen.height); break; case va.middle: vloc = Mathf.RoundToInt(((Screen.height * 0.5f) - (vsize * 0.5f)) - (yOffset * 0.01f * Screen.height)); break; } camera.pixelRect = new Rect(hloc,vloc,hsize,vsize); } void OnGUI(){ Vector3 markerPos = camera. camera.WorldToViewportPoint (target.position); int pointX = Mathf.RoundToInt((camera.pixelRect.xMin + camera.pixelRect.xMax) * markerPos.x); int pointY = Mathf.RoundToInt(Screen.height - (camera.pixelRect.yMin + camera.pixelRect.yMax) * markerPos.y); GUI.DrawTexture( new Rect(pointX-(marker.width * 0.5f),pointY-(marker.height * 0.5f),marker.width,marker.height), marker, ScaleMode.StretchToFill, true, 10.0f); } } - Save the script and attach it to the Map Camera. Then, in the Inspector view, change parameters of the Generate Map component as follows:
- Target: 3rd Person Controller
- Marker: marker
- Cam Height: 6
- Cam Distance: 10
- Horizontal Alignment: Right
- Vertical Alignment: Bottom
- Dimensions In: screen_percentage
- XOffset and YOffset: 0
- Width: 25
- Height: 25
- Play the scene. You should be able to see the mini-map functioning in the bottom-right corner of the screen:

Our script performs two main actions: it sets up the viewport according to the desired position and dimensions, and also adjusts the camera's transform settings, making it follow the main character from a top-view perspective. Plus, in order to make the map look cleaner, it hides our main character while displaying a marker where he should be.
If you want to experiment more with your mini-map, read on.
If you use Unity Pro, you could always use Render Texture and display your map using GUI.DrawTexture or Graphics.DrawTexture. For more information on Render Texture, please check the Unity documentation at http://docs.unity3d.com/Documentation/Components/class-RenderTexture.html.