
Dynamic soundtracks are the ones that change according to what is happening to the player in the game, musically reflecting that place or moment of the character's adventure. In this recipe, we will implement a soundtrack that changes when the player reaches specific targets. Also, we will have the option of fading the sound in and out.
For this recipe, we have prepared a basic level and some soundtrack audio files in .ogg format. They are contained inside the Unity package named DynamicSoundtrack, which can be found in the 0423_06_06 folder.
To make a dynamic soundtrack, follow these steps:
- Import the
DynamicSoundtrackpackage into your Unity project. Also, import the00_main,01_achievement, and02_dangeraudio files. - Open the level named SoundtrackScene. It should include a basic terrain, a 3rd Person Controller and three spheres named
Music Sphere. - In the Project view, create a new C# script and name it
DynamicSoundtrack. - Open the script in your editor and replace everything with the following code:
using UnityEngine;
using System.Collections;

public class DynamicSoundtrack : MonoBehaviour{
    public AudioClip[] clips;
    public int startingTrack = 0;
    private int currentTrack;
    private int nextTrack;
    private bool isFadingOut = false;
    private float fadeOutTime = 1.0f;
    private bool isFadingIn = false;
    private float fadeInTime = 1.0f;
    private bool waitSequence = true;
    private bool keepTime = false;
    private float targetVolume = 1.0f;
    private float oldVolume = 0.0f;
    private float fadeOutStart = 0.0f;
    private float fadeInStart = 0.0f;

    void Start(){
        audio.clip = clips[startingTrack];
        audio.Play();
        currentTrack = startingTrack;
    }

    void Update(){
        if (isFadingOut){
            if (audio.volume > 0){
                float elapsOut = Time.time - fadeOutStart;
                float indOut = elapsOut / fadeOutTime;
                audio.volume = oldVolume - (indOut * oldVolume);
            }else{
                isFadingOut = false;
                StartCoroutine(PlaySoundtrack());
            }
        }

        if (isFadingIn){
            if (audio.volume < targetVolume){
                float elapsIn = Time.time - fadeInStart;
                float indIn = elapsIn / fadeInTime;
                audio.volume = indIn;
            }else{
                audio.volume = targetVolume;
                isFadingIn = false;
            }
        }
    }

    public void ChangeSoundtrack(int newClip, bool waitForSequence, bool keepPreviousTime, float trackVolume, float fadeIn, float fadeOutPrevious){
        nextTrack = newClip;
        waitSequence = waitForSequence;
        keepTime = keepPreviousTime;
        targetVolume = trackVolume;
        fadeInTime = fadeIn;

        if (newClip != currentTrack){
            currentTrack = newClip;
            if (fadeOutPrevious != 0){
                oldVolume = audio.volume;
                fadeOutStart = Time.time;
                fadeOutTime = fadeOutPrevious;
                isFadingOut = true;
            }else{
                StartCoroutine(PlaySoundtrack());
            }
        }
    }
    IEnumerator PlaySoundtrack(){
        if (waitSequence)
            yield return new WaitForSeconds(audio.clip.length - ((float)audio.timeSamples / (float)audio.clip.frequency));

if(fadeInTime !=0){
    audio.volume = 0;
    fadeInStart = Time.time;
    isFadingIn = true;
        }
        float StartingPoint = 0.0f;
        if (keepTime)
            StartingPoint = audio.timeSamples;

        audio.clip = clips[nextTrack];
        audio.timeSamples = Mathf.RoundToInt(StartingPoint);
        audio.Play();
    }
}
Note
In case you are wondering why we are using
timeSamplesinstead oftime, it's because the former is more accurate when working with compressed audio files. To find out its actual time, we used the expressionaudio.timeSamples / audio.clip.frequency. As this is not currently documented in Unity's Scripting Reference, we thank audio engineer Aldo Naletto for this tip (and reviewer Peter Bruun for reminding us of usingfloat, for more precision). - Save your script and attach it to the Main Camera by dragging it from the Project view to the Main Camera game object in the Hierarchy view.
- Select the Main Camera and, in the Inspector view, access the Dynamic Soundtrack component and change the Size parameter of the Clips variable to 3. Then, drag the
0_Main,1_Achievement, and2_Dangersound files from the Project view into the appropriate slots. Also, type in0into the slot named Starting Track: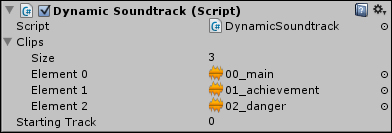
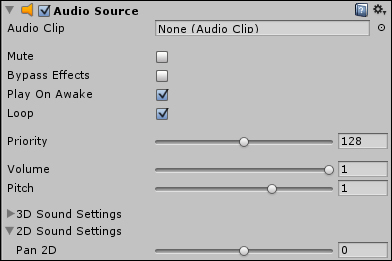
- Now, access the Audio Source component and make sure the Loop option is checked:
- In the Project view, create a new C# script and name it
TriggerSoundtrack. - Open the script in your editor and replace everything with the following code:
using UnityEngine; using System.Collections; public class TriggerSoundtrack : MonoBehaviour{ public bool waitForSequence = true; public bool keepTimeAndVolume = false; public float trackVolume = 1.0f; public float fadeIn = 0.0f; public float fadeOutPrevious = 0.0f; public int clip; private DynamicSoundtrack soundtrack; void Awake(){ soundtrack = Camera.main.GetComponent<DynamicSoundtrack>(); } void OnTriggerEnter(Collider other){ if (other.gameObject.CompareTag("Player")) soundtrack.ChangeSoundtrack(clip, waitForSequence, keepTimeAndVolume, trackVolume, fadeIn, fadeOutPrevious); } } - Save your script and attach it to the each one of the music spheres by dragging it from the Project view to the Main Camera game object in the Hierarchy view.
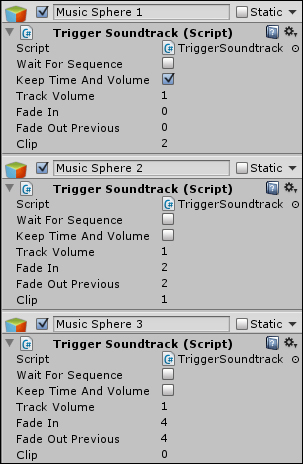
- Select each Music Sphere object and, in the Inspector view, change the Trigger Soundtrack parameters, as shown in the following screenshot:
- Play your scene and direct the character towards each Music Sphere object. The background music will change accordingly.
We have created two different scripts. The one attached to the Main Camera, DynamicSoundtrack, is responsible for keeping a list of the audio files that make up the entire soundtrack for the level. It also contains all of the functions that control the audio playback, volume transition, and so on. The second one, TriggerSoundtrack, is attached to the Music Sphere objects and triggers soundtrack changes based on the preferences expressed in that component's parameters. They are:
- Wait For Sequence: Leave this option checked if you want to wait until the end of the previous audio clip before playing the new part.
- Keep Time And Volume: Leave it checked to start a new audio clip from the same point where the previous clip was at. This also keeps the volume level from the previous clip.
- Track Volume: The volume for the new audio clip (from 0.0 to 1.0).
- Fade In: The amount of time in seconds it will take for the new audio clip's volume to fade in.
- Fade Out Previous: The amount of time in seconds it will take for the previous audio clip's volume to fade out.
Here is some information on how to fine-tune and customize this recipe.
If having milestone objects as triggers feels too obvious for you and your players, you can always make it invisible by disabling the Mesh Renderer component.
To avoid loss of audio quality, you should import your sound clips using the appropriate file format, depending on your target platform. If you are not sure which format to use, please check out Unity's documentation on this subject at http://docs.unity3d.com/Documentation/Manual/AudioFiles.html.