
The customization of avatars usually includes the selection of one or more textures that define its looks. In this recipe, we will implement a GUI that allows the player to create their avatar by combining two texture channels.
The 3D object and image files needed for this recipe are included in the selectTexture package, available inside the 0423_03_07 folder.
To overlay textures, follow these steps:
- Import the Unity package named
selectTextureinto your project. - Open the level named selTextScene.
- Let's create our base material: in the Project view, use the drop down menu to create a new material. Name it
selectableMaterial. - Change the Shader option of the selectableMaterial material to Decal. Then, apply the texture map named
face1as the Base map andprop1as the Decal map, as shown in the following screenshot: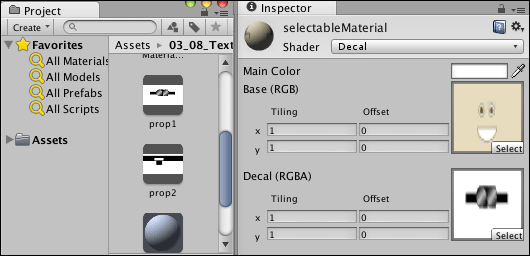
- Apply the material to the
Avatargame object. You can do this by dragging the material from the Project view into the game object's name in the Hierarchy view. - In the Project view, create a new C# script and rename it
SelectTexture. - Open
SelectTexturein your script editor and replace everything with the following code:using UnityEngine; using System.Collections; public class SelectTexture : MonoBehaviour { public Texture2D[] faces; public Texture2D[] props; void OnGUI() { for (int i = 0; i < faces.Length; i++) if (GUI.Button(new Rect(0, i * 64, 128, 64), faces[i])) ChangeMaterial("faces", i); for (int j = 0; j < props.Length; j++) if (GUI.Button(new Rect(128, j * 64, 128, 64), props[j])) ChangeMaterial("props", j); } void ChangeMaterial(string category, int index) { if (category == "faces") renderer.material.mainTexture = faces[index]; if (category == "props") renderer.material.SetTexture("_DecalTex", props[index]); } } - Save your script and apply it to
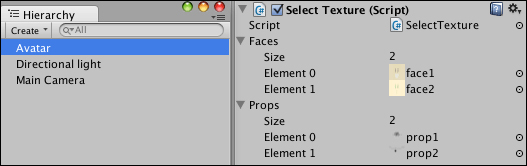
Avatargame object. - In the Inspector view, change the Size value of both Faces and Props to
2. - Set Element 0 and Element 1 of Faces to face1 and face2 respectively. Do the same for Element 0 and Element 1 of Props (changing it to prop1 and prop2 instead):
- Play the scene. You will be able to select your texture combination by clicking on the appropriate buttons:
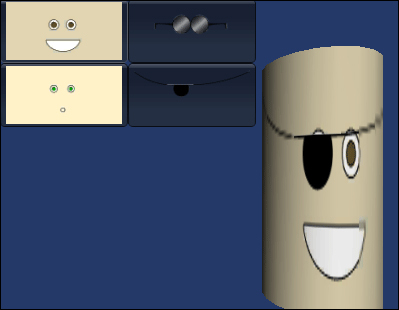
The script allows the user to create two collections of textures: one for the Base map (named Faces) and another one for the Decal map (named Props). When the scene is played, the textures are displayed inside GUI buttons which can be used to change the texture in the Avatar game object's material by calling the ChangeMaterial function. This function will receive, as parameters, both the category (either Face or Prop) and index of the image, assigning the correspondent texture map to the appropriate texture channel.
This recipe could be easily adapted to change other parameters of different material shaders. Check Unity's online documentation to learn about other texture names at http://unity3d.com/support/documentation/ScriptReference/Material.SetTexture.html. Also, you might want to learn more about shaders by exploring the built-in shaders' source available at http://unity3d.com/support/resources/assets/built-in-shaders.