
In Unity V4.x, the new Mecanim animation system was introduced, bringing with it a whole raft of new features to the already feature-packed Unity editor. With Unity 4.3 (and beyond), this system has had a minor overhaul for the new 2D animation system to give developers even more fine-grained control along with many fixes, tweaks, and performance improvements.
In this chapter, we will walk through all the features that are important to the new 2D system and go over several tips and tricks to irk the most out of what is available.
The topics that will be covered in this chapter are as follows:
- Sprite animation
- State machines and Mecanim
- Curves and fine control
Besides the 2D sprite system, Unity has created and updated their animation to handle 2D. With a greatly enhanced dope sheet animation/clip controller and full integration with the Mecanim state management system, there is a boundless world of choices available that are easy to use once you get to grips with them.
All of the animation in the new 2D system in Unity uses the new Mecanim system (introduced in Version 4) for design and control, which once you get used to is very simple and easy to use.
It is broken up into three main parts: animation controllers, animation clips, and animator components.
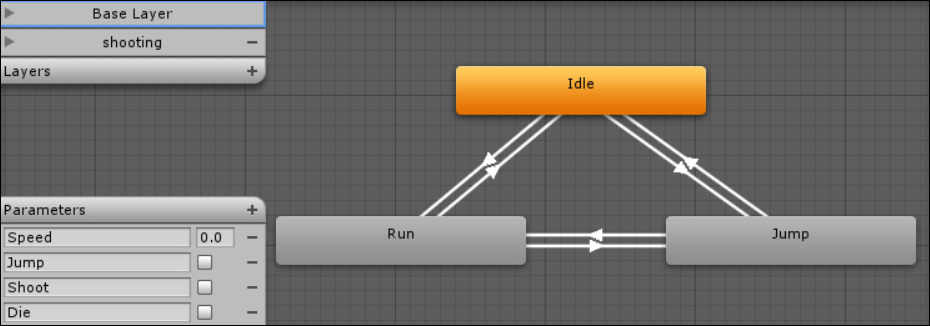
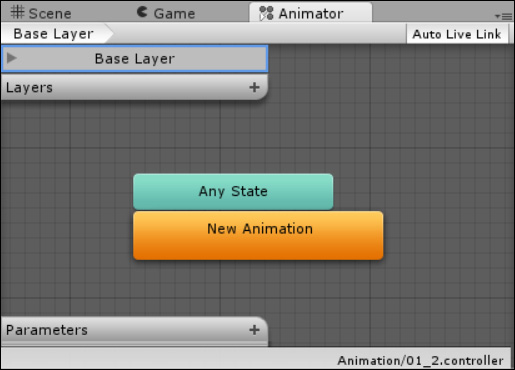
Animation controllers are simply state machines that are used to control when an animation should be played and how often, including what conditions control the transition between each state. In the new 2D system, there must be at least one controller per animation for it to play, and controllers can contain many animations as you can see here with three states and transition lines between them:
Animation clips are the heart of the animation system and have come very far from their previous implementation in Unity. Clips were used just to hold the crafted animations of the 3D models with a limited ability to tweak them for use on a complete 3D model:

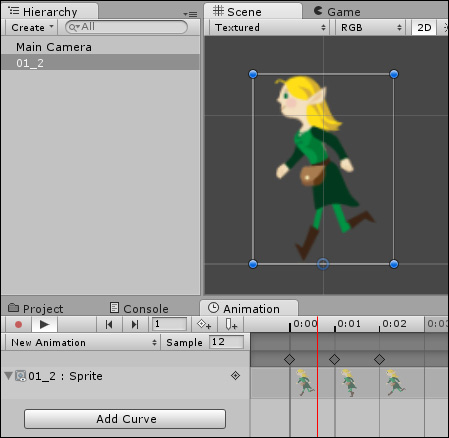
The new animation dope sheet system (as shown in the preceding screenshot) is very advanced; in fact, now it tracks almost every change in the inspector for sprites, allowing you to animate just about everything. You can even control which sprite from a spritesheet is used for each frame of the animation.
The preceding screenshot shows a three-frame sprite animation and a modified x position modifier for the middle image, giving a hopping effect to the sprite as it runs. This ability of the dope sheet system implies there is less burden on the shoulders of art designers to craft complex animations as the animation system itself can be used to produce a great effect.
To use the new animation prepared in a controller, you need to apply it to a game object in the scene. This is done through the Animator component, as shown here:

The only property we actually care about in 2D is the Controller property. This is where we attach the controller we just created.
Note
Other properties only apply to the 3D humanoid models, so we can ignore them for 2D. For more information about the complete 3D Mecanim system, refer to the Unity Learn guide at http://unity3d.com/learn/tutorials/modules/beginner/animation.
Animation is just one of the uses of the Mecanim system; we'll explore other uses of it in Chapter 7, Encountering Enemies and Running Away, Chapter 9, Getting Ready to Fight, and Chapter 10, The Battle Begins.
So, to start creating animations, you first need an animation controller in order to define your animation clips. As stated before, this is just a state machine that controls the execution of animations even if there is only one animation. In this case, the controller runs the selected animation for as long as it's told to.
Note
If you are browsing around the components that can be added to the game object, you will come across the Animator component, which takes a single animation clip as a parameter. This is the legacy animation system for backward compatibility only. Any new animation clip created and set to this component will not work; it will simply generate a console log item stating The AnimationClip used by the Animation component must be marked as Legacy. So, in Unity 4.3 onwards, just avoid this.
Creating an animation controller is just as easy as any other game object. In the Project view, simply right-click on the view and select Create | Animator Controller.
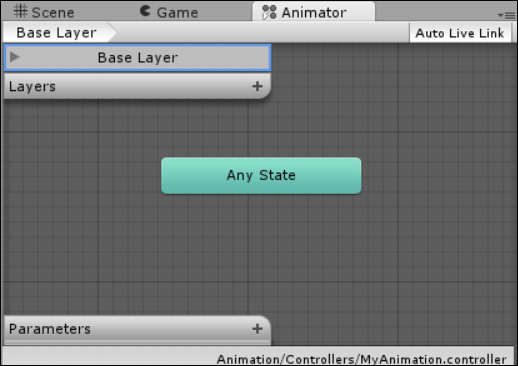
Opening the new animation will show you the blank animator controller in the Mecanim state manager window, as shown in the following screenshot:
If you have any existing clips, you can just drag them to the Mecanim controller's Edit window; alternatively, you can just select them in the Project view, right-click on them, and select From selected clip under Create. However, we will cover more of this later in practice.
Once you have a controller, you can add it to any game object in your project by clicking on Add Component in the inspector or by navigating to Component | Create and Miscellaneous | Animator and selecting it. Then, you can select your new controller as the Controller property of the animator. Alternatively, you can just drag your new controller to the game object you wish to add it to.
So with a controller in place, let's add some animation to it.
Unlike the 3D system in Unity where animations are defined in modeling programs and bound to certain model types and poses, there are actually two ways in which animations (or clips) can be created in the new 2D system. This is because Unity controls the creation of an animation, not an external tool.
Let's start off by creating some animation clips manually. It is a slightly lengthier task than the manual route, but it is good to understand what the automatic system is actually doing for you. This helps you choose which route to take depending on the kind of animation you want to create.
To start, first we need to create a game object in the hierarchy with an animator component and controller attached to it so that we can add a reference to the spritesheet. Perform the following steps:
- Drag either the spritesheet (with the regions defined) or any single sprite to the scene hierarchy in the scene view. This will create a new game object with Sprite Renderer for the assigned texture.
- Add the Animator component to the game object.
- Create a new animator controller by clicking on Animator Controller in the Project view.
- Drag the new animation controller to the game object, or set it to the Controller property in the inspector panel for the animator.
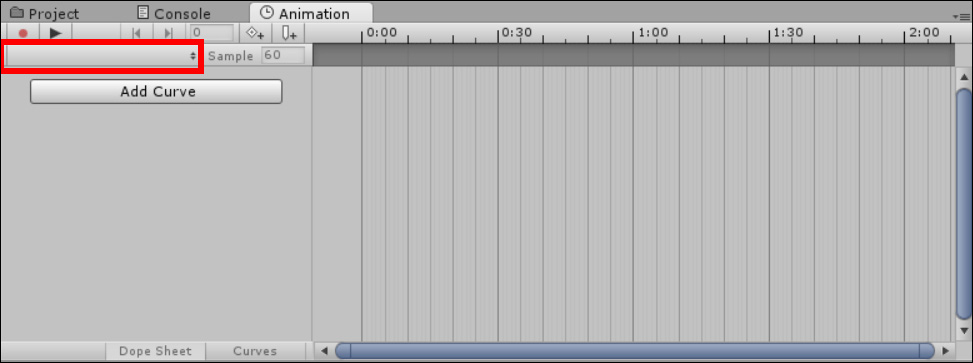
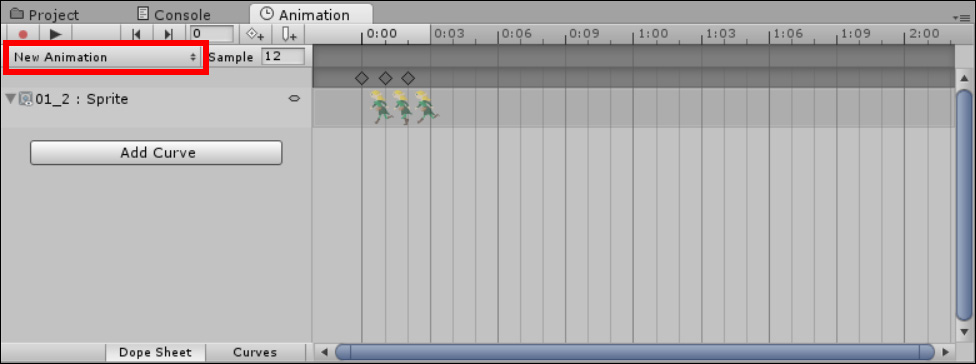
Now, if you open the Animator window (Window | Animation) with the new game object selected, you will get a blank animation with no clips defined, as shown in the following screenshot:
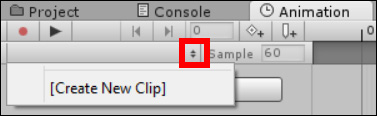
To create your first clip, simply click on the clip selection drop-down menu and click on [Create New Clip], as shown here:
From here, you can either drag individual sprites onto the timeline at the points you want to show a sprite from in your animation, or you can alter the properties in the Inspector pane to animate how the sprite should look on the screen. You can even preview the animation by clicking on the play button in the Animation tab and it will display the running animation in the Scene view window:
Now, you can have ultimate control over your animation as it plays out on the screen. The next section will go into more detail on the dope sheet system and what it has to offer.
Note that you are not limited to the whole character animation with the new animation system; you can also construct characters from several sprites and animate them individually. The best example of this is Unity's own 2D platform sample, which is available at the Unity Asset store (http://bit.ly/UnityPlatformer2D):
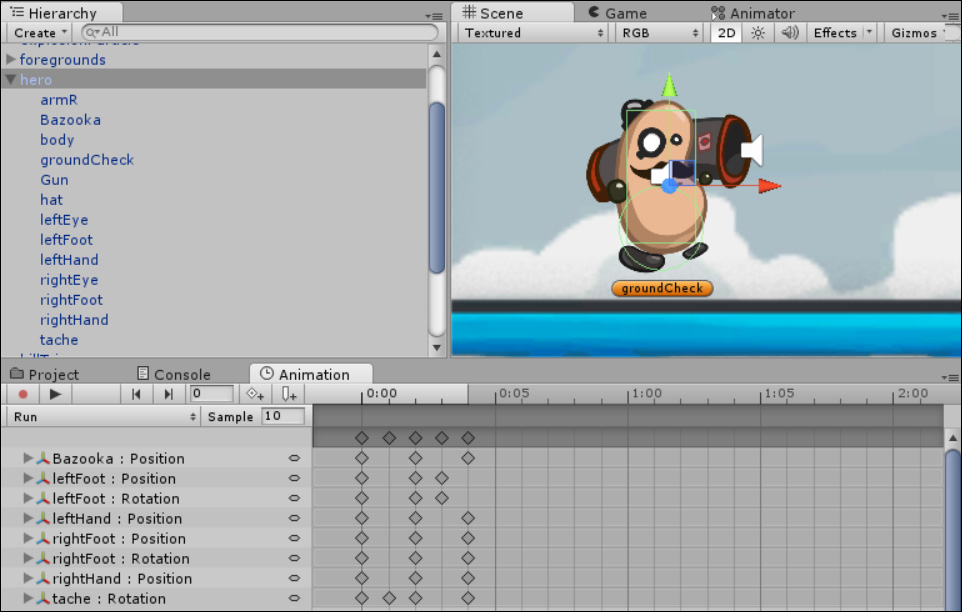
In the screenshot, you can see all the parts of the hero in the hierarchy, such as the body, tash, feet, and bazooka as separate sprites; then, in the animation dope sheet, the Run animation alters the position of each of these sprites to emulate a fast walking effect. This feature can be used in a powerful way once you get your head around what is possible.
The approach I'd always recommend (especially for beginners) is to let Unity create the animation clips for you. The automatic routines are well equipped to understand your animations, and they set the various properties for you very well. You can always tweak it later.
The process is very simple, and you can even create the default animation controller in the process by performing the following steps:
- First, delete the example you created previously, just to avoid confusion.
- Browse to your spritesheet that are in the
Assetsfolder structure in the Project view. - Expand the discovered sprites by clicking on the arrow next to the spritesheet's image.
- Select all the sprites for a single animation.
- Drag the selection to the Scene view hierarchy (not the Game view).
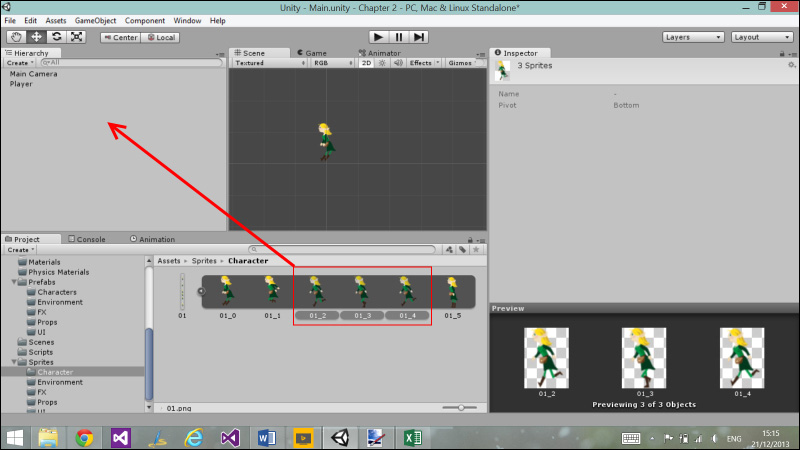
Dragging multiple sprites to the scene to make an animation
- You will then be prompted where to save the new animation clip:
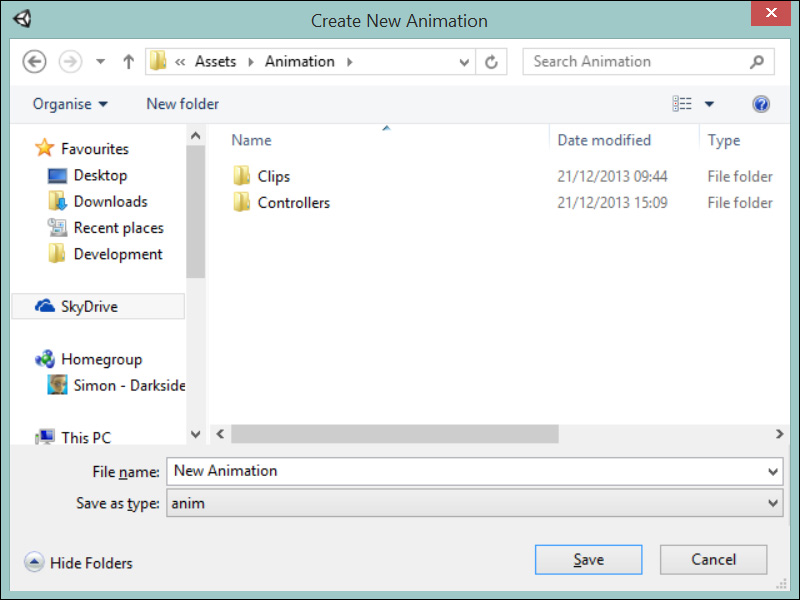
- Save to
AssetsAnimationClipsand you are done.
Once saved, be sure to sort your controllers and clips in the correct folder of your project, or leave them where they are until you are happy.
If you examine your new game object in the Inspector pane, you should find a new sprite created with an Animator component along with the new controller you saved, shown in the Inspector pane as you can see here:

Now, if you double-click on either the new controller in your Project folder or the Controller parameter in the Animator controller component in the Inspector pane, you will see the new single state animation that was generated for you, as follows:
If you also want to check out how the animation looks like, select your new object in your Project hierarchy and open the Animation view by navigating to Window | Animation in the menu. Once open, you should see the animator Dope Sheet view (as shown in the following screenshot) for the currently selected game object with the current animation clip in view (as highlighted):
Here, you can see the simple sprite animation expressed in the Dope Sheet view with the timings for when the sprite's image will change. By default, this will be in an eternal loop from start to finish.
Any changes that you make at this point with Dope Sheet open in the Inspector pane will be recorded at the selected time in the animation, so be careful about what you click on. We will cover more on the dope sheet system later.
The new and improved animation Dope Sheet has a growing set of features to make the animation easier and yet more powerful:
The features aren't limited to the new 2D system for use, but they do make a lot of 2D tasks a lot simpler to implement.
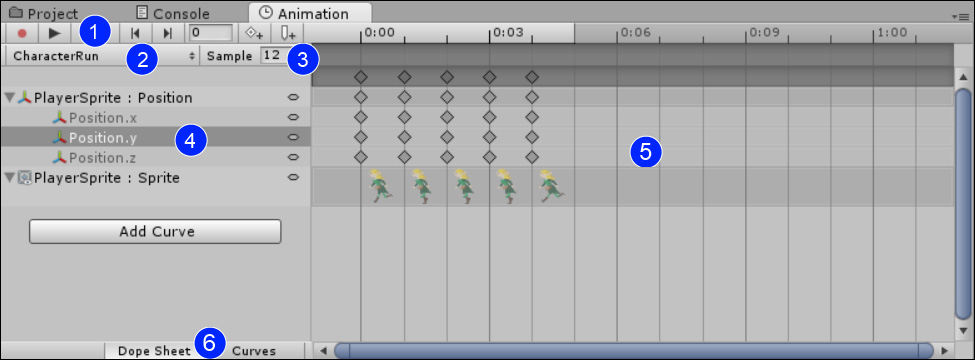
Navigating round the editor, we have the time/recording controls, animation clip selection, sample rate (frames per second), animation properties, timeline, and dope/curve view.
The time controls let you play or step through your recorded animation to see how it flows. This is especially useful when combined with the active play in the Scene and Game views.
The record button determines whether the changes in the Scene or Inspector panes will affect the Animation properties and will add new ones if a property has not been touched yet.
There are also the buttons to add new KeyFrames (specific point on the timeline at the currently selected time) or Animation Events (script launching points based on time).
This is a simple list of all the clips in the current animation set/controller. It also has the facility to add more clips directly from this drop-down menu.
The sample rate sets the number of frames per second that are available in the timeline. It controls the number of key frame points possible between time intervals.
Animation properties list all the different Inspector properties that are being controlled by this animation clip. If a property is touched in the editor while the record mode is active, it will create a new property in the animator or alter the existing property at the current time.
Note
Currently, the animations have one limitation. If a property is part of a construct such as vector3 and even if you only change one part of that construct, say the X value, it will set the other parts to their default values.
Animating the x axis on a position property, for instance to 0.1, at a specified time will also set the Y and Z values to 0; this overrides any script, changing those values. Keep this in mind while animating similar properties.
While in the record mode, any change in the editor will be captured. This includes any child game object properties that you change. This becomes very useful if your animated objects comprise multiple sprites in the child game objects.
The timeline window shows all the key frames being animated over the lifetime of the animation. Setting the sample rate higher and lower will control how many key points/frames will be available between time units.
You can also use the following keyboard shortcuts to navigate between the frames on the timeline:
- Press comma (,) to go to the previous frame
- Press period (.) to go to the next frame
- Press Alt + Comma (,) to go to the previous key frame
- Press Alt + Period (.) to go to the next key frame
The timeline view has an alternate view mode to add finer control and curves between the key frame animations, as shown in the following screenshot:
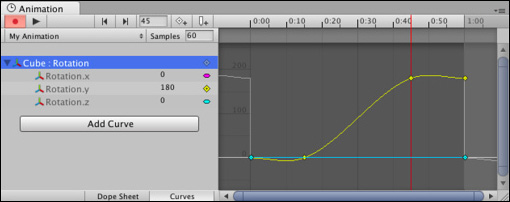
Editing the curves takes a little finesse but makes for a better-looking transition than the default Boolean (on/off) effect.
You can further control the curves by setting the inbound and outbound tangents of the curve, setting either a smooth (linear), sharp (constant), or free-form curve. Simply play with these settings until you have the kind of curve you want.
We'll cover curves in Chapter 5, NPCs and Interactions, where we'll learn a few of the slightly more complex curves and animations.