
Real-world applications need a way to accept input from users. This process of collecting input is managed by a wide range of input devices including the mouse, touch, stylus, and keyboard. Silverlight provides direct support for these devices through the System.Windows.Input namespace.
Whether you're implementing drag and drop or mouse-wheel zoom or creating your own right-click context menus, you'll almost certainly end up handling mouse input in your applications. Silverlight has great support for mouse states as well as for handling both left and right mouse buttons and allowing you to respond to the mouse wheel.
Multi-touch is now coming of age due to the proliferation of multi-touch devices, PC displays, and notebooks available to us. Silverlight can now accept single and multi-touch input to allow you to write next-generation touch-enabled applications.
If you have a tablet PC, an external drawing pad, or perhaps one of the newer tablet form factors that we're just dreaming about as I write this, then ink input using a stylus is a must. Ink is also a nice way to capture drawings done with the mouse.
Most keyboard input will be handled by the TextBox and similar controls. But what happens when you want to implement custom accelerators or write a game that responds to keystrokes? In those instances, you'll need to access the lower-level keyboard events like I did in the Commodore 64 emulator shown in chapter 5.
The keyboard has been our input of choice since the dawn of terminal-based computing (no, Silverlight doesn't have a paper tape input API, but you could probably write one) and is used by virtually all applications, so we'll start there.
Have you ever considered how an application determines how to handle your keystrokes? Often, we click and clack our way through our days and take for granted how our information gets where we intend it to go. But if we'd slow down for a second, we'd notice that there's an intermediary step.
Before typing any information, you must target an element and give it the focus. This section will provide an explanation of the concept of focus. Once an item has focus, it can begin receiving keyboard events—the topic of our second subsection. Finally, for the special situations where you want to handle key combinations, you must learn to deal with modifier keys—our final keyboard topic.
When an element has focus, it becomes the primary target for any information entered through the keyboard. This target element must be a System.Windows.Controls. Control element because only Control elements can be given focus in Silverlight. You can give these elements focus by selecting them with the mouse, by tabbing to them through the keyboard, or via the Focus method. Regardless of your approach, the concept of focus is especially important within the realm of the World Wide Web.
Web pages pose a unique challenge with focus because Silverlight plug-in instances are part of a larger ecosystem. In chapter 2, this ecosystem was shown to begin with an HTML document. This document may have multiple Silverlight controls or a mix of Silverlight controls and other control types such as Flash. In order for a Silverlight control to accept input from the keyboard on an HTML page with additional content, the Silverlight control itself must first have the focus. To accomplish this, you can use the following JavaScript:
var silverlightControl = document.getElementById('SilverlightControl'),
if (silverlightControl)
  silverlightControl.focus();
This example uses the HTML DOM to manually give the focus to an instance of the Silverlight plug-in. This approach can be useful if you want to give your Silverlight application the focus when a web page is loaded. If you don't do this, a user will either have to click or tab to your Silverlight plug-in instance. Once that's done, you'll be able to set focus to individual controls.
Individual elements on the Silverlight page receive focus by click or tab. But you can manually set focus to an element by calling the Focus method of the UIElement:
myTextBox.Focus();
You may want to do that in response to a special accelerator key, or to automatically set focus to a field with a validation error, or perhaps to allow for skipping fields based on prefilled data.
Once the plug-in instance has focus and one of the input controls on your page has focus, you can begin handling keyboard events within your Silverlight application.
Silverlight provides two events directly related to the keyboard. These events, KeyDown and KeyUp, are available through the UIElement class. The KeyDown event happens when a user presses a key. Once that key is released, the KeyUp event will fire. When either event is triggered, its event handler will receive a KeyEventArgs parameter. This parameter and the KeyDown and KeyUp events are shown in listing 8.1.
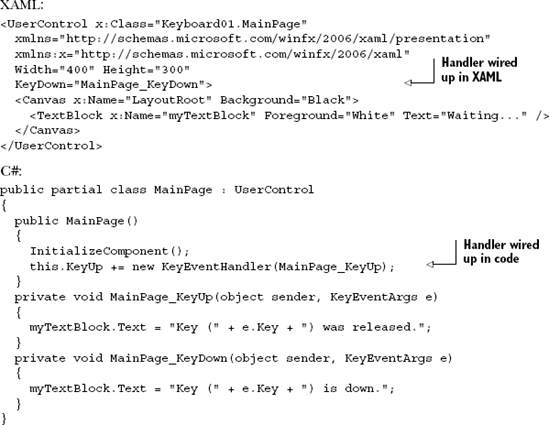
This listing shows a page in Silverlight that responds to the KeyDown and KeyUp events. The event handlers associated with these events update the TextBlock to show the key that was used. These events are watched through the UserControl element, which is inherently a UIElement. We'll discuss this element further in section 10.5 but, for now, note how the keyboard events are attached in two different ways. In one, the KeyDown event is attached through the XAML declarative approach. The other approach uses traditional procedural code. Regardless of the method, the appropriate keyboard event handler will receive a KeyEventArgs parameter.
Note
If the user holds the key down, and his system is set up to allow key repeating (the default), multiple KeyDown events will be fired and KeyUp will only be fired when the key is released. If you want to process typing, you should process KeyDown (to capture each character) but, if you want to process keystrokes for hotkeys or similar functionality, KeyUp may be a better event to use.
The KeyEventArgs class enables you to fetch data relayed from a user's keyboard. Once a user begins typing, you can use this object to interpret the user's keystrokes and act accordingly. The KeyEventArgs class provides the properties shown in table 8.1.
Table 8.1. The properties of the KeyEventArgs class
Property | Description |
|---|---|
| A |
| A reference to the element that originally raised this event. Since the keyboard events are bubbling routed events, you need this to identify the source of the event as opposed to the sender of the event. |
| This value identifies which key has been pressed. Unlike the |
| An integer value that provides the key code of a pressed key. This value is specifically tied to the operating system the user is using. |
After reviewing this table, you may be scratching your head and thinking, "Why would I ever use the PlatformKeyCode property when Silverlight is cross-platform?" When I ported the C64 emulator to Silverlight, I had to use the PlatformKeyCode to gain access to a number of keys Silverlight didn't surface through the Key enumeration—for example, the bracket and pipe keys. The key codes for those keys will be different on each supported platform and each type of keyboard, such as Qwerty in the US and Azerty in France.
Another reason is because some keys are irrelevant on other operating systems. For instance, checking for a Windows Logo keystroke on OS X makes as much sense as checking for a Command key press on Windows. If handling other OS-specific keystrokes is necessary, you can use the PlatformKeyCode. Otherwise, we recommend sticking with the Key property.
In addition to straight key presses, you may need to capture key combinations such as Ctrl-C.
Modifier keys are specific keys used in combination with other keys. Modifier keys are necessary because the KeyEventArgs class only exposes information about the currently pressed key. If you press something like the Shift key or Ctrl key and then another key, the initially selected key data will be lost. You can overcome this problem with the help of the statically visible Keyboard class.
The Keyboard class, in the System.Windows.Input namespace, exposes information directly related to the selected modifier keys. This information is available through the Modifiers property, which is a bit field enumeration that represents the set of ModifierKeys that are pressed. These ModifierKeys represent options of an enumeration.
Table 8.2 shows the options available in the ModifierKeys enumeration. Notably, the Apple key is equal to the Windows key in value, as they serve conceptually similar roles on the two platforms. The reason for this enumeration is to allow for bitwise operations.
Table 8.2. The ModifierKeys available within Silverlight
Key | Description |
|---|---|
| No modifier keys are pressed. |
| The Alt key is pressed. This key is available on all supported platforms. On an Apple keyboard, this key is also referred to as the Option key. |
| The Command key is pressed on an Apple system. These keys used to have open apples on them. |
| The Ctrl key is pressed. This key is available on all supported platforms, despite usage differences between Windows and Mac. |
| The Shift key is pressed. This key is available on all supported platforms. |
| The Windows Logo key is pressed on a Windows-enabled keyboard. |
The modifiers are important because they allow you to check whether multiple keys are selected at the same time. For instance, if you want to change the KeyDown event used in listing 8.1 to listen for Shift-B, you could use this code:
private void MainPage_KeyDown(object sender, KeyEventArgs e)
{
  if (e.Key == Key.B)
  {
    if (Keyboard.Modifiers.HasFlag(ModifierKeys.Shift))
    myTextBlock.Text = "You pressed SHIFT+B";
  }
}
This shows how you can go beyond individual key events in Silverlight. By appropriately listening to and responding to these events, you can extend the input and navigation of your application beyond just the mouse alone. Though that's compelling, especially for those of us who grew up with 40- or 80-character displays and a fondness for the command prompt, the mouse is the primary input device for most web applications today.
The mouse requires very different input processing compared with the keyboard. In addition to responding to button-related events, the mouse can also respond to movement. It's also common for the mouse to be moving with one or more buttons depressed. Another input vector on the mouse, one that's relatively new compared to the mouse itself, is the scroll wheel or mouse wheel. Though implementations vary from traditional wheels to capacitive touch pads, it's rare to find a modern mouse that omits this handy feature, so it's important that Silverlight developers be able to gather meaningful input from it.
We'll start with mouse button and movement events. The two are often used together to handle dragging and resizing operations. Even when used separately, they're often thought of together due to their ubiquity from the first days of mouse-based user interfaces.
From there, we'll look at the mouse wheel support added with Silverlight 3 and refined in Silverlight 4. The mouse wheel isn't necessarily an essential input like the mouse button and mouse movement, but it can make the difference between a mediocre user experience and an awesome one.
Silverlight supports a range of movement and click-related events emitted from the mouse. These events can be handled by any UIElement. The most familiar of these events are probably the click-handling events because they behave similarly to the keyboard events. Table 8.3 shows these click-related actions along with their descriptions.
Table 8.3. The click-related events associated with the mouse
Event | Description |
|---|---|
| Responds to the user depressing the left mouse button |
| Reacts to the user releasing the left mouse button |
| Responds to the user depressing the right mouse button |
| Fired when the user releases the right mouse button |
This table shows two pairs of events tied to the mouse buttons. When a mouse button is selected, the corresponding event handlers will receive a MouseButtonEventArgs object. This object derives from the MouseEventArgs class, which describes the mouse state at the time the event was raised.
You can receive the location of the mouse cursor in relation to a specific UIElement through the GetPosition method. This method is part of the MouseEventArgs class and will be discussed more in a moment. For now, please look at the properties available in the MouseEventArgs class (shown in table 8.4).
Table 8.4. The properties exposed by the MouseEventArgs
Property | Description |
|---|---|
| A |
| A reference to the element that originally raised this event Since the mouse events are bubbling routed events, you need this to identify the source of the event as opposed to the sender of the event. |
| Includes information associated with a tablet pen |
Table 8.4 lists the properties available through the MouseEventArgs class. As this table shows, Silverlight has built-in support for working with a stylus, which we'll discuss in a bit. One method in the MouseEventArgs class demands more immediate attention—GetPosition.
The GetPosition method gives you immediate access to the current location of the mouse. This location is returned from the GetPosition method as a Point in relation to any UIElement. This UIElement is determined by passing it as the sole parameter to the method. Optionally, you can pass null as the parameter to the GetPosition method to get the location of the mouse in relation to the Silverlight plug-in instance. Regardless of how you use it, this method is useful when handling both click and movement events. The UIElement class exposes the mouse-movement events shown in table 8.5.
Table 8.5. The mouse-movement-related event handlers
Event | Description |
|---|---|
| Triggers when the user enters the boundary of a |
| Reacts to mouse movement within the boundary of a |
| Fires when the move leaves the boundary of a |
The events in table 8.5 are passed a MouseEventArgs parameter so you can be readily informed of a mouse's position as it moves around a surface. This feature can especially be useful if you want to implement drag-and-drop features in Silverlight or track the mouse for drawing.
Besides buttons and pointer movement, modern mice offer one more form of input: the mouse wheel.
Silverlight 3 added built-in support for the mouse wheel, in the form of the UIElement. MouseWheel event. It was possible to wire up a mouse wheel handler in Silverlight 2, but you had to resort to JavaScript to do it—something that won't work out of browser, always seemed a bit of a hack, and is difficult to support cross-browser and cross-platform. Silverlight 4 expanded that by adding in support in the controls themselves.
Note
In the initial Silverlight 4 release, the MouseWheel event only worked in specific situations: windowed controls on IE and Firefox for Windows, as well as windowless controls for IE. The approach used with the Netscape Plug-in API (NPAPI) didn't provide the plug-in with mouse wheel information, so Silverlight didn't support the mouse wheel in Safari or Firefox on the Mac. Support is planned, though, and will be in place by the time you read this book. On Windows, when using windowed mode on those browsers, the Silverlight runtime bypasses the plug-in API and grabs the underlying window handle (hWND) for the control as a workaround.
Silverlight includes first-class mouse wheel support in the form of the MouseWheel event on the UIElement class. When the user scrolls the mouse wheel, this event is raised with an instance of the MouseWheelEventArgs class. The properties available in the MouseWheelEventArgs class are detailed in table 8.6.
Table 8.6. The properties exposed by MouseWheelEventArgs
Property | Description |
|---|---|
| An integer representing the relative change since the last time the event was raised A positive value indicates that the mouse wheel was scrolled up or away from the user. A negative value means the mouse wheel was scrolled down or toward the user. The higher the absolute value of the number, the faster the mouse wheel was scrolled. |
| A |
| A reference to the element that originally raised this event Since the mouse events are bubbling routed events, you need this to identify the source of the event as opposed to the sender of the event. |
| Includes information associated with a tablet pen |
Listing 8.2 shows the mouse wheel properties in action.
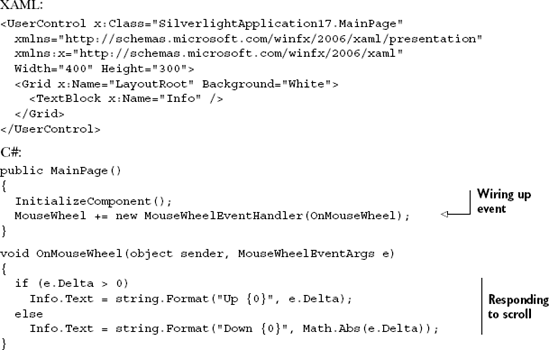
Listing 8.2 shows how to obtain the Delta value from the MouseWheel event in order to determine both direction and speed. Negative values mean the wheel was scrolled down or toward the user; positive values mean the wheel was scrolled up or away from the user.
The ScrollViewer control automatically handles the MouseWheel event, so the ListBox, ComboBox, TextBox, and other ScrollViewers will automatically scroll using the wheel. If you want to support the mouse wheel on other controls, simply handle the MouseWheel event as shown in listing 8.2. As another example, here's the mouse wheel integrated with a Slider:
private void OnMouseWheel(object sender, MouseWheelEventArgs e)
{
  if (e.Delta > 0)
    slider_X.Value += slider_X.LargeChange;
  else
    slider_X.Value -= slider_X.LargeChange;
}
First-class support for the mouse wheel event isn't the only advanced input supported by Silverlight. Silverlight also has a great feature for Windows 7 systems and beyond: multi-touch support.
Microsoft Windows 7 is the first Microsoft OS to have official built-in support for multi-touch-enabled hardware. For a platform to be touch enabled, it simply needs to recognize a single finger on the screen. Many tablets and portable devices support this, as do touch screens going all the way back to the 80s. Multi-touch is a pretty new ground. A multi-touch-enabled display will recognize more than one finger on the screen, allowing you to do things such as resize and rotate images by touching both corners or make complex multifinger gestures to perform specific functions, such as sweeping a screen to the side.
It's hard to predict how popular multi-touch will be on the desktop, but it's already finding use in new classes of portable hardware as well as in kiosk and kitchen-PC scenarios (as long as you have a cake-batter-and-grease-proof screen).
The static Touch.FrameReported event is the primary entry point into the touch API in Silverlight. This event fires on a regular interval, the timing and triggering of which depends on the touch-enabled hardware and drivers in use. As soon as you wire up the event handler, you'll begin receiving notifications.
The FrameReported event includes an instance of the TouchFrameEventArgs class with members as described in table 8.7.
Table 8.7. The properties and methods exposed by the TouchFrameEventArgs class
Property or method | Description |
|---|---|
| An integer representing the time for this specific frame You can use this to facilitate time-sensitive gestures. |
| Use this method when the primary touch point is down in order to suspend promoting that point to a mouse gesture until all the touch points are up. |
Returns the first touch made since the last time all touches were lifted from the screen This is the touch point that'll be promoted to a mouse event. | |
| Use this method to return a collection of |
The GetPrimaryTouchPoint function returns a single instance of the TouchPoint class. The GetTouchPoints collection returns a collection of TouchPoints, including the primary touch point. The TouchPoint class includes the members listed in table 8.8.
Table 8.8. The properties and methods exposed by the TouchPoint class
Property | Description |
|---|---|
| The user activity associated with this touch Possible values are |
| The x,y coordinates of the touch. This is relative to the application's |
| A rectangle describing the size of the touch point. You can use this to differentiate between, say, a light tap and a full press. |
| Information about the device that provided the touch information. |
| This property is located on the |
Listing 8.3 shows how to listen for the FrameReported event, enumerate the TouchPoint objects, and display their positions to the debug window.
Example 8.3. Responding to the FrameReported event and reporting touch points
public MainPage()
{
  InitializeComponent();
  Touch.FrameReported += new TouchFrameEventHandler(OnTouchFrameReported);
}

void OnTouchFrameReported(object sender, TouchFrameEventArgs e)
{
  foreach (TouchPoint tp in e.GetTouchPoints(this))
  {
    Debug.WriteLine(tp.Position);
  }
}
One final method of interaction with your application is ink input. Though ink is typically used with tablet-style PCs, it can be used with mice as well. With new pen-enabled devices such as multi-touch tablet PCs, there's renewed interest in ink collection in Silverlight applications.
Silverlight provides an intuitive way to collect hand-written information through an element known as the InkPresenter. This element empowers you to collect and display a kind of content known as ink, a term that refers to a series of points related to the movement of a device. These points can be collected from a mouse, stylus, or touch screen and are stored as a Stroke. The process of collecting Stroke elements is handled through the InkPresenter.
Over the course of this section, you'll learn how to gather and display ink with the InkPresenter. This process involves three simple but important steps. The first step involves creating a canvas to collect the ink. After that, you must wire up the canvas to collect ink-related information. Finally, once the ink has been collected, you can decide how to style the content.
To create a place to capture and display the ink, you must define an InkPresenter object. This object can be thought of as a Canvas because the InkPresenter class derives from that type. And like the Canvas, you can create an InkPresenter in XAML, as shown here:
<Grid x:Name="LayoutRoot" Background="White">
  <InkPresenter x:Name="myInkPresenter" Background="Silver"/>
</Grid>
This example creates a basic InkPresenter within a Grid. If you were to create a Silverlight application using this XAML, it'd look like the InkPresenter doesn't do anything.
The InkPresenter is designed to dynamically render ink as it's drawn, so let's look at how to dynamically collect ink content.
The first step in collecting ink involves listening for the mouse button or stylus to be depressed. When this event occurs, the MouseLeftButtonDown will fire and you can signal that the input device is depressed. At that point, you can begin to construct a Stroke object that can be added to an InkPresenter.
The Stroke object represents a continuous series of points. As a user moves a device around an InkPresenter, you build on that Stroke until the user releases the device. It's a general practice to define a Stroke object as a member variable of your Silverlight page, so you can interact with the same instance within the MouseLeftButtonDown, MouseMove, and MouseLeftButtonUp events. The MouseLeftButtonDown event is generally responsible for instantiating or resetting the Stroke, as shown in listing 8.4.
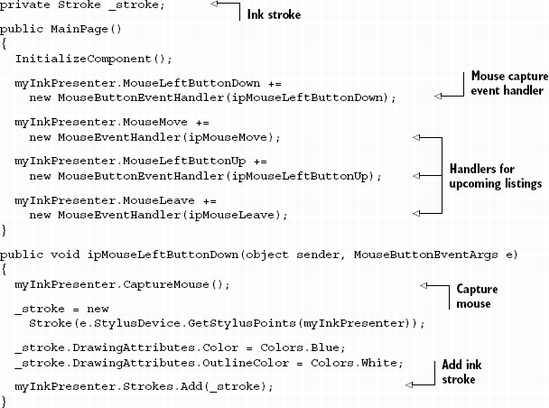
This example shows the member variable stroke used on these listings as well as the event handler wire-up required for listings 8.4 through 8.6. Importantly, it also shows the initial mouse capture established when the mouse left button is pressed.
The member variable _stroke is reset each time the user depresses the input device. This reset process involves retrieving the styles points that have been collected. This task is handled by the GetStylusPoints method of the StylusDevice object. Because of the reset, you must also reapply the styling settings, which we'll discuss shortly. With the styled Stroke in hand, you can add it to the InkPresenter, which will be immediately rendered. You can even do this as the move moves around an InkPresenter, as shown in listing 8.5.

This adds to the Stroke initialized in the previous example. You'll notice that this task is wrapped in a null check statement. The reason for this will become apparent as you complete the final step of drawing ink.
The final step involves completing the Stroke. The Stroke needs to be completed when the user releases the input device or leaves the InkPresenter. For this reason, you need to handle two events: MouseLeave and MouseLeftButtonUp. These two events perform the tasks of nullifying the Stroke and releasing the input device, as shown in listing 8.6.
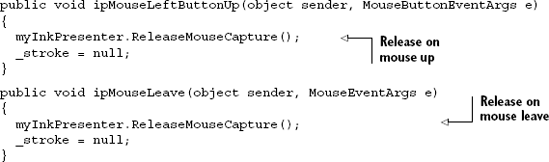
This completes the process of drawing a Stroke on an InkPresenter. By setting the Stroke to null, you can determine whether you should build on it when the MouseMove event occurs.
In the event that you do draw a Stroke, you should know how to stylize it.
The Stroke element provides a property called DrawingAttributes that may be used to alter its appearance. This utility class is defined within the System.Windows.Ink namespace. It provides four properties that allow you to specify a Stroke element's Color, Height, OutlineColor, and Width. Collectively, you can use these values to deliver truly expressive web content.
The Color property represents the System.Windows.Media.Color used to paint the interior of a Stroke. By default, this value is set to Colors.Black. This default value is different than the default OutlineColor property, which defaults to Transparent. This property must be set if you wish to specify the Color surrounding a Stroke. If it's set, a two-pixel boundary of the given Color will be added around the Stroke. The dimensions of the Stroke are just as important as colors.
The dimensions of a Stroke are defined through the Height and Width properties of the DrawingAttributes. These two double-precision values do exactly what you'd expect them to do. These properties can be used to help create Stroke elements that represent different drawing tools. Here's some code so you can get a feel for all these DrawingAttributes:
<InkPresenter x:Name="ip" Background="Silver"
              Height="300" Width="300">
  <InkPresenter.Strokes>
    <Stroke>
      <Stroke.DrawingAttributes>
        <DrawingAttributes Color="Blue" OutlineColor="Black"
                           Height="4" Width="6" />
      </Stroke.DrawingAttributes>
      <Stroke.StylusPoints>
        <StylusPoint X="10" Y="10" />
      <StylusPoint X="10" Y="50" />
    </Stroke.StylusPoints>
  </Stroke>
  </InkPresenter.Strokes>
</InkPresenter>
As this shows, you can define the DrawingAttributes of a Stroke within XAML. It also shows the one property that the InkPresenter exposes that the Canvas doesn't: the Strokes property. As these two properties remain consistent with the relationship between XAML and code, so too does the StylusPoints collection. This collection defines the continuous line of a Stroke, which is composed of a series of StylusPoint elements.
A StylusPoint, which is found in the System.Windows.Input namespace, represents an individual point within a Stroke. This point is positioned based on the values of two properties called X and Y. These values are double-precision values that represent a coordinate. This coordinate is relative to the containing InkPresenter.
Like multi-touch, ink may not be common in many desktop applications. But as devices continue to add support for the stylus, supporting ink in your own applications will become increasingly important.
Without input, an application would just be an automated slide show. Though controls will get you most of the way there, sometimes you just need lower-level access to the input devices. Luckily, Silverlight doesn't disappoint.
Silverlight provides complete access to the keyboard information as the user presses and releases keys. Constants are provided for the most common and cross-platform keys, and you can always get to the low-level keycode information should you need to.
The most common interaction device for many Silverlight applications is the mouse. Silverlight now provides access to the left and right mouse buttons as well as normal mouse movement and the scroll wheel.
Two other modes of interaction are gaining in popularity. Pen-and-ink input has been around for a while but hasn't seen serious interest until new waves of devices started becoming popular. Multi-touch, on the other hand, is both new and popular, especially in the device space.
Now that you know how input works behind-the scenes, including keyboard input, we're ready to discuss how to work with text.