Chapter 11 introduced you to the convenient data-binding mechanisms available within Silverlight. Although binding isn't restricted to just what we'd commonly think of as data, the truth of the matter is that's what it's usually used for. Working with data is essential to most applications, but you have to get the data into your application somehow. This is where networking and communications come in.
Silverlight provides numerous methods to get to data hosted on other systems, from complex web services to a simple XML document. The networking and communications features of Silverlight enable you to send and receive data with a variety of technologies including SOAP services, XML, JSON, RSS, Atom, and even sockets.
We'll start this chapter with the basics of Silverlight networking and the limitations of the browser stack. From there, we'll look at how to connect to SOAP services and RESTful services using the browser networking stack.
With the basics under your belt, it's then time to examine the client networking stack, introduced for out-of-browser applications but available even to applications running in-browser. This stack works around many of the limitations inherent in straight browser-based networking.
Then, because you'll need to do something with the data returned from these networking calls, we'll look at the deserialization support in Silverlight for things such as XML and JSON.
Our next stop will be to look at the WCF service enhancements available to Silverlight; then, we'll dive into WCF duplex services, or polling duplex as it's often called. Polling duplex enables push communications between the server and client, much like sockets, but without as much code.
Speaking of sockets, regular point-to-point sockets and UDP multicast sockets will be our last IP networking topics for the chapter. Multicast sockets are new to Silverlight 4 and enable a number of scenarios previously difficult or impossible in Silverlight.
We'll wrap up with a local non-IP networking feature that enables communication between two or more Silverlight applications, in-browser or out, running on the same machine.
You must consider several basic concepts when using the communication APIs in Silverlight. These concepts—trust, security, and the limitations of the browser—apply to all methods of communication discussed in this chapter, with a partial exception granted to the Silverlight cross-application communication we wrap up with.
Silverlight executes within the confines of the client browser. Even the standard out-of-browser mode discussed in chapter 5 lives in this sandbox. Because of this, you have to retrieve data differently than the way you may be used to with a server-side technology such as ASP.NET. For example, you can't directly connect to a database without using something as a proxy, most commonly a web service. Although this method of communicating resembles that used by Ajax, there are significant differences.
Imagine you're building a Silverlight application that allows users to add items to a shopping cart. As soon as users add an item to their cart, you want to reserve it for them. Because Silverlight executes in the browser, you can't just call the database and mark the item as reserved. You need something acting as a proxy to the database. Throughout this chapter, we'll discuss methods of connecting to remote services to accomplish tasks like this. For now, let's move to the first basic concept: trust.
The concept of trust applies to cross-domain access. If your application is hosted at http://10rem.net and you're attempting to access a web service hosted at http://silverlight.net, the request is made cross-domain. In the case of cross-domain access, it isn't a matter of whom your application trusts, but of who trusts your application. In the vein of increased security, Silverlight, like Flash before it, has restricted client applications to connecting only to the same domain that hosts the application itself. For those familiar with web services, this seems counterproductive, so the Silverlight team also worked in an exemption that requires the involvement of the server hosting the web service. Administrators of web servers can create policy files to give access to only the resources they want exposed to the requesting domains they trust. A simple XML file is added that tells the Silverlight application what it has access to on the foreign server.
Note
Cross-domain policy files aren't required for elevated trust (trusted) out-of-browser applications, described in chapter 5. Normal trust out-of-browser applications and in-browser applications still require them. Cross-domain policy files typically aren't required for images and media.
The clientaccesspolicy.xml file defines these policies; it needs to be placed at the root of the domain hosting any web service that's allowed to be accessed from a different domain. Even if there's a valid policy file, if it's located anywhere other than the root of the hosting domain, your application won't find it, and the request will fail. If the file is in place and has the proper attributes, your application is considered trusted, and the call will return as expected. So, what does a properly formatted policy file look like? Take a look at this example:
<?xml version="1.0" encoding="utf-8"?>
<access-policy>
    <cross-domain-access>
        <policy>
            <allow-from http-request-headers="*">
                <domain uri="*"/>
            </allow-from>
            <grant-to>
                <resource path="/" include-subpaths="true"/>
            </grant-to>
        </policy>
    </cross-domain-access>
</access-policy>
This shows the minimum needed in a clientaccesspolicy.xml file to allow HTTP access to all web services hosted on the current domain. If you want to have different rights for different services or to allow for socket access to the server, you can make additions to that file. Sockets are described in section 14.5. The example here is as open as possible-requests from any domain can access any resource in the host domain, and host headers are allowed. Table 14.1 shows the elements and attributes that make up a clientaccesspolicy.xml file. Attributes are shown after the element they apply to.
I know that you're anxious to see how to connect to data from within your application, but you need to create a solid foundation on which to build service access. You can make the policy file as open or as restrictive as you desire. By changing the domain element, you can limit access to a single domain. You can also add multiple policy elements to apply different rules to requests from different domains, as shown in the next example.
Table 14.1. Elements and attributes allowed in clientaccesspolicy.xml
Element/attribute | Required | Description |
|---|---|---|
| Yes | Root element for the policy file. |
| Yes | Container for one or more policy elements. |
| Yes | Defines rules for a single domain or a group of domains. |
| Yes | Container for permitted domains. If it contains no domain elements, no cross-domain access is granted. |
| No | Defines which headers are allowed to be sent to the web services hosted at the current domain. If absent, no headers are allowed. |
| Yes | Defines domains affected by the policy element in which the domain is a child. |
| Yes | Specifies the exact domain allowed for the current policy. |
| Yes | Container for one or more resource elements. |
| Yes | Required for |
| Yes | Required for |
| No | Optional for |
| Yes | Required for socket access. Defines socket resources affected by the current policy. |
| Yes | Required for socket access. Defines a port or range of ports, which must fall between 4502 and 4534, affected by the current policy. |
| Yes | Required for socket access. Defines what protocols are allowed under the current policy. The only protocol currently allowed is TCP. |
Two separate policies are defined in this example. The first allows any request coming from a Silverlight application hosted at sometrusteddomain.com to have unrestricted access to the entire application; the second forces requests from any other domain to be restricted to the API folder and to have HTTP headers denied:
<?xml version="1.0" encoding="utf-8"?>
<access-policy>
  <cross-domain-access>
    <policy>
      <allow-from http-request-headers="*">
        <domain uri="http://sometrusteddomain.com"/>
      </allow-from>
      <grant-to>
        <resource path="/" include-subpaths="true"/>
      </grant-to>
    </policy>
    <policy>
      <allow-from>
        <domain uri="*"/>
      </allow-from>
      <grant-to>
        <resource path="/api"/>
      </grant-to>
    </policy>
  </cross-domain-access>
</access-policy>
The elements and attributes shown apply for connecting to any HTTP-based resource. Modifications are needed if you're using TCP sockets, which are described in section 14.5.
Even if this file isn't in place, you may still be in luck. Silverlight will also use policy files created for use with Adobe Flash, known as crossdomain.xml files, for cross-domain access. There are two restrictions when using a crossdomain.xml file:
It may only be used for
WebClient, HttpWebRequest, or service reference proxy access. Socket access isn't permitted.The entire domain must be allowed access for Silverlight to use a crossdomain.xml file. Silverlight doesn't parse the advanced properties of crossdomain.xml.
If the domain hosting the web service you're calling has either a clientaccesspolicy.xml or a crossdomain.xml file with the correct attributes in place, it's considered trusted and will return a result.
It's necessary to have an outside source trust your application, but should you trust everyone else? Let's look at a few ways to ensure that your application is as safe and secure as possible.
Just as you put a valid policy file in place for security reasons, you can take other steps to make your application more secure. In this section, we'll briefly discuss data integrity, using HTTPS, and attaching HTTP headers to your request.
Never trust that your data source will return pure, clean data every time. It's possible that, either purposefully or as a result of an error on the part of the service creator, harmful data may be returned to your application. You should always take steps to validate that the data you receive is compatible with the use you intend.
Any time you're passing sensitive data, you should use Hypertext Transfer Protocol over Secure Sockets Layer (HTTPS), which encrypts the message to prevent eavesdropping. In order to access cross-scheme services and data (HTTP to HTTPS or HTTPS to HTTP), the cross-domain policy file must permit that access.
Because Silverlight typically uses the browser's networking stack, cookies for the current domain also get added to requests from your Silverlight application. This is good if you're hosting your Silverlight component in an authenticated application that uses tokens stored in a cookie. In this case, the token also authenticates the requests originating from your Silverlight application, ensuring that you can access the resources you're authorized for.
One potential problem using this method is that when a user has a cookie-based token for a given domain, any Silverlight request to that domain contains the auth cookie, even if the request is from a different Silverlight application than the one you intend. Another issue is that this method of authentication relies on the client browser having session cookies enabled—which isn't always true.
Trust and security are important for any application; before we move on to the meat of accessing data, let's make sure the browser itself is capable of doing everything you're asking of it. This question brings us to the next basic concept: limitations of the browser.
A few limitations apply to Silverlight due to its use of the networking API of the host browser. These limitations have affected browsers for years, and now they carry over into Silverlight as well when using the browser networking stack. We've already discussed the client-side nature of Silverlight and how that affects data access, so now we're going to talk about two similar limitations: connection limits and asynchronous calls.
The number of concurrent connections to a single subdomain (for example, http://10rem.net and http://images.10rem.net are two different subdomains) is limited in most browsers to two. This limit has been increased in Internet Explorer 8 to six concurrent connections; but because Silverlight runs in multiple browsers, you should still be aware of it. Because Silverlight uses the browser's networking stack for its communications by default, it's bound by the same limits. You may need a combination of resources or other approaches to ensure that this doesn't create unnecessary delays in your application. Keep in mind that the browser may be loading objects outside the scope of the Silverlight application as well, such as stylesheets, images, and JavaScript files. All these objects count toward the limit of two concurrent connections. You should keep this fact in mind, particularly when performing duplex communication as described in section 14.4.
All communication from within the Silverlight application is done asynchronously because of the Silverlight development team's decision to use the browser's networking API, and to keep the APIs tight with only one way to accomplish any given task. The most common way of making asynchronous calls requires a few simple steps, which we'll detail in the following section. Typically, all you need to do is create an event handler to be executed when the call returns.
If you want to create a more synchronous experience for your application, you can enable some kind of blocking element, such as a download-progress animation, when the call begins and then remove it once the request has returned its data. We'll discuss how to create animations in chapter 22.
Note that the asynchronous behavior can occur on multiple threads, a fact that can cause trouble when you aren't aware of it. In section 14.2.2, we'll point out where you need to be careful with which thread you're on, and show you a technique to avoid trouble. Now that we have the basics out of the way, let's get to the point of this chapter: connecting to data sources.
Nearly every application built today, even using Silverlight, needs data to accomplish its goal. In chapter 11, you saw how to take data and bind it to properties on controls, but where does that data come from? Because Silverlight executes on the client, often on the other side of a firewall, it doesn't have direct access to a database as do server-based technologies such as ASP.NET. To get access to the data from within Silverlight, you need to use a proxy of some sort, typically a web service. A web service is a resource made available to clients using a defined protocol. Most web services fall into two categories: SOAP and REST. We'll explain these popular formats, and how to use them, in this section.
When you think of a classic web service, you're thinking about SOAP. SOAP services follow a strict protocol that defines the format in which messages are passed back and forth. Silverlight has great support for SOAP Services, supporting the WS-I Basic Profile 1.0 (SOAP 1.1 over HTTP), SOAP 1.2, and WS-Addressing 1.0, as well as a small subset of WS-Security. Using SOAP services in Silverlight allows for both the simplest implementation and most powerful data-transfer mechanism of any service type through the use of the service reference. Over the next few pages, you'll create a proxy object for the service, call a method on it, and download the results. After you've created and used a proxy to connect to a SOAP service, you'll be amazed at how simple yet powerful this capability is.
Note
SOAP originally stood for Simple Object Access Protocol, but that definition fell into disuse and was officially dropped with version 1.2 of the W3C SOAP standard.
The easiest way to connect to a service is through a service reference proxy. If the web service you're connecting to supports Web Services Description Language (WSDL), Visual Studio can read that information and create a proxy in your application for you. Creating a service reference in your Silverlight application takes three simple steps:
In Visual Studio 2010, right-click your Silverlight project and choose Add Service Reference.
This brings up the Add Service Reference dialog box. On this form, you can either type in the URI of the service you wish to connect to and click the Go button or, if the services are part of the same solution, click the Discover button. Either option tells Visual Studio to poll the chosen location for available services and analyze their signatures. When the services have been displayed, you can open them and look at what methods are available on each service. You can then enter in the text box a namespace by which you want to refer to the service and click OK to create the proxy.
You can modify more advanced settings either by clicking the Advanced button in the previous dialog or by right-clicking the service reference and selecting Configure Service Reference. One particularly useful capability of this form is the ability to change the collection types returned by the service. The default collection type can vary depending on the service you're connecting to, but you can also change it to use other collection types, even generics.
When the service reference is created, Visual Studio also adds references to the System.Runtime.Serialization and System.ServiceModel assemblies. These are used by Silverlight in connecting to web services and in serializing and deserializing the SOAP message.
When you've created your service reference, it's easy to use for both sending and receiving data. First, let's talk about calling SOAP services using the service reference you just created.
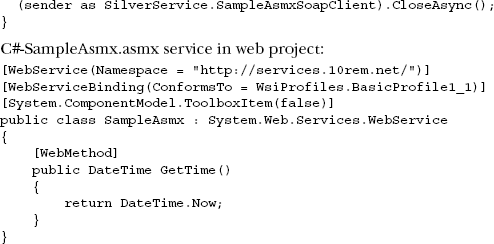
Connecting to and downloading data from a simple SOAP service is easy. You need to add two Using statements to your page, one for System.ServiceModel and another for System.ServiceModel.Channels. Next, you need to create a proxy to the service using the service reference as created in the previous section. Name the service reference namespace SilverService for this example. Then, you add an event handler to catch the return of the asynchronous call to the exposed method on the service. These steps are demonstrated in listing 14.1.
This shows the entire process of creating the proxy ![]() , adding an event handler
, adding an event handler ![]() , calling an asynchronous method
, calling an asynchronous method ![]() , and handling the results
, and handling the results ![]() . In this example, the SOAP service you're connecting to exposes a method called
. In this example, the SOAP service you're connecting to exposes a method called GetTime, which accepts no input properties and outputs a DateTime of the current time. You first create a Binding of type BasicHttpBinding. This tells the proxy that the service you're connecting to uses SOAP 1.1. The default constructor for BasicHttpBinding creates a Binding with no security. An optional parameter on the constructor accepts a BasicHttpSecurityMode, which allows you to tell the binding how to secure itself; for example, you can tell the binding to use SSL when transmitting the SOAP message. You also create an EndpointAddress that points to the URI of the service you're about to call. Finally, you create the proxy using the service reference created earlier and pass into it the binding BasicHttpBinding and the initialized EndpointAddress objects.
Note
The port number for your development-mode web service may change from time to time, breaking any service references. To force the port number to stick, right-click the web project, select Properties, and click the Web tab. Then, select the option to always use the specified port number.
Next, you need to add an event handler to be called when your asynchronous method call returns. You can do this by using the Visual Studio shortcut of pressing the + key, then the = key, and then pressing Tab twice after selecting the GetTimeCompleted event on your proxy. Using this shortcut automatically finishes the event handler declaration for you and creates a stubbed method as the event handler. Finally, you call the Get-TimeAsync() method on the proxy to begin the asynchronous call to the service. IntelliSense will show you a [webmethod]Completed event and a [webmethod]Async() method for each method exposed by the SOAP service. When you created the service reference in the previous step, Visual Studio queried the service to see what methods were available and made proxy methods for each of them.
After the service returns, the method declared as the event handler-proxy_GetTimeCompleted-gets called with the results. Because the method is outputting the results as a Datetime object, you can convert it to a string using standard .NET conversion methods, which you can then assign to the Text property of a TextBlock. The only other task to perform in the return method is to close out the connection using the CloseAsync() method on the proxy. Garbage collection will technically come through and close any old connections, but it's good programming practice to close any connection when you're done using it.
And that's all there is to it—you've now connected to a SOAP service, called a method on it, and displayed the results. Sending data to a SOAP service is just as easy.
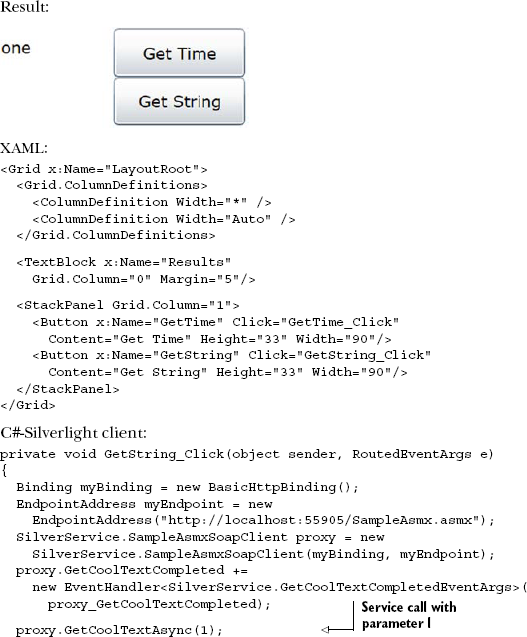
If you're thinking that all you need to do to send data to a SOAP service using a service reference is to include a parameter in the method call, you're right. Let's look at listing 14.2 for an example.
Listing 14.2 builds on the code from listing 14.1. This is an example of sending of a single int as a parameter to the GetCoolText method on the web service. This approach is fine for sending a simple data value, but what about complex data types? Still no problem.
Sending and receiving complex data types over a SOAP service is also a simple matter. When you created the service reference, the signatures for objects used in the SOAP message were automatically analyzed and a client-side proxy made for those as well. With this proxy, you can instantiate objects of that type in your application (see listing 14.3).
Example 14.3. Using complex data types with a SOAP service
Service:
[WebMethod]
public void SetSomething(int count, WsUser myObject)
{
  //Perform database operations here
}

...
public class WsUser
{
  public int Id { get; set; }
  public string Name { get; set; }
  public bool IsValid { get; set; }
}
C#:
private void UploadUser()
{
  Binding myBinding = new BasicHttpBinding();
EndpointAddress myEndpoint =
new EndpointAddress("http://localhost:55905/SampleAsmx.asmx");
SilverService.SampleAsmxSoapClient proxy = new
SilverService.SampleAsmxSoapClient(myBinding, myEndpoint);
SilverService.WsUser myData = new
SilverService.WsUser()
{ Id = 3, Name = "John", IsValid = true };
proxy.SetSomethingCompleted += new
EventHandler<System.ComponentModel.AsyncCompletedEventArgs>
(proxy_SetSomethingCompleted);
proxy.SetSomethingAsync(1, myData);
}
void proxy_SetSomethingCompleted(object sender,
System.ComponentModel.AsyncCompletedEventArgs e)
{
(sender as SilverService.SampleAsmxSoapClient).CloseAsync();
}This listing shows how you can use complex data types on SOAP services from within your Silverlight application. The service itself is left as an exercise for you, and the example is illustrative only. As you can see in the web method declaration, the method SetSomething expects two parameters: an int and a WsUser. WsUser is made up of three properties. Note that both the web method and the WsUser class are part of the ASMX web service, not the Silverlight application.
Now, let's use WsUser in the example application. Because WsUser is a return type on a method, a copy of its type exists on the proxy for you to use. In this example, you create an instance of the WsUser class and fill its properties. Then, you add the instance of the object as a parameter on the asynchronous method call, SetSomethingAsync.
So far, we've shown the slightly more verbose way of calling a service, where all the endpoint information is handled in code. Silverlight provides another option: you can use the information in the ServiceReferences.ClientConfig file.
Note
ServiceReferences.ClientConfig is an XML file created automatically when you add a service reference. It's packaged into the .xap file (see chapter 3 for more on .xap files) and is deployed with your application. You may update this configuration file at any time by unzipping the .xap, changing the file, and rezipping it. Some clever developers have even come up with tools to handle this automatically; Bing them (www.bing.com) to find out more.
An example configuration file is shown in listing 14.4. The configuration file specifies, among other things, the type of encoding, the maximum receive message and buffer sizes, the binding contract, and endpoint information.
Although certainly not a requirement, this example uses the new WCF binary encoding with a WCF SOAP service on the server-a new feature enabled by default in Silverlight when using the Silverlight Enabled WCF Service template mentioned in section 14.5.1. This reduces the message size considerably in situations where the server and client aren't using GZIP compression on the content and the server is running .NET 3.5 SP1 or above.
In addition, the server side is able to handle more requests due to the binary nature of the messages. The downside is that the service clients are restricted to those aware of the proprietary format, unless you add a second endpoint.
When using the information from the .ClientConfig file and eliminating all the setup code, your client-side code becomes considerably simpler, as shown in listing 14.5.
The code has been simplified considerably because you externalize the settings. This time around, you don't need to create bindings or endpoints and pass them in to the proxy. Whether this is appropriate for your situations comes down to whether you want to handle the bindings in code or in configuration files.
In code, you can get the address of the current server and base your service call on that, if appropriate. But if you want to change that algorithm and, say, move from www.mydomain.com/services to api.mydomain.com, you'll need to change code and recompile/redeploy the client.
In configuration, you can set the URL to be anything you wish, but you must remember to change it when moving between servers (such as from development to test to staging to production). Given that this doesn't require a recompile and the format is XML inside a standard zip, there's little risk to this approach.
That's all it takes to use SOAP services in Silverlight. Silverlight isn't limited to SOAP services. Next, we'll discuss consuming REST services through Silverlight, a topic that opens up a whole new arena of data providers.
Representational State Transfer, or REST, means several things; in this case, it refers to the approach of making services accessible through a set of simple URIs and HTTP verbs. Before the days of web services and stateful web applications, everything on the web was RESTful, meaning that all traffic over HTTP used one of the HTTP verbs to define its purpose, and all calls were complete without requiring server-side state. Over the years, the use of these verbs dwindled down to nearly all traffic using only the GET and POST verbs for requesting a page and submitting form data, respectively. Recently there's been a trend toward moving simple web services to a simpler framework.
Many web service providers incorrectly use the term REST to mean any service that isn't SOAP. The main thing to realize is that the URI, and possibly the HTTP verb, may change depending on the action being performed. Typically, a creator of RESTful services will try to follow an intuitive structure where the URI first contains a type followed by an instance. For example, a URI with the structure http://www.arestfuldomain.com/Users might return an array of user records, whereas the URI http://www.arestfuldomain.com/Users/JohnSmith might return a single user record for John Smith. This isn't a rule of REST services; it's more of a guideline.
Silverlight currently supports only the GET and POST verbs when using the default networking stack (see the end of this chapter for more options). This is another limitation of using the browser's networking stack. Luckily, because this is a common browser limitation, most service creators are aware of it and try to use those two verbs for all actions.
In the previous section, you saw how to use service references to create proxies to SOAP services. Consuming a REST service takes a little more work on the side of the Silverlight developer. Silverlight nicely handles calling RESTful services through the Http-WebRequest object that you're already familiar with. In this section, we'll show you how to use this class to read data from and send data to a RESTful service. The asynchronous nature of these calls can cause problems accessing the UI, so let's solve that first.
Note
You can also use the simpler WebClient class for accessing RESTful services. Because HttpWebRequest is both more complex and more powerful, and therefore requires an example, we'll cover that here.
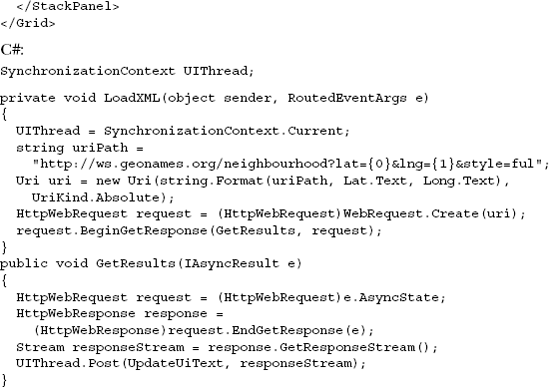
The asynchronous nature of Silverlight web service calls can create threading problems for the developer. When you're dealing with service reference-generated proxies, threading isn't an issue; when you're creating the connection yourself, you have to deal with this part as well. When you attempt to access UI elements directly within callback methods, you get a threading exception. You deal with this by creating a class-level variable of type SynchronizationContext, which gives you a handle back to the correct thread to do UI updates:
private SynchronizationContext UIThread;
private void btnSingleXml_Click(object sender, RoutedEventArgs e)
{
  UIThread = SynchronizationContext.Current;
  ...
  request.BeginGetResponse(SingleXmlCallBack, request);
}
private void SingleXmlCallBack(IAsyncResult result)
{
  ...
  UIThread.Post(UpdateUiText, responseStream);
}
private void UpdateUiText(object stream)
{
  ...
}
The first thing you do in this example is create a class variable of type SynchronizationContext. Scoping it at the class level means you'll have access to it no matter where you are in the process. Next, in the method that starts the request (we'll detail the request in the next section), you assign a reference to the current thread to the variable previously created. Then, in the callback method, you call the Post method on the SynchronizationContext variable, which has two parameters. The first parameter accepts a method to do the UI update with, and the second accepts an object. In this case, it's simplest to send the entire response stream as the second parameter. Finally, in the method called by the Post method, you can cast the received object into a Stream and perform whatever UI updates you need. You don't need to pass the entire response stream to the method that updates the UI—you can send any object. It's my personal preference to let the update method also do any deserialization; by using this technique, you ensure that your UI updates will succeed.
As you can see, as long as you know how to get back to the UI thread, there isn't a problem here. Now, let's GET to the meat of REST services.
In relation to Silverlight, although REST may dictate the method in which a resource is accessed, it doesn't dictate the format of the data received. The most common ways to return data from a RESTful web service are Plain Old XML (POX) and JSON. We'll discuss how to consume both POX and JSON in section 14.3.
The basics of calling a REST-based web service from Silverlight involve creating an HttpWebRequest object, setting its destination URI, and calling it asynchronously (see listing 14.6).
Example 14.6. Getting data from a REST service
C#:
private void GetSingleXml_Click(object sender, RoutedEventArgs e)
{
  UIThread = SynchronizationContext.Current;
  string rawPath
    = "http://www.silverlightinaction.com/Authors.svc/SingleXml/{0}";
  Uri path = new Uri(string.Format(rawPath, Input.Text),
    UriKind.Absolute);

  HttpWebRequest request = (HttpWebRequest)WebRequest.Create(path);
  request.BeginGetResponse(SingleXmlCallBack, request);
}
private void SingleXmlCallBack(IAsyncResult result)
{
  HttpWebRequest request = (HttpWebRequest)result.AsyncState;
  HttpWebResponse response
    = (HttpWebResponse)request.EndGetResponse(result);
  Stream responseStream = response.GetResponseStream();
  UIThread.Post(UpdateUiText, responseStream);
}
In this example, you make a simple request to a RESTful web service. Three steps are necessary when making a GET request, all of which are demonstrated here:
Create a
Uriobject and initialize it with the path and, optionally, theUriKind.Create an
HttpWebRequestobject for theUri.Call
BeginGetResponseon yourHttpWebRequestobject and pass it the name of a callback method, as well as theHttpWebRequestitself.
The BeginGetResponse method initiates the call to the service and registers the passed-in method as a callback method. When the response returns, that method will be called with the current HttpWebRequest being passed to it as type IAsyncResult.
In the callback method, the first thing is to cast the AsyncState of the IAsyncResult into an HttpWebRequest object. In the next statement, you call the EndGetResponse method on the request object to both end the connection and return an HttpWebResponse object. Finally, you call the GetResponseStream method of the HttpWebResponse object to get the Stream, the response to your web service call. We'll cover deserializing the Stream into useful data in section 14.3.
Most RESTful services use GET to retrieve data and POST to send it. Because the default HTTP verb used when using HttpWebRequest is GET, you need to do a few things differently when you want to perform a POST. Listing 14.7 shows the process of sending data to a REST service.
Example 14.7. POSTing data to a REST service
C#:
private void Test_Click(object sender, RoutedEventArgs e)
{
  UIThread = SynchronizationContext.Current;
  Uri path = new
    Uri("http://www.silverlightinaction.com/Authors.svc/Update/Brown",
    UriKind.Absolute);
  HttpWebRequest request = (HttpWebRequest)WebRequest.Create(path);
  request.Method = "POST";
  request.ContentType = "application/xml";
  request.BeginGetRequestStream(AddPayload, request);
}

private void AddPayload(IAsyncResult result)
{
  HttpWebRequest request = (HttpWebRequest) result.AsyncState;
  StreamWriter dataWriter =
    new StreamWriter(request.EndGetRequestStream(result));
  dataWriter.Write("<?xml version="1.0"?><Author><FirstName>Bob" +
    "</FirstName><LastName>Smith</LastName></Author>");
  dataWriter.Close();
  request.BeginGetResponse(SingleJsonCallBack, request);
}

private void SingleJsonCallBack(IAsyncResult result)
{
  HttpWebRequest request = (HttpWebRequest)result.AsyncState;
  HttpWebResponse response =
    (HttpWebResponse)request.EndGetResponse(result);
  Stream responseStream = response.GetResponseStream();
  UIThread.Post(UpdateUiText, responseStream);
}
Because REST services don't have methods, and instead deal with entities, you need to add any data to be sent to the service to the message being sent. In listing 14.7, instead of calling BeginGetResponse from the initial call, you call BeginGetRequestStream. This event handler allows you to add information to the stream after it's created but before it's sent to the service. After that's been done, you register the BeginGetResponse event handler as is done during GET operations.
Knowing how to do GETs and POSTs is only half of the battle; you need to be able to use what gets returned as well. REST services normally return either XML- or JSON-formatted data. In section 14.4, we'll talk about ways to take the response stream containing these common data formats and convert it into useful objects.
The browser stack only allows POST and GET, not DELETE or PUT. Those limitations, and the need for out-of-browser networking support, prompted the team to create a second separate networking stack: the client HTTP Stack.
Silverlight 3 introduced a second networking stack, meant primarily for use when running out-of-browser, but accessible in in-browser scenarios as well. This stack eliminates some of the restrictions of the browser-based HTTP stack.
The two stacks included in Silverlight are known as the browser HTTP stack and the client HTTP stack. As their names indicate, the browser HTTP stack goes directly through the browser for all networking calls, whereas the client HTTP stack doesn't. This opens up a plethora of new capabilities, such as additional verbs like PUT and DELETE, as well as getting around the limitations on simultaneous connections. There are some caveats, though. We'll discuss those after we go through the mechanics of using the stack.
In this section, we'll first look at how to manually create the client stack. Then, because manually creating the stack every time can be a real chore, and impossible with generated code, you'll see how to automatically select the stack at runtime. Finally, we'll look at one important difference from the browser stack: cookie management.
One way to create an instance of the ClientHttp network stack is to use the System.Net.Browser.WebRequestCreator object. That object serves as a kind of a factory and includes two static properties: BrowserHttp and ClientHttp. Call the Create method on the ClientHttp property as shown:
private void CallNetwork_Click(object sender, RoutedEventArgs e)
{
  HttpWebRequest request =
    (HttpWebRequest)WebRequestCreator.ClientHttp.Create(
    new Uri("http://api.10rem.net/Authors"));

  request.Method = "PUT";

  ...

}
This approach to creating the stack is usable only when you're using the low-level HttpWebRequest class. That's helpful, but what if you want it to automatically be used by any WebRequest-derived classes?
A second way to use the client stack is to have it automatically selected based on specific URLs or schemes. That way, any call to the specified URL or scheme will use the stack you specify. The FTP, FILE, HTTP, and HTTPS schemes are already assigned to the browser stack, but you can override them or go a more specific route and specify that the client stack should be used for any HTTP* calls to a specific web site, or a specific service at a known URL. For example, if you want all calls to 10rem.net, both regular and SSL, to use the client stack, you'd put the following early in your code:
WebRequest.RegisterPrefix(
    "http://10rem.net", WebRequestCreator.ClientHttp);
WebRequest.RegisterPrefix(
    "https://10rem.net", WebRequestCreator.ClientHttp);
After this is done, any classes that use WebRequest or a class which derives from it will automatically use the client HTTP stack you have specified.
The client stack brings along a number of enhancements, including the ability to automatically and manually set some HTTP header values previously unavailable to you.
When a HTTP request is sent across the wire, it includes a number of headers that we typically don't see. For example, if I open up Yahoo! in my browser, the request contains the following info:
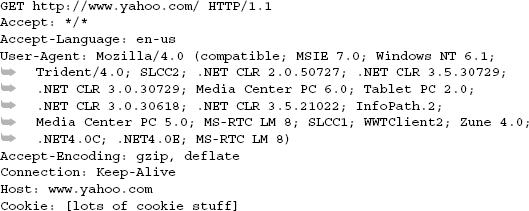
The first line is the verb and the target. In this case, we're GETting the Yahoo! home page. Most of the stuff after that is pretty standard. IE8 is sending some information about the browser in use, what formats it'll accept, the cookies, and so on. Collectively, those are called HTTP headers. New to Silverlight 4, and unique to the client networking stack, is the ability to send the HTTP Referer (sic) header with all requests, including out-of-browser network requests.
The HTTP Referer header is a web standard used to indicate the origin of a request. Often, this is used to figure out what other pages are linked to your page, or what other pages are attempting to post to your form.
Note
Don't use the HTTP Referer header to implement any type of important security check. Some browsers include utilities that allow users to eliminate the referer or replace it with one they manually input.
When using the client stack, Silverlight automatically sets the HTTP Referer to the base URL of the .xap file where the out-of-browser application originated. This is useful, because an out-of-browser application doesn't really have a URL and certainly doesn't have a hosting web page.
For example, if I access my web site from a trusted out-of-browser application (remember, in trusted applications, there's no check for a client access policy), the request headers look like this:
GET http://10rem.net/ HTTP/1.1
Accept: */*
Accept-Language: en-US
Referer: http://localhost:21597/ClientBin/RefererTest.xap
Accept-Encoding: identity
User-Agent: ...
Host: 10rem.net
Connection: Keep-Alive
I removed the user-agent for brevity; it's the same as the previous example. But note the value of the HTTP Referer header. I ran this example from Visual Studio, so the host is localhost:21597. The full path of the .xap is included as the Referer automatically.
Note
Currently, Firefox doesn't set the HTTP Referer header for any HTTP GET requests from plug-ins running in-browser. If you must have a HTTP Referer set for GET requests, you'll need to use the client stack as shown here. POST requests are handled properly.
You can't manually set the HTTP Referer header; it's one of a number of restricted headers. In addition to the Referer, Silverlight also sets headers such as the Content-Length, User-Agent, and others. Some of those, such as Content-Length, Content-Type, and Authentication, have dedicated request properties that map to the appropriate headers. It's unusual to change Content-Length and Content-Type, but setting authentication credentials is a must for any serious web application.
Many endpoints on the Web, and even more on internal networks, are protected by some sort of authentication scheme. In order to access those endpoints, you must be able to provide authentication information along with the request.
The client networking stack supports NTLM, basic, and digest authorization, allowing you to pass credentials to the endpoint of a request via the Credentials property. Listing 14.8 shows how to use credentials with the client networking stack.
Optionally, you can pass a third parameter to the NetworkCredential
constructor: the domain name. Passing a domain name is required for some forms of authentication, including NTLM. To modify listing 14.8 to work with those forms, change the NetworkCredential constructor call to include the domain, like this:
... new NetworkCredential("Pete", "password", "domain");Of course, you'd use a real username, password, and domain name in the call. It's also important to note that you have no client-side control over what type of authentication is used. If the server challenges with basic authentication, the credentials will be sent across in plain text. Unlike the full desktop API, there's no CredentialCache class that can be used to hold credentials by challenge type.
With the additional capabilities offered by this stack, such as security and the avoidance of cross-domain checks for trusted applications, it may seem like a no-brainer to use it in place of the browser stack. But there are some important differences to keep in mind. For example, the location of the download cache may be different depending on the operating system and whether you were using the default OS browser to begin with. It's not common to concern yourself with that level of detail. But one of the biggest and most important differences is the way in which cookies are handled.
In the browser stack, the browser handles all cookie management. The browser automatically sends up, with each request, the cookies appropriate to that domain and page.
When using the client stack, you need to manually manage the cookies that are sent up with each request. The HttpWebRequest class contains a CookieContainer property that's used for managing the cookies for that specific request.
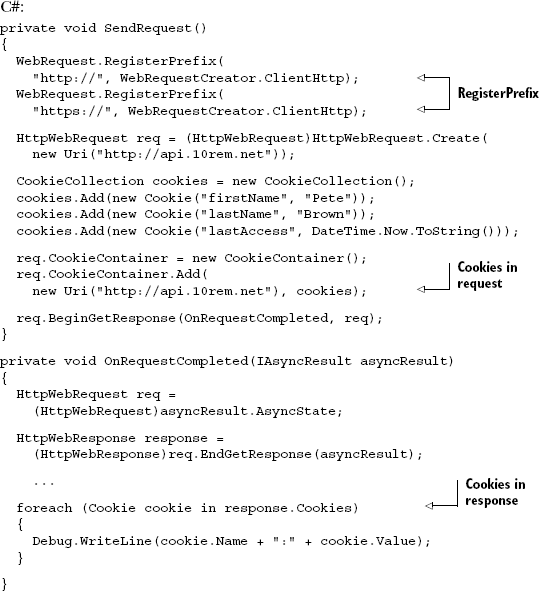
Listing 14.9 shows how to use the CookieContainer with the HttpWebRequest class, combined with the Register prefix function described in the previous section.
Managing cookies manually is pretty easy, as you saw in this example. But keep in mind that the cookies won't be shared between the two stacks. Take, for example, an application in which the user is authenticated using ASP.NET forms-based authentication. The web pages handle the authentication before the Silverlight application is displayed. Many web applications, and even larger platforms such as SharePoint, can use this model.
After the user is authenticated via the browser, the Silverlight application is displayed. If the Silverlight application then makes a network request, using the client stack, to the hosting server, the request will fail. Why? Because the ASP.NET authentication cookie, which is automatically sent up with all browser stack requests, isn't set up by the client stack request.
We've looked at two different ways to instantiate the client stack. You have the option of setting the stack preferences globally in your application or handling it on a request-by-request basis. We also looked at how to manage cookies for each request. When you're working with the client stack for all but the most basic requests, this is essential.
The client stack was originally designed for use in out-of-browser situations; but despite its limitations, it's found use in in-browser Silverlight applications as well. The stack definitely has advantages, but only if you understand the limitations.
When you get the data, regardless of form or networking stack used, you need to process it and do something useful with it. In the next section, we'll cover working with XML and JSON data in Silverlight.
We've now discussed ways to request data from both SOAP and REST services. What we haven't talked about is how to do anything with what you've received. In the case of a SOAP service using a service reference, you have strongly typed objects to deal with. In the case of a REST service, you typically receive raw XML or JSON. Luckily, Silverlight gives you several ways to take the incoming data and make it usable in your application.
In the following sections, we'll show you how to deserialize a stream containing either POX or JSON. In addition, we'll talk about a specialized way to work with feeds following either the RSS or the Atom standard.
Several examples in this section use a publicly available service hosted by www.geonames.org. This service returns geographic and demographic data in various formats including XML and JSON. Connecting to free services like this is a great way to test methods for connecting to remote systems.
Plain Old XML (POX) has been the data format of choice on the Internet for nearly a decade. The fact that it's human-readable, customizable, and platform-independent virtually guaranteed its acceptance. Due to its long life and universal acceptance, the Silverlight team built in several ways to use POX after it's available in the application.
In this section, we'll describe the three major ways to use POX content. The three built-in methods to use XML content are LINQ to XML, also known as XLINQ, Xml-Reader, and XmlSerializer. In the following examples, we'll demonstrate each of these ways to read the same data using different methods.
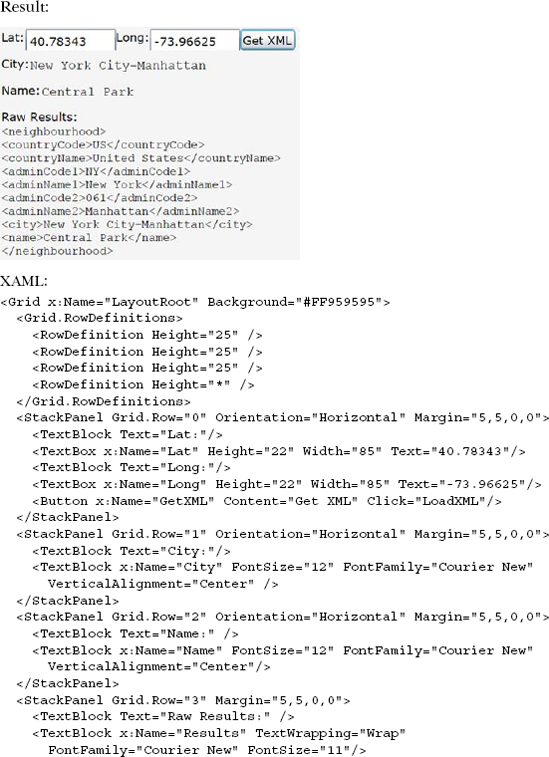
Each example that follows uses the same Silverlight application and the same web service call. First, we'll show you what you're getting and then how to deal with it. Listing 14.10 shows how to use a latitude/longitude service to get the name for a location.
In listing 14.10, you use the HttpWebRequest object to retrieve the response stream from a web service that returns POX. The following examples show different versions of the UpdateUiText method, one for each way of parsing POX.
XLINQ is a flavor of LINQ used to navigate and parse XML content. It facilitates both property and query syntax to access the nodes and attributes in a chunk of XML. Add a reference to System.Xml.Linq, and then add the following to the code-behind:
public void UpdateUiText(object stream)
{
  XmlReader responseReader = XmlReader.Create((Stream)stream);
  XElement xmlResponse = XElement.Load(responseReader);
  XElement root = xmlResponse.Element("neighbourhood");
  Results.Text = root.ToString();
  City.Text = (string)root.Element("city");
  Name.Text = (string)root.Element("name");
}
This example shows the LINQ to XML version of UpdateUiText. It shows how using XLINQ to access the data contained within individual XML elements is incredibly simple. The first step is to create an XmlReader from the response stream. You can load that into an XElement, which represents the root element. You can then access any element or attribute by name to get its value.
This is a simple example of LINQ to XML, but it can be even more powerful when used to parse larger XML structures using the query syntax. Next, let's look at using the XmlReader directly.
It's possible to use the XmlReader itself, without using a higher-level object to parse the XML for you:
public void UpdateUiText(object stream)
{
  XmlReader responseReader = XmlReader.Create((Stream)stream);
  responseReader.Read();
  responseReader.ReadToFollowing("city");
  string city = responseReader.ReadElementContentAsString();
  responseReader.ReadToFollowing("name");
  string name = responseReader.ReadElementContentAsString();
  responseReader.ReadEndElement();
  responseReader.ReadEndElement();
  City.Text = city;
  Name.Text = name;
}
This example uses the plain XmlReader to step through the returned XML to find the values you want. The approach is rather clunky but does work. Because the XmlReader is forward-only, you have to be careful to get everything you need from the information the first time through-a potentially cumbersome task on complex documents.
In the next example, you can also see the same results using the XmlSerializer from the System.Xml.Serialization namespace, which is included in the SDK, so you need to add a reference to use it in your application.
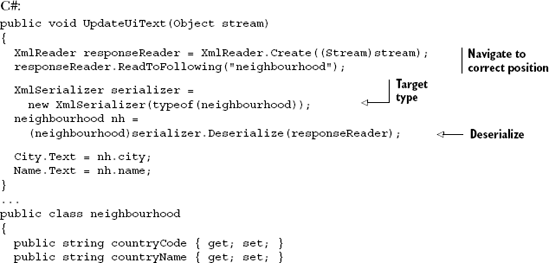
The XmlSerializer provides a way to convert an XmlReader into strongly typed objects. This approach takes a little more setup but is incredibly useful in many business applications. Listing 14.11 shows how to use the XmlSerializer to parse an XML document.
You can see in listing 14.11 that using an XmlSerializer allows you to create a strongly typed object from the incoming XML data. To use this approach, you need to define a class that matches the format of the incoming XML. This class can be defined in your application, in a referenced class library, or in a service reference proxy. The first step is to move your XmlReader to the correct location. You also need to create a new XmlSerializer and initialize it with the target type you want the XML deserialized into. The final step is to use the Deserialize method on the XmlSerializer instance you just created and pass in the XmlReader. The Deserialize method returns an object of the type it's defined as or, if the deserialization failed, null.
Now that you've seen how to use POX, let's look at another common data format. In the next section, you'll learn how to use JSON-formatted data. JSON can be returned from a RESTful service just as easily as XML can, so let's dig into that format now.
If you've worked with Ajax, it's likely that you're already familiar with JSON. JSON provides a relatively simple way to create data objects using JavaScript. Because JSON is already prevalent in client-side programming and is used as the return type from my public services, Microsoft has made a simple way to convert managed objects into and out of JSON objects.
The next example shows a sample of what a JSON object looks like. You can accomplish this conversion in a couple ways, such as using a DataContractJsonSerializer or even using LINQ syntax against a JsonObject. For the example, let's use the same method to load the data as was used in listing 14.10, but change the URI to
ws.geonames.org/neighbourhoodJSON?lat={0}&lng={1}The resulting JSON response looks like this:
{
  "neighbourhood": {
    "adminName2": "New York County",
    "adminCode2": "061",
    "adminCode1": "NY",
    "countryName": "United States",
    "name": "Central Park",
    "countryCode": "US",
    "city": "New York City-Manhattan",
    "adminName1": "New York"
  }
}
This example shows a simple but typical JSON object. As you can see, the returned JSON represents the same object as the XML returned in listing 14.10, but in a more compact form. Luckily, the methods for converting the JSON object into a useful format are similar as well. Let's start by taking a look at using the JsonObject syntax.
As with XML, there's more than one way to use JSON-formatted data returned from a web service. The JSON being deserialized in these examples is shown in the previous example. The ways of working with JSON data differ greatly, as the following examples will show:
public void UpdateUiText(Object stream)
{
  JsonObject nh = (JsonObject)JsonObject.Load((Stream)stream);
  City.Text = nh["neighbourhood"]["city"];
  Name.Text = nh["neighbourhood"]["name"];
  Results.Text = nh.ToString();
}
One way to read JSON data is by using JsonObject.Load to convert the stream into an object based on the structure found within the stream. To get access to the JsonObject, you need to add a reference to the System.Json assembly and add a Using statement for the same namespace to the page. After the JsonObject has been created, it's a matter of using the name of the property you want as the key. If the property is nested, you add more keys, as when accessing the city property inside the Neighbourhood class.
Another way to access returned JSON involves using the DataContractJsonSerializer to deserialize the stream into objects of predefined types. This new object to serialize and deserialize JSON is included in the System.Runtime.Serialization.Json namespace and in the System.ServiceModel.Web assembly. The two methods of the DataContractJsonSerializer are ReadObject and WriteObject, which deserialize and serialize JSON objects respectively.
The following example again uses the Neighbourhood class defined earlier:
public class MyResults
{
  public Neighbourhood neighbourhood { get; set; }
}
...
public void UpdateUiText(Object stream)
{
  DataContractJsonSerializer ser =
    new DataContractJsonSerializer(typeof(MyResults));
  MyResults nh = (MyResults)ser.ReadObject((Stream)stream);
  City.Text = nh.neighbourhood.city;
  Name.Text = nh.neighbourhood.name;
}
This example shows the classes that hold the data after it's deserialized, as well as the method that does the work. This approach is simple. First, you instantiate the
DataContractJsonSerializer with the type of object you want filled. All that's left is to pass the response stream into the ReadObject method of the DataContractJsonSerializer you just created. You access the data as you would with any other strongly typed .NET object. In the case of two well-known schemas, RSS and Atom, there's no need to deserialize the stream yourself. We'll look at these specialized classes, which make consuming published feeds easy and straightforward.
You've seen how to download data and various ways to parse the returned data streams into usable pieces. Let's now talk about a few special networking cases. Some SOAP services can be crafted in such a way as to provide additional functionality beyond basic SOAP. Windows Communication Foundation (WCF) is part of the .NET Framework 3.0 and provides a framework for creating SOAP web services. Although this technology is fairly new, it's growing in usage.
Another special case is that of two-way services, also known as push services. Silverlight supports two kinds of push technology in the form of WCF duplex services and TCP sockets. Although the topics in this section are more complex, the abilities to add push communications and advanced error handling on service calls make this all good to know.
Connecting to a WCF service is accomplished in the same way as connecting to any other SOAP service, as described in section 14.2.1. Creating a service reference allows the use of a client proxy, which exposes all referenced types and methods to the Silverlight application. WCF can expose features not allowed in Silverlight; so, when you're creating a WCF service for Silverlight consumption, there are a few restrictions. We've already stated that Silverlight supports the 1.1 version of the SOAP protocol with the addition of optional binary encoding. Another limitation is that Silverlight doesn't support the WS-* series of protocols made available through WCF.
Due to Silverlight's service limitations, Visual Studio has a special template for creating a WCF service to be consumed by Silverlight called Silverlight-Enabled WCF Service. Describing how to create a WCF service is beyond the scope of this book, but the template should help ensure that the service is consumable by Silverlight. If you create your own WCF service, you have the ability to enhance the error-handling capability of calls to it from Silverlight.
One of the nice things about WCF is the ability to throw exceptions on a service call. Unfortunately, Silverlight doesn't support this. Any exception thrown by the service gets translated by the browser into a 404 File Not Found error. The creator of the WCF service can still add error messages by adding them as an OUT parameter.
When the signature of the WCF service contains an OUT parameter, you can access it directly through the EventArgs on the event handler for the completed call, as shown in listing 14.12.
Example 14.12. Reading an out parameter from a WCF service
WCF C#:
[OperationContract]
string GetSomeData(int Id, out MyErrorObject myError);
Silverlight C#:
void serviceProxy_GetSomeDataCompleted(object sender,
  GetSomeDataCompletedEventArgs e)
{
  if (e.Error != null)
  {
    Message.Text = e.Error.Message;
  }
  if (e.myError != null)
  {
    Message.Text = e.myError.Message;
  }
  else
  {
    Message.Text = e.Result.ToString();
  }
}
In this example, you see a standard [ServiceMethod]Completed method like those shown throughout this chapter. This example also demonstrates error trapping and a custom out parameter.
Now that you've seen standard WCF services, let's dig deeper and look at how WCF duplex services can enable you to push data from a server to Silverlight.
So far, we've talked about ways to send and receive data that requires the Silverlight application to initiate each individual request. A couple of options allow the server to push data directly to your application. Duplex WCF services and sockets each provide a channel that allows properly configured server resources to send data without an explicit client request each time.
Duplex services give the server the ability to send, or push, data directly to the client as it becomes available. Ajax applications have to send a request for updates to the server that execute on a loop with a timer. This approach, known as polling, creates overhead, both in your application and on the network, that can be avoided by using these techniques.
Duplex communication is possible in Silverlight using properly configured WCF services. This is useful if you're building an application that needs to receive notifications of changed properties on the server, such as when scores change in a sporting event, or an open record changes in a database. To enable duplex communication within Silverlight, a pair of new assemblies, both named System.ServiceModel.PollingDuplex.dll, need to be referenced-one by the server application hosting the duplex service and the other by your Silverlight application. They're identifiable by their location within the Silverlight SDK, because one is in the LibrariesServer path and the other is in the LibrariesClient path.
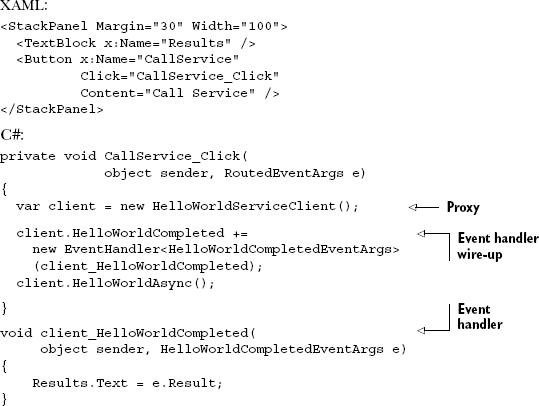
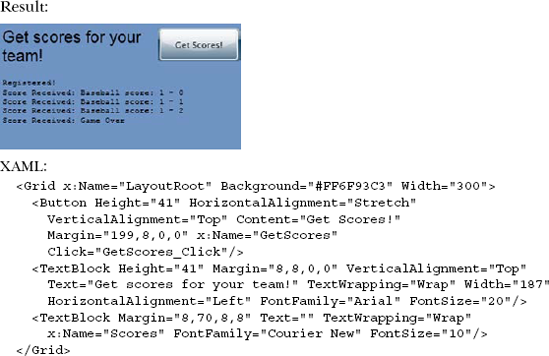
See the source code at Manning.com for everything required to set up a polling duplex service in a web project. When you have a functioning WCF service set up to enable duplex communication, let's attach it to a Silverlight application. In the test application, a Button initiates the duplex communication and a TextBlock displays the results, so the XAML is simple. Here, you're building a simple application that registers with the service to get updates on scores from a game (see listing 14.13).
The only thing of note in the XAML is that the Click attribute of the button points to the GetScores_Click method, which we'll discuss in listing 14.14. In this example, you grab a link to the current SynchronizationContext before beginning your asynchronous operations. This ensures that you always have a way to update the user interface.
In this example, you start the process of binding to a duplex web service. You begin by creating a PollingDuplexHttpBinding object, on which you set the timeout properties. You then use that polling object to create an IChannelFactory of type IDuplex-SessionChannel. The next step is to begin the asynchronous call using the BeginOpen method of the factory you just created.
The PollingDuplexHttpBinding constructor accepts an optional parameter that allows you to specify either single messages per poll or multiple messages per poll. If you want to support HTTP message chunking-multiple messages per poll-you can pass the parameter in to the constructor like this:
var poll = PollingDuplexHttpBinding(
              PollingDuplexMode.MultipleMessagesPerPoll);
Using the multiple messages option can significantly reduce the round trips for services that typically have more than one message waiting in response to a poll, allowing the service to scale better.
One thing you'll see throughout these samples is the calling of CompletedSynchronously immediately after the asynchronous call. You do this in case the response is immediate, as can occur for some small asynchronous operations. With this in mind, note that all the asynchronous calls are to methods that also check the CompletedSynchronously property and then either return or call the proper next method. Here's an example of one such method:
void OnOpenFactoryComplete(IAsyncResult result)
{
  if (result.CompletedSynchronously)
    return;
  else
    OpenTheChannel(result);
}
For the rest of this sample, we won't show the On[action]Completed methods, because they all follow the pattern of this example. The next step is to open the channel with the WCF service and to begin polling it for queued messages, as in listing 14.15.
Example 14.15. Opening the duplex channel and establishing polling
C#:
void OpenTheChannel(IAsyncResult result)
{

  IChannelFactory<IDuplexSessionChannel> channelFactory =
    (IChannelFactory<IDuplexSessionChannel>)result.AsyncState;

  channelFactory.EndOpen(result);

  IDuplexSessionChannel channel = channelFactory.CreateChannel(new
    EndpointAddress("http://localhost:51236/ScoreService.svc"));

  IAsyncResult channelOpenResult = channel.BeginOpen(new
    AsyncCallback(OnOpenChannelComplete), channel);

  if (channelOpenResult.CompletedSynchronously)
  {
    StartPolling(channelOpenResult);
  }
}

void StartPolling(IAsyncResult result)
{
  IDuplexSessionChannel channel =
    (IDuplexSessionChannel)result.AsyncState;
  channel.EndOpen(result);

  Message message =
    Message.CreateMessage(channel.GetProperty<MessageVersion>(),
    "Silverlight/IScoreService/Register","Baseball");

  IAsyncResult resultChannel = channel.BeginSend(message,
    new AsyncCallback(OnSendComplete), channel);

  if (resultChannel.CompletedSynchronously)
  {
    CompleteOnSend(resultChannel);
  }
  PollingLoop(channel);
}
The method OpenTheChannel in this code shows where you define the service you're attempting to connect to. It's assigned as an endpoint on the duplex channel. The StartPolling method creates the SOAP message for the initial call and sends it to the service.
Listing 14.16 shows that CompleteOnSend receives the response from the initial call. This is also the first use of the uiThread SynchronizationContext to update text in the XAML.
Example 14.16. Looking for messages
C#:
void CompleteOnSend(IAsyncResult result)
{
  IDuplexSessionChannel channel =
    (IDuplexSessionChannel)result.AsyncState;
  channel.EndSend(result);
  _uiThread.Post(UpdateScore, "Registered!" + Environment.NewLine);
}

void UpdateScore(object text)

{
  Scores.Text += (string)text;
}

void PollingLoop(IDuplexSessionChannel channel)
{
  IAsyncResult result =
    channel.BeginReceive(new AsyncCallback(OnReceiveComplete),
    channel);
  if (result.CompletedSynchronously)
    CompleteReceive(result);
}
The PollingLoop method assigns CompleteReceive (see listing 14.17) as the method to handle messages received from the duplex service and then closes the channel when the game is over.
Example 14.17. Reading the message
C#:

void CompleteReceive(IAsyncResult result)
{
  IDuplexSessionChannel channel =
    (IDuplexSessionChannel)result.AsyncState;
  try
  {
    Message receivedMessage = channel.EndReceive(result);
    if (receivedMessage == null)
    {
      _uiThread.Post(UpdateScore, "Channel Closed");
    }
    else
    {
      string text = receivedMessage.GetBody<string>();
      _uiThread.Post(UpdateScore, "Score Received: " +
        text + Environment.NewLine);

      if (text == "Game Over")
      {
        IAsyncResult resultFactory =
            channel.BeginClose(new AsyncCallback(OnCloseChannelComplete),
            channel);
        if (resultFactory.CompletedSynchronously)
        {
          CompleteCloseChannel(result);
        }
      }
      else
      {
        PollingLoop(channel);
      }
    }
  }
  catch (CommunicationObjectFaultedException)
  {

   _uiThread.Post(UpdateScore, "Channel Timed Out");
 }
}

void CompleteCloseChannel(IAsyncResult result)
{
  IDuplexSessionChannel channel =
    (IDuplexSessionChannel)result.AsyncState;
  channel.EndClose(result);
}
Creating and consuming a duplex-enabled WCF service take more effort than a standard SOAP service, but there are definitely benefits. The ability to open a channel to the server to get requests as they're available is powerful. Another approach you can take to accomplish this uses sockets, which we'll discuss next.
We've already discussed using a specially configured WCF service to enable push communications, so now let's talk about using sockets for the same purpose. A socket is a communications endpoint that enables a connection to be established. After it's established, information can flow in either direction along the open channel. The only socket protocol supported by Silverlight is TCP, and the ports are restricted to the range of 4502–4534 using IPv4 or IPv6 addresses.
Sockets require a clientaccesspolicy.xml file with a few changes. The resource element isn't used and is replaced with the socket-resource element. Both element types may exist in the file and apply the style to the specific type or request. The following is an example of a simple client access policy giving access to sockets using TCP over port 4502:
<?xml version="1.0" encoding="utf-8"?>
<access-policy>
  <cross-domain-access>
    <policy>
      <allow-from>
        <domain uri="*"/>
      </allow-from>
      <grant-to>
        <socket-resource port="4502" protocol="tcp"/>
      </grant-to>
    </policy>
  </cross-domain-access>
</access-policy>
Your Silverlight application will typically be served up from port 80, a web server. Sockets, on the other hand, don't require a web server to be present and are on ports other than 80. For those reasons, you must serve up a sockets policy file, because every call is considered cross-domain (or at least cross-port).
You have two options for serving up the policy file. You may either host it on a web server on port 80 on the same IP address as the sockets server, or on a sockets server on port 943. Typically, you'll set up a separate thread or a separate socket server that listens for a connection on 943, sends the socket policy file, and closes the connection.
Before we move on to opening the connection, refer to this book's page on Manning. com for the source code for a simple sockets server.
Opening a socket connection with a socket server can be done in a few simple steps that are similar to the other forms of communicating you've already seen. The first step is to open the socket. Listing 14.18 shows how to open the socket on the client.
Example 14.18. Opening the socket connection on the client
C#:
public void OpenTheSocket()
{
  DnsEndPoint tcpEndpoint =
    new DnsEndPoint(Application.Current.Host.Source.DnsSafeHost, 4502);
  Socket tcpSocket = new Socket(AddressFamily.InterNetwork,
    SocketType.Stream, ProtocolType.Tcp);
  SocketAsyncEventArgs socketArgs = new SocketAsyncEventArgs();
  socketArgs.UserToken = tcpSocket;
  socketArgs.RemoteEndPoint = tcpEndpoint;
  socketArgs.Completed +=
    new EventHandler<SocketAsyncEventArgs>(socketArgs_Completed);
  tcpSocket.ConnectAsync(socketArgs);
}
The example creates an endpoint and a socket and then using them to asynchronously request a connection to the remote socket server. You use Application.Current. Host.Source.DnsSafeHost to get the IP address of the host of the Silverlight application in a form usable for creating a socket endpoint. Using this technique to create the endpoint is only useful when the socket and the Silverlight application are hosted in the same location.
Sockets are bidirectional in nature. After you've requested the connection, you need to handle the response. Listing 14.19 shows how to handle the incoming response on the client.
Example 14.19. Handling the socket response
C#:
public void socketArgs_Completed(object sender,
  SocketAsyncEventArgs receivedArgs)
{
  switch (receivedArgs.LastOperation)
  {
    case SocketAsyncOperation.Connect:
      if (receivedArgs.SocketError == SocketError.Success)

     {
       byte[] response = new byte[1024];
       receivedArgs.SetBuffer(response, 0, response.Length);
       Socket socket = (Socket)receivedArgs.UserToken;
       socket.ReceiveAsync(receivedArgs);
     }
     else
       throw new SocketException((int)receivedArgs.SocketError);
     break;

     case SocketAsyncOperation.Receive:
       ReceiveMessageOverSocket(receivedArgs);
       break;
  }
}
You can determine the type of response by evaluating the value of the LastOperation property of SocketAsyncEventArgs, as shown in table 14.2.
Table 14.2. SocketAsyncEventArgs LastOperation values
Value | Description |
|---|---|
| Connection not yet established |
| Connection established |
| Packets received |
| Packets sent |
Now you need to set up the connection to receive data, as shown here:
public void ReceiveMessageOverSocket(SocketAsyncEventArgs receivedArgs)
{
  string message = Encoding.UTF8.GetString(receivedArgs.Buffer,
    receivedArgs.Offset, receivedArgs.BytesTransferred);
  UIThread.Post(UpdateUIControls, message);
  Socket socket = (Socket)receivedArgs.UserToken;
  socket.ReceiveAsync(receivedArgs);
}
When the message comes in, it needs to be converted into the correct format (a string, in this case); it can then be deserialized using any of the methods described in previous sections, depending on the format of the incoming data.
In additional to the traditional point-to-point connection offered by the Socket class, Silverlight supports multicast sockets where there may be many broadcasting servers or a single broadcasting server, sending to multiple clients.
The System.Net.Sockets namespace includes another type of socket implementation: UDP multicast sockets. IP multicast is a component of the core IP protocols, supporting one-to-many communication over IP, most often using UDP. Multicast is an efficient way for forwarding the IP datagrams to many receivers, enabling the service to scale out to more connected clients.
IP multicast has a dependency on the routers and other equipment in use between the service and the connected clients. That equipment must all support IP multicast in order for the service to function. Luckily, most modern hardware and firmware implementations support IP multicast.
A common scenario for IP multicast is the virtual classroom. In those cases, you may have hundreds or even thousands of clients connected, watching a single streaming video and receiving updates from virtual whiteboards, teacher notes, and public discussion streams.
Silverlight supports two types of multicast protocols, described in table 14.3.
Table 14.3. Multicast support in Silverlight
Client | Protocol and description |
|---|---|
| Internet Standard Multicast (ISM) or Any Source Multicast (ASM). This client can receive multicast traffic from any source in a multicast group. |
| Source Specific Multicast (SSM). This client can receive multicast traffic from a single source. |
The Any Source Multicast (ASM) approach enables a single client to receive traffic from any source in a single multicast group. An example of this might be a virtual meeting with multiple broadcasters or an event with several cameras and commentary, all set up as individual servers in the same group.
When Silverlight first attempts to join a multicast group, it sends out an announcement message in the form of a UDP packet to port 9430. In the any-source model, this goes to the group, and any responder in the group can send the ok back to port 9430.
Listing 14.20 shows the basics of connecting to a multicast group in preparation for receiving data.
Example 14.20. Opening a connection using ASM
C#:
private void OpenMulticastConnection()
{
  IPAddress groupAddress = IPAddress.Parse("224.156.5.5");
  int localPort = 1212;

  var client = new UdpAnySourceMulticastClient(
                                 groupAddress, localPort);

  client.BeginJoinGroup(OnBeginJoinGroup, client);

}

private void OnBeginJoinGroup(IAsyncResult asyncResult)
{
  UdpAnySourceMulticastClient client =
    (UdpAnySourceMulticastClient)asyncResult.AsyncState;

  client.EndJoinGroup(asyncResult);

  ...
}
In addition to the any-source approach, you can also designate that you want to listen only to a single server using the Source Specific Multicast (SSM) model.
The SSM approach is more common than the any-source model. Of course, at the time of this writing, neither is particularly common. The source-specific model has been used for broadcasting video and even software images on large campuses and in some organizations. The benefit is the massive savings in bandwidth as compared to more traditional means.
When Silverlight first attempts to join a multicast group, it sends out an announcement message in the form of a UDP packet to port 9430; but unlike the any-source model, this packet goes directly to the single source IP.
Opening the connection and joining the multicast group is similar to the anysource approach, but the constructor takes in the IP address of the single source in addition to the group information.
Listing 14.21 shows how to connect to a multicast group and target a single source address as the address to be listened to.
Example 14.21. Opening a connection to a single source
C#:
private void OpenMulticastConnection()
{
  IPAddress sourceAddress = IPAddress.Parse("192.168.1.1");
  IPAddress groupAddress = IPAddress.Parse("224.156.5.5");
  int localPort = 1212;

  var client = new UdpSingleSourceMulticastClient(
                   sourceAddress, groupAddress, localPort);

  client.BeginJoinGroup(OnBeginJoinGroup, client);
}

private void OnBeginJoinGroup(IAsyncResult asyncResult)
{
  UdpAnySourceMulticastClient client =
    (UdpAnySourceMulticastClient)asyncResult.AsyncState;

  client.EndJoinGroup(asyncResult);

  ...
}
The differences between listing 14.20 and 14.21 are minimal, coming down to the inclusion of the additional IP address in the constructor.
Note
MSDN Code Gallery includes examples of both a multicast server and a multicast client. The full examples are impractical to place in a book due to their length. You can download the SilverChat examples from http://code.msdn.microsoft.com/silverlightsdk.
Multicast is just starting to take off in the media, education, and large business sectors. If you're looking at streaming media to a large number of clients, streaming stockticker quotes, or building your own webcasting software, you'll definitely want to learn more about multicast socket development. Fortunately, Silverlight will be able to support you as a good client in those scenarios.
Sockets in general are a great choice when you want to have complete control over the messaging, such as you might when creating a game and you want to have the tightest possible real-time messaging protocol. WCF duplex is a good choice when you're willing to trade wire-level control for the ability to use all the great features, such as automatic serialization, that WCF provides. Different problems call for different solutions, sometimes within the same physical application. It's great to see Silverlight offer such a spectrum of capabilities you can use when connecting applications to the outside world.
Sockets and WCF duplex are great for bidirectional communication between a Silverlight client and a server, or via two machines using the server as a proxy. Straight SOAP and REST are useful when consuming public or application-specific APIs. Silverlight has another mechanism, similar to sockets, that you can use to connect two Silverlight applications running on the same client machine.
The new local connection API in System.Windows.Messaging, introduced in Silverlight 3, allows communication between two or more instances of the Silverlight plug-in, whether they're on the same page in the same browser instance, on different pages in different browsers, or even some in browsers and others running out-of-browser.
In this example, you'll set up a pair of applications, the second of which echoes the text entered into a TextBox on the first. Much like socket programming, you'll need to designate one application or piece of code as a sender and another as a receiver. You'll start with the receiver.
Each receiver has a unique name. Think of it as the address of an endpoint. You define the name when creating the LocalMessageReceiver object as shown:
private LocalMessageReceiver _receiver =
        new LocalMessageReceiver("InAction");
The overload for the constructor enables you to indicate whether you want to listen only to specific domains or to all domains (what's called the namescope, not to be confused with XAML namescope), and to provide a list of acceptable domains. Additionally, it provides the same ability to supply a receiver name.
In this case, the receiver is named InAction. Remember, this name needs to be unique within the namescope. If it isn't, you'll get a ListenFailedException when executing the next step, listening for senders:
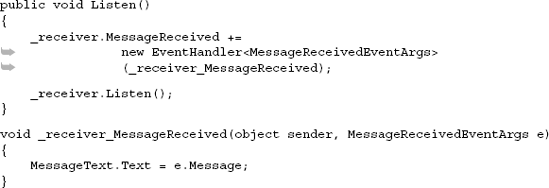
Much like the other communications APIs, you first wire up an event handler, call a method, and then wait for a response within the handler. As is often the case, the event args class specific to this process—MessageReceivedEventArgs—includes a number of additional properties, shown in table 14.4.
Table 14.4. MessageReceivedEventArgs properties
Property | Description |
|---|---|
| The message from the sender. |
| A value of either |
| The name of the |
| A response provided by the receiver. This makes it easy to immediately respond to a message, perhaps with something as simple as an ACK (acknowledge). |
| The domain of the Silverlight application that sent this message. |
After you've created the listener, the next step is to create something to send the messages: the sender.
The sender is extremely simple to create. All it needs to do is create a LocalMessageSender object specifying a particular listener and optionally the listener's domain, and then start sending messages:
private LocalMessageSender _sender =
          new LocalMessageSender("InAction");
public MainPage()
{
    ...
    MessageText.TextChanged +=
          new TextChangedEventHandler(OnTextChanged);
}

void OnTextChanged(object sender, TextChangedEventArgs e)
{
    _sender.SendAsync(MessageText.Text);
}
In the example, whenever the text changes in the TextBox, you send the entire Text-Box contents across the pipe and to the listener.
The next step is to place both Silverlight control into the same HTML page, using separate object tags. When run, the application will look something like figure 14.1.
Of course, if you want, you can host the two instances in separate browser windows and still allow them to communicate, as shown in figure 14.2. Create a page for the sender and one for the receiver. The two browsers don't need to be the same brand, as long as they're both supported by Silverlight.
You can also have one or both of the applications running out of the browser, as shown in figure 14.3.
The new local connection API provides a great way to let two or more Silverlight applications communicate. Unlike the old methods of using the DOM to send application messages, this doesn't rely on the applications being in the same DOM tree or even in the same browser instance. This new API enables scenarios such as disconnected but coordinating web parts on a SharePoint page, composite applications, and many more.
Most Silverlight applications don't live in a vacuum, self-contained and apart from the rest of the world. In most cases, applications need to either gather data from or send data to services on the Internet or intranet. The various networking approaches we discussed here will help you connect your applications to the outside world and even to other Silverlight applications.
As a web technology, Silverlight as a platform must be able to connect to services and consume various types of data as a top-tier feature. Silverlight doesn't disappoint in this area. From low-level HTTP access through to SOAP, REST, sockets, multicast sockets, and duplex communications, Silverlight provides a full spectrum of capabilities for accessing information on other machines.
Of course, if you had to manually parse all that data, it wouldn't be a great platform feature. Luckily, Silverlight has us covered here as well. Silverlight supports multiple ways to access XML data-one of the most popular data formats on the web today. In addition, Silverlight supports the lightweight and nimble JSON format introduced with Ajax applications.
Silverlight also supports a pseudonetworking mechanism for connecting two Silverlight applications running on the same machine, even in different browsers or out-of-browser instances.
Silverlight provides numerous ways to connect to, download, and use a variety of types of data. With support for technologies ranging from the decade old POX to WCF Data Services and WCF RIA Services, there's sure to be something to fit any application framework.
In the next chapter, we'll combine the information on networking, binding, and other topics and learn how to handle navigation.

