
Believe it or not, there once was a time when I had to cower in my cube at a client site, trying to make sure no one saw me designing icons in a graphics program, or hand-coding subtle timer-based animation for an application UI. Working with those things was looked upon as "not real work." At the same time, the clients expected icons and application UI to magically appear as though someone just pressed the "Make it Awesome" button on an IDE.
Gladly, for most companies, those days are gone. The value of good graphics, good UX, and for the most part, good animation have become mainstream in all but the most conservative organizations. The last of those, and probably the least broadly accepted, is animation.
Animation is a relative newcomer to the world of application development. Yes, creative types have been doing it for years, but many of us haven't seen much animation in our own applications, web or otherwise. Flash, WPF, Silverlight, and jQuery, not to mention the vastly improved motion graphics on TV and in movies, have all helped to finally make animation mainstream.
Animation is a double-edged sword. Silverlight will make it simple for you to use animation as much as you want, even if that's overdoing it so much that your entire application UI appears to be suspended from a bed of Slinky springs. I won't judge, honestly. I'll just show you how to use the awesome capabilities Silverlight gives us.
We'll start by covering the basics of animation, of how animation is a change in the value of a property over time. Then we'll work with the timeline and storyboards. Once we know how to group animations in a storyboard, we'll cover how to create key frames to allow Silverlight to interpolate the values between different points in time. Of course, key frames would be pretty boring without easing functions, so that comes next. We'll even see how to create our own easing functions. Finally, we'll wrap up the chapter with some examples of using and creating behaviors.
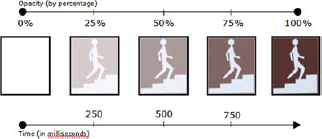
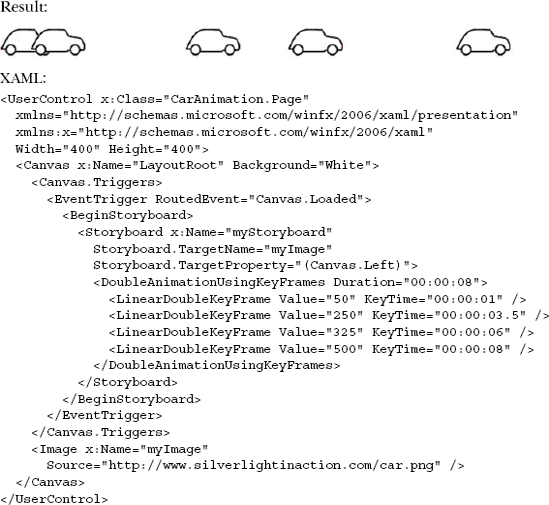
An animation within Silverlight boils down to changing a single visual property over a period of time. Without the concept of time, an animation would be a static graphic, and there'd be no need for this chapter. By gradually changing a visual property over the course of a time period, you can deliver dynamic effects. One such effect is shown in figure 22.1.
This figure shows the relationship between the Opacity property of an Image and the duration of an animation. As this animation progresses over the course of a single second, the Opacity value gradually increases. As the Opacity value increases, the Image gradually becomes more and more opaque. You create this dramatic animation by using the code in listing 22.1.
Example 22.1. XAML for fading in an Image over the course of one second
<Image x:Name="myImage"
  Source="http://www.silverlightinaction.com/man.png">
  <Image.Triggers>
    <EventTrigger RoutedEvent="Image.Loaded">
      <BeginStoryboard>
        <Storyboard x:Name="myStoryboard">
          <DoubleAnimation Duration="0:0:2"
                           Storyboard.TargetName="myImage"
                           Storyboard.TargetProperty="Opacity"
                           From="0" To="1" />
           </Storyboard>
         </BeginStoryboard>
       </EventTrigger>
     </Image.Triggers>
   </Image>
This example shows the XAML responsible for fading an image into view. A lot of new elements are presented within this small example; to gain an understanding of how these elements relate to one another, here's an overview of the items seen in listing 22.1:
The
EventTriggerelement initiates an action when theImageis loaded. This action is represented as theBeginStoryboardelement. A trigger is one way to start an animation.The
Storyboardobject is responsible for organizing and controlling the animations defined within it. Because of theBeginStoryboardaction, thisStoryboardis automatically started when theEventTriggeris fired.The
DoubleAnimationelement specifies that you're going to animate a doubleprecision value. There are other animation types that we'll cover in a moment. But more importantly, the value to animate is referenced with help from theStoryboard.TargetPropertyandStoryboard.TargetNameproperties.
As this outline demonstrates, each element serves a specific purpose. These elements work together to allow you to create lively animations. These animations ultimately revolve around time. Time is probably best represented as a line such as the one shown in figure 22.1. This timeline demonstrates how central the concept of time is to an animation.
At its base, every animation represents a Timeline object. This object is defined within the System.Windows.Media.Animation namespace and is used to represent a period of time. During this period of time, you have the opportunity to change the value assigned to a visual property. To specify which property value should be changed, you answer the following simple questions:
What type of property are you animating?
Where are you starting from, and where are you going?
How long should the animation run?
Although these questions sound fairly basic, there are a significant number of details surrounding each one. For this reason, we'll cover each question in detail, beginning with the first question.
To create an animation, you first select a single visual attribute of a single element. This item is guaranteed to have a data type associated with it. This data type will serve as the guiding light throughout the animation process. Ultimately, it's what will decide the type of animation that should be used. Imagine having a basic Ellipse that you want to animate. The XAML for this sample is shown in listing 22.2.
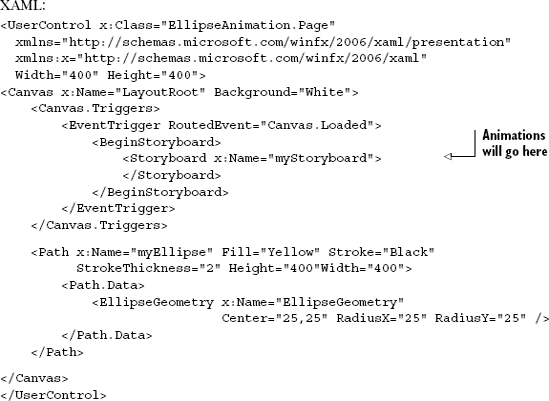
This example shows an Ellipse named myEllipse. This Ellipse will be used in the remainder of this section to describe animating properties. Silverlight provides three types of animations to assist you in creating dramatic visual effects. These types differ in regard to the type of property being animated. Silverlight has the ability to animate double, Point, and Color values via the DoubleAnimation, PointAnimation, and ColorAnimation types. We'll begin by discussing the most useful type, the DoubleAnimation.
A DoubleAnimation enables you to animate a single property value from one doubleprecision floating-point value to another. This is probably the most widely used type of animation. To illustrate a DoubleAnimation, this example shows how you could fade out the Ellipse defined in listing 22.2 over one second:
<DoubleAnimation Storyboard.TargetName="myEllipse"
                 Storyboard.TargetProperty="Opacity"
                 From="1" To="0"
                 Duration="0:0:1" />
As this markup illustrates, delivering a fade effect is incredibly simple. The DoubleAnimation element prepares Silverlight to generate double-precision values between the From and To values. As you can imagine, this opens the doors to tons of animation scenarios, but not every opened door should necessarily be entered.
Attempting to animate the FontSize property of a TextBlock can be a resourceconsuming task. Even though this property is implemented as a double-precision value, animating it can quickly lead to poorly performing applications because the text will be smoothed on every frame—an expensive process, even when the text is using animation-optimized smoothing. For this reason, if you need to animate your text, you may want to consider converting your TextBlock into a Path and using a ScaleTransform.
Regardless, the DoubleAnimation is still applicable in a variety of scenarios: creating fades, moving elements around a Panel, and performing transformations, among other things. However useful the DoubleAnimation is, there still may be situations where you need to animate Point-related values.
The PointAnimation type enables you to animate from one pair of x and y coordinates to another. As the name implies, this type of animation enables you to animate any property that represents a System.Windows.Point. And although this type isn't as widely used throughout the Silverlight APIs as the double type, it still has its place. For instance, you may need to animate the center of an EllipseGeometry object or dynamically change the presentation of a brush. Regardless of the need, it's nice to know that you can rely on the PointAnimation, which is illustrated here:
<PointAnimation Storyboard.TargetProperty="Center"
                Storyboard.TargetName="EllipseGeometry"
                Duration="0:0:2"
                From="100,100"
                To="100,300" />
The animation in this example changes the origin of any transforms applied to the Ellipse in listing 22.2. Generally, a PointAnimation will only be used in association with transforms and the Geometry elements mentioned in chapter 18. But, for a more subtle animation, you may consider using a ColorAnimation.
A ColorAnimation enables you to create smooth transitions from one color to another. These transitions can be performed between any two System.Windows. Media.Color property values. For this reason, this type of animation is used primarily with a brush as shown in this example:
<ColorAnimation Storyboard.TargetName="myEllipse"
           Storyboard.TargetProperty="(Fill).(SolidColorBrush.Color)"
           Duration="00:00:01"
           From="Yellow" To="Red" />
This XAML shows an assumed Ellipse shifting from Yellow to Red over the course of one second. This animation, along with the others mentioned, shows how easy it is to animate a property. Up to this point, we've only focused on animation related to a property type. In reality you also need to know how to specify the exact property you're animating.
Each of the animation types that we've discussed exposes two attached properties that specify the target of an animation. Appropriately, these attributes are called Storyboard. TargetProperty and Storyboard.TargetName. These properties work in coordination to determine which property of a specific element will be animated. This is a simplified description of these properties; a more detailed definition will be provided in section 22.3.2. For now, let's turn our focus to the second question in our animation journey.
As figure 22.1 illustrated, an animation has a beginning and an end, whether inferred or explicit. The end of an animation can be specified using one of two properties. We'll discuss each of these properties in detail later in this section. Before we can discuss the end of an animation, we should first discuss the beginning.
There's a saying that you can't know where you're going until you know where you've been. In regard to animation, this phrase should be changed to you can't know where you're going unless you know where you're from. To identify where an animation is coming from, you rely on the aptly named From property.
The From property is accessible from all the animation types that we've discussed. This value determines where an animation will begin. The following XAML shows the From property in action to help jump start our discussion:
<DoubleAnimation Storyboard.TargetName="myImage"
                 Storyboard.TargetProperty="Opacity"
                 From="0" To="1"
                 Duration="0:0:1" />
...
<Image x:Name="myImage"
       Source=" http://www.silverlightinaction.com/man.png"
       Opacity=".25" />
This example is preparing to animate the Opacity property of an assumed Image. The Opacity property of this Image is initially set to 0 when the animation starts. This is determined by the value provided within the From property. Once the animation begins, the Opacity value gradually increases over the course of one second to the value of 1.
Note that this value is compatible with the animation type. The 0 may look like an integer, but at runtime, it's automatically converted into a double-precision value. If you'd attempted to set the From property value to Yellow, an exception would've been thrown because Yellow isn't a valid double-precision value. Alternatively, you can skip this potential problem altogether by not defining a From property value; the From property is an optional attribute.
If a From value isn't provided, the animation will automatically decide where to start from. To decide where to begin, the animation will examine the target specified by the Storyboard.TargetName and Storyboard.TargetProperty attributes. Once these are examined, the From property will be set to the current property value associated with the target, as shown in this example:
<DoubleAnimation Storyboard.TargetName="myImage"
                 Storyboard.TargetProperty="Opacity"
                 To="1" Duration="0:0:1" />
...
<Image x:Name="myImage"
       Source=" http://www.silverlightinaction.com/man.png"
       Opacity=".25" />
When the animation in this markup begins, it automatically determines that the Opacity value within the animation should begin at .25. This is the current value of the Opacity property, which is defined as the target. This approach can help create smoother, more fluid animations. On the other hand, explicitly stating the From value can have unexpected effects on your animations.
Explicitly setting the From value can cause your animations to jump or jerk between iterations because the animation may need to reset the target property back to the value set within the From attribute. If you want more fluid animations, you may consider having an animation end at, or just before, the value specified within the From value. Alternatively, you may choose to skip setting the From value altogether. Either way, you need to know where the animation is going.
One way to predetermine where an animation is going is by setting the To property. The To property is exposed within the ColorAnimation, DoubleAnimation, and PointAnimation types. This value represents the destination of a specific animation. Like the From property, the value associated with the To property must be compatible with the type of animation. To get a better feel for this property, examine its use in this example:
<DoubleAnimation Storyboard.TargetProperty="Opacity"
                 Storyboard.TargetName="myEllipse"
                 Duration="0:0:1"
                 From=".75" To="0" />
This XAML shows the Opacity of the Ellipse changing from .75 to 0 when the animation begins. Over the course of one second, the Opacity of the Ellipse will change to 0. If you've defined a value for the From attribute, you don't have to set the To property. Instead, you can rely on the use of the By property.
The By property is a special shortcut that provides an alternate to the To property. Instead of having to know where you want to go initially, you can conveniently specify a value in the By attribute. When the animation is run, Silverlight adds the value defined in the From field to the By value to automatically determine the To value. To get a firmer understanding of how this can be used, take a look at this markup:
<DoubleAnimation Storyboard.TargetName="myImage"
                 Storyboard.TargetProperty="Opacity"
                 From=".25" By=".50"
                 Duration="0:0:1" />
This example defines the animation for an assumed Image. When the animation begins, the Opacity property of the Image is set to .25. Over the course of one second, you want this animation to increase the Opacity value by .50. When this animation has started, the To value will essentially be .75. You can also decrease the Opacity value by providing a negative value, as shown in this XAML fragment:
<DoubleAnimation Storyboard.TargetName="myImage"
                 Storyboard.TargetProperty="Opacity"
                 From=".25" By="-.10"
                 Duration="0:0:1" />
This markup shows the alternative to increasing a value. Note that the By property itself is an alternative to the To property. If both properties are defined, the To property will take precedence and the By property will be ignored.
The By and To properties enable you to provide guidance for your animations. These animations begin at the value provided within the From field. To determine how long the animation should take to get to the destination, we have one final question to address.
As mentioned earlier, each animation is a Timeline object, so a number of valuable time-related traits are shared among all animations. The most important of these items is the Duration property.
The Duration property specifies how long it'll take for a Timeline to complete a single episode. This value can be defined using the TimeSpan syntax or it can use a predefined value, defined within the Duration struct and described in table 22.1.
Table 22.1. Options for the Duration property
Property | Description |
|---|---|
| Means that a |
| Signals that an animation can run forever. |
Table 22.1 illustrates that you have two options when it comes to controlling the Duration of an animation. To control the playback speed of an animation, call on the SpeedRatio property.
The SpeedRatio property represents the throttle for a Timeline. By default, this double-precision value is set to 1.0. This value can be set to any positive double-precision value and act as a multiplier to the Duration property value. Figure 22.2 shows the Duration, SpeedRatio, and time values for a completed Timeline.
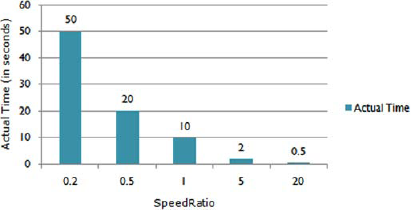
As figure 22.2 illustrates, the SpeedRatio property can have a pretty significant impact on the Duration of a Timeline. These results show that any value less than 1 will slow down an animation. At the same time, any value greater than 1 will speed up the animation.
Besides adjusting the speed of an animation, you may need to repeat its performance. For this reason, there's a RepeatBehavior property.
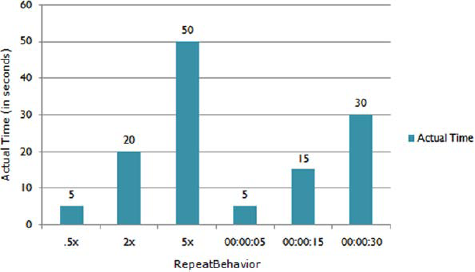
The RepeatBehavior property is an interesting animal that may act differently than you're anticipating. This property enables you to specify how many times an animation should be played back-to-back. This property also enables you to specify how long the animation should run regardless of the Duration value—the animation will play back-to-back until the time specified in the RepeatBehavior property has elapsed. To get a further understanding of how this property works, examine figure 22.3.
Figure 22.3 illustrates the effects of the RepeatBehavior property in relation to an animation's Duration. The first three bars illustrate how to use the RepeatBehavior to specify the total number of times a Timeline should run. The last three bars show how to use the RepeatBehavior to specify a specific length of time for a Timeline.
As shown in the first three bars, you can append an x as the suffix to a positive, double-precision value. This suffix informs Silverlight that you want an animation to run a specific number of times. The total number of times is represented as the value before the x. If the RepeatBehavior is set to 2.0x, the animation will run two times; if the value is set to 5.0x, it'll run five times. These types of values can have a significant impact on your animations.
If the value before the x is greater than 1.0, you may notice a jerk between the iterations of the animation because, unless your animation ends with the same value as it started, it'll need to jump to the start to be reset. If the value before the x is less than 1.0, you'll notice that the animation will stop before the animation has completed because the RepeatBehavior takes precedence over the Duration property. This can have significant implications if you specify a time value as shown in the last three bars of figure 22.3.
By specifying a specific length of time for the RepeatBehavior, you're informing the Timeline to repeat until the specified time has elapsed. This length of time can be specified using the TimeSpan format. Or, you can specify the Forever value to make the Timeline run until you programmatically force the animation to stop. Either way, at times you may want a more cyclical animation. For these situations, you may want to consider the AutoReverse property.
The AutoReverse property enables you to automatically play a Timeline in reverse after it has played once forward. This boolean property is, by default, set to false. Changing this property value to true can enable you to deliver a throbbing effect— among other things. Note that changing this property to true can have residual effects on the overall playback of a Timeline.
By setting the AutoReverse property to true, the overall playback time of a Timeline may be doubled. When the AutoReverse property is true, a Timeline isn't deemed finished until it plays once forward and once backward. If you're specifying a number of iterations within the RepeatBehavior property, a single iteration will take twice as long.
Once an iteration has completed, you should have the ability to decide how it should behave.
When an animation reaches the end of a Timeline, it normally stays (or holds) at the end, but the FillBehavior property gives you the opportunity to determine what to do. When the end is reached, you can tell the playback what to do using one of the options provided by the FillBehavior enumerator. These options and their descriptions are shown in table 22.2.
Table 22.2. Available FillBehavior options
Value | Description |
|---|---|
| When completed, a |
| Once the |
You have two options: stay at the end or reset to the beginning. But the beginning of a Timeline isn't necessarily what it may seem. This beginning of a Timeline can be altered by the BeginTime property.
The BeginTime property represents when to start playing a Timeline. In reality, this property sort of behaves as an offset, which can be set using the familiar TimeSpan format. By default, the BeginTime property's value is set to null, which translates to 0. This setting is why animations begin playing immediately when told to do so. You can set this value to another TimeSpan value to provide an offset, as shown in this example:
<DoubleAnimation Storyboard.TargetName="myImage"
                 Storyboard.TargetProperty="Opacity"
                 From="0" To="1"
                 BeginTime="00:00:5" Duration="0:0:1" />
This shows an Image that fades in over the course of one second. Unlike the previous animations, this one won't start immediately. Instead, once the animation begins to play, it waits until the time specified within the BeginTime property has elapsed. Once this time period has elapsed, the image begins to fade into view. Because of this, you can assume the entire animation in this example takes six seconds to complete.
The BeginTime property may seem somewhat odd. It is sort of odd if you consider it only in regard to a single animation, but this property provides a significant amount of value when you have multiple animations working together. To make use of multiple animations, you must take advantage of the required Storyboard element.
Every animation created within Silverlight must be defined within a Storyboard. A Storyboard enables you to organize multiple animated parts that work together simultaneously. Often, these animated parts will span different properties across different UI elements. It makes sense to have a way to collectively organize and control these animated parts. Thankfully, the Storyboard enables you to do just that.
A Storyboard is an umbrella under which multiple animations can be defined to address a common scenario. From a development perspective, a Storyboard can be considered as a collection or grouping of animations. This grouping provides you with a way to easily target and control one or more animations. The syntax is shown this example:
<Storyboard x:Name="myStoryboard">
  <!-- The common animations -->
</Storyboard>
This XAML shows the basic syntax of a Storyboard. This Storyboard element could have any number of animations placed inside it. You can place other Storyboard elements within it if you so desire because the Children property of a Storyboard represents a collection of Timeline elements. You can add any type of animation or other Storyboard elements because they derive from the Timeline class. Listing 22.3 shows how you can intertwine types within a single Storyboard.
Example 22.3. Syntax of Storyboard element with multiple animations
<Storyboard x:Name="myStoryboard" Storyboard.TargetName="myRectangle">
  <DoubleAnimation x:Name="myDoubleAnimation" Duration="00:00:03"
                   Storyboard.TargetProperty="Opacity"
                   From="0" To="1" />
  <ColorAnimation x:Name="myColorAnimation"
    Storyboard.TargetProperty="(Shape.Fill).(SolidColorBrush.Color)"
                  Duration="00:00:03"
                  From="Green" To="Blue" />
</Storyboard>
...
<Rectangle x:Name="myRectangle" Width="180" Height="60" Fill="Green"
  Opacity="0" />
This listing shows a Storyboard that changes a Rectangle from green to blue as it fades into view. This small sample begins to show the power allotted by the Storyboard. Before we discuss the other powerful features of the Storyboard, let's look at how to define the target of your animations.
As mentioned earlier, the Storyboard exposes two attached properties that can be used to set the target of an animation. The first is TargetName, and the second is TargetProperty. These two property values are codependent and both are required to create an animation. Without these values, your animations won't know what to animate. If you define these two values within a Storyboard, you can share their values across the child Timeline elements.
As shown in the previous listing, the Storyboard uses the TargetName attached property to specify the target of the animation. Each of the child animations uses the same target element. If one of these animations needs to use a different element, you can trump this value by providing a different TargetName value, using the approach shown in listing 22.4.
Example 22.4. Animation overriding target of its parent Storyboard
<Storyboard x:Name="myStoryboard" Storyboard.TargetName="myRectangle">
  <ColorAnimation x:Name="myColorAnimation" Duration="00:00:03"
    Storyboard.TargetProperty="(Shape.Fill).(SolidColorBrush.Color)"
    From="Green" To="Blue" />

  <DoubleAnimation x:Name="myDoubleAnimation" Duration="00:00:03"
    Storyboard.TargetName="myRectangle2"
    Storyboard.TargetProperty="Opacity"
    From="0" To="1" />

  <DoubleAnimation x:Name="myDoubleAnimation2" Duration="00:00:05"
Storyboard.TargetProperty="Width"
To="180" />
</Storyboard>
...
<Rectangle x:Name="myRectangle" Width="180" Height="120" Fill="Green" />
<Rectangle x:Name="myRectangle2" Width="90" Height="30" Fill="Pink" />This listing defines the primary target of the Storyboard as myRectangle. This target is used by the myColorAnimation and myDoubleAnimation2 animations. myDoubleAnimation uses myRectangle2 as the target instead of myRectangle. This is accomplished by overriding the TargetName value set in the storyboard itself. Note that each of the animations in this listing targets a separate property.
To target a property within an animation, you use the TargetProperty attached property. As you've probably guessed, this attribute allows you to specify which property of the target element should be animated. You can specify the name of this property in a couple of ways.
The first and most explicit approach involves setting the name of the property you intend to animate. This approach is used in myDoubleAnimation and myDoubleAnimation2. Generally, this approach will work for most of the properties throughout the Silverlight APIs, but it won't always be enough.
Consider the situation where you want to change the color of a Brush. Generally, the color of a Brush is defined as a property within a property within a property. This is shown in the myColorAnimation animation of the listing. Although at first this may not seem possible within XAML, there is a way.
XAML supports a flexible property path model that enables you to access nested properties. This model allows you to access the individual properties by drilling through the hierarchy using element types. To drill down through the hierarchy, you begin at an element type. From there, you access a specific property by using a period as a delimiter. If the property represents a collection, you can access the individual items by using an indexing syntax. To gain a firmer understanding of these syntactical details, review listing 22.5.
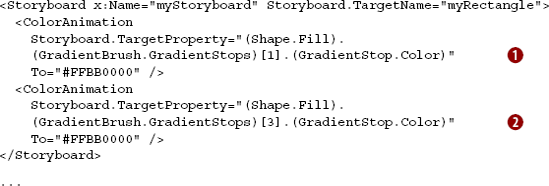
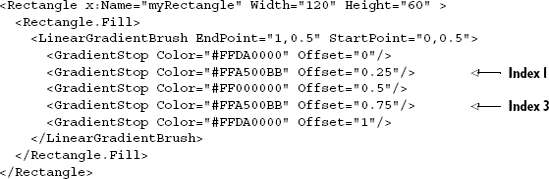
This listing shows how to use the property path syntax to access the individual colors used within the LinearGradientBrush. An index of 1 is used within ![]() to reference the second
to reference the second GradientStop in the brush. At the same time, an index of 3 ![]() is used to change the color of the fourth
is used to change the color of the fourth GradientStop. In addition to the indexing syntax, it's important to recognize the use of the parentheses around each property.
Parentheses are used in the property path syntax to group a property with an element. As shown in listing 22.5, you can't begin by drilling into a property; instead, you begin with an element type. From there, you specify the name of the property you want to animate and continue by delimiting with a period. This syntax is depicted in figure 22.4.

This figure shows the general syntax used for referencing properties using this property path syntax. This approach makes it easy to access items that haven't been explicitly named. This syntax enables you to readily take control of the properties within an element. Equally important is the way that Silverlight enables you to take control of the Storyboard itself.
The Storyboard class exposes a number of valuable methods that enable you to programmatically control an animation. These methods, shown in table 22.3, reflect many of the features you've already seen within the MediaElement.
Table 22.3. Methods associated with the Storyboard object
Method | Description |
|---|---|
| Turns the hourglass to start pouring the sands of time. This method starts the animations that are the |
| Halts the playback of the animations associated with a |
| Continues the animations associated with a |
| Skips to a new position within a |
| Halts the playback of the animations associated with a |
The methods described in this table enable you to programmatically interact with a Storyboard. In doing so, you can easily deliver a dynamic animation experience. This experience may involve leaping forward to a later part in an animation or giving the user control via interactive playback features. Either way, an important part of interacting with an animation involves knowing when it's finished. Thankfully, the Storyboard exposes the Completed event.
The Completed event is the only event exposed by the Storyboard element. In reality, this event is part of the Timeline. Regardless, the Completed event is triggered when the assigning Storyboard has finished. A Storyboard is deemed finished once all its child Timeline elements have completed. Listing 22.6 shows a MediaElement performing one complete rotation when a user clicks it. Once this animation has completed, it'll use another animation to fade the MediaElement out of view.
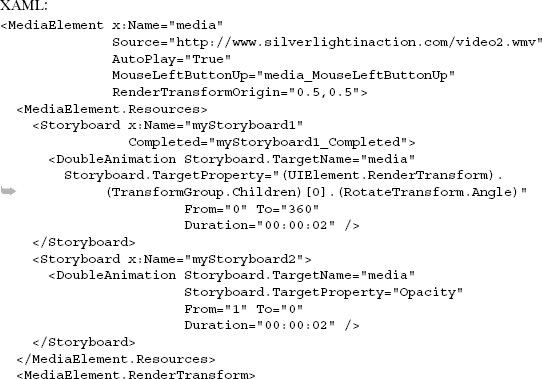
This listing shows how you can programmatically use the Completed event as well as one of the interactive playback methods. When the user clicks the MediaElement, the Storyboard defined as myStoryboard1 will begin playing. Once this Storyboard has finished playing, the Completed event associated with it will be triggered. This event handler will then start the animation defined in myStoryboard2. This example also shows how you can define an animation as a resource. This is one of the two ways that you can use an animation on the road to being resourceful.
Storyboard elements enable you to create complex and intricate animations. These animations may be used in response to an event or to something that has occurred behind the scenes. Because of this, you need multiple ways to interact with a Storyboard. Thankfully, Silverlight gives you two approaches for organizing Storyboard elements. You can define a Storyboard as either a resource or a trigger.
The first approach for organizing a Storyboard involves defining it as a resource. A resource is an easy way to set aside a commonly used item for reuse. (We'll cover resources more in chapter 23.) This item—in our case, a Storyboard—can be defined as a resource by creating it within the Resources collection of a UIElement. This can be accomplished by either programmatically adding it through code, or creating it within XAML as shown in listing 22.7.
Example 22.7. Defining a Storyboard as a resource
<Canvas x:Name="myCanvas">
  <Canvas.Resources>
    <Storyboard x:Key="myStoryboard">
      <DoubleAnimation Duration="00:00:01"
                       Storyboard.TargetName="myImage"
                       Storyboard.TargetProperty="Opacity"
                       From="1" To="0" />
</Storyboard>
</Canvas.Resources>
<Image x:Name="myImage"
Source="http://www.silverlightinaction.com/man.png" />
</Canvas>This listing shows how easy it is to define a Storyboard as a resource in XAML. The definition of the Storyboard is placed within the Resources collection of the root Canvas. The root element of a Silverlight page is generally where you'll place your resources because it makes the resources accessible to all the elements within the page. Thankfully, the Resources collection can store as many or as few resources as you need.
Once a Storyboard is defined as a resource, it's your responsibility to start it. You must first programmatically retrieve it. This step involves retrieving the storyboard by key. The following example shows the Storyboard from listing 22.7 being retrieved from the resources collection, then programmatically started via the Begin method:
Storyboard myStoryboard = (Storyboard)(myCanvas.Resources["myStoryboard"]);
myStoryboard.Begin();
This illustrates how simple it is to programmatically start a Storyboard defined as a resource.
There are times when you know that a specific action should automatically start a Storyboard. For these situations, Silverlight provides an elegant shortcut that enables you to automatically start a Storyboard when a defined event occurs.
The second approach for defining a Storyboard involves setting it as an event handler. An EventTrigger is a special element that enables you to declaratively define a response for a specified event. When this event occurs, the EventTrigger automatically starts the defined Storyboard. To accomplish this, you follow a few simple steps.
First you decide which event you want to respond to. Currently, the only event supported within the EventTrigger is the Loaded event. To specify this event as the triggering event, you must identify the type of object responsible for the event. Once identified, you can set it, as well as the event, through the RoutedEvent property as shown in this example:
<EventTrigger RoutedEvent="Canvas.Loaded">
  <!-- Insert Actions here -->
</EventTrigger>
As this shows, the RoutedEvent property uses a syntax that resembles elementType-Name.eventName. The type name comes from the parent type. Generally, you'll be able to retrieve this type name from the attached property containing the trigger. This attached property is called Triggers, and it's available from all UIElement objects. If you were to expand on our previous code example, you should have something like this XAML fragment:
<Canvas.Triggers>
  <EventTrigger RoutedEvent="Canvas.Loaded">
    <!-- Insert Actions here -->
  </EventTrigger>
</Canvas.Triggers>
This example shows how the EventTrigger has been added to a Canvas. Significantly, this doesn't mean that the target of the Storyboard will be the Canvas. Instead, as discussed earlier, the target of the Storyboard is set within the Storyboard itself. To set the target of the Storyboard, you first define the Storyboard.
If you're defining a Storyboard within an EventTrigger, you must associate it with an action. Currently, Silverlight only provides one action called BeginStoryboard, which starts a Storyboard when called. You must use this action if you're creating an EventTrigger. To put all the pieces together, defining a Storyboard as a trigger would look like listing 22.8.
Example 22.8. Defining a Storyboard as an event trigger
<Canvas Width="100" Height="100" Background="White">
  <Canvas.Triggers>
    <EventTrigger RoutedEvent="Canvas.Loaded">
      <BeginStoryboard>
        <Storyboard x:Name="myStoryboard">
          <DoubleAnimation Duration="00:00:01"
                           Storyboard.TargetName="myImage"
                           Storyboard.TargetProperty="Opacity"
                           From="0" To="1" />
        </Storyboard>
      </BeginStoryboard>
    </EventTrigger>
  </Canvas.Triggers>
  <Image x:Name="myImage"
         Source="http://www.silverlightinaction.com/man.png" />
</Canvas>
This example shows a Storyboard defined as a trigger. But the official Silverlight documentation included with the SDK recommends against using a trigger, as visual states (covered in chapter 23) and behaviors are often better ways to start the animation. Either way, the Storyboard provides a way to logically organize your animations.
These animations are all about changing a visual property over time. As you've seen, this process works in a linear fashion. To create even more dynamic visual effects, it's important to consider using a technique known as keyframing.
In the realm of traditional animation, animators will often present a high-level overview of a story by drawing out the main images. These images generally represent the beginning and ending points of a transition; the endpoints represent the key frames within an animation. Once the keyframes are created, the process of creating the animation in between them is fairly straightforward. Within software, this process of creating the in-between frames is known as interpolation or tweening.
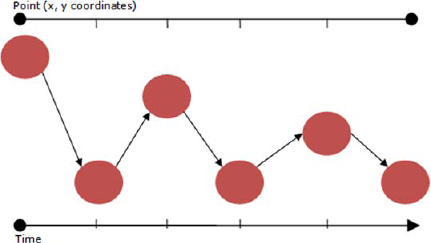
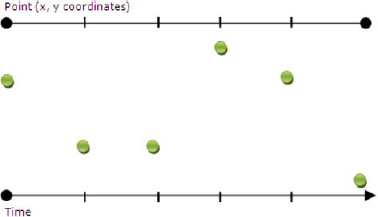
To firmly grasp the concept of how keyframe animations can be used, let's consider the task of animating a bouncing ball. If you were to attempt to animate an ellipse, the ball may look like that in figure 22.5 over some period of time.
The arrows shown in this figure represent two things within the animation. They represent the direction that the ball is bouncing and the parts of the animation created via interpolation. This process of interpolation enables you to ignore having to define the To, From, and By property values you were using earlier. Instead, you must create a KeyFrame for each discrete location within an animation. Listing 22.9 shows the XAML to reproduce the animation shown in figure 22.5.
Example 22.9. Creating a bouncing ball using keyframes
<Canvas x:Name="LayoutRoot" Background="White">
  <Canvas.Triggers>
    <EventTrigger RoutedEvent="Canvas.Loaded">
      <BeginStoryboard>
        <Storyboard x:Name="myStoryboard">
           <DoubleAnimationUsingKeyFrames
                        Storyboard.TargetName="myEllipse"
                        Storyboard.TargetProperty="(Canvas.Left)">
             <LinearDoubleKeyFrame KeyTime="00:00:00" Value="0" />
             <LinearDoubleKeyFrame KeyTime="00:00:01" Value="77" />
             <LinearDoubleKeyFrame KeyTime="00:00:02" Value="148" />
             <LinearDoubleKeyFrame KeyTime="00:00:03" Value="223" />
             <LinearDoubleKeyFrame KeyTime="00:00:04" Value="315" />
             <LinearDoubleKeyFrame KeyTime="00:00:05" Value="397" />
           </DoubleAnimationUsingKeyFrames>
           <DoubleAnimationUsingKeyFrames
                        Storyboard.TargetName="myEllipse"
                        Storyboard.TargetProperty="(Canvas.Top)">
             <LinearDoubleKeyFrame KeyTime="00:00:00" Value="0" />
             <LinearDoubleKeyFrame KeyTime="00:00:01" Value="132" />
             <LinearDoubleKeyFrame KeyTime="00:00:02" Value="42" />
             <LinearDoubleKeyFrame KeyTime="00:00:03" Value="132" />
             <LinearDoubleKeyFrame KeyTime="00:00:04" Value="81" />
             <LinearDoubleKeyFrame KeyTime="00:00:05" Value="132" />
</DoubleAnimationUsingKeyFrames>
</Storyboard>
</BeginStoryboard>
</EventTrigger>
</Canvas.Triggers>
<Ellipse Width="50" Height="50" x:Name="myEllipse"
Fill="Maroon" Stroke="Black" />
</Canvas>This example illustrates the general syntax of a KeyFrame. This example uses two keyframe animations to move an Ellipse around the Canvas. The new position of the Ellipse is interpolated between the values specified within the Value property of each KeyFrame. The KeyFrame determines how to interpolate these values by referring to the type of KeyFrame.
The type of KeyFrame always follows a naming template that mimics [interpolation-Type]propertyTypeKeyFrame. This syntax specifies the type of property that's the target of the animation. The syntax also specifies what type of interpolation should be used to generate the in-between values. To simultaneously address both important items, Silverlight provides the keyframe types shown in table 22.4.
Table 22.4. The keyframe types available within Silverlight
Discrete keyframe types | Linear keyframe types | Spline keyframe types |
|---|---|---|
|
|
|
|
|
|
| ||
|
|
|
Each type of keyframe helps to address specific animation scenarios. To understand when a specific type of animation is relevant, it's important to understand the various types of interpolation.
An interpolation type gives you control over how an animation will accelerate or decelerate as it progresses. The interpolation type signals how an animation should estimate the values in between keyframes. To estimate the values as you see fit, Silverlight provides three interpolation types: linear, spline, and discrete.
Linear interpolation constructs the most direct transition between two key frames. The linear descriptor is used because the change between two keyframes occurs at a constant, linear rate. Figure 22.6 shows an object moving between several points using linear interpolation.
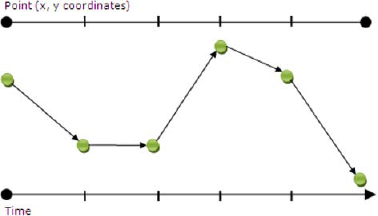
The idea of using an animation that occurs at a constant, predictable rate at first seems appealing. But, as this figure shows, you can easily end up with a jerky or jagged animation. This jarring can leave users feeling like they're riding an old, wooden rollercoaster. This effect occurs because the transition between two linear keyframes occurs in distinct states. These stages may be desirable, but if they aren't, there's a way to create even smoother transitions thanks to spline interpolation.
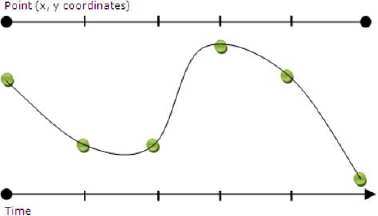
Splines are generally used to create smooth, seamless transitions. These transitions occur by estimating the values as if they were generated along a Bézier curve. This curve represents the values to use within a time segment. To illustrate, figure 22.7 shows a curved interpolation.
If you compare this figure to figure 22.6, you can see how using splines allows you to create a much smoother transition between keyframes. Note that the line in this figure doesn't represent the path that the ball travels along. Instead, the line gives the illusion of varying speeds. These varying speeds are controlled through the KeySpline property.
The KeySpline property enables you to control the progress of an animation through two control points, which determine the curve that the values are interpolated along. By default, this curve resembles a straight line. To generate values along something other than a line, you must understand how the KeySpline relates values to points in time. This relationship, as well as the KeySpline syntax, is shown in figure 22.8.
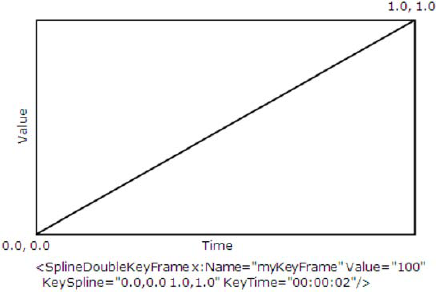
This figure shows the default curve defined by the KeySpline property. The two control points used in this figure are specified as 0.0,0.0 1.0,1.0. These control points always follow a syntax that mimics x1,y1 x2,y2. In addition, each coordinate within each point is specified as a positive double-precision value between 0.0 and 1.0. Anything outside of this range will create a runtime error.
The first point defined within the KeySpline property determines how values will be generated along the first half of the curve. The second point defined within the KeySpline property determines how values will be created along the second half of the curve. Either way, if the y value is greater than the x value, the animation will run more quickly. Alternatively, if the x value is greater than the y value, the animation will run slower. Figure 22.9 shows sample curves along with their respective KeySpline values.
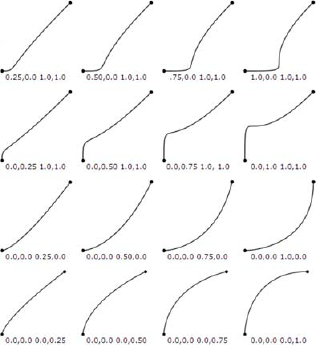
The curves shown in this figure represent potential curves you can use for interpolating values. In reality, you'll need to play with these values until your keyframe animation feels right. Sometimes, an animation may feel right if the transitions are more discrete.
Occasionally, you may have to create an animation that jumps between values. These rifts seem counterintuitive within the realm of animation because animations are generally considered to be smooth. But, what if you were creating an animation that depicted a Whack-a-Mole game? In a Whack-a-Mole game, small critters appear at random from dark holes. This surprising effect can be effectively recreated using discrete interpolation.
When discrete interpolation is used, Silverlight generates sudden changes between two keyframes. These sudden changes make it appear as if the interpolation doesn't occur at all. That's because it doesn't! Figure 22.10 illuminates how the discrete method interpolates.
This illustration is difficult to make sense of. Everything seemingly occurs at random, just like Whack-a-Mole.
Although randomness has its place, you often need control over when a keyframe occurs. Luckily, there's is a property that allows you to do just that—KeyTime.
The KeyTime property of a KeyFrame represents the time at which the value specified within a KeyFrame will be reached. In a sense, the KeyTime sort of represents a bookmark within an animation. But, the position of this bookmark is completely dependent on the TimeSpan value you use.
By providing a TimeSpan value, you can specify the exact point in time when a KeyFrame should be reached. This point in time is relative to the beginning of the animation that the KeyFrame is defined within, so the order of the keyframe elements is irrelevant. But, this value still has to be assigned to the KeyTime property, as shown in listing 22.10. In addition, the example shows an illustration of how the animation would be rendered.
This listing shows the typical approach for defining KeyFrame elements within an animation. The KeyTime value in each KeyFrame is set to a TimeSpan value. This approach provides a convenient and verbose way to perform an animation. This example shows how important the KeyTime property is in keyframe animations, which are the types of animations created by Expression Blend.
These animations have been interesting, but they've all lacked a certain amount of "pop" we've come to expect from modern applications. That's because they're not using any sort of easing functions with the keyframes. Let's fix that next.
Easing functions provide a way to liven up what would otherwise be pretty flat and boring animation. They provide acceleration/deceleration, and even bounce or spring to the approach into (or departure from) a keyframe in an animation.
If you've found animation to be a little too computer-generated so far, you'll appreciate the more organic effect that easing functions provide. Easing functions perform a function f over time t. Time is provided by the animation system; the easing function returns a value, normally between zero and one (it can over and undershoot) that indicates progress toward the final value specified in the animation. We'll cover more of the inner workings in the second half of this section when we create our own easing function.
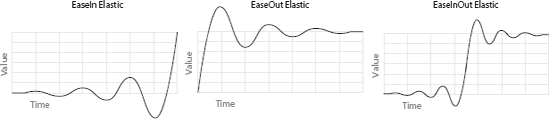
Easing functions have three modes of use: EaseIn, EaseOut, and EaseInOut. The modes affect how the easing function is applied to the animation over time. These modes are easier seen than read. Figure 22.11 illustrates what the built-in ElasticEase easing function looks like in all three of its modes.
From the illustration, you can see that EaseIn and EaseOut are opposites; EaseOut is the EaseIn function in reverse. EaseInOut is a little trickier. In that mode, the overall time remains the same, but the function used is a combination of EaseIn and EaseOut.
In this section, we'll first look at how to use the great library of built-in easing functions. Then, because customization is especially important when it comes to something as design-sensitive as how an animation functions over time, we'll look at how to build your own easing functions.
Easing functions are used with special keyframes that start with the word Easing. These key frames provide a property named EasingFunction, which accepts an easing function to be used on that specific keyframe. Silverlight includes 11 built-in easing functions, which are listed in table 22.5.
Table 22.5. Built-in easing functions
Easing function | Description |
|---|---|
| Retracts the motion of an animation slightly before it begins to animate in the path indicated. |
| Creates a bouncing effect, like a rubber ball. |
| Accelerates or decelerates using a circular function. |
| Accelerates or decelerates using a cube function (time cubed). |
| An animation that resembles the oscillation of a spring. The lower the supplied |
Accelerates or decelerates using a formula based around the supplied exponent. | |
| Accelerates or decelerates using a formula based on the supplied power. |
| Accelerates or decelerates using a squaring function. |
| Accelerates or decelerates using a power of 4 function. |
| Accelerates or decelerates using a power of 5 function. |
| Accelerates or decelerates using the sine function. |
MSDN has great documentation on the easing functions, including graphics showing each of the modes and the actual functions in use. You can find the additional information in the MSDN online library here: http://bit.ly/MSDNEasing.
To use an easing function, you need to set up an animation using storyboards and keyframes. Listing 22.11 shows an easing function attached to two animations.
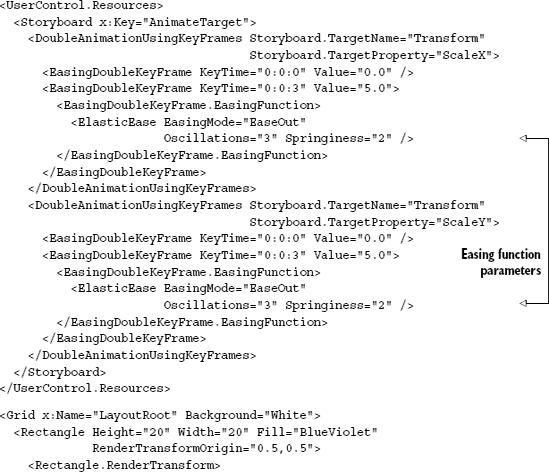
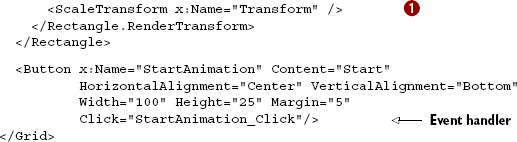
This example shows markup that contains a single rectangle to be animated. The things we'll be animating are the ScaleX and ScaleY properties of the ScaleTransform ![]() attached to the rectangle. The result of this is a spring-type animation, which looks like you're sitting directly below a block suspended from a rubber band.
attached to the rectangle. The result of this is a spring-type animation, which looks like you're sitting directly below a block suspended from a rubber band.
To start the animation, I used a button with the event handler wired up in markup. The code-behind code in the event handler is a single line:
private void StartAnimation_Click(object sender, RoutedEventArgs e)
{
  ((Storyboard)Resources["AnimateTarget"]).Begin();
}
The line of code in the event handler finds the resource named AnimateTarget and, assuming it's a Storyboard, calls the function to start animating. With this code in place, run the application and click the button. You'll see the rectangle bounce in and out until it comes to a quick rest. Try changing the Oscillations or Springiness parameters in the easing function for very different effects: Oscillations controls the number of bounces; Springiness controls the depth of the bounces.
The built-in easing functions will serve the vast majority of our needs; you can create just about any typical effect using them. What about atypical effects? What if you want to include physics, or a function the team didn't think of? For those situations, the Silverlight team had the foresight to open up the API to enable us to create our own easing functions.
The WPF and Silverlight teams put together a pretty comprehensive set of standard easing functions. Most folks will never need or want to write one of their own.
That said, you may come up with a specialized function and want to package that in a way that enables others to use it from XAML or code in their own animation.
To create your own easing function, you derive from EasingFunctionBase and override the EaseInCore function.
EasingFunctionBase provides the structure of an easing function. It includes the EasingMode and its dependency property, as well as the Ease function, which is called by the animation system. The Ease function, in turn, calls EaseInCore, the function you provide.
This is where your easing code goes. You provide the implementation for EaseIn via the EaseInCore code, and the runtime will automatically infer EaseOut and EaseInOut from that. EaseOut will be the reverse of EaseIn, and EaseInOut will be the two together.
EaseInCore takes a double representing normalized time, and expects you to return the progress for that point in time. If you think of time as the x axis on a graph and progress as the y axis, you're taking in x as a parameter and returning y as the result.
A standard linear ease would return the value passed in. f(x) = x. Instantaneous movement would be f(x) = 1. No movement (ever) would be f(x) = 0. The interesting stuff happens when the result is between those numbers.
Listing 22.12 shows a randomizing ease. This uses the built-in Random object to provide a random value that approaches the final value. The end result is a stuttering animation that eventually gets to the right place.
Example 22.12. A custom randomizing ease
C#:
public class RandomEase : EasingFunctionBase
{
  private Random _random = new Random();

  protected override double EaseInCore(double normalizedTime)
  {
    return normalizedTime / 2.0 +
           _random.Next(0, 100) / 100.0 * (normalizedTime / 2.0);
  }
}
XAML:
<EasingDoubleKeyFrame.EasingFunction>
  <local:RandomEase EasingMode="EaseIn"/>
</EasingDoubleKeyFrame.EasingFunction>
To use this function, take the XAML from the ElasticEase demonstration and replace the two easing functions with the XAML fragment here. Be sure to map an XML namespace to the local application.
Easing functions really help liven up animation, providing a sometimes more organic but always more interesting way to move a value between two bounds. The built-in easing functions cover almost every need you'll have when animating in Silverlight. For those cases when the built-in functions aren't quite what you want, you can create your own easing functions as long as you an express the equation in code.
Easing functions were originally designed with Blend in mind. Designers love to be able to specify an easing function to use on a keyframe; they can do it right from the Blend UI. Another technology that came about due to Blend, this time from the Blend team itself, is the behavior. Behaviors are fascinating ways to add animation, code, or other reusable logic to your elements in XAML.
Behaviors, triggers, and actions are odd things. They can be virtually anything, do virtually anything. Between stock behaviors and community-created ones, I've seen everything from TextBox edit masks, to drag and drop, to physics, to effects, automatic animations, and even ICommand substitutes for calling methods on events. Because behaviors and animation are so closely tied to Expression Blend, I figured I'd pop them in here. They're reusable designer-friendly components. They interact with the UI, but aren't controls.
While lumped together, behaviors, triggers, and actions are conceptually different. Behaviors are self-contained units of functionality that act as a bit of a sidecar to an existing object. They go along for the ride and respond to the environment in which the object exists. Triggers are much like the built-in triggers we've seen in this chapter, but more flexible in their applications. Actions are simpler in concept; they're attached to an object and provide a way to invoke some functionality. The common way to refer to all three is by calling them behaviors, so that's what we'll do in this chapter.
One example of an action we've already seen was the CallMethodAction in chapter 16. That action allows an arbitrary event to invoke an arbitrary method on an arbitrary object. Even outside the scope of the ViewModel pattern, that's a pretty powerful component to make available to the designer.
The scope and power of behaviors are best understood by example. In order to try them out, we need to first perform a bit of project setup to pull in the right core bits.
In order to work with behaviors, you'll need to reference two Expression Blend SDK libraries. If you have Expression Blend already installed, the SDK will be under Program FilesMicrosoft SDKs. If you don't have Blend installed, you can still download the SDK from http://bit.ly/Blend4SDK; it's free and doesn't require Expression Blend on the machine.
Once you have the SDK installed, reference the two Blend libraries as shown in figure 22.12.
The final step is to add the appropriate namespaces into your XAML files. We'll be working with MainPage.xaml for the remaining examples, so place the following two namespace declarations in the top element of that file:
xmlns:i="http://schemas.microsoft.com/expression/2010/interactivity"
mlns:ei="http://schemas.microsoft.com/expression/2010/interactions"
With all the pieces in place, we're ready to start playing around with behaviors. We'll first take a look at existing out-of-box functionality and how to use it in your own applications. Then, because behaviors facilitate reuse and sharing, we'll build our own simple behavior for Silverlight.
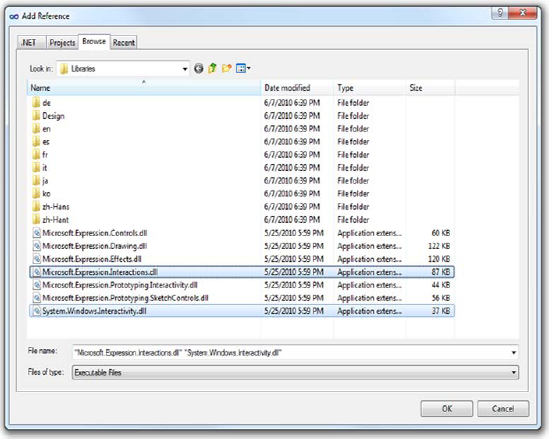
Figure 22.12. Adding the Blend SDK assemblies as references. On my machine, the Microsoft. Expression.Interactions library and the System.Windows.Interactivity library were both located in C:Program FilesMicrosoft SDKsExpressionBlendSilverlightv4.0Libraries.
In chapter 16, we saw how to use the CallMethodAction behavior. This is a simple but flexible action that allows you to wire up any function to any event. Another interesting behavior is the DataTrigger. This performs actions when the bound data meets a specified condition. One of my favorite behaviors is the FluidMoveBehavior. Not only does that behavior have a great visual effect at runtime, but it also builds on much of what we've learned about animation in this chapter.
The FluidMoveBehavior helps get past abrupt layout changes. It listens to the layout system, and when it finds a layout change, it smoothly animates from the old value to the new value. This is extremely useful in panels such as wrap panels where resizing may move several elements around at once.
Listing 22.13 shows how to use the FluidMoveBehavior on a single element in the UI. We'll use the purple square example from the last section.

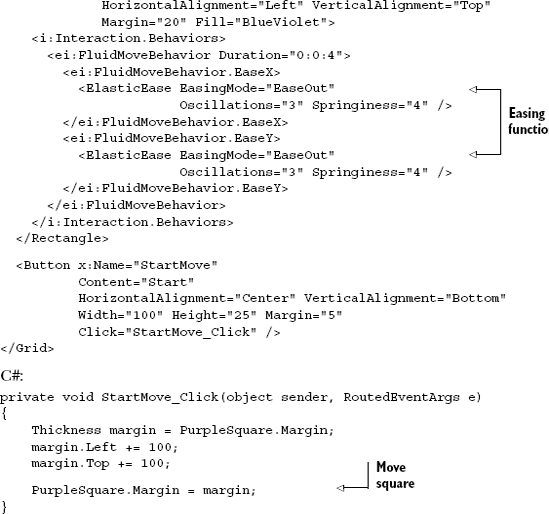
This example shows how to smoothly move an element from one location to another. What would normally have been an abrupt change in location is now a four-second animation with an elastic easing function applied. These are the same easing functions we discussed earlier in the chapter.
Behind the scenes, this behavior builds an animation whenever layout-affecting properties (margins, top, left, size, and so forth) are changed, and uses that animation to move between the original layout value and the one specified.
Other behaviors attach to objects in similar ways. The parameters may change, but the approach is generally the same. In fact, we'll see that when we create our own behavior next.
The System.Windows.Interactivity library includes the base classes you'll typically want to inherit from when creating your own behavior. There are additional specialcase base classes in the Blend library, including some that make it easier to work with animation from within a behavior.
For our example, we're going to use the core Interactivity DLL and inherit from Behavior<T> to provide a behavior that'll allow itself to be attached to certain types of elements.
Behavior<T> has two main methods you must override in your implementation. The first is OnAttached. OnAttached is called when the behavior is attached to an element of type T. That element is referenced by the AssociatedObject property. The second method is OnDetaching. This method allows you to perform any cleanup, such as removing event handlers.
Listing 22.14 shows our behavior attached to a button. This behavior will display a MessageBox whenever the button is clicked. We'll use the same FluidMoveBehavior XAML as the previous section and attach this behavior to the Start button.
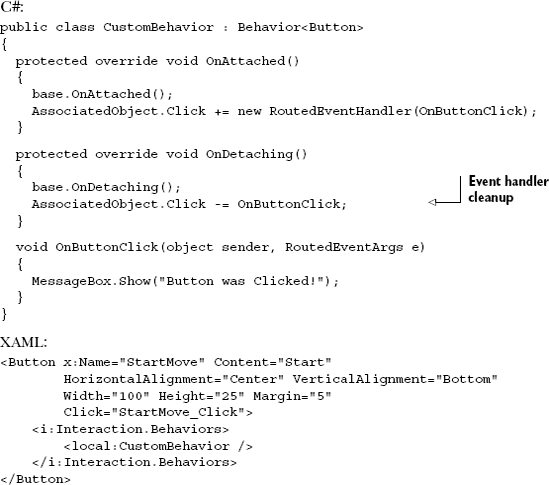
When you run the application and click the button, you'll first see the MessageBox from the behavior and then, because it's a blocking call, once you close the box you'll see the FluidMoveBehavior in action.
Once you've created a behavior or action that you like, be sure to share it on the Expression Gallery at http://gallery.expression.microsoft.com. There are a ton of interesting behaviors there; you may learn from some, and you may contribute others. It's a great community.
Behaviors, triggers, and actions—collectively "behaviors"—provide an excellent way to package up reusable bits of functionality without the overhead of a custom control. The Blend SDK comes with a number of important behaviors, providing a broad spectrum of capabilities. The Expression gallery includes a number of other behaviors that you can download and use in your own applications. Already, a large number of individuals and companies have developed and shared their own useful behaviors with the community. And, if the existing behaviors are insufficient for your needs, you can build your own behaviors using the same building blocks the expression team and community use.
Throughout this chapter, you saw the details associated with animating elements within Silverlight. When it comes down to it, it's really about manipulating a single property over a time interval. This time interval can be specified within either an animation, or higher up the tree, a Storyboard. The Storyboard enables you to organize and control multiple animations simultaneously, so you can create incredibly dramatic and engaging effects. With the help of keyframes, these effects can be developed extremely quickly and efficiently. When you add easing functions into the mix, the results are visually stunning and can provide that "pop" your application needs.
Behaviors provide reusable packages of functionality that can span a broad spectrum of capabilities. Some interact with animation and easing functions; others interact with code; still others enable you to play sounds or provide special movement to elements on a page. The community at the Expression Gallery has created a large number of reusable behaviors that you can incorporate into your own applications. If you want to create your own from scratch or contribute to that community, you already have all the tools you need with Visual Studio 2010 and the Blend SDK.
Providing an engaging user experience can be a valuable addition to any application. Providing a consistent user experience is perhaps equally, if not more, valuable. Silverlight has a variety of style and template features to help provide a consistent user experience. These features are discussed in detail in chapter 23.