
We are about to implement two routes to see routing in action. The first route is our main page, which shows the Welcome screen. The second page shows the About screen. We are also going to need some links or buttons to switch between the two pages.
Since the Angular CLI provides the ng generate component command, which creates a new component scaffold with all the necessary files and project modifications, let's generate an About page first:
- Run the following command:
ng generate component about
Pay attention to the command's output. As a result, you get a Typescript file with the component; a spec.ts file, which contains a unit testing placeholder; and an HTML template, which contains the SCSS stylesheet. The Angular CLI also updates the main application module in the app.module.ts file to include the newly generated component in the application's structure.
- The output should be similar to the following:
      CREATE src/app/about/about.component.scss (0 bytes)
      CREATE src/app/about/about.component.html (24 bytes)
      CREATE src/app/about/about.component.spec.ts (621 bytes)
      CREATE src/app/about/about.component.ts (266 bytes)
      UPDATE src/app/app.module.ts (651 bytes)
Once our new About component is ready, we can register an application route to display it to the user.
- Update the src/app/app-routing.module.ts file and add a new entry to the routes array, as shown in the following code:
      import { NgModule } from '@angular/core';
      import { Routes, RouterModule } from '@angular/router';
      import { AboutComponent } from './about/about.component';

      const routes: Routes = [
        {
          path: 'about',
          component: AboutComponent
        }
      ];

      @NgModule({
        imports: [RouterModule.forRoot(routes)],
        exports: [RouterModule]
      })
      export class AppRoutingModule {}
The preceding code introduces a new URL fragment, /about, which displays the About component when we visit that link. We are going to see this in action shortly, but first let's add some buttons to allow users to switch between screens.
- Update the app.module.ts file and import the MatButtonModule and MatIconModule modules from Angular Material. Don't forget to provide them inside the module's imports section as well:
      import { MatButtonModule } from '@angular/material/button';
      import { MatIconModule } from '@angular/material/icon';

      @NgModule({
        declarations: [AppComponent, AboutComponent],
        imports: [
          BrowserModule,
          AppRoutingModule,
          BrowserAnimationsModule,
          MatToolbarModule,
          MatButtonModule,
          MatIconModule
        ],
        providers: [],
        bootstrap: [AppComponent]
      })
      export class AppModule {}
- The Angular Material library provides different kinds of buttons and button styling. For the sake of simplicity, let's use the Icon Button component with the help_outline image from Material Icons.
- Update your HTML code according to the following listing:
 <mat-toolbar color="primary">
 <span>My Application</span>

 <span class="spacer"></span>

 <button mat-icon-button>
 <mat-icon>help_outline</mat-icon>
 </button>
 </mat-toolbar>

 <!--The content below is only a placeholder and can be
    replaced.-->
 <div style="text-align:center">
 <h1>Welcome to {{ title }}!</h1>
 </div>

 <router-outlet></router-outlet>
Note the use of an extra span element within the spacer class. We need it to take up space in the middle of the toolbar and move the buttons to the right corner while leaving the application title on the left. This is a typical layout for application toolbars or menus.
- To make our spacer work as expected, we also need to update the app.component.scss file and declare the following style:
 .spacer {
 flex: 1 1 auto;
 }
- If you run the application now, you should see a nice-looking application toolbar with a ? button on the right-hand side:

You may have noticed, however, that the button on the toolbar does nothing so far. The application title label also does nothing. Traditionally, the application's title redirects the user to the main page, that is, the home page.
The Angular Router component allows us to map buttons to particular routes and hides all the complexity related to navigation. You can use the routerLink attribute with your components to inform the router that this button expects navigation to occur.
Let's learn how to use attributes to configure routing in our application:
- Update your HTML template according to the following code:
      <mat-toolbar color="primary">
        <button mat-button routerLink="/">My Application</button>

        <span class="spacer"></span>

        <button mat-icon-button routerLink="/about">
          <mat-icon>help_outline</mat-icon>
        </button>
      </mat-toolbar>

      <div style="text-align:center">
        <h1>Welcome to {{ title }}!</h1>
      </div>

      <router-outlet></router-outlet>
- Switch to your running application and try to click on the ? button again. Notice that the main content area underneath the Welcome label changes to about works!. This string is part of the auto-generated About component, and it proves that the About route works for us:

- Click the My Application label to get back to the home page.
- Notice, however, that extra content gets displayed within the <router-outlet> tags:
<router-outlet></router-outlet>
The Welcome to Angular Electron heading is placed above the router outlet so that you can see it on every page. Note that you have static content that should be visible on every page, such as the toolbar component, and some dynamic content that changes according to the user's actions.
As an exercise, let's move the heading into a separate Home component so that we can see the About and Home content take up all the space:
- Generate a new component that will store the content of the Home page:
ng generate component home
Like the previous component, the Angular CLI generates output so that you can see what files have been affected by your change. Also, if you are using a source control program, such as Git, you can always roll-back these changes.
The output from using the preceding command is as follows:
      CREATE src/app/home/home.component.scss (0 bytes)
      CREATE src/app/home/home.component.html (23 bytes)
      CREATE src/app/home/home.component.spec.ts (614 bytes)
      CREATE src/app/home/home.component.ts (262 bytes)
      UPDATE src/app/app.module.ts (878 bytes)
- Proceed to the app.routing-module.ts file and prepend the Home route to the routes collection:
      import { AboutComponent } from './about/about.component';
      import { HomeComponent } from './home/home.component';

      const routes: Routes = [
        {
          path: '',
          component: HomeComponent
        },
        {
          path: 'about',
          component: AboutComponent
        }
      ];
Note that we are using an empty path value this time. This means that the HomeComponent will be displayed on the default application path, for example, at http://localhost:4200.
- Now, we need to move the Welcome label to the new location in the home.component.ts file. Update the src/app/home/home.component.html template according to the following code:
      <div style="text-align:center">
        <h1>Welcome to {{ title }}!</h1>
      </div>

      <p>
        home works!
      </p>
- The component template relies on the title property, so don't forget to move that property from the app.component.ts file to the home.component.ts file as well:
      import { Component, OnInit } from '@angular/core';

      @Component({
        selector: 'app-home',
        templateUrl: './home.component.html',
        styleUrls: ['./home.component.scss']
      })
      export class HomeComponent implements OnInit {
        title = 'Angular Electron';

        constructor() {}

        ngOnInit() {}
      }
- Finally, we can clean up the main application component and leave only the toolbar and the router outlet, which are our placeholders for the active route's content:
      <mat-toolbar color="primary">
        <button mat-button routerLink="/">My Application</button>

        <span class="spacer"></span>

        <button mat-icon-button routerLink="/about">
          <mat-icon>help_outline</mat-icon>
        </button>
      </mat-toolbar>

      <router-outlet></router-outlet>
- At runtime, you should see the same Welcome heading and a home works! string:
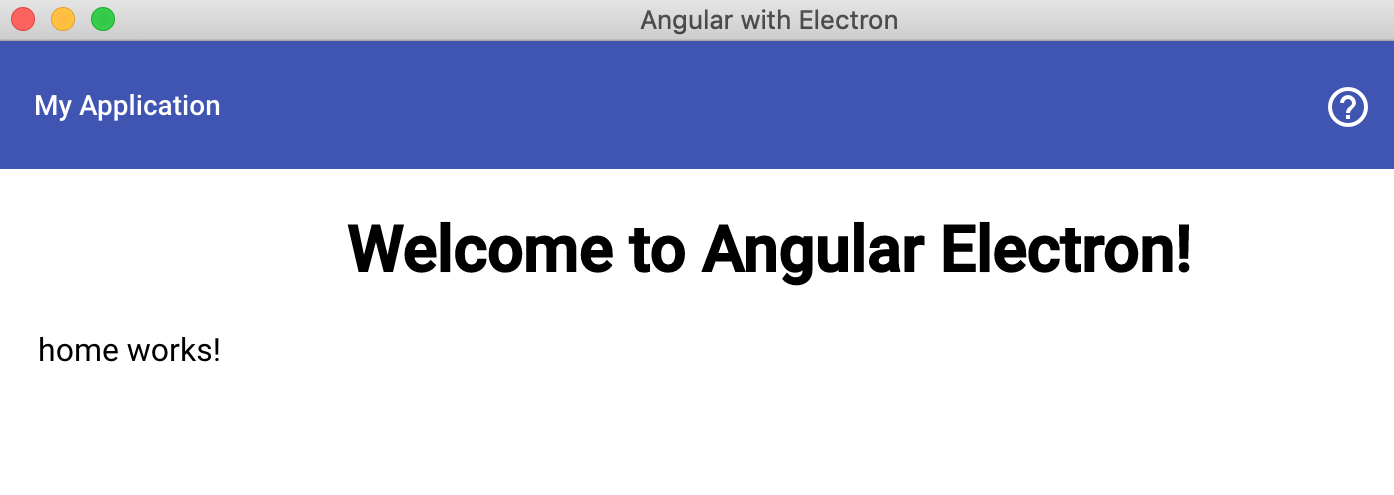
This time, however, all the text on the screen comes from the Home component that we loaded for the default route. Click on the ? button once again to ensure that you can see the About screen taking up the content area:

At this point, you are ready to build multi-page applications and display different areas by navigating users via the Angular Routing system.
The application we have just built can share the same code base as the web client.
Now, you know how to build Electron applications with the Angular framework and Google's ecosystem of components and libraries. In the next section, we are going to walk through the process of setting up React projects and using the Facebook ecosystem.